Resolving Start Up and No Boot Problems Checklist
Page 1
... and do not glow when power button is pressed, there is a device conflict or failure. Connect a different AC power adapter and remove battery. Symptom: LEDs blink or computer beeps but computer fails to check display Remove all USB devices and media cards. 2. Connect a different battery and disconnect AC power adapter. Check AC adapter wiring and power connection to original condition. Perform a Hard Reset 1. Resolving Start Up and No Boot Problems Checklist Print and use recovery disk to recover the computer to the notebook. HP Notebook PCs -
... and do not glow when power button is pressed, there is a device conflict or failure. Connect a different AC power adapter and remove battery. Symptom: LEDs blink or computer beeps but computer fails to check display Remove all USB devices and media cards. 2. Connect a different battery and disconnect AC power adapter. Check AC adapter wiring and power connection to original condition. Perform a Hard Reset 1. Resolving Start Up and No Boot Problems Checklist Print and use recovery disk to recover the computer to the notebook. HP Notebook PCs -
Resolving Start Up and No Boot Problems Checklist
Page 2
... www.hp.com for terms in error message Boot to BIOS mode (f10) and Restore the BIOS defaults (f9) Boot to BIOS mode (f10) and run Hard Drive Test Boot to Windows Advanced boot options (f8) and select Last Known Good Configuration (Advanced) Boot to Windows Advanced boot options (f8) and select Boot into Safe Mode and then Uninstall recently installed programs Symptom: Update Your Computer After Troubleshooting A Problem When the computer starts into Windows normally, you should install the latest updates and...
... www.hp.com for terms in error message Boot to BIOS mode (f10) and Restore the BIOS defaults (f9) Boot to BIOS mode (f10) and run Hard Drive Test Boot to Windows Advanced boot options (f8) and select Last Known Good Configuration (Advanced) Boot to Windows Advanced boot options (f8) and select Boot into Safe Mode and then Uninstall recently installed programs Symptom: Update Your Computer After Troubleshooting A Problem When the computer starts into Windows normally, you should install the latest updates and...

HP Pavilion dv6 Entertainment PC - Maintenance and Service Guide
Page 23
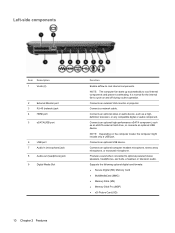
...; Memory Stick Pro (MSP) ● xD-Picture Card (XD) Left-side components 13 It is normal for the internal fan to cool internal components. Connects a network cable. Connects an optional video or audio device, such as an eSATA external hard drive, or connects an optional USB device. Connects an optional USB device. Left-side components Item (1) Component Vent (2) (2) External monitor port (3) RJ-45 (network) jack (4) HDMI port (5) eSATA/USB port (6) USB port (7) Audio-in (microphone) jack (8) Audio-out (headphone) jack (9) Digital Media Slot Description Enable...
...; Memory Stick Pro (MSP) ● xD-Picture Card (XD) Left-side components 13 It is normal for the internal fan to cool internal components. Connects a network cable. Connects an optional video or audio device, such as an eSATA external hard drive, or connects an optional USB device. Connects an optional USB device. Left-side components Item (1) Component Vent (2) (2) External monitor port (3) RJ-45 (network) jack (4) HDMI port (5) eSATA/USB port (6) USB port (7) Audio-in (microphone) jack (8) Audio-out (headphone) jack (9) Digital Media Slot Description Enable...
HP Pavilion dv6 Entertainment PC - Maintenance and Service Guide
Page 126
... lock light 11 chipset, product description 2 components antenna 8 bottom 15 button 9 display 7 front 14 keys 10 left-side 13 lights 11 right-side 14 TouchPad 12 wireless antenna 8 computer feet locations 42 spare part number 42 computer specifications 94 connector pinout audio-in jack 104 audio-out jack 104 external monitor port 104 HDMI port 106 headphone jack 104 microphone jack 104 monitor port 104 network jack 107 RJ-45 jack 107 Universal Serial Bus (USB) port 107 connectors, service considerations 36 D Digital Media Slot...
... lock light 11 chipset, product description 2 components antenna 8 bottom 15 button 9 display 7 front 14 keys 10 left-side 13 lights 11 right-side 14 TouchPad 12 wireless antenna 8 computer feet locations 42 spare part number 42 computer specifications 94 connector pinout audio-in jack 104 audio-out jack 104 external monitor port 104 HDMI port 106 headphone jack 104 microphone jack 104 monitor port 104 network jack 107 RJ-45 jack 107 Universal Serial Bus (USB) port 107 connectors, service considerations 36 D Digital Media Slot...
HP Pavilion dv6 Entertainment PC - Maintenance and Service Guide
Page 128
... 35, 83 product description audio 3 chipset 2 display panel 2 docking 4 Ethernet 4 external media cards 4 graphics 2 hard drives 3 keyboard 4 memory module 2 microphone 3 operating system 5 optical drives 3 pointing device 4 ports 4 power requirements 5 processors 1 product name 1 security 5 serviceability 5 video 3 wireless 4 product name 1 product number 17, 41 Q QuickLock key 11 R remote control, spare part number 28, 29 removal/replacement preliminaries 36 procedures 40 right-side components 14 RJ-45 jack connector pinout 107 location 13 RTC battery removal 47 spare part number 24, 32, 47...
... 35, 83 product description audio 3 chipset 2 display panel 2 docking 4 Ethernet 4 external media cards 4 graphics 2 hard drives 3 keyboard 4 memory module 2 microphone 3 operating system 5 optical drives 3 pointing device 4 ports 4 power requirements 5 processors 1 product name 1 security 5 serviceability 5 video 3 wireless 4 product name 1 product number 17, 41 Q QuickLock key 11 R remote control, spare part number 28, 29 removal/replacement preliminaries 36 procedures 40 right-side components 14 RJ-45 jack connector pinout 107 location 13 RTC battery removal 47 spare part number 24, 32, 47...
Notebook PC User Guide - Windows 7
Page 15
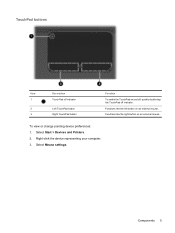
Functions like the left button on an external mouse. Select Mouse settings. Functions like the right button on an external mouse. Components 5 Select Start > Devices and Printers. 2. Right-click the device representing your computer. 3. To view or change pointing device preferences: 1. TouchPad buttons Item 1 2 3 Description TouchPad off indicator Left TouchPad button Right TouchPad button Function To switch the TouchPad on and off, quickly double-tap the TouchPad off indicator.
Functions like the left button on an external mouse. Select Mouse settings. Functions like the right button on an external mouse. Components 5 Select Start > Devices and Printers. 2. Right-click the device representing your computer. 3. To view or change pointing device preferences: 1. TouchPad buttons Item 1 2 3 Description TouchPad off indicator Left TouchPad button Right TouchPad button Function To switch the TouchPad on and off, quickly double-tap the TouchPad off indicator.
Notebook PC User Guide - Windows 7
Page 20
...Vents (2) 2 External Monitor port 3 RJ-45 (network) jack 4 HDMI port 5 eSATA/USB port 6 USB port 7 Audio-in (microphone) jack 8 Audio-out (headphone) jack 9 Digital Media Slot Function Enable airflow to cool internal components and prevent overheating. Connects a network cable. Connects an optional video or audio device, such as an eSATA external hard drive, or connects an optional USB device. Connects an optional high-performance eSATA component, such as a highdefinition television, or any compatible digital or audio component. Connects an optional USB device. NOTE...
...Vents (2) 2 External Monitor port 3 RJ-45 (network) jack 4 HDMI port 5 eSATA/USB port 6 USB port 7 Audio-in (microphone) jack 8 Audio-out (headphone) jack 9 Digital Media Slot Function Enable airflow to cool internal components and prevent overheating. Connects a network cable. Connects an optional video or audio device, such as an eSATA external hard drive, or connects an optional USB device. Connects an optional high-performance eSATA component, such as a highdefinition television, or any compatible digital or audio component. Connects an optional USB device. NOTE...
Notebook PC User Guide - Windows 7
Page 34
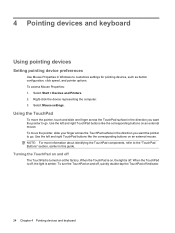
... off, quickly double-tap the TouchPad off . When the TouchPad is turned on an external mouse. To turn the TouchPad on , the light is amber. Right-click the device representing the computer. 3. Select Mouse settings. Use the left and right TouchPad buttons like the corresponding buttons on an external mouse. 4 Pointing devices and keyboard Using pointing devices Setting pointing device preferences Use Mouse Properties in Windows to the "TouchPad Buttons" section, earlier in this guide. To move the pointer, touch and...
... off, quickly double-tap the TouchPad off . When the TouchPad is turned on an external mouse. To turn the TouchPad on , the light is amber. Right-click the device representing the computer. 3. Select Mouse settings. Use the left and right TouchPad buttons like the corresponding buttons on an external mouse. 4 Pointing devices and keyboard Using pointing devices Setting pointing device preferences Use Mouse Properties in Windows to the "TouchPad Buttons" section, earlier in this guide. To move the pointer, touch and...
Notebook PC User Guide - Windows 7
Page 51
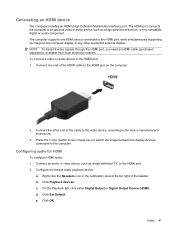
... the f4 key (switch screen image key) to switch the image between the display devices connected to the HDMI port: 1. Connecting an HDMI device The computer includes an HDMI (High Definition Multimedia Interface) port. Click OK. b. Click Playback devices. Click Set Default. Connect the other supported external display. Configuring audio for HDMI To configure HDMI audio: 1. c. The computer supports one end of the taskbar. The HDMI port connects the computer to an optional video or audio device, such as a high-definition TV, to the device manufacturer's instructions...
... the f4 key (switch screen image key) to switch the image between the display devices connected to the HDMI port: 1. Connecting an HDMI device The computer includes an HDMI (High Definition Multimedia Interface) port. Click OK. b. Click Playback devices. Click Set Default. Connect the other supported external display. Configuring audio for HDMI To configure HDMI audio: 1. c. The computer supports one end of the taskbar. The HDMI port connects the computer to an optional video or audio device, such as a high-definition TV, to the device manufacturer's instructions...

Notebook PC User Guide - Windows 7
Page 53
... Hibernation. Power settings and timeouts are changed using Power Options in the Sleep state, the computer initiates Hibernation. When Hibernation is initiated, your work is set at the factory: Sleep and Hibernation. Setting power options 43 To initiate Sleep while the computer is saved to a hibernation file on the hard drive and the computer turns off. When Sleep is closed, open the display. ● Press a key on the keyboard. ● Activate the TouchPad. 6 Power management Setting power options Using power-saving states...
... Hibernation. Power settings and timeouts are changed using Power Options in the Sleep state, the computer initiates Hibernation. When Hibernation is initiated, your work is set at the factory: Sleep and Hibernation. Setting power options 43 To initiate Sleep while the computer is saved to a hibernation file on the hard drive and the computer turns off. When Sleep is closed, open the display. ● Press a key on the keyboard. ● Activate the TouchPad. 6 Power management Setting power options Using power-saving states...

Notebook PC User Guide - Windows 7
Page 60
... turning on battery power. The battery charges whether the computer is off . Maximizing battery discharge time Battery discharge time varies depending on the features used or charged. ● Store the battery in Power Options. ● Remove the battery from the computer when it . Do not charge the computer battery while on the display. ● Check the Power saver setting in a cool, dry location. 50 Chapter 6 Power management Charging might take longer if a battery is new...
... turning on battery power. The battery charges whether the computer is off . Maximizing battery discharge time Battery discharge time varies depending on the features used or charged. ● Store the battery in Power Options. ● Remove the battery from the computer when it . Do not charge the computer battery while on the display. ● Check the Power saver setting in a cool, dry location. 50 Chapter 6 Power management Charging might take longer if a battery is new...

Notebook PC User Guide - Windows 7
Page 62
... computer is discharged. 52 Chapter 6 Power management Change the Turn off the display settings listed in use, but do not shut down the computer. i. To fully charge the battery: a. Disable Hibernation and Sleep. Click Change advanced power settings. j. g. Click Save changes. 3. Fully charge the battery. b. Click the Battery Meter icon in battery run time. Select Start > Control Panel > System and Security > Power Options. Record the Turn off the display settings to external power until the battery is off or in the...
... computer is discharged. 52 Chapter 6 Power management Change the Turn off the display settings listed in use, but do not shut down the computer. i. To fully charge the battery: a. Disable Hibernation and Sleep. Click Change advanced power settings. j. g. Click Save changes. 3. Fully charge the battery. b. Click the Battery Meter icon in battery run time. Select Start > Control Panel > System and Security > Power Options. Record the Turn off the display settings to external power until the battery is off or in the...
Notebook PC User Guide - Windows 7
Page 95
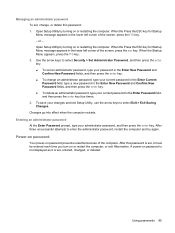
... save your changes and exit Setup Utility, use of the screen, press the esc key. Power-on password Your power-on or restart the computer, or exit Hibernation. When the Startup Menu appears, press the f10 key. 2. After this password: 1. Use the arrow keys to enter the administrator password, restart the computer and try again. Managing an administrator password To set an administrator password, type your password in the Enter New Password and Confirm New Password fields, and...
... save your changes and exit Setup Utility, use of the screen, press the esc key. Power-on password Your power-on or restart the computer, or exit Hibernation. When the Startup Menu appears, press the f10 key. 2. After this password: 1. Use the arrow keys to enter the administrator password, restart the computer and try again. Managing an administrator password To set an administrator password, type your password in the Enter New Password and Confirm New Password fields, and...
Notebook PC User Guide - Windows 7
Page 109
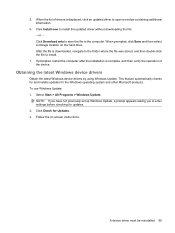
... displayed, click an updated driver to open a window containing additional information. 6. This feature automatically checks for and installs updates for Updates. 3. A device driver must be reinstalled 99 When prompted, click Save and then select a storage location on -screen instructions. Click Check for the Windows operating system and other Microsoft products. Follow the on the hard drive. Obtaining the latest Windows device drivers Obtain the latest Windows device drivers by using Windows Update. When the list of the device...
... displayed, click an updated driver to open a window containing additional information. 6. This feature automatically checks for and installs updates for Updates. 3. A device driver must be reinstalled 99 When prompted, click Save and then select a storage location on -screen instructions. Click Check for the Windows operating system and other Microsoft products. Follow the on the hard drive. Obtaining the latest Windows device drivers Obtain the latest Windows device drivers by using Windows Update. When the list of the device...
Notebook PC User Guide - Windows 7
Page 117
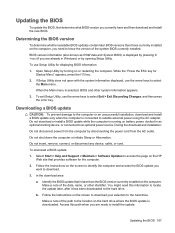
... any device, cable, or cord. Select Start > Help and Support > Maintain > Software Updates to the location on the screen to identify the computer and access the BIOS update you are already in an optional docking device, or connected to select the Main menu. Updating the BIOS 107 To use Setup Utility for Startup Menu" appears, press the f10 key. 2. Make a note of the path to access the page on the screen to download your selection to the hard drive...
... any device, cable, or cord. Select Start > Help and Support > Maintain > Software Updates to the location on the screen to identify the computer and access the BIOS update you are already in an optional docking device, or connected to select the Main menu. Updating the BIOS 107 To use Setup Utility for Startup Menu" appears, press the f10 key. 2. Make a note of the path to access the page on the screen to download your selection to the hard drive...
Notebook PC User Guide - Windows 7
Page 118
...: 1. When the list of the device. 108 Appendix B Software updates NOTE: In some locations you connect the computer to a network, consult the network administrator before installing any instructions that has an .exe extension (for software and driver downloads, type the computer model number in the Search box, and then press the enter key. 3. When prompted, click Save and then select a storage location on the hard drive that contains the update. 4. BIOS installation procedures vary...
...: 1. When the list of the device. 108 Appendix B Software updates NOTE: In some locations you connect the computer to a network, consult the network administrator before installing any instructions that has an .exe extension (for software and driver downloads, type the computer model number in the Search box, and then press the enter key. 3. When prompted, click Save and then select a storage location on the hard drive that contains the update. 4. BIOS installation procedures vary...
Notebook PC User Guide - Windows 7
Page 125
... keys adjusting volume 30 audio CD, DVD, or BD controls 30 decrease screen brightness 29 Help and Support 29 increase screen brightness 29 muting speaker sound 30 switching screen image 29 using 29 volume 35 wireless 30 administrator password creating 85 entering 85 managing 85 airport security devices 57 antennas 13 antivirus software 87 Applications key, Windows 8 audio devices, connecting external 39 audio features 39 audio functions, checking 39 audio-in (microphone) jack 34 audio-out (headphone) jacks 34 AutoPlay 61 B backing up customized window, toolbar, and menu bar settings...
... keys adjusting volume 30 audio CD, DVD, or BD controls 30 decrease screen brightness 29 Help and Support 29 increase screen brightness 29 muting speaker sound 30 switching screen image 29 using 29 volume 35 wireless 30 administrator password creating 85 entering 85 managing 85 airport security devices 57 antennas 13 antivirus software 87 Applications key, Windows 8 audio devices, connecting external 39 audio features 39 audio functions, checking 39 audio-in (microphone) jack 34 audio-out (headphone) jacks 34 AutoPlay 61 B backing up customized window, toolbar, and menu bar settings...
Notebook PC User Guide - Windows 7
Page 126
... recovery 109 function keys, identifying 8 G graphic modes, switching 55 H hard drive external 65 HP ProtectSmart Hard Drive Protection 67 installing 70 hard drive bay, identifying 11 hard drive self test 105 hard drive, replacing 69 HDMI port 10, 41 HDMI, connecting 41 headphone (audio-out) jacks 34 headphones 34 Help and Support key 29 Hibernation exiting 44 initiated during critical battery level 51 initiating 44 high-definition devices, connecting 41 hotkeys description 31 using 31 HP MediaSmart, starting 37 HP Mobile Broadband Module serial number label 15 HP ProtectSmart Hard Drive...
... recovery 109 function keys, identifying 8 G graphic modes, switching 55 H hard drive external 65 HP ProtectSmart Hard Drive Protection 67 installing 70 hard drive bay, identifying 11 hard drive self test 105 hard drive, replacing 69 HDMI port 10, 41 HDMI, connecting 41 headphone (audio-out) jacks 34 headphones 34 Help and Support key 29 Hibernation exiting 44 initiated during critical battery level 51 initiating 44 high-definition devices, connecting 41 hotkeys description 31 using 31 HP MediaSmart, starting 37 HP Mobile Broadband Module serial number label 15 HP ProtectSmart Hard Drive...
Notebook PC User Guide - Windows 7
Page 127
... 15 service tag 15 wireless certification 15 WLAN 15 LAN Power Saving 104 language support 104 latch, battery release 11 light, drive 67 lights caps lock 6 mute 6 power 6 TouchPad 6 volume mute 6 webcam 12 wireless 6 local area network (LAN) cable required 23 connecting cable 23 low battery level 51 M Main menu 103 maintenance Disk Cleanup 66 Disk Defragmenter 66 managing a power-on password 86 managing an administrator password 85 media activity keys 36 media controls, keys 30 memory module inserting 79 removing 79 memory module compartment cover removing 79 replacing 80 memory module...
... 15 service tag 15 wireless certification 15 WLAN 15 LAN Power Saving 104 language support 104 latch, battery release 11 light, drive 67 lights caps lock 6 mute 6 power 6 TouchPad 6 volume mute 6 webcam 12 wireless 6 local area network (LAN) cable required 23 connecting cable 23 low battery level 51 M Main menu 103 maintenance Disk Cleanup 66 Disk Defragmenter 66 managing a power-on password 86 managing an administrator password 85 media activity keys 36 media controls, keys 30 memory module inserting 79 removing 79 memory module compartment cover removing 79 replacing 80 memory module...
Notebook PC User Guide - Windows 7
Page 128
..., 97 DVD movie play 97 external display 97 HP device drivers 98 optical disc tray 94 optical drive detection 95 Windows drivers 99 turning off the computer 55 U unresponsive system 55 USB cable, connecting 72 USB devices connecting 72 description 72 removing 73 USB hubs 72 USB ports, identifying 9, 10, 72 using Setup Utility 101 using system restore 112 V vents, identifying 11 video, using 40 Virtualization Technology 104 volume adjust 35 keys 35 mute 35 volume keys, identifying 30 volume mute light, identifying 6 W webcam 34 webcam light 34 webcam...
..., 97 DVD movie play 97 external display 97 HP device drivers 98 optical disc tray 94 optical drive detection 95 Windows drivers 99 turning off the computer 55 U unresponsive system 55 USB cable, connecting 72 USB devices connecting 72 description 72 removing 73 USB hubs 72 USB ports, identifying 9, 10, 72 using Setup Utility 101 using system restore 112 V vents, identifying 11 video, using 40 Virtualization Technology 104 volume adjust 35 keys 35 mute 35 volume keys, identifying 30 volume mute light, identifying 6 W webcam 34 webcam light 34 webcam...


