HP Pavilion HDX Entertainmet Series Notebook PC - Maintenance and Service Guide
Page 17
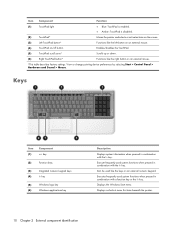
...the screen. (3) Left TouchPad button* Functions like the left button on an external mouse. (4) TouchPad on/off button Enables/disables the TouchPad. (5) TouchPad scroll zone* Scrolls up or down. (6) Right TouchPad button* Functions like the keys on an external mouse. *This table describes factory settings. View or change pointing device preferences by selecting Start > Control Panel > Hardware and Sound > Mouse. Displays the Windows Start menu. Executes frequently used like the right button on an external numeric keypad. Keys Item (1) Component esc key (2) Function...
...the screen. (3) Left TouchPad button* Functions like the left button on an external mouse. (4) TouchPad on/off button Enables/disables the TouchPad. (5) TouchPad scroll zone* Scrolls up or down. (6) Right TouchPad button* Functions like the keys on an external mouse. *This table describes factory settings. View or change pointing device preferences by selecting Start > Control Panel > Hardware and Sound > Mouse. Displays the Windows Start menu. Executes frequently used like the right button on an external numeric keypad. Keys Item (1) Component esc key (2) Function...
HP Pavilion HDX Entertainmet Series Notebook PC - Maintenance and Service Guide
Page 26
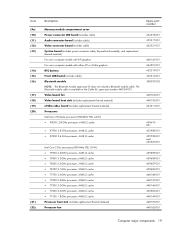
...cover Power connector LED board (includes cable) Audio connector board (includes cable) Video connector board (includes cable) System board (includes power connector cable, ExpressCard assembly, and replacement thermal material) For use in the Cable Kit, spare part number 448169-001. The Bluetooth module cable is available in computer models with ATI graphics For use in computer models with either ATI or nVidia graphics RTC battery Front USB board (includes cable) Bluetooth module NOTE: The Bluetooth module spare part kit does not include a Bluetooth module cable. Video board fan Video...
...cover Power connector LED board (includes cable) Audio connector board (includes cable) Video connector board (includes cable) System board (includes power connector cable, ExpressCard assembly, and replacement thermal material) For use in the Cable Kit, spare part number 448169-001. The Bluetooth module cable is available in computer models with ATI graphics For use in computer models with either ATI or nVidia graphics RTC battery Front USB board (includes cable) Bluetooth module NOTE: The Bluetooth module spare part kit does not include a Bluetooth module cable. Video board fan Video...

HP Pavilion HDX Entertainmet Series Notebook PC - Maintenance and Service Guide
Page 93
... factory settings.) Cancel any hard drive in seconds. ● Set the boot order. ● Enable/disable Virtualization Technology. ● Enable/disable button sound. 86 Chapter 5 Computer Setup System Configuration menu NOTE: Some of the listed System Configuration options may not be supported by your computer. Run a comprehensive check on password. Security menu Select Setup password Power-On password To do this Run a comprehensive self-test on any changes entered during the current session. Select Language (or press f2) Boot options Device configurations...
... factory settings.) Cancel any hard drive in seconds. ● Set the boot order. ● Enable/disable Virtualization Technology. ● Enable/disable button sound. 86 Chapter 5 Computer Setup System Configuration menu NOTE: Some of the listed System Configuration options may not be supported by your computer. Run a comprehensive check on password. Security menu Select Setup password Power-On password To do this Run a comprehensive self-test on any changes entered during the current session. Select Language (or press f2) Boot options Device configurations...

HP Pavilion HDX Entertainmet Series Notebook PC - Maintenance and Service Guide
Page 137
... CMOS clearing 34 components bottom 14 buttons 7, 8 display 6 fingerprint reader 8 front 11 keys 10 left-side 13 lights 7, 8 pointing device 9 rear 11 right-side 13 top 6 TouchPad 9 computer case spare part numbers 25, 29 computer feet locations 36 spare part number 20, 29, 36 Computer Setup accessing 84 changing the language 84 closing 85 Diagnostics menu 86 File menu 86 navigating and selecting 84 restoring default settings 85 Security menu 86 System Configuration menu 86 using...
... CMOS clearing 34 components bottom 14 buttons 7, 8 display 6 fingerprint reader 8 front 11 keys 10 left-side 13 lights 7, 8 pointing device 9 rear 11 right-side 13 top 6 TouchPad 9 computer case spare part numbers 25, 29 computer feet locations 36 spare part number 20, 29, 36 Computer Setup accessing 84 changing the language 84 closing 85 Diagnostics menu 86 File menu 86 navigating and selecting 84 restoring default settings 85 Security menu 86 System Configuration menu 86 using...

HP Pavilion HDX Entertainmet Series Notebook PC - Maintenance and Service Guide
Page 138
... part number 23, 29 Display Screw Kit, spare part number 23, 29 display specifications 88 display switch 6 docking support, product description 5 drive light 11 drives boot order 86 preventing damage 32 DVD button 7 DVD±RW and CD-RW Combo Drive precautions 32 removal 49 spare part number 21, 24, 27, 49 specifications 89 E electrostatic discharge 32 eSATA port 13 esc key 10 Ethernet, product description 3 expansion port 3 port 13 ExpressCard slot 14 ExpressCard slot bezel 23 external media cards, product description 3 external monitor port location...
... part number 23, 29 Display Screw Kit, spare part number 23, 29 display specifications 88 display switch 6 docking support, product description 5 drive light 11 drives boot order 86 preventing damage 32 DVD button 7 DVD±RW and CD-RW Combo Drive precautions 32 removal 49 spare part number 21, 24, 27, 49 specifications 89 E electrostatic discharge 32 eSATA port 13 esc key 10 Ethernet, product description 3 expansion port 3 port 13 ExpressCard slot 14 ExpressCard slot bezel 23 external media cards, product description 3 external monitor port location...
HP Pavilion HDX Entertainmet Series Notebook PC - Maintenance and Service Guide
Page 139
... devices, spare part numbers 24 media button 7 memory check 86 memory map specifications 94 memory module product description 1 removal 47 spare part numbers 27, 29, 47 memory module compartment 15 memory module compartment cover illustrated 23 removal 48 microphone 6 microphone jack location 11 pin assignments 120 Mini Card compartment 15 model name 1 modem, product description 3 monitor port location 13 pin assignments 120 mouse spare part number 28 mouse, spare part number 25 N navigating in Computer Setup 84 network jack location 13 pin assignments 121 next/fast forward button 8 num lock...
... devices, spare part numbers 24 media button 7 memory check 86 memory map specifications 94 memory module product description 1 removal 47 spare part numbers 27, 29, 47 memory module compartment 15 memory module compartment cover illustrated 23 removal 48 microphone 6 microphone jack location 11 pin assignments 120 Mini Card compartment 15 model name 1 modem, product description 3 monitor port location 13 pin assignments 120 mouse spare part number 28 mouse, spare part number 25 N navigating in Computer Setup 84 network jack location 13 pin assignments 121 next/fast forward button 8 num lock...
HP Pavilion HDX Entertainmet Series Notebook PC - Maintenance and Service Guide
Page 140
...fan removal 69 spare part number 19, 28, 69 processor heat sink removal 75 spare part number 19, 28, 75 product description audio 2 camera 2 chipset 1 diskette drive 2 display panel 1 docking support 5 Ethernet 3 external media cards 3 graphics 1 hard drives 2 keyboard 5 memory module 1 modem 3 operating system 5 optical drives 2 pointing device 5 ports 3 power requirements 5 processors 1 product name 1 remote control 4 security 5 serviceability 5 TV tuner 3 wireless 3 product name 1 R rear components 11 rear cover removal 53 spare part number 53 18, 28, rear USB board removal 66 spare part...
...fan removal 69 spare part number 19, 28, 69 processor heat sink removal 75 spare part number 19, 28, 75 product description audio 2 camera 2 chipset 1 diskette drive 2 display panel 1 docking support 5 Ethernet 3 external media cards 3 graphics 1 hard drives 2 keyboard 5 memory module 1 modem 3 operating system 5 optical drives 2 pointing device 5 ports 3 power requirements 5 processors 1 product name 1 remote control 4 security 5 serviceability 5 TV tuner 3 wireless 3 product name 1 R rear components 11 rear cover removal 53 spare part number 53 18, 28, rear USB board removal 66 spare part...
HP Pavilion HDX Entertainmet Series Notebook PC - Maintenance and Service Guide
Page 141
... Serial Bus (USB) port locations 13 pin assignments 122 unknown password 34 USB board removal 66 spare part numbers 18, 19, 29, 64, 66 video board fan removal 81 spare part number 19, 28, 81 video board heat sink removal 79 spare part number 19, 28, 79 video board, spare part numbers 25 video connector board removal 68 spare part number 19, 29, 68 volume down light 9 volume mute button 8 volume mute light 9 volume scroll zone 9 volume up light 9 W Windows application key 10 Windows logo key 10 wireless button 8 wireless light 8 wireless, product description 3 WLAN module removal 44 spare part...
... Serial Bus (USB) port locations 13 pin assignments 122 unknown password 34 USB board removal 66 spare part numbers 18, 19, 29, 64, 66 video board fan removal 81 spare part number 19, 28, 81 video board heat sink removal 79 spare part number 19, 28, 79 video board, spare part numbers 25 video connector board removal 68 spare part number 19, 29, 68 volume down light 9 volume mute button 8 volume mute light 9 volume scroll zone 9 volume up light 9 W Windows application key 10 Windows logo key 10 wireless button 8 wireless light 8 wireless, product description 3 WLAN module removal 44 spare part...
Wireless (Select Models Only) - Windows Vista
Page 13
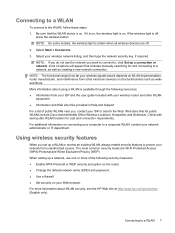
... information on . Select your network administrator or IT department. Select Start > Connect to a corporate WLAN, contact your wireless network listing, and then type the network security key, if required. The most common security levels are off , press the wireless button. Check with your ISP and the user guide included with each public WLAN location for and connecting to , click Set up a network, use one or more information about...
... information on . Select your network administrator or IT department. Select Start > Connect to a corporate WLAN, contact your wireless network listing, and then type the network security key, if required. The most common security levels are off , press the wireless button. Check with your ISP and the user guide included with each public WLAN location for and connecting to , click Set up a network, use one or more information about...

MultiBoot - Windows Vista
Page 9
... a disc formatted as drive C, that contains a hard drive, this USB hard drive and fails, it will not attempt to boot to an optional docking device (select models only) that CD-ROM drive becomes drive C and the hard drive in the hard drive bay becomes drive D. ● The computer will boot from a NIC device only if the device has first been enabled in the Device security menu of Computer Setup. However, if there are treated like external USB devices in the boot order. 3 2 Boot order change...
... a disc formatted as drive C, that contains a hard drive, this USB hard drive and fails, it will not attempt to boot to an optional docking device (select models only) that CD-ROM drive becomes drive C and the hard drive in the hard drive bay becomes drive D. ● The computer will boot from a NIC device only if the device has first been enabled in the Device security menu of Computer Setup. However, if there are treated like external USB devices in the boot order. 3 2 Boot order change...
Power Management - Windows Vista
Page 7
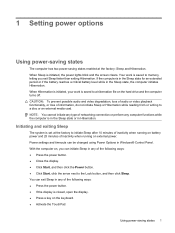
... keyboard. ● Activate the TouchPad. When Hibernation is initiated, your work is set at the factory: Sleep and Hibernation. Power settings and timeouts can initiate Sleep in Windows® Control Panel. NOTE: You cannot initiate any type of networking connection or perform any of inactivity when running on battery power and 25 minutes of the following ways: ● Press the power button. ● If the display is saved to a disc or an external media card. Using power...
... keyboard. ● Activate the TouchPad. When Hibernation is initiated, your work is set at the factory: Sleep and Hibernation. Power settings and timeouts can initiate Sleep in Windows® Control Panel. NOTE: You cannot initiate any type of networking connection or perform any of inactivity when running on battery power and 25 minutes of the following ways: ● Press the power button. ● If the display is saved to a disc or an external media card. Using power...
Power Management - Windows Vista
Page 19
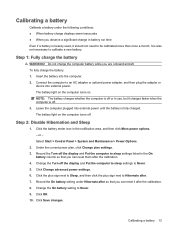
.... The battery light on the computer turns on the computer turns off the display and Put the computer to sleep settings listed in battery run time Even if a battery is off or in the notification area, and then click More power options. - Leave the computer plugged into the computer. 2. Change the On battery setting to calibrate a new battery. Select Start > Control Panel > System and Maintenance > Power Options. 2. Step 2: Disable Hibernation and Sleep 1. To fully charge the battery...
.... The battery light on the computer turns on the computer turns off the display and Put the computer to sleep settings listed in battery run time Even if a battery is off or in the notification area, and then click More power options. - Leave the computer plugged into the computer. 2. Change the On battery setting to calibrate a new battery. Select Start > Control Panel > System and Maintenance > Power Options. 2. Step 2: Disable Hibernation and Sleep 1. To fully charge the battery...
Power Management - Windows Vista
Page 21
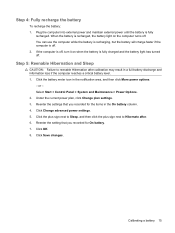
... if the computer reaches a critical battery level. 1. You can use the computer while the battery is recharging, but the battery will charge faster if the computer is recharged, the battery light on when the battery is fully recharged. Click OK. 8. Select Start > Control Panel > System and Maintenance > Power Options. 2. Reenter the settings that you recorded for On battery. 7. Reenter the setting that you recorded for the items...
... if the computer reaches a critical battery level. 1. You can use the computer while the battery is recharging, but the battery will charge faster if the computer is recharged, the battery light on when the battery is fully recharged. Click OK. 8. Select Start > Control Panel > System and Maintenance > Power Options. 2. Reenter the settings that you recorded for On battery. 7. Reenter the setting that you recorded for the items...
Software Updates - Windows Vista
Page 7
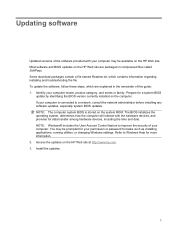
... installing applications, running utilities, or changing Windows settings. Prepare for a system BIOS update by identifying the BIOS version currently installed on the system ROM. NOTE: The computer system BIOS is connected to a network, consult the network administrator before installing any software updates, especially system BIOS updates. Updating software Updated versions of the software provided with the hardware devices, and provides for data transfer among hardware devices, including the time and date. If your computer model, product category, and series...
... installing applications, running utilities, or changing Windows settings. Prepare for a system BIOS update by identifying the BIOS version currently installed on the system ROM. NOTE: The computer system BIOS is connected to a network, consult the network administrator before installing any software updates, especially system BIOS updates. Updating software Updated versions of the software provided with the hardware devices, and provides for data transfer among hardware devices, including the time and date. If your computer model, product category, and series...

Software Updates - Windows Vista
Page 8
... screen to download your computer and access the BIOS update you are already in an optional docking device, or connected to an optional power source. Make a note of the screen. 2. Open Computer Setup by turning on the computer, you currently have and then download and install the new BIOS. Do not download or install a BIOS update while the computer is displayed. 3. To download a BIOS update: 1. You may need to know the version of the system BIOS currently installed. Determining the BIOS...
... screen to download your computer and access the BIOS update you are already in an optional docking device, or connected to an optional power source. Make a note of the screen. 2. Open Computer Setup by turning on the computer, you currently have and then download and install the new BIOS. Do not download or install a BIOS update while the computer is displayed. 3. To download a BIOS update: 1. You may need to know the version of the system BIOS currently installed. Determining the BIOS...
Drives - Windows Vista
Page 13
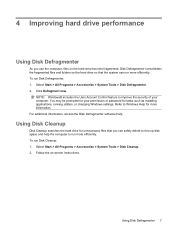
... as installing applications, running utilities, or changing Windows settings. You may be prompted for more efficiently. For additional information, access the Disk Defragmenter software Help. To run Disk Defragmenter: 1. Using Disk Defragmenter 7 Follow the on the hard drive so that you use the computer, files on the hard drive become fragmented. Disk Defragmenter consolidates the fragmented files and folders on -screen instructions. To run Disk Cleanup: 1. Click Defragment now. Select Start...
... as installing applications, running utilities, or changing Windows settings. You may be prompted for more efficiently. For additional information, access the Disk Defragmenter software Help. To run Disk Defragmenter: 1. Using Disk Defragmenter 7 Follow the on the hard drive so that you use the computer, files on the hard drive become fragmented. Disk Defragmenter consolidates the fragmented files and folders on -screen instructions. To run Disk Cleanup: 1. Click Defragment now. Select Start...
Drives - Windows Vista
Page 14
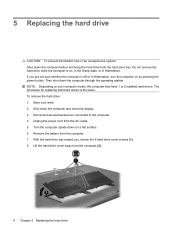
... hard drive bay toward you are not sure whether the computer is the same. 5 Replacing the hard drive CAUTION: To prevent information loss or an unresponsive system: Shut down the computer before removing the hard drive from the computer. 7. Disconnect all external devices connected to the computer. 4. Turn the computer upside down on your work. 2. Remove the battery from the hard drive bay. If you , loosen the 6 hard drive cover...
... hard drive bay toward you are not sure whether the computer is the same. 5 Replacing the hard drive CAUTION: To prevent information loss or an unresponsive system: Shut down the computer before removing the hard drive from the computer. 7. Disconnect all external devices connected to the computer. 4. Turn the computer upside down on your work. 2. Remove the battery from the hard drive bay. If you , loosen the 6 hard drive cover...
Drives - Windows Vista
Page 17
... devices 2 B Blu-ray Disc ROM Drive 3 C CD inserting 4 removing, with power 5 removing, without power 6 CD drive 3 D Disk Cleanup software 7 Disk Defragmenter software 7 disk performance 7 drives caring for 2 hard 8, 9 optical 3 DVD inserting 4 removing, with power 5 removing, without power 6 DVD drive 3 H hard disk drive installing 9 removing 8 replacing 8 hard drive installing 9 removing 8 replacing 8 HD-DVD ROM Drive 3 L LightScribe DVD±RW and CD-RW Combo Drive with Double-Layer support 3 M maintenance Disk Cleanup 7 Disk Defragmenter 7 O optical disc inserting 4 removing, with power...
... devices 2 B Blu-ray Disc ROM Drive 3 C CD inserting 4 removing, with power 5 removing, without power 6 CD drive 3 D Disk Cleanup software 7 Disk Defragmenter software 7 disk performance 7 drives caring for 2 hard 8, 9 optical 3 DVD inserting 4 removing, with power 5 removing, without power 6 DVD drive 3 H hard disk drive installing 9 removing 8 replacing 8 hard drive installing 9 removing 8 replacing 8 HD-DVD ROM Drive 3 L LightScribe DVD±RW and CD-RW Combo Drive with Double-Layer support 3 M maintenance Disk Cleanup 7 Disk Defragmenter 7 O optical disc inserting 4 removing, with power...
Notebook Tour - Windows Vista
Page 30
... 5 bass volume up 5 battery 14 caps lock 4 Digital Media Slot 18 drive 14 HP Webcam 2 mute 5 num lock 5 optical drive 5, 17 power 3, 14 TouchPad 12 treble 5 treble volume down 5 treble volume up 5 volume down 5 24 Index volume mute 5 volume up 5 wireless 5 Product Key 22 product name and number, computer 22 M media activity buttons, identifying 4 media button, identifying 3 memory module compartment, identifying 19 microphone (audio-in) jack 14 microphones, internal, identifying 2 Microsoft Certificate of Authenticity label 22 Mini Card compartment, identifying 19 monitor port, external 18...
... 5 bass volume up 5 battery 14 caps lock 4 Digital Media Slot 18 drive 14 HP Webcam 2 mute 5 num lock 5 optical drive 5, 17 power 3, 14 TouchPad 12 treble 5 treble volume down 5 treble volume up 5 volume down 5 24 Index volume mute 5 volume up 5 wireless 5 Product Key 22 product name and number, computer 22 M media activity buttons, identifying 4 media button, identifying 3 memory module compartment, identifying 19 microphone (audio-in) jack 14 microphones, internal, identifying 2 Microsoft Certificate of Authenticity label 22 Mini Card compartment, identifying 19 monitor port, external 18...
Security - Windows Vista
Page 8
... setting a Windows administrator password or a Windows user password, select Start > Help and Support. 2 Chapter 2 Using passwords When you set in Computer Setup, you exit Sleep or Hibernation. The following password considerations: ● Setup and power-on passwords are set in Computer Setup and are managed by the system BIOS. ● Windows passwords are set in the Windows operating system. ● If you forget the setup password set in Computer Setup, you cannot turn on wakeup feature has been enabled, the password must be entered...
... setting a Windows administrator password or a Windows user password, select Start > Help and Support. 2 Chapter 2 Using passwords When you set in Computer Setup, you exit Sleep or Hibernation. The following password considerations: ● Setup and power-on passwords are set in Computer Setup and are managed by the system BIOS. ● Windows passwords are set in the Windows operating system. ● If you forget the setup password set in Computer Setup, you cannot turn on wakeup feature has been enabled, the password must be entered...


