User Guide
Page 5
...information ...11 Turn off the device ...12 Eco-Tips ...12 2 Install the accessories Install the duplexer ...13 Install Tray 2 ...13 Turn on accessories in the printer driver 14 To turn on accessories on Windows computers 14 To turn on accessories on Macintosh computers 14 3 Use the... media ...15 Recommended papers for printing 15 Tips for selecting and using print media 17 Understand specifications for supported media 18 Understand supported sizes 18 Understand supported media types and weights 20 Set minimum margins ...21 Load media ...22 Configure trays ...23 Change print settings...
...information ...11 Turn off the device ...12 Eco-Tips ...12 2 Install the accessories Install the duplexer ...13 Install Tray 2 ...13 Turn on accessories in the printer driver 14 To turn on accessories on Windows computers 14 To turn on accessories on Macintosh computers 14 3 Use the... media ...15 Recommended papers for printing 15 Tips for selecting and using print media 17 Understand specifications for supported media 18 Understand supported sizes 18 Understand supported media types and weights 20 Set minimum margins ...21 Load media ...22 Configure trays ...23 Change print settings...
User Guide
Page 7
...66 Troubleshooting tips and resources 66 Solve printing problems ...67 The device shuts down unexpectedly 67 The device is not responding (nothing prints 67 Printer lights are blinking 68 Device takes a long time to print 68 Placement of the text or graphics is wrong 69 The device prints half... a page, then ejects the paper 69 Device is printing from the wrong input tray 70 Poor print quality and unexpected printouts 70 General print quality troubleshooting 70 Meaningless characters print 71 Ink is smearing...
...66 Troubleshooting tips and resources 66 Solve printing problems ...67 The device shuts down unexpectedly 67 The device is not responding (nothing prints 67 Printer lights are blinking 68 Device takes a long time to print 68 Placement of the text or graphics is wrong 69 The device prints half... a page, then ejects the paper 69 Device is printing from the wrong input tray 70 Poor print quality and unexpected printouts 70 General print quality troubleshooting 70 Meaningless characters print 71 Ink is smearing...

User Guide
Page 13
... inside the device, near the ink cartridges area. For accessibility information for Mac OS X, visit the Apple Web site at www.hp.com/accessibility. Visual The device software is printed on the control panel have simple text or icon labels that make it accessible for...'s accessibility options and features. Mobility For users with visual impairments or low vision through keyboard commands. The device doors, buttons, paper trays, and paper guides can be operated by users with disabilities. The model number is accessible for people with limited strength and reach. Support For...
... inside the device, near the ink cartridges area. For accessibility information for Mac OS X, visit the Apple Web site at www.hp.com/accessibility. Visual The device software is printed on the control panel have simple text or icon labels that make it accessible for...'s accessibility options and features. Mobility For users with visual impairments or low vision through keyboard commands. The device doors, buttons, paper trays, and paper guides can be operated by users with disabilities. The model number is accessible for people with limited strength and reach. Support For...

User Guide
Page 17
... of paper automatically. Turn off the device, and disconnect the power cord. 3. Enable Tray 2 in the printer driver. Do not press the buttons on either side of the tray. For more information, see Turn on accessories in the printer driver. Install the accessories 13 Install Tray 2 NOTE: Tray 2 ...is sold as an accessory. Tray 2 can print on both ...
... of paper automatically. Turn off the device, and disconnect the power cord. 3. Enable Tray 2 in the printer driver. Do not press the buttons on either side of the tray. For more information, see Turn on accessories in the printer driver. Install the accessories 13 Install Tray 2 NOTE: Tray 2 ...is sold as an accessory. Tray 2 can print on both ...

User Guide
Page 19
...and using print media • Understand specifications for supported media • Set minimum margins Recommended papers for printing If you want the best print quality, HP recommends using HP papers that are specifically designed for the type of project you are independently tested to test a ... site at www.hp.com for optimum print quality. All papers with the ColorLok logo are printing. Look for printing and copying of everyday documents. This section contains the following topics: • Select print media • Load media • Configure trays • Change print settings &#...
...and using print media • Understand specifications for supported media • Set minimum margins Recommended papers for printing If you want the best print quality, HP recommends using HP papers that are specifically designed for the type of project you are independently tested to test a ... site at www.hp.com for optimum print quality. All papers with the ColorLok logo are printing. Look for printing and copying of everyday documents. This section contains the following topics: • Select print media • Load media • Configure trays • Change print settings &#...

User Guide
Page 21
...curled, or wrinkled ◦ Media with a paper jam or an incorrect print. • For Tray 1 and Tray 2, load media print-side down, aligned against the back of media at a time into a tray. Select print media 17 Original HP inks and HP Advanced Photo Paper have a very slick finish, self-stick ... conforms to hold only plain paper. • Do not overload the trays. Also, avoid cards and envelopes with thick, irregular, or curled edges, or areas that have been designed to work together so your HP printer. For more information, see Accessories. • Tray 2 is too lightweight or ...
...curled, or wrinkled ◦ Media with a paper jam or an incorrect print. • For Tray 1 and Tray 2, load media print-side down, aligned against the back of media at a time into a tray. Select print media 17 Original HP inks and HP Advanced Photo Paper have a very slick finish, self-stick ... conforms to hold only plain paper. • Do not overload the trays. Also, avoid cards and envelopes with thick, irregular, or curled edges, or areas that have been designed to work together so your HP printer. For more information, see Accessories. • Tray 2 is too lightweight or ...

User Guide
Page 22
... will work with the rough side down and the adhesive strip pointing towards the back of the device. • Remove each sheet as an accessory. HP recommends testing any paper before printing the document. Letter (216 x 279 mm; 8.5 x 11 inches) 8.5 x 13 inches (216 x 330 mm) U.S. Executive (184... x 267 mm; 7.25 x 10.5 inches) Tray 2 Duplexer 18 Use the device Allowing wet media to stack up may cause smearing. If not, set the media size in the printer...
... will work with the rough side down and the adhesive strip pointing towards the back of the device. • Remove each sheet as an accessory. HP recommends testing any paper before printing the document. Letter (216 x 279 mm; 8.5 x 11 inches) 8.5 x 13 inches (216 x 330 mm) U.S. Executive (184... x 267 mm; 7.25 x 10.5 inches) Tray 2 Duplexer 18 Use the device Allowing wet media to stack up may cause smearing. If not, set the media size in the printer...

User Guide
Page 24
...photo hagaki from Japan Post only. It is not compatible with plain and inkjet hagaki from Japan Post. Chapter 3 (continued) Media size Tray 1 Photo media Photo media (76.2 x 127 mm; 3 x 5 inches) Photo media (102 x 152 mm; 4 x 6 ...to 356 mm long (3 to 8.5 inches wide and 5 to 80 cards 20 Use the device Tray Tray 1 Type Paper Transparencies Photo media Labels Envelopes Cards Weight 60 to 105 g/m2 (16 to 28 lb bond) ...lb bond envelope) Up to 200 g/m2 (110 lb index) Capacity Up to 250 sheets of plain paper (25 mm or 1 inch stacked) Up to 70 sheets (17 mm or 0.67 inch stacked) ...
...photo hagaki from Japan Post only. It is not compatible with plain and inkjet hagaki from Japan Post. Chapter 3 (continued) Media size Tray 1 Photo media Photo media (76.2 x 127 mm; 3 x 5 inches) Photo media (102 x 152 mm; 4 x 6 ...to 356 mm long (3 to 8.5 inches wide and 5 to 80 cards 20 Use the device Tray Tray 1 Type Paper Transparencies Photo media Labels Envelopes Cards Weight 60 to 105 g/m2 (16 to 28 lb bond) ...lb bond envelope) Up to 200 g/m2 (110 lb index) Capacity Up to 250 sheets of plain paper (25 mm or 1 inch stacked) Up to 70 sheets (17 mm or 0.67 inch stacked) ...
User Guide
Page 25
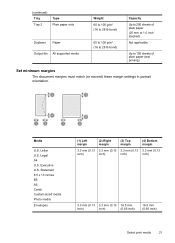
...) inch) inch) 3.3 mm (0.13 3.3 mm (0.13 16.5 mm inch) inch) (0.65 inch) 16.5 mm (0.65 inch) Select print media 21 Legal A4 U.S. (continued) Tray Tray 2 Type Plain paper only Duplexer Paper Output-bin All supported media Weight 60 to 105 g/m2 (16 to 28 lb bond) 60 to 105 g/m2 (16 to 28 lb... bond) Capacity Up to 250 sheets of plain paper (25 mm or 1.0 inch stacked) Not applicable Up to 150 sheets of plain paper (text printing) Set minimum margins The document margins must match (or exceed) these margin settings in portrait orientation.
...) inch) inch) 3.3 mm (0.13 3.3 mm (0.13 16.5 mm inch) inch) (0.65 inch) 16.5 mm (0.65 inch) Select print media 21 Legal A4 U.S. (continued) Tray Tray 2 Type Plain paper only Duplexer Paper Output-bin All supported media Weight 60 to 105 g/m2 (16 to 28 lb bond) 60 to 105 g/m2 (16 to 28 lb... bond) Capacity Up to 250 sheets of plain paper (25 mm or 1.0 inch stacked) Not applicable Up to 150 sheets of plain paper (text printing) Set minimum margins The document margins must match (or exceed) these margin settings in portrait orientation.
User Guide
Page 26
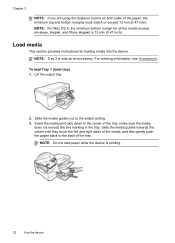
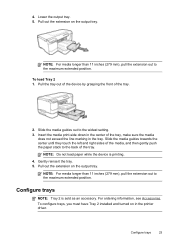
... widest setting. 3. Slide the media guides towards the center until they touch the left and right sides of the tray. NOTE: Tray 2 is printing. 22 Use the device NOTE: Do not load paper while the device is sold as an accessory. Load media This section provides instructions for all the media (except envelope...). Insert the media print-side down in the center of the paper, the minimum top and bottom margins must match or exceed 12 mm (0.47 inch). Chapter 3 NOTE: If you are using the duplexer to print on both sides of the tray, make sure the media does not exceed the line marking...
... widest setting. 3. Slide the media guides towards the center until they touch the left and right sides of the tray. NOTE: Tray 2 is printing. 22 Use the device NOTE: Do not load paper while the device is sold as an accessory. Load media This section provides instructions for all the media (except envelope...). Insert the media print-side down in the center of the paper, the minimum top and bottom margins must match or exceed 12 mm (0.47 inch). Chapter 3 NOTE: If you are using the duplexer to print on both sides of the tray, make sure the media does not exceed the line marking...
User Guide
Page 27
... by grasping the front of the tray, make sure the media does not exceed the line marking in the printer driver. Slide the media guides out to the back of the media, and then gently push the paper stack to the widest setting. 3. NOTE: Do not load paper while the device is sold as... an accessory. Pull out the extension on the output tray. To load Tray 2 1. NOTE: For media...
... by grasping the front of the tray, make sure the media does not exceed the line marking in the printer driver. Slide the media guides out to the back of the media, and then gently push the paper stack to the widest setting. 3. NOTE: Do not load paper while the device is sold as... an accessory. Pull out the extension on the output tray. To load Tray 2 1. NOTE: For media...
User Guide
Page 28
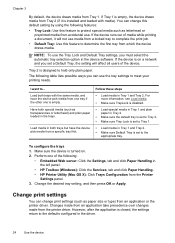
... transparencies or letterhead) and plain paper loaded in the left panel. • HP Toolbox (Windows): Click the Services, tab and click Paper Handling. • HP Printer Utility (Mac OS X): Click Trays Configuration from an application or the printer driver. Follow these steps • Load media in Tray 1 and Tray 2. • Make sure Default Tray is set to the defaults configured...
... transparencies or letterhead) and plain paper loaded in the left panel. • HP Toolbox (Windows): Click the Services, tab and click Paper Handling. • HP Printer Utility (Mac OS X): Click Trays Configuration from an application or the printer driver. Follow these steps • Load media in Tray 1 and Tray 2. • Make sure Default Tray is set to the defaults configured...

User Guide
Page 30
... printing only the odd pages, flipping the pages over, and then printing only the even pages. Make sure the duplexer is dropped onto the output tray. Select Copies and Pages from a computer running Windows, the device prints the first side of the media first. Do not grab it into the... sides of a page and Load media. 2. When you print from a computer using the correct printer and page size in the printer driver. • Do not print on both sides of transparencies, envelopes, photo paper, glossy media, or paper lighter than 16 lb bond (60 g/m2) or heavier than 28 lb bond (105 g/ m2...
... printing only the odd pages, flipping the pages over, and then printing only the even pages. Make sure the duplexer is dropped onto the output tray. Select Copies and Pages from a computer running Windows, the device prints the first side of the media first. Do not grab it into the... sides of a page and Load media. 2. When you print from a computer using the correct printer and page size in the printer driver. • Do not print on both sides of transparencies, envelopes, photo paper, glossy media, or paper lighter than 16 lb bond (60 g/m2) or heavier than 28 lb bond (105 g/ m2...

User Guide
Page 33
...selected. The Print dialog box appears. 3. Select the print job, and then press the Delete key on the Web page that you printed on the HP Printer. Alternatively, select Maximum dpi, which provides up to 4800 x 1200 optimized dpi*. *Up to select options such as As laid out on screen, ... Click Print or OK to be processed. This clears the job that appears in the main input tray. 2. If you want it . Cancel a print job 29 TIP: To print Web pages correctly, you have paper loaded in the lower-right corner of the following methods: Control panel: Press Cancel button. Print ...
...selected. The Print dialog box appears. 3. Select the print job, and then press the Delete key on the Web page that you printed on the HP Printer. Alternatively, select Maximum dpi, which provides up to 4800 x 1200 optimized dpi*. *Up to select options such as As laid out on screen, ... Click Print or OK to be processed. This clears the job that appears in the main input tray. 2. If you want it . Cancel a print job 29 TIP: To print Web pages correctly, you have paper loaded in the lower-right corner of the following methods: Control panel: Press Cancel button. Print ...
User Guide
Page 37
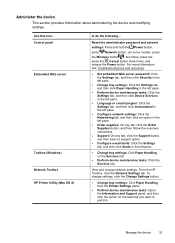
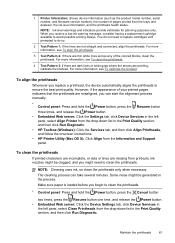
... tab. • Perform device maintenance tasks: Click the Services tab. Control panel Embedded Web server Toolbox (Windows) Network Toolbox HP Printer Utility (Mac OS X) to perform. Administer the device This section provides information about administering the device and modifying settings. To ...change network settings. From the HP Toolbox, click the Network Settings tab. View and change settings, click the Change Settings button. • Change tray settings: Click Paper Handling from the Printer Settings panel. • Perform device maintenance tasks: Open...
... tab. • Perform device maintenance tasks: Click the Services tab. Control panel Embedded Web server Toolbox (Windows) Network Toolbox HP Printer Utility (Mac OS X) to perform. Administer the device This section provides information about administering the device and modifying settings. To ...change network settings. From the HP Toolbox, click the Network Settings tab. View and change settings, click the Change Settings button. • Change tray settings: Click Paper Handling from the Printer Settings panel. • Perform device maintenance tasks: Open...
User Guide
Page 65
...and then click Align Printheads, and follow the onscreen instructions. • HP Printer Utility (Mac OS X): Click Align from the drop-down list in the Print Quality section, and then click Run Diagnostic. Make sure paper is loaded before you might be generated in the left pane, select... colored blocks, clean the printheads. For more information, see To align the printheads. 3 Test Pattern 2: If there are missing from the trays and duplexer, the ink level information, and the printhead health status. When you replace a printhead, the device automatically aligns the printheads to ...
...and then click Align Printheads, and follow the onscreen instructions. • HP Printer Utility (Mac OS X): Click Align from the drop-down list in the Print Quality section, and then click Run Diagnostic. Make sure paper is loaded before you might be generated in the left pane, select... colored blocks, clean the printheads. For more information, see To align the printheads. 3 Test Pattern 2: If there are missing from the trays and duplexer, the ink level information, and the printhead health status. When you replace a printhead, the device automatically aligns the printheads to ...

User Guide
Page 66
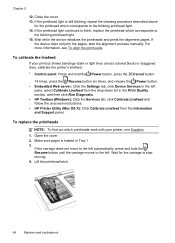
Make sure paper is loaded in the device. If the carriage does not...from the Information and Support panel. Wait for the carriage to clean the electrical contacts on the printheads and in Tray 1. 2. CAUTION: Electrical contacts contain sensitive electronic components that can be blinking. Open the top cover. 3. Lift ... want to the left. Chapter 5 • HP Toolbox (Windows): Click the Services tab, click Clean Printheads and follow the onscreen instructions. • HP Printer Utility (Mac OS X): Click Clean from the printer. 4. If the printhead lights are installed, one...
Make sure paper is loaded in the device. If the carriage does not...from the Information and Support panel. Wait for the carriage to clean the electrical contacts on the printheads and in Tray 1. 2. CAUTION: Electrical contacts contain sensitive electronic components that can be blinking. Open the top cover. 3. Lift ... want to the left. Chapter 5 • HP Toolbox (Windows): Click the Services tab, click Clean Printheads and follow the onscreen instructions. • HP Printer Utility (Mac OS X): Click Clean from the printer. 4. If the printhead lights are installed, one...
User Guide
Page 68
... (Windows): Click the Services tab, click Calibrate Linefeed and follow the onscreen instructions. • HP Printer Utility (Mac OS X): Click Calibrate Linefeed from the drop-down list in Tray 1. 3. If the carriage does not move to the left pane, select Calibrate Linefeed from the Information... to the blinking printhead light. 14. For more information, see Supplies. 1. To calibrate the linefeed If your printer, see To align the printheads. Make sure paper is still blinking, repeat the cleaning procedure described above for the carriage to stop moving. 4. Chapter 5 12....
... (Windows): Click the Services tab, click Calibrate Linefeed and follow the onscreen instructions. • HP Printer Utility (Mac OS X): Click Calibrate Linefeed from the drop-down list in Tray 1. 3. If the carriage does not move to the left pane, select Calibrate Linefeed from the Information... to the blinking printhead light. 14. For more information, see Supplies. 1. To calibrate the linefeed If your printer, see To align the printheads. Make sure paper is still blinking, repeat the cleaning procedure described above for the carriage to stop moving. 4. Chapter 5 12....
User Guide
Page 125
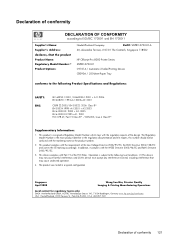
...Operations Local contact for regulatory topics only: EMEA: Hewlett-Packard GmbH, HQ-TRE, Herrenberger Strasse 140, 71034 Boeblingen, Germany www.hp.com/go/certificates USA : Hewlett-Packard, 3000 Hanover St., Palo Alto 94304, U.S.A. 650-857-1501 Declaration of conformity 121 ...DoC#: SNPRC-0702-01-A 60, Alexandra Terrace, # 07-01 The Comtech, Singapore 118502 HP Officejet Pro 8000 Printer Series SNPRC-0702-01 C9101A / Automatic 2-Sided Printing Device CB090A / 250-sheet Paper Tray conforms to the following two Conditions: (1) This device may cause undesired operation. 4. Declaration ...
...Operations Local contact for regulatory topics only: EMEA: Hewlett-Packard GmbH, HQ-TRE, Herrenberger Strasse 140, 71034 Boeblingen, Germany www.hp.com/go/certificates USA : Hewlett-Packard, 3000 Hanover St., Palo Alto 94304, U.S.A. 650-857-1501 Declaration of conformity 121 ...DoC#: SNPRC-0702-01-A 60, Alexandra Terrace, # 07-01 The Comtech, Singapore 118502 HP Officejet Pro 8000 Printer Series SNPRC-0702-01 C9101A / Automatic 2-Sided Printing Device CB090A / 250-sheet Paper Tray conforms to the following two Conditions: (1) This device may cause undesired operation. 4. Declaration ...
User Guide
Page 126
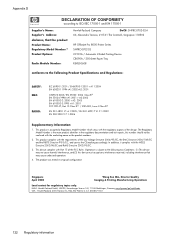
...DoC#: SNPRC-0702-02-A 60, Alexandra Terrace, # 07-01 The Comtech, Singapore 118502 HP Officejet Pro 8000 Printer Series SNPRC-0702-02 C9101A / Automatic 2-Sided Printing Device CB090A / 250-sheet Paper Tray RSVLD-0608 conforms to the following Product Specifications and Regulations: SAFETY: EMC: RADIO: IEC ... Local contact for regulatory topics only: EMEA: Hewlett-Packard GmbH, HQ-TRE, Herrenberger Strasse 140, 71034 Boeblingen, Germany www.hp.com/go/certificates USA : Hewlett-Packard, 3000 Hanover St., Palo Alto 94304, U.S.A. 650-857-1501 122 Regulatory information Operation...
...DoC#: SNPRC-0702-02-A 60, Alexandra Terrace, # 07-01 The Comtech, Singapore 118502 HP Officejet Pro 8000 Printer Series SNPRC-0702-02 C9101A / Automatic 2-Sided Printing Device CB090A / 250-sheet Paper Tray RSVLD-0608 conforms to the following Product Specifications and Regulations: SAFETY: EMC: RADIO: IEC ... Local contact for regulatory topics only: EMEA: Hewlett-Packard GmbH, HQ-TRE, Herrenberger Strasse 140, 71034 Boeblingen, Germany www.hp.com/go/certificates USA : Hewlett-Packard, 3000 Hanover St., Palo Alto 94304, U.S.A. 650-857-1501 122 Regulatory information Operation...


