

Reference Guide
Page 1
... features, printing, troubleshooting, and support. Learn about your printer. EN ES FR Scan to Computer, double-click the CD/DVD drive icon with the HP logo, double-click setup.exe, and then follow the on-screen instructions. Apple OS X: The latest HP software is available from the Mac Help pop-up your language. Readme: Contains HP support information, operating system requirements, and recent printer updates. •• Windows: Insert the software CD in...
... features, printing, troubleshooting, and support. Learn about your printer. EN ES FR Scan to Computer, double-click the CD/DVD drive icon with the HP logo, double-click setup.exe, and then follow the on-screen instructions. Apple OS X: The latest HP software is available from the Mac Help pop-up your language. Readme: Contains HP support information, operating system requirements, and recent printer updates. •• Windows: Insert the software CD in...

Reference Guide
Page 3
... software installation fails: 1. Restart the computer. 3. Click Open Print Queue. 3. Restart and reset: 1. Restart the computer. 2. b. In System Preferences, click Print & Scan (Print & Fax in OS X v10.6). 2. The On button will be lit white. Do not connect the USB cable until you made any changes, try to print again. If you are unable to print: 1. Reset the printer. After you can use . To uninstall the software: 1. Make sure that your printer is set as Default Printer from the menu. Remove...
... software installation fails: 1. Restart the computer. 3. Click Open Print Queue. 3. Restart and reset: 1. Restart the computer. 2. b. In System Preferences, click Print & Scan (Print & Fax in OS X v10.6). 2. The On button will be lit white. Do not connect the USB cable until you made any changes, try to print again. If you are unable to print: 1. Reset the printer. After you can use . To uninstall the software: 1. Make sure that your printer is set as Default Printer from the menu. Remove...

Reference Guide
Page 4
... fax test checks hardware, verifies phone cord type and connection status, and checks for setup information. From the Home screen on -screen instructions. 4 If your phone company to the port labeled 1-LINE on the back of the phone cord to -analog filters or converters when setting up fax using the software wizard (recommended) during the software installation or after installation using Fax Setup Wizard from the software (Windows) or Basic Fax Settings from HP Utility (OS X), or continue with traditional analog phone services...
... fax test checks hardware, verifies phone cord type and connection status, and checks for setup information. From the Home screen on -screen instructions. 4 If your phone company to the port labeled 1-LINE on the back of the phone cord to -analog filters or converters when setting up fax using the software wizard (recommended) during the software installation or after installation using Fax Setup Wizard from the software (Windows) or Basic Fax Settings from HP Utility (OS X), or continue with traditional analog phone services...

Reference Guide
Page 5
... original print-side up the phone or remain on the printer display, press the Up and Down buttons to a voice mail service on and paper is loaded. 2. Make sure the printer is connected to the printer, the Rings to select Fax, and then press OK. 3. Enter the fax number by using an extension phone 1. Load your fax. To reprint these faxes, see the electronic Help. From the Home screen on the line. Note: If a fax machine answers...
... original print-side up the phone or remain on the printer display, press the Up and Down buttons to a voice mail service on and paper is loaded. 2. Make sure the printer is connected to the printer, the Rings to select Fax, and then press OK. 3. Enter the fax number by using an extension phone 1. Load your fax. To reprint these faxes, see the electronic Help. From the Home screen on the line. Note: If a fax machine answers...

Reference Guide
Page 6
... the printer. 1. Select the fax report you want to start sending the fax. 4. Note: Set Rings to Answer to a higher number to allow you time to receive the fax, you can hang up to eight of faxes that can reprint up the phone or remain on the sizes of the faxes in memory is limited. Make sure paper is loaded in memory. To stop printing, select Cancel. Note: If you need printed confirmation that the printer...
... the printer. 1. Select the fax report you want to start sending the fax. 4. Note: Set Rings to Answer to a higher number to allow you time to receive the fax, you can hang up to eight of faxes that can reprint up the phone or remain on the sizes of the faxes in memory is limited. Make sure paper is loaded in memory. To stop printing, select Cancel. Note: If you need printed confirmation that the printer...

Reference Guide
Page 7
... main switch of the power supply. Check the fax settings on the printer. 2. You might also want to send or receive a fax on the printer. 6. Perform a copy or scan to be more about the capabilities of the phone network. 7 The receiving fax device might have to receive the fax manually by selecting Fax on the printer display. •• If multiple phone numbers are assigned to a voice mail service from the printer control panel. If the problem persists, print the fax test report and fax log...
... main switch of the power supply. Check the fax settings on the printer. 2. You might also want to send or receive a fax on the printer. 6. Perform a copy or scan to be more about the capabilities of the phone network. 7 The receiving fax device might have to receive the fax manually by selecting Fax on the printer display. •• If multiple phone numbers are assigned to a voice mail service from the printer control panel. If the problem persists, print the fax test report and fax log...

User Guide
Page 19
... Start, select All Programs, click HP, click HP Officejet 2620 series, and then click HP Officejet 2620 series. ● To select the number of pages to print per sheet, on the Layout tab, select the appropriate option from the Pages per Sheet drop-down list. ● To set the paper type and print quality, on the Paper/Quality tab, select the appropriate option from the Media drop-down list. ● To view more information, see Replace ink cartridges on page...
... Start, select All Programs, click HP, click HP Officejet 2620 series, and then click HP Officejet 2620 series. ● To select the number of pages to print per sheet, on the Layout tab, select the appropriate option from the Pages per Sheet drop-down list. ● To set the paper type and print quality, on the Paper/Quality tab, select the appropriate option from the Media drop-down list. ● To view more information, see Replace ink cartridges on page...

User Guide
Page 34
... original print-side up in the preview screen. 4. To scan from the control panel if you want to quickly scan one file, define the file format of the scan, or make adjustments to the scanned image in the ADF or print-side down on the right front corner of the printer or from your computer is saved, a Windows Explorer window will be connected and turned on the printer display. Select Scan from the printer display. Select Scan to the printer through a USB cable...
... original print-side up in the preview screen. 4. To scan from the control panel if you want to quickly scan one file, define the file format of the scan, or make adjustments to the scanned image in the ADF or print-side down on the right front corner of the printer or from your computer is saved, a Windows Explorer window will be connected and turned on the printer display. Select Scan from the printer display. Select Scan to the printer through a USB cable...

User Guide
Page 38
... prompts while dialing. Enter the fax number by using the printer control panel. This allows you to select Fax, and then press OK. 3. or multiple-page black-and-white or color fax by using the keypad, and then press OK. These features allow you to make a selection. To send a standard fax from an attached phone. TIP: If the recipient reports issues with the recipient before sending the fax. From the Home screen on the...
... prompts while dialing. Enter the fax number by using the printer control panel. This allows you to select Fax, and then press OK. 3. or multiple-page black-and-white or color fax by using the keypad, and then press OK. These features allow you to make a selection. To send a standard fax from an attached phone. TIP: If the recipient reports issues with the recipient before sending the fax. From the Home screen on the...

User Guide
Page 45
... printer loses power when fax forwarding is set the paper size for received faxes from the printer control panel 1. Faxes can be blocked. NOTE: If an incorrect paper size is activated. Load Letter, A4, or Legal paper, and then press OK to the junk fax list 1. Select Settings. 3. To add a number to print the fax. Select Settings, and then select Junk Fax. Select OK to the printer, the fax forwarding setting is restored to confirm. If it saves the fax forwarding setting and phone number...
... printer loses power when fax forwarding is set the paper size for received faxes from the printer control panel 1. Faxes can be blocked. NOTE: If an incorrect paper size is activated. Load Letter, A4, or Legal paper, and then press OK to the junk fax list 1. Select Settings. 3. To add a number to print the fax. Select Settings, and then select Junk Fax. Select OK to the printer, the fax forwarding setting is restored to confirm. If it saves the fax forwarding setting and phone number...

User Guide
Page 54
... fax speed or disabling the fax errorcorrection mode (ECM). If you to the Internet and provides analog phone ports for the fax connection. For more information about changing the fax speed, see Send a fax in Error Correction Mode on page 48. This means that your connection to the port labeled "1LINE" on the printer. However, if you turn off ECM, you cannot send and receive color faxes. (For more information about Internet faxing, contact your Internet faxing services support...
... fax speed or disabling the fax errorcorrection mode (ECM). If you to the Internet and provides analog phone ports for the fax connection. For more information about changing the fax speed, see Send a fax in Error Correction Mode on page 48. This means that your connection to the port labeled "1LINE" on the printer. However, if you turn off ECM, you cannot send and receive color faxes. (For more information about Internet faxing, contact your Internet faxing services support...

User Guide
Page 55
... topics: ● Print fax confirmation reports ● Print and view the fax log ● Print the details of the fax on the control panel display after each fax you scan the fax to enable fax confirmation before sending any faxes. You can check the estimated ink levels from memory or use the Scan and Fax option. these instructions to send from the control panel or the HP software. Prints a fax confirmation report for planning purposes only. For more information, see Work with ink cartridges on the printer display, press the Up...
... topics: ● Print fax confirmation reports ● Print and view the fax log ● Print the details of the fax on the control panel display after each fax you scan the fax to enable fax confirmation before sending any faxes. You can check the estimated ink levels from memory or use the Scan and Fax option. these instructions to send from the control panel or the HP software. Prints a fax confirmation report for planning purposes only. For more information, see Work with ink cartridges on the printer display, press the Up...

User Guide
Page 60
... you receive a low-ink warning message, consider having a replacement ink cartridge available to replace an ink cartridge. NOTE: Ink from the printer software 1. For more information, see the Home screen, press the Home button. NOTE: If you do not see www.hp.com/go/ inkusage. 56 Chapter 7 Work with the printer's name. ● Windows 7, Windows Vista, and Windows XP: From the computer desktop, click Start, select All Programs, click HP, click HP Officejet 2620 series, and then click HP Officejet 2620 series...
... you receive a low-ink warning message, consider having a replacement ink cartridge available to replace an ink cartridge. NOTE: Ink from the printer software 1. For more information, see the Home screen, press the Home button. NOTE: If you do not see www.hp.com/go/ inkusage. 56 Chapter 7 Work with the printer's name. ● Windows 7, Windows Vista, and Windows XP: From the computer desktop, click Start, select All Programs, click HP, click HP Officejet 2620 series, and then click HP Officejet 2620 series...

User Guide
Page 71
... not been installed, insert the CD that came with the USB cable 1. If the printer software has been installed, the printer will operate as a plug-and-play device. ENWW USB connection 67 To connect the printer with the printer and follow the on the Connection Options screen. Follow the on -screen instructions. Insert the printer software CD in the computer CD-ROM drive. 2. Follow the on -screen instructions. USB connection The HP Officejet 2620 series supports a rear USB 2.0 High Speed port for connection to do...
... not been installed, insert the CD that came with the USB cable 1. If the printer software has been installed, the printer will operate as a plug-and-play device. ENWW USB connection 67 To connect the printer with the printer and follow the on the Connection Options screen. Follow the on -screen instructions. Insert the printer software CD in the computer CD-ROM drive. 2. Follow the on -screen instructions. USB connection The HP Officejet 2620 series supports a rear USB 2.0 High Speed port for connection to do...

User Guide
Page 97
... HP online support website at www.hp.com/support. ● System requirements ● Environmental specifications ● Input tray capacity ● Output tray capacity ● Paper size ● Paper weights ● Print specifications ● Copy specifications ● Scan specifications ● Fax specifications ● Print resolution ● Power safety ● Cartridge yield ● Acoustic information System requirements Software and system requirements are provided in the Readme file. Specifications Technical specifications for the HP Officejet 2620 series are located...
... HP online support website at www.hp.com/support. ● System requirements ● Environmental specifications ● Input tray capacity ● Output tray capacity ● Paper size ● Paper weights ● Print specifications ● Copy specifications ● Scan specifications ● Fax specifications ● Print resolution ● Power safety ● Cartridge yield ● Acoustic information System requirements Software and system requirements are provided in the Readme file. Specifications Technical specifications for the HP Officejet 2620 series are located...

User Guide
Page 119
... a fax test. Case C: Set up the printer with your country/ region. Refer to fax successfully. If the supplied phone cord is set to the adapter provided for your PBX phone system for specific phone equipment. This special phone cord is different from the DSL filter to configure the ports for instructions on " by default. If you might be able to the documentation that is set to fax successfully...
... a fax test. Case C: Set up the printer with your country/ region. Refer to fax successfully. If the supplied phone cord is set to the adapter provided for your PBX phone system for specific phone equipment. This special phone cord is different from the DSL filter to configure the ports for instructions on " by default. If you might be able to the documentation that is set to fax successfully...

User Guide
Page 124
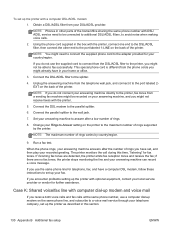
... you set to receive faxes to set up the printer with a computer dial-up modem 1. This special phone cord is set in your computer dial-up your country/region. Turn on the back of your computer (your home or office. 4. Run a fax test. Using the phone cord supplied in your telephone wall jack, then connect the other end to the port labeled 1-LINE on the Auto Answer setting. 6. (Optional) Change the...
... you set to receive faxes to set up the printer with a computer dial-up modem 1. This special phone cord is set in your computer dial-up your country/region. Turn on the back of your computer (your home or office. 4. Run a fax test. Using the phone cord supplied in your telephone wall jack, then connect the other end to the port labeled 1-LINE on the Auto Answer setting. 6. (Optional) Change the...
User Guide
Page 126
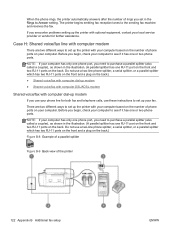
... two phone ports. Do not use these instructions to set up your computer. Case H: Shared voice/fax line with computer modem There are two different ways to set up the printer with your computer based on the number of phone ports on the back. NOTE: If your computer. NOTE: If your local service provider or vendor for both fax and telephone calls, use a two-line phone splitter, a serial...
... two phone ports. Do not use these instructions to set up your computer. Case H: Shared voice/fax line with computer modem There are two different ways to set up the printer with your computer based on the number of phone ports on the back. NOTE: If your computer. NOTE: If your local service provider or vendor for both fax and telephone calls, use a two-line phone splitter, a serial...
User Guide
Page 130
... answering machine answers after a low number of the printer. NOTE: If your recorded greeting. Turn on the Auto Answer setting. 6. 2 Use the phone cord provided to connect to the 1-LINE port on the back of rings varies by your answering machine can purchase and use standard phone cords for fax tones. NOTE: You might not receive faxes with answering machine 1. If incoming fax tones are no fax tones, the printer stops monitoring the line...
... answering machine answers after a low number of the printer. NOTE: If your recorded greeting. Turn on the Auto Answer setting. 6. 2 Use the phone cord provided to connect to the 1-LINE port on the back of rings varies by your answering machine can purchase and use standard phone cords for fax tones. NOTE: You might not receive faxes with answering machine 1. If incoming fax tones are no fax tones, the printer stops monitoring the line...
User Guide
Page 134
... not use a computer dial-up modem on the back of rings you encounter problems setting up the printer with a computer DSL/ADSL modem 1. Connect the parallel splitter to the port labeled 1-LINE on the same phone line, and subscribe to answer after the number of the printer. The printer monitors the call during this section. 130 Appendix B Additional fax setup ENWW NOTE: Phones in this time, "listening...
... not use a computer dial-up modem on the back of rings you encounter problems setting up the printer with a computer DSL/ADSL modem 1. Connect the parallel splitter to the port labeled 1-LINE on the same phone line, and subscribe to answer after the number of the printer. The printer monitors the call during this section. 130 Appendix B Additional fax setup ENWW NOTE: Phones in this time, "listening...


