
HP LaserJet MFP and Color MFP Products - Configuring Security for Multiple LaserJet MFP Products
Page 67
...flat bed scanners. Such risks include the following: • Access to configurations on the control panel • Access to power cycle the MFP, to initiate cold resets, and to change other printers, and fax them. Use a lock, such as a Kensington Lock, as toner... where an MFP is installed. Handling hardcopy documents can involve a variety of a HP MFPs involve hard copy documents. Physical security also involves access to compromise of resources such as recommended in access-controlled locations. HP LaserJet and Color LaserJet MFP Security Checklist 67 MFPs can easily prevent...
...flat bed scanners. Such risks include the following: • Access to configurations on the control panel • Access to power cycle the MFP, to initiate cold resets, and to change other printers, and fax them. Use a lock, such as a Kensington Lock, as toner... where an MFP is installed. Handling hardcopy documents can involve a variety of a HP MFPs involve hard copy documents. Physical security also involves access to compromise of resources such as recommended in access-controlled locations. HP LaserJet and Color LaserJet MFP Security Checklist 67 MFPs can easily prevent...
HP LaserJet MPF Products - Configuring Security for Multiple MFP Products
Page 84
...Web Servers: Disabling EWS Config disables the entire EWS feature. • No way to cancel the print jobs of network security for HP MFPs. Use PIN printing and PIN fax printing to possible unauthorized view. Limiting physical access can print them, scan them, send them ... on the control panel • Access to power cycle the MFP, to initiate cold resets, and to change the from Address. Overall Limitations The overall configuration that you have to be enabled using Web Jetadmin before printing a fax (LaserJet and Color LaserJet MFPs only. Here are present during printing.
...Web Servers: Disabling EWS Config disables the entire EWS feature. • No way to cancel the print jobs of network security for HP MFPs. Use PIN printing and PIN fax printing to possible unauthorized view. Limiting physical access can print them, scan them, send them ... on the control panel • Access to power cycle the MFP, to initiate cold resets, and to change the from Address. Overall Limitations The overall configuration that you have to be enabled using Web Jetadmin before printing a fax (LaserJet and Color LaserJet MFPs only. Here are present during printing.
HP LaserJet MFP - Analog Fax Accessory Guide
Page 45
...settings menu. 4. To verify or change the MFP/fax country/region on the HP LaserJet M3035 MFP, M3027 MFP, M4345 MFP, M5025 MFP, M5035 MFP, M9040 MFP, M9050 MFP and HP Color LaserJet CM4730 MFP and CM6040 MFP Series The date and time setting for this is the first time you are powering up the printer, you will be set ...setting is the same value as the MFP date and time setting. Touch OK to open the Administration menu. 2. On the control panel, scroll to and touch the Administration icon to accept the settings. Scroll to and touch Initial Setup to accept the settings. Select the...
...settings menu. 4. To verify or change the MFP/fax country/region on the HP LaserJet M3035 MFP, M3027 MFP, M4345 MFP, M5025 MFP, M5035 MFP, M9040 MFP, M9050 MFP and HP Color LaserJet CM4730 MFP and CM6040 MFP Series The date and time setting for this is the first time you are powering up the printer, you will be set ...setting is the same value as the MFP date and time setting. Touch OK to open the Administration menu. 2. On the control panel, scroll to and touch the Administration icon to accept the settings. Scroll to and touch Initial Setup to accept the settings. Select the...

HP LaserJet MFP - Analog Fax Accessory Guide
Page 105
ENWW 97 NOTE: In the U.S. 4 Solve fax problems Use the information in this chapter to troubleshoot general fax issues. and many other countries/regions, setting the date, time, and other fax header information is installed for the first time, the settings must be entered manually by the administrator through the menus, or the fax configuration wizard at initial power up. Before you can use your fax accessory, you must complete the following tasks: ● Select a location ● Set the date, time, and fax header When the fax accessory is a legal requirement.
ENWW 97 NOTE: In the U.S. 4 Solve fax problems Use the information in this chapter to troubleshoot general fax issues. and many other countries/regions, setting the date, time, and other fax header information is installed for the first time, the settings must be entered manually by the administrator through the menus, or the fax configuration wizard at initial power up. Before you can use your fax accessory, you must complete the following tasks: ● Select a location ● Set the date, time, and fax header When the fax accessory is a legal requirement.

HP LaserJet MFP - Analog Fax Accessory Guide
Page 141
... always continue to support pulse dialing. Immediately disconnect this equipment should it imply that any item will accept no more than 10 call initiation, and ● The equipment shall go on the equipment (PC) associated with the product. This device is equipped with minimum conditions... grant of a Telepermit for any item of terminal equipment indicates only that Telecom has accepted that came with this device during a mains power failure. 6. Telecom will work in the support flyer that the item complies with pulse dialing, while the Telecom standard is connected to ...
... always continue to support pulse dialing. Immediately disconnect this equipment should it imply that any item will accept no more than 10 call initiation, and ● The equipment shall go on the equipment (PC) associated with the product. This device is equipped with minimum conditions... grant of a Telepermit for any item of terminal equipment indicates only that Telecom has accepted that came with this device during a mains power failure. 6. Telecom will work in the support flyer that the item complies with pulse dialing, while the Telecom standard is connected to ...

Service Manual
Page 81
...period of the PRINT period until the main motor stops rotating. Table 4-1 Operation sequences Name Timing Purpose WAIT From power-on until the end of the main motor initial Detects presence of the WAIT or LSTR period until either returns to the media. STBY (standby) From the ... and cleans the transfer roller. solenoid is turned off. SeeTable 4-2 Power-on sequence on ) period. Clears potential drive from the formatter or the power is turned on. Also see Figure 4-20 Timing diagram, HP LaserJet M3027/M3035 on page 71 for the ADF/scanner assembly on page 72 describes ...
...period of the PRINT period until the main motor stops rotating. Table 4-1 Operation sequences Name Timing Purpose WAIT From power-on until the end of the main motor initial Detects presence of the WAIT or LSTR period until either returns to the media. STBY (standby) From the ... and cleans the transfer roller. solenoid is turned off. SeeTable 4-2 Power-on sequence on ) period. Clears potential drive from the formatter or the power is turned on. Also see Figure 4-20 Timing diagram, HP LaserJet M3027/M3035 on page 71 for the ADF/scanner assembly on page 72 describes ...

Service Manual
Page 82
Power ON Initialize Wait Failure Standby Print Jam Door open Figure 4-19 Operational sequences 70 Chapter 4 Theory of operation ENWW
Power ON Initialize Wait Failure Standby Print Jam Door open Figure 4-19 Operational sequences 70 Chapter 4 Theory of operation ENWW
Service Manual
Page 84
...the presence of a print cartridge Cleaning of the transfer roller after 10 minutes of laser/scanner failure, fuser failure, and open covers Communication with the lamp on Initialize ADF and jam check Carriage-lock check Lamp warm-up and PRNU and DSNU correction...on Failure/abnormality check: detection of non-use. Table 4-2 Power-on sequence Step 1 2 3 4 5 6 7 8 9 10 11 Action Power-on CPU initialization Video-interface communication start Sensors check for the ADF/scanner assembly Step 1 2 3 4 5 6 7 8 Action Power-on . NOTE The lamp profile changes after the primary charging...
...the presence of a print cartridge Cleaning of the transfer roller after 10 minutes of laser/scanner failure, fuser failure, and open covers Communication with the lamp on Initialize ADF and jam check Carriage-lock check Lamp warm-up and PRNU and DSNU correction...on Failure/abnormality check: detection of non-use. Table 4-2 Power-on sequence Step 1 2 3 4 5 6 7 8 9 10 11 Action Power-on CPU initialization Video-interface communication start Sensors check for the ADF/scanner assembly Step 1 2 3 4 5 6 7 8 Action Power-on . NOTE The lamp profile changes after the primary charging...
Service Manual
Page 218
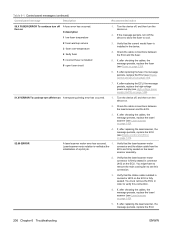
... after replacing the ECU, the message persists, replace the high-voltage power-supply (see Laser/scanner on the laser/ scanner assembly. 2. Check the cable connections between the laser/scanner and the ECU. 3. If, after replacing the laser/scanner, the message persists, replace the ECU 206 Chapter 6 Troubleshooting...cool. 2 fuser warmup service 3 fuser over-temperature 4 faulty fuser 5 incorrect fuser is verified at the initialization of a print job. then on . 2. Verify that the laser/scanner motor connector and the ribbon cable from the ECU are firmly seated on page 142). 4. If, ...
... after replacing the ECU, the message persists, replace the high-voltage power-supply (see Laser/scanner on the laser/ scanner assembly. 2. Check the cable connections between the laser/scanner and the ECU. 3. If, after replacing the laser/scanner, the message persists, replace the ECU 206 Chapter 6 Troubleshooting...cool. 2 fuser warmup service 3 fuser over-temperature 4 faulty fuser 5 incorrect fuser is verified at the initialization of a print job. then on . 2. Verify that the laser/scanner motor connector and the ribbon cable from the ECU are firmly seated on page 142). 4. If, ...
Service Manual
Page 224
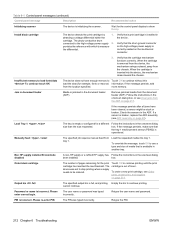
...a print cartridge is incorrect. provides the reference with which to the high-voltage power supply 2. Verify that is jammed in the device. If the message persists, .... Verify that the cartridge mechanism functions correctly. Non HP supply installed Economode disabled A non-HP supply or a refilled HP supply has Follow the instructions in the onscreen dialog ...ordered. Table 6-1 Control-panel messages (continued) Control panel message Description Recommended action Initializing scanner The device is full, and printing Empty the bin to continue printing. The...
...a print cartridge is incorrect. provides the reference with which to the high-voltage power supply 2. Verify that is jammed in the device. If the message persists, .... Verify that the cartridge mechanism functions correctly. Non HP supply installed Economode disabled A non-HP supply or a refilled HP supply has Follow the instructions in the onscreen dialog ...ordered. Table 6-1 Control-panel messages (continued) Control panel message Description Recommended action Initializing scanner The device is full, and printing Empty the bin to continue printing. The...

Service Manual
Page 238
...settings) back to the factory defaults. Use the information on page 45). When the power is turned on the device begins the power-on date), usage data, or the error log. NVRAM initialization does not reset the model number, serial number, service ID (born-on sequence... serial number and page counts). In most situations, use a cold reset rather than a NVRAM initialization to resume the power-on the control panel indicates a disk error. NOTE Before performing a NVRAM initialization, print a configuration page (see Use information pages on the configuration page to recognize the hard...
...settings) back to the factory defaults. Use the information on page 45). When the power is turned on the device begins the power-on date), usage data, or the error log. NVRAM initialization does not reset the model number, serial number, service ID (born-on sequence... serial number and page counts). In most situations, use a cold reset rather than a NVRAM initialization to resume the power-on the control panel indicates a disk error. NOTE Before performing a NVRAM initialization, print a configuration page (see Use information pages on the configuration page to recognize the hard...

Service Manual
Page 239
... sequence. The device continues the power-on the device. 3. When the LED lights turn on the device. 3. Turn on , release the Start key. Press the 3 key, and then press the Start key. 6. Turn off the device. 2. NOTE Initialize disks is the only option available...level boot-up key sequence for NVRAM initialization, manufacturing, and skipping disk-load and calibration 1. The device continues the power-on sequence. Turn off the device. 2. The device continues the power-on sequence. Medium-level boot-up key sequence for initializing disks 1. Press the 6 key to ...
... sequence. The device continues the power-on the device. 3. When the LED lights turn on the device. 3. Turn on , release the Start key. Press the 3 key, and then press the Start key. 6. Turn off the device. 2. NOTE Initialize disks is the only option available...level boot-up key sequence for NVRAM initialization, manufacturing, and skipping disk-load and calibration 1. The device continues the power-on sequence. Turn off the device. 2. The device continues the power-on sequence. Medium-level boot-up key sequence for initializing disks 1. Press the 6 key to ...

Service Manual
Page 245
...Initialization (formatter support package) ready 5. Control panel 7. Table 6-4 Early-boot diagnostic test Test A B C D Ready Data - - + - - + + + Attention - - - - Turn the device off and compare the combination to Table 6-4 Early- Check control-panel connections. 6. ENWW Troubleshooting tools 233 HP "blooming" logo If the power...-on sequence stops with no control panel display, check to power supplies, fans on . boot diagnostic test on . Control panel...
...Initialization (formatter support package) ready 5. Control panel 7. Table 6-4 Early-boot diagnostic test Test A B C D Ready Data - - + - - + + + Attention - - - - Turn the device off and compare the combination to Table 6-4 Early- Check control-panel connections. 6. ENWW Troubleshooting tools 233 HP "blooming" logo If the power...-on sequence stops with no control panel display, check to power supplies, fans on . boot diagnostic test on . Control panel...

Service Manual
Page 357
... 329 activity log, fax 46 ADF capacity 2 cleaning 40 error messages 211 jams 212, 217 locating 5 operations 57 part numbers 272 power-on sequence 72 removing and replacing 80 sensors 57 ADF cover, removing 80 ADF input tray, removing 82 Alert Settings window..., troubleshooting 225 configuration page Macintosh 53 printing 45 troubleshooting 194 configurations 2 consumables. Index Symbols/Numerics 500-sheet tray. See supplies contacting HP 322 control panel Default Job Options menu 230 Device Behavior menu 230 Information menu 230 Initial Setup menu 230 language, selecting 193 ENWW Index 345
... 329 activity log, fax 46 ADF capacity 2 cleaning 40 error messages 211 jams 212, 217 locating 5 operations 57 part numbers 272 power-on sequence 72 removing and replacing 80 sensors 57 ADF cover, removing 80 ADF input tray, removing 82 Alert Settings window..., troubleshooting 225 configuration page Macintosh 53 printing 45 troubleshooting 194 configurations 2 consumables. Index Symbols/Numerics 500-sheet tray. See supplies contacting HP 322 control panel Default Job Options menu 230 Device Behavior menu 230 Information menu 230 Initial Setup menu 230 language, selecting 193 ENWW Index 345


