FutureSmart - Printer Integration with McAfee Enterprise Security Manager Security Information Event Management Solution
Page 4
... printers support the "Enhanced Security Event Logging" setting for integration with McAfee ESM SIEM: Printer Models HP Color LaserJet Enterprise M552, M553 series HP Color LaserJet Enterprise MFP M577 series HP Color LaserJet Enterprise M651 series HP Color LaserJet Enterprise M652, M653 series HP Color LaserJet Enterprise MFP M680 series HP Color LaserJet Enterprise Flow MFP M681 series HP Color LaserJet Enterprise Flow MFP M682z HP Color LaserJet Enterprise M750 series HP Color LaserJet Enterprise M855 series HP Color LaserJet Enterprise flow MFP M880 series HP Color LaserJet Managed MFP...
... printers support the "Enhanced Security Event Logging" setting for integration with McAfee ESM SIEM: Printer Models HP Color LaserJet Enterprise M552, M553 series HP Color LaserJet Enterprise MFP M577 series HP Color LaserJet Enterprise M651 series HP Color LaserJet Enterprise M652, M653 series HP Color LaserJet Enterprise MFP M680 series HP Color LaserJet Enterprise Flow MFP M681 series HP Color LaserJet Enterprise Flow MFP M682z HP Color LaserJet Enterprise M750 series HP Color LaserJet Enterprise M855 series HP Color LaserJet Enterprise flow MFP M880 series HP Color LaserJet Managed MFP...
Fax Guide
Page 11
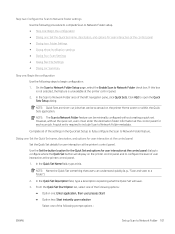
... results list and follow to set up either LAN or Internet connection, the fax accessory is available for your printer model and the words "update firmware." For earlier printer models, do not select a version earlier than FutureSmart 3.9. ENWW Update firmware 5 Update firmware It is installed but not configured. - Go to the most current FutureSmart firmware version that are provided. - If the control panel prompts you to update firmware, and then set...
... results list and follow to set up either LAN or Internet connection, the fax accessory is available for your printer model and the words "update firmware." For earlier printer models, do not select a version earlier than FutureSmart 3.9. ENWW Update firmware 5 Update firmware It is installed but not configured. - Go to the most current FutureSmart firmware version that are provided. - If the control panel prompts you to update firmware, and then set...
Fax Guide
Page 17
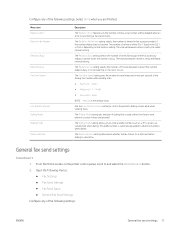
... on the printer control panel, scroll to all phone numbers when dialed. The Redial on the location setting. The Detect dial tone setting determines whether the fax checks for a dial tone before dialing to control the printer's dialing volume level when sending faxes. Open the following menus: ● Fax Settings ● Fax Send Settings ● Fax Send Setup ● General Fax Send Settings Configure any of...
... on the printer control panel, scroll to all phone numbers when dialed. The Redial on the location setting. The Detect dial tone setting determines whether the fax checks for a dial tone before dialing to control the printer's dialing volume level when sending faxes. Open the following menus: ● Fax Settings ● Fax Send Settings ● Fax Send Setup ● General Fax Send Settings Configure any of...

User Guide
Page 7
... USB 2.0 port from the HP Embedded Web Server (network-connected printers only) ...74 5 Copy ...75 Make a copy ...75 Copy on both sides (duplex) ...77 Additional copy tasks ...78 6 Scan ...81 Set up Scan to Email ...82 Introduction ...82 Before you begin ...82 Step one: Access the HP Embedded Web Server (EWS 82 Step two: Configure the Network Identification settings 83 Step three: Configure the Send to Email feature 85 Method one: Basic configuration using the Email Setup...
... USB 2.0 port from the HP Embedded Web Server (network-connected printers only) ...74 5 Copy ...75 Make a copy ...75 Copy on both sides (duplex) ...77 Additional copy tasks ...78 6 Scan ...81 Set up Scan to Email ...82 Introduction ...82 Before you begin ...82 Step one: Access the HP Embedded Web Server (EWS 82 Step two: Configure the Network Identification settings 83 Step three: Configure the Send to Email feature 85 Method one: Basic configuration using the Email Setup...
User Guide
Page 10
...timer and configure the printer to use 1 watt or less of power 163 Set the sleep schedule ...164 HP Web Jetadmin ...164 Software and firmware updates ...164 9 Solve problems ...167 Customer support ...168 Control panel help system ...168 Reset factory settings ...169 Introduction ...169 Method one: Reset factory settings from the printer control panel 169 Method two: Reset factory settings from the HP Embedded Web Server (network-connected printers only) ...169 A "Cartridge is low" or "Cartridge is very low" message displays on the printer control panel 169 Printer does not pick up paper or...
...timer and configure the printer to use 1 watt or less of power 163 Set the sleep schedule ...164 HP Web Jetadmin ...164 Software and firmware updates ...164 9 Solve problems ...167 Customer support ...168 Control panel help system ...168 Reset factory settings ...169 Introduction ...169 Method one: Reset factory settings from the printer control panel 169 Method two: Reset factory settings from the HP Embedded Web Server (network-connected printers only) ...169 A "Cartridge is low" or "Cartridge is very low" message displays on the printer control panel 169 Printer does not pick up paper or...

User Guide
Page 11
... toner cartridge or cartridges 190 Check paper and the printing environment 191 Step one: Use paper that meets HP specifications 191 Step two: Check the environment 191 Step three: Set the individual tray alignment 191 Try a different print driver ...192 Troubleshoot image defects ...192 Solve wired network problems ...200 Solve wireless network problems ...200 Solve fax problems ...201 Checklist for solving fax problems ...202 What type of phone line are you using 202 Are you using a surge-protection device...
... toner cartridge or cartridges 190 Check paper and the printing environment 191 Step one: Use paper that meets HP specifications 191 Step two: Check the environment 191 Step three: Set the individual tray alignment 191 Try a different print driver ...192 Troubleshoot image defects ...192 Solve wired network problems ...200 Solve wireless network problems ...200 Solve fax problems ...201 Checklist for solving fax problems ...202 What type of phone line are you using 202 Are you using a surge-protection device...

User Guide
Page 31
... Windows macOS ● Internet connection ● Internet connection ● Dedicated USB 1.1 or 2.0 connection or a network connection ● Dedicated USB 1.1 or 2.0 connection or a network connection ● 2 GB of available hard-disk space ● 1.5 GB of supported operating systems, go /upd. Download the driver, and then use the Microsoft Add Printer tool to install it . NOTE: Supported operating systems can change. Download the driver, and then use the Microsoft Add Printer tool to install it to install the print driver. Download the driver, and then use...
... Windows macOS ● Internet connection ● Internet connection ● Dedicated USB 1.1 or 2.0 connection or a network connection ● Dedicated USB 1.1 or 2.0 connection or a network connection ● 2 GB of available hard-disk space ● 1.5 GB of supported operating systems, go /upd. Download the driver, and then use the Microsoft Add Printer tool to install it . NOTE: Supported operating systems can change. Download the driver, and then use the Microsoft Add Printer tool to install it to install the print driver. Download the driver, and then use...

User Guide
Page 48
... Preferences button to the printer. 1. Envelope orientation Envelopes need to be loaded in a specific manner in the print driver, and then load the envelopes into the tray after sending the print job to open the print driver. Select the printer from a Windows 8 or 8.1 Start screen app, select Devices, select Print, and then select the printer. 3. Tray 1 holds up to 10 envelopes. ● Print envelopes ● Envelope orientation Print envelopes To print envelopes using the manual feed option, follow these steps to select the correct settings...
... Preferences button to the printer. 1. Envelope orientation Envelopes need to be loaded in a specific manner in the print driver, and then load the envelopes into the tray after sending the print job to open the print driver. Select the printer from a Windows 8 or 8.1 Start screen app, select Devices, select Print, and then select the printer. 3. Tray 1 holds up to 10 envelopes. ● Print envelopes ● Envelope orientation Print envelopes To print envelopes using the manual feed option, follow these steps to select the correct settings...

User Guide
Page 76
... you are using the HP printing software for macOS, including how to print on both sides or print multiple pages per sheet (macOS) ● Select the paper type (macOS) ● Additional print tasks How to print (macOS) ● Automatically print on both sides (macOS) ● Manually print on both sides (macOS) If your print job. Click the File menu, and then click the Print option. 2. Click the Print button. Use a paper size and type supported by the duplexer. Click Show Details or Copies & Pages, and...
... you are using the HP printing software for macOS, including how to print on both sides or print multiple pages per sheet (macOS) ● Select the paper type (macOS) ● Additional print tasks How to print (macOS) ● Automatically print on both sides (macOS) ● Manually print on both sides (macOS) If your print job. Click the File menu, and then click the Print option. 2. Click the Print button. Use a paper size and type supported by the duplexer. Click Show Details or Copies & Pages, and...
User Guide
Page 113
... Option list, select one of the left navigation pane, click Quick Sets. A quick set , users must enter the destination folder information at the control panel for user interaction at the printer control panel. 2. In the Quick Set Name field, type a title. Click Add to Network Folder check box. NOTE: Quick Sets are short-cut jobs that users can be accessed on the printer control panel and to begin configuration. 1. On the Scan to Network Folder Setup page...
... Option list, select one of the left navigation pane, click Quick Sets. A quick set , users must enter the destination folder information at the control panel for user interaction at the printer control panel. 2. In the Quick Set Name field, type a title. Click Add to Network Folder check box. NOTE: Quick Sets are short-cut jobs that users can be accessed on the printer control panel and to begin configuration. 1. On the Scan to Network Folder Setup page...

User Guide
Page 148
... by using the printer control panel Configure the fax features using the printer control panel Introduction This information applies to fax models, or to other printers when an optional analog fax accessory has been installed. Select Next. 6. If a dialing prefix is required for analog fax) or to disable LAN fax. 3. When LAN or Internet fax is enabled, the analog fax accessory is enabled, use the HP Embedded Web Server to...
... by using the printer control panel Configure the fax features using the printer control panel Introduction This information applies to fax models, or to other printers when an optional analog fax accessory has been installed. Select Next. 6. If a dialing prefix is required for analog fax) or to disable LAN fax. 3. When LAN or Internet fax is enabled, the analog fax accessory is enabled, use the HP Embedded Web Server to...

User Guide
Page 159
... HP Embedded Web Server pages. General tab Refer to the printer. Add or customize a link to specific email addresses. Change the default display language and keyboard layouts. Set a different schedule for holidays. Configure the printer to send automated emails regarding printer configuration and supplies to another website. Provides connection information about the printer. Set the date and time or synchronize with the HP Embedded Web Server (EWS) 147 Table 8-2 HP Embedded Web Server General tab Menu Description Control Panel Customization Quick Sets Alerts Control...
... HP Embedded Web Server pages. General tab Refer to the printer. Add or customize a link to specific email addresses. Change the default display language and keyboard layouts. Set a different schedule for holidays. Configure the printer to send automated emails regarding printer configuration and supplies to another website. Provides connection information about the printer. Set the date and time or synchronize with the HP Embedded Web Server (EWS) 147 Table 8-2 HP Embedded Web Server General tab Menu Description Control Panel Customization Quick Sets Alerts Control...

User Guide
Page 160
.... Configure the print quality settings, including color adjustment, image registration, and allowed paper types. Table 8-3 HP Embedded Web Server Copy/Print tab Menu Description Print from USB Drive Settings Manage Stored Jobs Default Print Options Restrict Color (Color printers only) PCL and PostScript Settings Print Quality Manage Supplies Copy Settings Manage Trays Enable or disable the Print from specific software programs. Adjust the PCL and PostScript settings for jobs that are not set from the control panel at the start of a job, the default settings will be used for...
.... Configure the print quality settings, including color adjustment, image registration, and allowed paper types. Table 8-3 HP Embedded Web Server Copy/Print tab Menu Description Print from USB Drive Settings Manage Stored Jobs Default Print Options Restrict Color (Color printers only) PCL and PostScript Settings Print Quality Manage Supplies Copy Settings Manage Trays Enable or disable the Print from specific software programs. Adjust the PCL and PostScript settings for jobs that are not set from the control panel at the start of a job, the default settings will be used for...
User Guide
Page 163
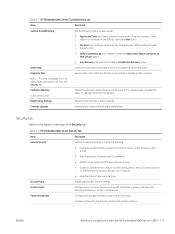
... Web Services option ● Auto Recovery area: Enable or disable the Enable Auto Recovery option. Configure settings for jobs that can be useful for processing PJL commands. ● Set file system access and firmware upgrade security. ● Enable or disable the Host USB port on the control panel or the USB connectivity port on the printer hard drive. Table 8-8 HP Embedded Web Server Security tab Menu Description General Security Settings for general security, including the following options as appropriate: ● Reports and Tests area: Select and print several types...
... Web Services option ● Auto Recovery area: Enable or disable the Enable Auto Recovery option. Configure settings for jobs that can be useful for processing PJL commands. ● Set file system access and firmware upgrade security. ● Enable or disable the Host USB port on the control panel or the USB connectivity port on the printer hard drive. Table 8-8 HP Embedded Web Server Security tab Menu Description General Security Settings for general security, including the following options as appropriate: ● Reports and Tests area: Select and print several types...

User Guide
Page 220
... J jams 520-sheet trays 182 auto-navigation 179 causes of 179 document feeder 180 fuser 184 locations 178 output bin 183 right door 184 Tray 1 181 Tray 2 182 Tray 3 182 Jetadmin, HP Web 164 JetAdvantage 133 jobs, stored creating (Windows) 67 deleting 67, 70 Mac settings 67 printing 67 L label orientation 38 labels orientaion, loading 38 printing (Windows) 60 printing on 38 labels, loading 38 LAN port locating 4, 6 loading paper in Tray 1 24 paper in Trays 2 and 3 30 local area network (LAN) locating 4, 6 lock formatter 159, 161 M Mac driver settings Job...
... J jams 520-sheet trays 182 auto-navigation 179 causes of 179 document feeder 180 fuser 184 locations 178 output bin 183 right door 184 Tray 1 181 Tray 2 182 Tray 3 182 Jetadmin, HP Web 164 JetAdvantage 133 jobs, stored creating (Windows) 67 deleting 67, 70 Mac settings 67 printing 67 L label orientation 38 labels orientaion, loading 38 printing (Windows) 60 printing on 38 labels, loading 38 LAN port locating 4, 6 loading paper in Tray 1 24 paper in Trays 2 and 3 30 local area network (LAN) locating 4, 6 lock formatter 159, 161 M Mac driver settings Job...

User Guide
Page 221
... feeder 180 fuser 184 locations 178 output bin 183 right door 184 Tray 1 181 Tray 2 182 Tray 3 182 paper pickup problems solving 171, 173 paper trays overview 23 paper type selecting (Windows) 60 paper types selecting (Mac) 64 paper, ordering 42 parts overview 41 ports locating 4, 6 potential shock hazard 3 power consumption 21 power connection locating 4 power switch locating 4 power usage 1 watts or less 162 print drivers download from printer support website 192 print media loading in Tray 1 24 print on both sides Mac 64 manually, Windows 60 Windows 60 print settings HP Embedded Web Server...
... feeder 180 fuser 184 locations 178 output bin 183 right door 184 Tray 1 181 Tray 2 182 Tray 3 182 paper pickup problems solving 171, 173 paper trays overview 23 paper type selecting (Windows) 60 paper types selecting (Mac) 64 paper, ordering 42 parts overview 41 ports locating 4, 6 potential shock hazard 3 power consumption 21 power connection locating 4 power switch locating 4 power usage 1 watts or less 162 print drivers download from printer support website 192 print media loading in Tray 1 24 print on both sides Mac 64 manually, Windows 60 Windows 60 print settings HP Embedded Web Server...

User Guide
Page 222
... requirements HP Embedded Web Server 144 T TCP/IP manually configuring IPv4 parameters 155 manually configuring IPv6 parameters 155 technical specifications 11 technical support online 168 toner cartridge components 43 low threshold settings 169 replacing 43 using when low 169 toner collection unit replacing 48 toner-collection unit locating 4 touchscreen locating features 4, 8 transparencies printing (Windows) 60 Tray 1 jams 181 loading envelopes 36 locating 4 paper orientation 24, 25 Tray 2 jams 182 loading 30 locating 4 paper orientation 30, 31 Tray 3 jams 182 loading 30 locating 4 paper...
... requirements HP Embedded Web Server 144 T TCP/IP manually configuring IPv4 parameters 155 manually configuring IPv6 parameters 155 technical specifications 11 technical support online 168 toner cartridge components 43 low threshold settings 169 replacing 43 using when low 169 toner collection unit replacing 48 toner-collection unit locating 4 touchscreen locating features 4, 8 transparencies printing (Windows) 60 Tray 1 jams 181 loading envelopes 36 locating 4 paper orientation 24, 25 Tray 2 jams 182 loading 30 locating 4 paper orientation 30, 31 Tray 3 jams 182 loading 30 locating 4 paper...
On-Site Installation Guide
Page 62
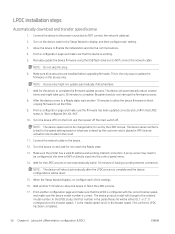
... Setup Wizard displays, re-configure each setting. 3. In the LPDC status the first number in the parentheses (x) will be changed after the LPDC process is placed in HPI's license activation site located in EWS or directly input into the control panel menu. 14. Connect the device to reach the Ready state. 13. Manually update the device firmware using the USB flash drive but do NOT connect the network cable. NOTE: Do not skip this time...
... Setup Wizard displays, re-configure each setting. 3. In the LPDC status the first number in the parentheses (x) will be changed after the LPDC process is placed in HPI's license activation site located in EWS or directly input into the control panel menu. 14. Connect the device to reach the Ready state. 13. Manually update the device firmware using the USB flash drive but do NOT connect the network cable. NOTE: Do not skip this time...

On-Site Installation Guide
Page 83
... the top of the imaging unit. ❑ Connect the imaging unit cable to retract the interlock at the connector on the control panel. ❑ Select the following: Support Tools > Maintenance > USB Firmware Upgrade NOTE: All accessories must be upgraded automatically.. NOTE: Accessories added later will NOT be attached when upgrading firmware. ENWW HP LaserJet MFP E72525, E72530, E72535 with firmware at the imaging unit opening. ❑ Unpack the imaging unit. ❑ Remove the white protective cover. CAUTION: The engine...
... the top of the imaging unit. ❑ Connect the imaging unit cable to retract the interlock at the connector on the control panel. ❑ Select the following: Support Tools > Maintenance > USB Firmware Upgrade NOTE: All accessories must be upgraded automatically.. NOTE: Accessories added later will NOT be attached when upgrading firmware. ENWW HP LaserJet MFP E72525, E72530, E72535 with firmware at the imaging unit opening. ❑ Unpack the imaging unit. ❑ Remove the white protective cover. CAUTION: The engine...

On-Site Installation Guide
Page 85
... HP LaserJet MFP E72525, E72530, E72535 with a DCF and HP LaserJet Spacer installation checklist 79 Table 8-2 On-site final setup DCF on the rear of the tray heater into the slots in the rear wall of the 2000-sheet HCI. ❑ Install one screw to secure the tray heater. ❑ Remove the rear cover of the 2000-sheet HCI. ❑ Connect the cable from the tray heater to the cable...
... HP LaserJet MFP E72525, E72530, E72535 with a DCF and HP LaserJet Spacer installation checklist 79 Table 8-2 On-site final setup DCF on the rear of the tray heater into the slots in the rear wall of the 2000-sheet HCI. ❑ Install one screw to secure the tray heater. ❑ Remove the rear cover of the 2000-sheet HCI. ❑ Connect the cable from the tray heater to the cable...


