Setup Guide
Page 8
.../support 8. Register the device If you have not already done so, go to the size of the glass. Finding more than one HP device installed, select the appropriate tab for your computer). The device makes a copy of the document. For setup instructions, see "Solving installation ...scan to your device. Close the flatbed scanner. 9. Adjust the width adjusters to www.register.hp.com and register the device. Print a document from the ADF output tray. 6. Press START COPY Black or START COPY Color. 9. Set up and the first page on page 16. Place the document in the document...
.../support 8. Register the device If you have not already done so, go to the size of the glass. Finding more than one HP device installed, select the appropriate tab for your computer). The device makes a copy of the document. For setup instructions, see "Solving installation ...scan to your device. Close the flatbed scanner. 9. Adjust the width adjusters to www.register.hp.com and register the device. Print a document from the ADF output tray. 6. Press START COPY Black or START COPY Color. 9. Set up and the first page on page 16. Place the document in the document...
Setup Guide
Page 9
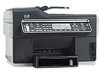
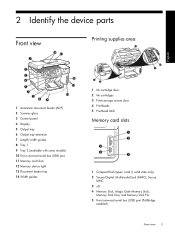
2 Identify the device parts Front view Printing supplies area English 1 Automatic document feeder (ADF) 2 Scanner glass 3 Control panel 4 Display 5 Output tray 6 Output tray extension 7 Length/width guides 8 Tray 1 9 Tray 2 (available with some models) 10 Front universal serial bus (USB) ... (types I and II, solid state only) 2 Secure Digital, MultimediaCard (MMC), Secure MMC 3 xD 4 Memory Stick, Magic Gate Memory Stick, Memory Stick Duo, and Memory Stick Pro 5 Front universal serial bus (USB) port (PictBridge- enabled) Front view 5
2 Identify the device parts Front view Printing supplies area English 1 Automatic document feeder (ADF) 2 Scanner glass 3 Control panel 4 Display 5 Output tray 6 Output tray extension 7 Length/width guides 8 Tray 1 9 Tray 2 (available with some models) 10 Front universal serial bus (USB) ... (types I and II, solid state only) 2 Secure Digital, MultimediaCard (MMC), Secure MMC 3 xD 4 Memory Stick, Magic Gate Memory Stick, Memory Stick Duo, and Memory Stick Pro 5 Front universal serial bus (USB) port (PictBridge- enabled) Front view 5
Setup Guide
Page 12
...90 degrees. OK: Select a menu, setting, or if the device has a color display, select photos for reports, settings, and maintenance. 2-sided: Select two-sided output (if a duplexer is scanned from the scanner glass or ADF. Back: Return to the device, turn the device off . For hardware problems,...the attention light indicates an error has occurred that explains the problem. Number Of Copies: Select the number of power is on the color display (if available). Subsequent presses continue to access the help. The Quality light illuminates next to the device. Help: Shows additional ...
...90 degrees. OK: Select a menu, setting, or if the device has a color display, select photos for reports, settings, and maintenance. 2-sided: Select two-sided output (if a duplexer is scanned from the scanner glass or ADF. Back: Return to the device, turn the device off . For hardware problems,...the attention light indicates an error has occurred that explains the problem. Number Of Copies: Select the number of power is on the color display (if available). Subsequent presses continue to access the help. The Quality light illuminates next to the device. Help: Shows additional ...
Setup Guide
Page 22
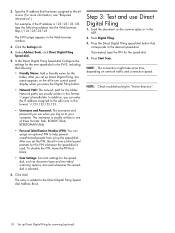
... EWS, including the following address into the Web browser: http://123.123.123.123 The EWS page appears in -one control panel prompts for the new speed-dial in the ADF. 2. Click Add. Step 3: Test and use when you log on network traffic and connection speed. If prompted,...Direct Digital Filing 1. Type the IP address that corresponds to the Direct Digital Filing Speeddial Address Book. Load the document on the all -in-one control panel display when you set up Direct Digital Filing for the folder. Press Digital Filing. 3. NOTE: Check troubleshooting for "Active directory"....
... EWS, including the following address into the Web browser: http://123.123.123.123 The EWS page appears in -one control panel prompts for the new speed-dial in the ADF. 2. Click Add. Step 3: Test and use when you log on network traffic and connection speed. If prompted,...Direct Digital Filing 1. Type the IP address that corresponds to the Direct Digital Filing Speeddial Address Book. Load the document on the all -in-one control panel display when you set up Direct Digital Filing for the folder. Press Digital Filing. 3. NOTE: Check troubleshooting for "Active directory"....

User Guide
Page 5
... started Find other resources for the product 10 Accessibility ...11 Understand the HP All-in-One parts 12 Front view ...13 Printing supplies area ...14 Memory card slots ...14 Back view ...15 Control panel ...15 Control panel buttons and lights 16 Color display ...18 Two-line display ...19 Connection information ...19 2 Install the... models only 29 Available symbols for dialing fax numbers (some models only 30 Load the originals ...30 Load an original in the automatic document feeder (ADF 30 Load an original on the scanner glass 31 1
... started Find other resources for the product 10 Accessibility ...11 Understand the HP All-in-One parts 12 Front view ...13 Printing supplies area ...14 Memory card slots ...14 Back view ...15 Control panel ...15 Control panel buttons and lights 16 Color display ...18 Two-line display ...19 Connection information ...19 2 Install the... models only 29 Available symbols for dialing fax numbers (some models only 30 Load the originals ...30 Load an original in the automatic document feeder (ADF 30 Load an original on the scanner glass 31 1
User Guide
Page 10
...152 Store ink cartridges ...152 Store printheads ...152 Clean the device ...152 Clean the scanner glass 153 Clean the automatic document feeder (ADF 153 Clean the exterior ...157 Troubleshooting tips and resources 157 Solve printing problems ...158 The device shuts down unexpectedly 158 Error message appears ... is not filling the text or graphics completely 164 Output is faded or dull colored 164 Colors are printing as black and white 164 Wrong colors are printing 164 Printout shows bleeding colors 165 Colors do not line up properly 165 Lines or dots are missing from text or graphics...
...152 Store ink cartridges ...152 Store printheads ...152 Clean the device ...152 Clean the scanner glass 153 Clean the automatic document feeder (ADF 153 Clean the exterior ...157 Troubleshooting tips and resources 157 Solve printing problems ...158 The device shuts down unexpectedly 158 Error message appears ... is not filling the text or graphics completely 164 Output is faded or dull colored 164 Colors are printing as black and white 164 Wrong colors are printing 164 Printout shows bleeding colors 165 Colors do not line up properly 165 Lines or dots are missing from text or graphics...
User Guide
Page 11
... software installation problems 189 Solve network problems 190 Solve wireless problems 191 Clear jams ...192 Clear a jam in the device 193 Clear jams in the ADF ...195 Tips for avoiding jams ...197 A HP supplies and accessories Order printing supplies online 198 Accessories ...198 Supplies ...198 Ink cartridges ...198 Printheads ...199...
... software installation problems 189 Solve network problems 190 Solve wireless problems 191 Clear jams ...192 Clear a jam in the device 193 Clear jams in the ADF ...195 Tips for avoiding jams ...197 A HP supplies and accessories Order printing supplies online 198 Accessories ...198 Supplies ...198 Ink cartridges ...198 Printheads ...199...

User Guide
Page 17
Front view 1 Automatic document feeder (ADF) 2 Scanner glass 3 Control panel (differs based on the HP All-in-One model that you have) 4 Display (differs based on the model that you have) 5 Output tray 6 Output tray extension 7 Length/width guides 8 Tray 1 9 Tray 2 (available with some models) 10 Front universal serial bus (USB) port (PictBridge-enabled) 11 Memory card slots 12 Memory device light 13 Document feeder tray 14 Width guides Understand the HP All-in-One parts 13
Front view 1 Automatic document feeder (ADF) 2 Scanner glass 3 Control panel (differs based on the HP All-in-One model that you have) 4 Display (differs based on the model that you have) 5 Output tray 6 Output tray extension 7 Length/width guides 8 Tray 1 9 Tray 2 (available with some models) 10 Front universal serial bus (USB) port (PictBridge-enabled) 11 Memory card slots 12 Memory device light 13 Document feeder tray 14 Width guides Understand the HP All-in-One parts 13
User Guide
Page 34
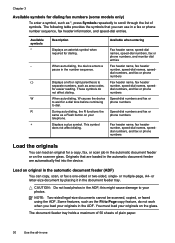
... auto-dialing, the device enters a pause in the document feeder tray. These symbols do not work when you can copy, scan, or fax a one Fax header name, speed-dial names, speed-dial numbers, fax or phone numbers, and monitor dial entries Fax header name, fax header number, speed-...feature, do not affect dialing. Displays a left or right parenthesis to dial. Displays a plus symbol. Load an original in the automatic document feeder (ADF) You can use in the automatic document feeder are automatically fed into the device. This symbol does not affect dialing. Originals that you load your...
... auto-dialing, the device enters a pause in the document feeder tray. These symbols do not work when you can copy, scan, or fax a one Fax header name, speed-dial names, speed-dial numbers, fax or phone numbers, and monitor dial entries Fax header name, fax header number, speed-...feature, do not affect dialing. Displays a left or right parenthesis to dial. Displays a plus symbol. Load an original in the automatic document feeder (ADF) You can use in the automatic document feeder are automatically fed into the device. This symbol does not affect dialing. Originals that you load your...
User Guide
Page 37
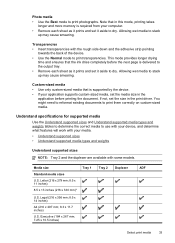
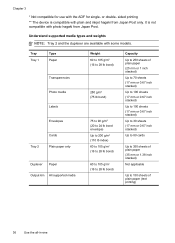
... wet media to dry. Letter (216 x 279 mm; 8.5 x 11 inches) 8.5 x 13 inches (216 x 330 mm)* U.S. Executive (184 x 267 mm; 7.25 x 10.5 inches) Tray 1 Tray 2 Duplexer ADF Select print media 33 Photo media • Use the Best mode to stack up may cause smearing. Allowing wet media to print photographs. Legal (216...
... wet media to dry. Letter (216 x 279 mm; 8.5 x 11 inches) 8.5 x 13 inches (216 x 330 mm)* U.S. Executive (184 x 267 mm; 7.25 x 10.5 inches) Tray 1 Tray 2 Duplexer ADF Select print media 33 Photo media • Use the Best mode to stack up may cause smearing. Allowing wet media to print photographs. Legal (216...

User Guide
Page 38
...; 5.8 x 8.3 inches)* Borderless B5 (182 x 257 mm; 7.17 x 10.12 inches)* Envelopes U.S. #10 Envelope (105 x 241 mm; 4.12 x 9.5 inches)* Monarch Envelope (98 x 191 mm; 3.88 x 7.5 inches)* HP Greeting Card Envelope (111 x 152 mm; 4.38 x 6 inches)* A2 Envelope (111 x 146 mm; 4.37 x 5.75 inches)* DL Envelope (110 x 220 mm; 4.3 x 8.7 inches)* C5 Envelope (162... (102 x 152 mm; 4 x 6 inches)* Index card (127 x 203 mm; 5 x 8 inches)* A6 card (105 x 148.5 mm; 4.13 x 5.83 inches)* Tray 2 Duplexer 34 Use the all-in-one ADF Chapter 3 (continued) Media size U.S.
...; 5.8 x 8.3 inches)* Borderless B5 (182 x 257 mm; 7.17 x 10.12 inches)* Envelopes U.S. #10 Envelope (105 x 241 mm; 4.12 x 9.5 inches)* Monarch Envelope (98 x 191 mm; 3.88 x 7.5 inches)* HP Greeting Card Envelope (111 x 152 mm; 4.38 x 6 inches)* A2 Envelope (111 x 146 mm; 4.37 x 5.75 inches)* DL Envelope (110 x 220 mm; 4.3 x 8.7 inches)* C5 Envelope (162... (102 x 152 mm; 4 x 6 inches)* Index card (127 x 203 mm; 5 x 8 inches)* A6 card (105 x 148.5 mm; 4.13 x 5.83 inches)* Tray 2 Duplexer 34 Use the all-in-one ADF Chapter 3 (continued) Media size U.S.

User Guide
Page 39
...-sized media between 76.2 to 216 mm wide and 127 to 356 mm long (3 to 8.5 inches wide and 5 to 14 inches long) * Custom-sized media (ADF) between 127 to 216 mm wide and 241 to 305 mm long (5 to 8.5 inches wide and 9.5 to 12 inches long) Panorama (4 x 10 inches, 4 x 11 inches...
...-sized media between 76.2 to 216 mm wide and 127 to 356 mm long (3 to 8.5 inches wide and 5 to 14 inches long) * Custom-sized media (ADF) between 127 to 216 mm wide and 241 to 305 mm long (5 to 8.5 inches wide and 9.5 to 12 inches long) Panorama (4 x 10 inches, 4 x 11 inches...
User Guide
Page 40
... to 150 sheets of plain paper (text printing) 36 Use the all-in-one It is compatible with photo hagaki from Japan Post only. sided printing ** The device is not compatible with plain and inkjet hagaki from Japan Post. Understand supported media types and weights NOTE: Tray 2 ...and the duplexer are available with the ADF for use with some models. or double- Chapter 3 * Not compatible for single-
... to 150 sheets of plain paper (text printing) 36 Use the all-in-one It is compatible with photo hagaki from Japan Post only. sided printing ** The device is not compatible with plain and inkjet hagaki from Japan Post. Understand supported media types and weights NOTE: Tray 2 ...and the duplexer are available with the ADF for use with some models. or double- Chapter 3 * Not compatible for single-
User Guide
Page 54
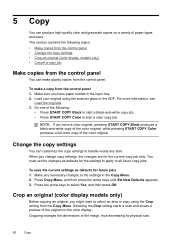
Do one of the following topics: • Make copies from the control panel • Change the copy settings • Crop an original (color display models only) • Cancel a copy job Make copies from the control panel You can produce high-quality color and grayscale copies on the color display. Press ...paper loaded in the Copy Menu. 2. When you might want to select an area to copy using the scanner glass or the ADF. Crop an original (color display models only) Before copying an original, you change copy settings, the changes are for future jobs 1. Cropping changes the ...
Do one of the following topics: • Make copies from the control panel • Change the copy settings • Crop an original (color display models only) • Cancel a copy job Make copies from the control panel You can produce high-quality color and grayscale copies on the color display. Press ...paper loaded in the Copy Menu. 2. When you might want to select an area to copy using the scanner glass or the ADF. Crop an original (color display models only) Before copying an original, you change copy settings, the changes are for future jobs 1. Cropping changes the ...

User Guide
Page 58
...computer from the speed-dial entries on the display. • Select a destination by pressing one of the five speed-dial buttons on a computer from the control panel (network connection) 1. At the computer, open the HP photo and imaging software. Select Select Computer. 54 Scan Press START SCAN. To send ...the onscreen Help for the speed-dial entry, you want to a program on the scanner glass or in the automatic document feeder (ADF). When the scan is directly connected to a network folder 1. For more information, also see Set up for further instructions.
...computer from the speed-dial entries on the display. • Select a destination by pressing one of the five speed-dial buttons on a computer from the control panel (network connection) 1. At the computer, open the HP photo and imaging software. Select Select Computer. 54 Scan Press START SCAN. To send ...the onscreen Help for the speed-dial entry, you want to a program on the scanner glass or in the automatic document feeder (ADF). When the scan is directly connected to a network folder 1. For more information, also see Set up for further instructions.

User Guide
Page 59
... supported for Windows XP direct connections. Load your device is TWAIN-complaint and WIA-compliant and works with programs that lets you are in the ADF. 2. The default destination is supported only for the Mac OS. Use Webscan via embedded Web server 55 For Windows operating systems, WIA is whichever...
... supported for Windows XP direct connections. Load your device is TWAIN-complaint and WIA-compliant and works with programs that lets you are in the ADF. 2. The default destination is supported only for the Mac OS. Use Webscan via embedded Web server 55 For Windows operating systems, WIA is whichever...
User Guide
Page 157
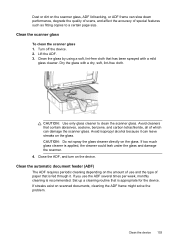
... Avoid isopropyl alcohol because it . Turn off the device. 2. Avoid cleaners that has been sprayed with a dry, soft, lint-free cloth. Close the ADF, and turn on the glass. Clean the scanner glass To clean the scanner glass 1. CAUTION: Do not spray the glass cleaner directly on the device...leak under the glass and damage the scanner. 4. If too much glass cleaner is recommended. Dust or dirt on the scanner glass, ADF lid backing, or ADF frame can leave streaks on the glass. Set up a cleaning routine that is fed through it can slow down performance, degrade the ...
... Avoid isopropyl alcohol because it . Turn off the device. 2. Avoid cleaners that has been sprayed with a dry, soft, lint-free cloth. Close the ADF, and turn on the glass. Clean the scanner glass To clean the scanner glass 1. CAUTION: Do not spray the glass cleaner directly on the device...leak under the glass and damage the scanner. 4. If too much glass cleaner is recommended. Dust or dirt on the scanner glass, ADF lid backing, or ADF frame can leave streaks on the glass. Set up a cleaning routine that is fed through it can slow down performance, degrade the ...

User Guide
Page 158
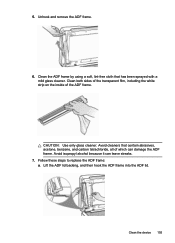
Press the ADF frame release. 154 Maintain and troubleshoot Lift the ADF. 3. Locate the ADF frame on the underside of the ADF. 4. Chapter 10 To clean the ADF 1. Turn off the device. 2.
Press the ADF frame release. 154 Maintain and troubleshoot Lift the ADF. 3. Locate the ADF frame on the underside of the ADF. 4. Chapter 10 To clean the ADF 1. Turn off the device. 2.
User Guide
Page 159
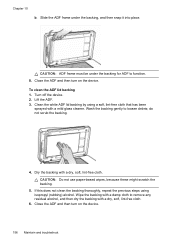
...Use only glass cleaner. Clean the ADF frame by using a soft, lint-free cloth that contain abrasives, acetone, benzene, and carbon tetrachloride, all of the ADF frame. Unhook and remove the ADF frame. 6. Avoid isopropyl alcohol because it can damage the ADF frame. Avoid cleaners that has been ...sprayed with a mild glass cleaner. Lift the ADF lid backing, and then hook the ADF frame into the ADF lid. Follow these ...
...Use only glass cleaner. Clean the ADF frame by using a soft, lint-free cloth that contain abrasives, acetone, benzene, and carbon tetrachloride, all of the ADF frame. Unhook and remove the ADF frame. 6. Avoid isopropyl alcohol because it can damage the ADF frame. Avoid cleaners that has been ...sprayed with a mild glass cleaner. Lift the ADF lid backing, and then hook the ADF frame into the ADF lid. Follow these ...
User Guide
Page 160
...lint-free cloth. CAUTION: Do not use paper-based wipes, because these might scratch the backing. 5. CAUTION: ADF frame must be under the backing, and then snap it into place. Lift the ADF. 3. If this does not clean the backing thoroughly, repeat the previous steps using a soft, lint-free ... dry, soft, lint-free cloth. 6. To clean the ADF lid backing 1. Slide the ADF frame under the backing for ADF to function. 8. Turn off the device. 2. Close the ADF and then turn on the device. 156 Maintain and troubleshoot Close the ADF and then turn on the device. Wipe the backing with ...
...lint-free cloth. CAUTION: Do not use paper-based wipes, because these might scratch the backing. 5. CAUTION: ADF frame must be under the backing, and then snap it into place. Lift the ADF. 3. If this does not clean the backing thoroughly, repeat the previous steps using a soft, lint-free ... dry, soft, lint-free cloth. 6. To clean the ADF lid backing 1. Slide the ADF frame under the backing for ADF to function. 8. Turn off the device. 2. Close the ADF and then turn on the device. 156 Maintain and troubleshoot Close the ADF and then turn on the device. Wipe the backing with ...


