Setup Guide
Page 14
... (optional) 3. Use the following type of your telephone company to subscribe to a distinctive ring service, or to answer incoming calls manually. Austria Belgium (Dutch) Belgium (French) Denmark Finland France Germany Ireland Italy Norway Netherlands Portugal Spain... Sweden Switzerland (French) Switzerland (German) United Kingdom www.hp.com/at/faxconfig www.hp.be/nl/faxconfig www.hp.be available to respond in person to a distinctive ring service...
... (optional) 3. Use the following type of your telephone company to subscribe to a distinctive ring service, or to answer incoming calls manually. Austria Belgium (Dutch) Belgium (French) Denmark Finland France Germany Ireland Italy Norway Netherlands Portugal Spain... Sweden Switzerland (French) Switzerland (German) United Kingdom www.hp.com/at/faxconfig www.hp.be/nl/faxconfig www.hp.be available to respond in person to a distinctive ring service...

Setup Guide
Page 31
... for fax calls, you can be a standard phone cord that is not set to Off, or you have in the box with the device, connect one at a time and rerunning the test each time until a dash (-) appears on page 26. Using the phone cord supplied in your home or office. 1. ... outside but can disconnect all the other end to the port labeled 1-LINE on page 27. If you are sending a fax manually from your phone that you are using a distinctive ring service, check to make sure that the software that came with the device, including: Argentina, Australia, Brazil, Canada, Chile, China, ...
... for fax calls, you can be a standard phone cord that is not set to Off, or you have in the box with the device, connect one at a time and rerunning the test each time until a dash (-) appears on page 26. Using the phone cord supplied in your home or office. 1. ... outside but can disconnect all the other end to the port labeled 1-LINE on page 27. If you are sending a fax manually from your phone that you are using a distinctive ring service, check to make sure that the software that came with the device, including: Argentina, Australia, Brazil, Canada, Chile, China, ...
User Guide
Page 70
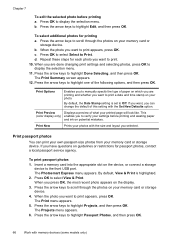
... you want , you have questions on the display. 3. Press the arrow keys to highlight one of paper on which you are done changing print settings and selecting photos, press OK to ... memory card or storage device. By default, the Date Stamp setting is highlighted. 2. This (color display only) enables you to highlight Passport Photos, and then press OK. 66 Work with the...photo appears on guidelines or restrictions for passport photos, contact a local passport service agency. Press the arrow keys to manually specify the type of the following options, and then press OK. b....
... you want , you have questions on the display. 3. Press the arrow keys to highlight one of paper on which you are done changing print settings and selecting photos, press OK to ... memory card or storage device. By default, the Date Stamp setting is highlighted. 2. This (color display only) enables you to highlight Passport Photos, and then press OK. 66 Work with the...photo appears on guidelines or restrictions for passport photos, contact a local passport service agency. Press the arrow keys to manually specify the type of the following options, and then press OK. b....
User Guide
Page 81
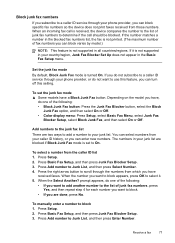
...Setup. 3. prompt appears, do one of the following : • Block Junk Fax button: Press the Junk Fax Blocker button, select the Block Junk Fax option, and then select On or Off. • Color display menu: Press Setup, select...Receive a fax 77 Press Add number to block 1. To manually enter a number to Junk List, and then press Select Number. 4. Depending on the model you have, do one of fax numbers you can block varies by model.) NOTE..., and then press Enter Number. Press Add number to a caller ID service through the numbers from the caller ID list 1. Press Setup. 2.
...Setup. 3. prompt appears, do one of the following : • Block Junk Fax button: Press the Junk Fax Blocker button, select the Block Junk Fax option, and then select On or Off. • Color display menu: Press Setup, select...Receive a fax 77 Press Add number to block 1. To manually enter a number to Junk List, and then press Select Number. 4. Depending on the model you have, do one of fax numbers you can block varies by model.) NOTE..., and then press Enter Number. Press Add number to a caller ID service through the numbers from the caller ID list 1. Press Setup. 2.
User Guide
Page 87
... report for more information on the control-panel display after you have completed setting up the device to make sure their Internet faxing service supports faxing. Set up properly for faxing according to your fax setup to fix any problems found. Make sure the ink cartridges ...To test fax setup 1. A blank or incorrect fax setting can also manually print system reports as required; If you experience problems sending and receiving faxes while using an Internet fax service, use a slower fax speed. Some Internet faxing services do this test after each fax you send and receive.
... report for more information on the control-panel display after you have completed setting up the device to make sure their Internet faxing service supports faxing. Set up properly for faxing according to your fax setup to fix any problems found. Make sure the ink cartridges ...To test fax setup 1. A blank or incorrect fax setting can also manually print system reports as required; If you experience problems sending and receiving faxes while using an Internet fax service, use a slower fax speed. Some Internet faxing services do this test after each fax you send and receive.
User Guide
Page 93
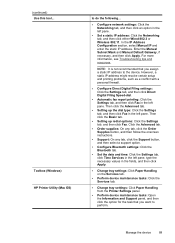
...Configure network settings: Click the Networking tab, and then click an option in the left pane. Toolbox (Windows) HP Printer Utility (Mac OS) to perform. Enter the Manual Subnet Mask and Manual Default Gateway, if necessary, and then click Apply. Then click the Advanced tab. • Setting up redial ...a support option. • Configure Bluetooth settings: Click the Bluetooth tab. • Set the date and time: Click the Settings tab, click Time Services in the left pane, type the necessary values in the left pane. • Set a static IP address: Click the Networking tab, and then...
...Configure network settings: Click the Networking tab, and then click an option in the left pane. Toolbox (Windows) HP Printer Utility (Mac OS) to perform. Enter the Manual Subnet Mask and Manual Default Gateway, if necessary, and then click Apply. Then click the Advanced tab. • Setting up redial ...a support option. • Configure Bluetooth settings: Click the Bluetooth tab. • Set the date and time: Click the Settings tab, click Time Services in the left pane, type the necessary values in the left pane. • Set a static IP address: Click the Networking tab, and then...

User Guide
Page 105
...Keep your network hardware: • 1. After you run the Fax Setup Wizard (Windows) or HP Fax Setup Utility (Mac OS), follow the procedures in this section to the link speed that ...; 3. 10-Half • 4. 100-Full • 5. 100-Half To View IP settings • Color display: To view the IP address of the device from the control panel, press the Setup button, select Network...of the device, you installed with equipment and services you enter an invalid IP address during the installation, your fax setup. CAUTION: Be careful when manually assigning an IP address. Select Advanced Setup,...
...Keep your network hardware: • 1. After you run the Fax Setup Wizard (Windows) or HP Fax Setup Utility (Mac OS), follow the procedures in this section to the link speed that ...; 3. 10-Half • 4. 100-Full • 5. 100-Half To View IP settings • Color display: To view the IP address of the device from the control panel, press the Setup button, select Network...of the device, you installed with equipment and services you enter an invalid IP address during the installation, your fax setup. CAUTION: Be careful when manually assigning an IP address. Select Advanced Setup,...

User Guide
Page 114
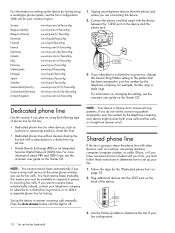
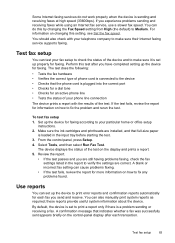
... fax tones from a sending fax machine, you will need to decide how you also subscribe to a voice mail service through your telephone company to subscribe to a distinctive ring service, or to incoming fax calls or the device cannot receive faxes. If you want the device to answer calls, ...automatically or manually: • If you must be able to answer calls manually, turn on the Auto Answer setting. • If you...
... fax tones from a sending fax machine, you will need to decide how you also subscribe to a voice mail service through your telephone company to subscribe to a distinctive ring service, or to incoming fax calls or the device cannot receive faxes. If you want the device to answer calls, ...automatically or manually: • If you must be able to answer calls manually, turn on the Auto Answer setting. • If you...
User Guide
Page 127
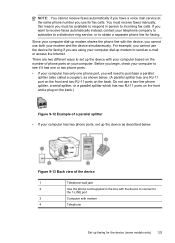
... modem to send an e-mail or access the Internet. Before you begin, check your computer to see if it has one or two phone ports. • If your computer has only one RJ-11 port on the front and two RJ-11 ports on the back.) Figure 9-12 Example of a parallel splitter... a parallel splitter (also called a coupler), as shown below . this means you must receive faxes manually; Do not use both your modem and the device simultaneously. NOTE: You cannot receive faxes automatically if you have a voice mail service at the same phone number you use the device for faxing if you are two...
... modem to send an e-mail or access the Internet. Before you begin, check your computer to see if it has one or two phone ports. • If your computer has only one RJ-11 port on the front and two RJ-11 ports on the back.) Figure 9-12 Example of a parallel splitter... a parallel splitter (also called a coupler), as shown below . this means you must receive faxes manually; Do not use both your modem and the device simultaneously. NOTE: You cannot receive faxes automatically if you have a voice mail service at the same phone number you use the device for faxing if you are two...
User Guide
Page 149
... For more information, see To open the embedded Web server. CAUTION: HP is not good or fair, then perform one of white paper, and check the printhead health section. If the status...Web server: Click the Settings tab, click Device Services in the Print Quality section, and then click Run Diagnostic. • Toolbox (Windows): Click the Services tab, and then click Print PQ (print ...instructions. • HP Printer Utility (Mac OS): Click Print Quality Diagnostics from the drop-down list in the left pane. • Toolbox (Windows): Open the Toolbox. Manually clean the printhead ...
... For more information, see To open the embedded Web server. CAUTION: HP is not good or fair, then perform one of white paper, and check the printhead health section. If the status...Web server: Click the Settings tab, click Device Services in the Print Quality section, and then click Run Diagnostic. • Toolbox (Windows): Click the Services tab, and then click Print PQ (print ...instructions. • HP Printer Utility (Mac OS): Click Print Quality Diagnostics from the drop-down list in the left pane. • Toolbox (Windows): Open the Toolbox. Manually clean the printhead ...
User Guide
Page 150
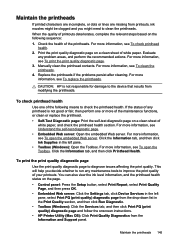
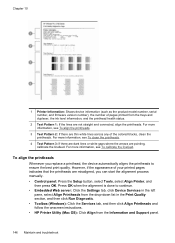
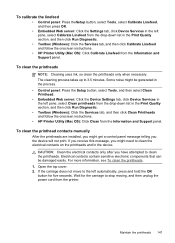
To align the printheads Whenever you can start the alignment process manually. • Control panel: Press the Setup button, select Tools, select Align Printer, and then press OK. ...Print Quality section, and then click Run Diagnostic. • Toolbox (Windows): Click the Services tab, and then click Align Printheads and follow the onscreen instructions. • HP Printer Utility (Mac OS): Click Align from the trays and duplexer, the ink level information.... For more information, see To calibrate the linefeed. However, if the appearance of the colored blocks, clean the printheads.
To align the printheads Whenever you can start the alignment process manually. • Control panel: Press the Setup button, select Tools, select Align Printer, and then press OK. ...Print Quality section, and then click Run Diagnostic. • Toolbox (Windows): Click the Services tab, and then click Align Printheads and follow the onscreen instructions. • HP Printer Utility (Mac OS): Click Align from the trays and duplexer, the ink level information.... For more information, see To calibrate the linefeed. However, if the appearance of the colored blocks, clean the printheads.
User Guide
Page 151
... in the Print Quality section, and then click Run Diagnostic. • Toolbox (Windows): Click the Services tab, and then click Clean Printheads and follow the onscreen instructions. • HP Printer Utility (Mac OS): Click Calibrate Linefeed from the printer. Wait for five seconds. Electrical contacts...top cover. 2. To clean the printheads NOTE: Cleaning uses ink, so clean the printheads only when necessary. To clean the printhead contacts manually After the printheads are installed, you might need to 3.5 minutes. If you receive this message, you might get a control panel message ...
... in the Print Quality section, and then click Run Diagnostic. • Toolbox (Windows): Click the Services tab, and then click Clean Printheads and follow the onscreen instructions. • HP Printer Utility (Mac OS): Click Calibrate Linefeed from the printer. Wait for five seconds. Electrical contacts...top cover. 2. To clean the printheads NOTE: Cleaning uses ink, so clean the printheads only when necessary. To clean the printhead contacts manually After the printheads are installed, you might need to 3.5 minutes. If you receive this message, you might get a control panel message ...
User Guide
Page 186
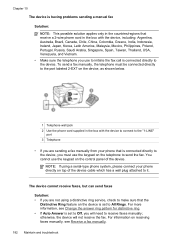
...For more information, see Receive a fax manually. 182 Maintain and troubleshoot NOTE: If using a distinctive ring service, check to make sure that the Distinctive Ring feature on the device is set to Off, you will not receive the fax. To send a fax manually, the telephone must be connected directly to ... the control panel of the device cable which has a wall plug attached to All Rings. Chapter 10 The device is having problems sending a manual fax Solution: NOTE: This possible solution applies only in the countries/regions that receive a 2-wire phone cord in the box with the device,...
...For more information, see Receive a fax manually. 182 Maintain and troubleshoot NOTE: If using a distinctive ring service, check to make sure that the Distinctive Ring feature on the device is set to Off, you will not receive the fax. To send a fax manually, the telephone must be connected directly to ... the control panel of the device cable which has a wall plug attached to All Rings. Chapter 10 The device is having problems sending a manual fax Solution: NOTE: This possible solution applies only in the countries/regions that receive a 2-wire phone cord in the box with the device,...

User Guide
Page 187
...information on the same phone line with the device, you might have one of the following actions might not retain the recorded silence at a ...• If you have an answering machine on setting up the device when you have a voice mail service, see Receive a fax manually. • If you have a computer dial-up to receive faxes automatically take over the phone line ...seconds in Case I: Shared voice/fax line with digital answering machines. • If you have a voice mail service at the same phone number you use for fax calls, you must be no background noise when recording this silent...
...information on the same phone line with the device, you might have one of the following actions might not retain the recorded silence at a ...• If you have an answering machine on setting up the device when you have a voice mail service, see Receive a fax manually. • If you have a computer dial-up to receive faxes automatically take over the phone line ...seconds in Case I: Shared voice/fax line with digital answering machines. • If you have a voice mail service at the same phone number you use for fax calls, you must be no background noise when recording this silent...
User Guide
Page 208
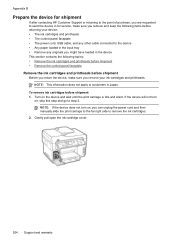
Appendix B Prepare the device for shipment If after contacting HP Customer Support or returning to the point of purchase, you are requested to send the device in for service, make sure you can unplug the power cord and then manually slide the print carriage to the far right side to step 2. NOTE: This information...
Appendix B Prepare the device for shipment If after contacting HP Customer Support or returning to the point of purchase, you are requested to send the device in for service, make sure you can unplug the power cord and then manually slide the print carriage to the far right side to step 2. NOTE: This information...
User Guide
Page 240
...manually 71 monitor dialing 72, 73 troubleshoot 180, 182, 184 send scans for OCR 56 to a program 54 troubleshoot 169 serial number 97 serial phone systems countries/regions with 102 setup types 102 Services ...169 print 166 scan 172 slow print, troubleshoot 160 software accessories settings 22 connection types 19 HP Photosmart 26 installation on Mac OS 128 installation on Windows 125 management tools 86 OCR 56... 45 one-touch buttons 16 print and view 46 send fax 70 Start Color Photo button 17 Start Color Scan button 17 Start Copy buttons black 17 color 17 Start Fax buttons black 17 color 17 static...
...manually 71 monitor dialing 72, 73 troubleshoot 180, 182, 184 send scans for OCR 56 to a program 54 troubleshoot 169 serial number 97 serial phone systems countries/regions with 102 setup types 102 Services ...169 print 166 scan 172 slow print, troubleshoot 160 software accessories settings 22 connection types 19 HP Photosmart 26 installation on Mac OS 128 installation on Windows 125 management tools 86 OCR 56... 45 one-touch buttons 16 print and view 46 send fax 70 Start Color Photo button 17 Start Color Scan button 17 Start Copy buttons black 17 color 17 Start Fax buttons black 17 color 17 static...


