Understanding pixel defects in TFT flat panel monitors
Page 2
...is viewing a cleaner image without the distraction of the manufacturing process. Even so, some minimal sub-pixel defects. Executive summary Flat panel LCD technology is because the current state-of color and detail that today's high-quality flat panel displays deliver crisp, clear visual quality at...minor flaws, HP has developed a set of quality to its standards for sub-pixel defect specifications, and as a result, has adopted a more stringent unified standard for the end user because the user is this important to me? It does, however, allow for some LCD monitors may produce ...
...is viewing a cleaner image without the distraction of the manufacturing process. Even so, some minimal sub-pixel defects. Executive summary Flat panel LCD technology is because the current state-of color and detail that today's high-quality flat panel displays deliver crisp, clear visual quality at...minor flaws, HP has developed a set of quality to its standards for sub-pixel defect specifications, and as a result, has adopted a more stringent unified standard for the end user because the user is this important to me? It does, however, allow for some LCD monitors may produce ...
Understanding pixel defects in TFT flat panel monitors
Page 3
... to the fluorescent tubes used to a solid crystal. Unfortunately, when the drive voltage is driven such that the pixels are placed on one set on the "top" glass, and the other on the panel creates the complete image. Color filters are switched, in standard office lighting, ... in different amounts, controlled by controlling the alignment of the LC molecules electrically, causing them to understand the technology behind this type of all HP LCD monitors as well as an ordered arrangement of its "off . Combining red, green, and blue light in all the pixels on the bottom)....
... to the fluorescent tubes used to a solid crystal. Unfortunately, when the drive voltage is driven such that the pixels are placed on one set on the "top" glass, and the other on the panel creates the complete image. Color filters are switched, in standard office lighting, ... in different amounts, controlled by controlling the alignment of the LC molecules electrically, causing them to understand the technology behind this type of all HP LCD monitors as well as an ordered arrangement of its "off . Combining red, green, and blue light in all the pixels on the bottom)....
Understanding pixel defects in TFT flat panel monitors
Page 6
...("stuck off") pixel 2 single or double bright or dark sub-pixels 3 to 5 "stuck on the number of the HP monitor. These identify three classes for pixel defects, contained within the above listed range of standards.. further, we require no full pixel defects; in May ...or double bright or dark sub-pixels (again, depending on " or "stuck off The HP specification ensures that fall within the ISO 9241 set of specifications for measuring pixel defects in flat panel monitors: Class 0 panels are shipping with only a single sub-pixel defect. Most ...
...("stuck off") pixel 2 single or double bright or dark sub-pixels 3 to 5 "stuck on the number of the HP monitor. These identify three classes for pixel defects, contained within the above listed range of standards.. further, we require no full pixel defects; in May ...or double bright or dark sub-pixels (again, depending on " or "stuck off The HP specification ensures that fall within the ISO 9241 set of specifications for measuring pixel defects in flat panel monitors: Class 0 panels are shipping with only a single sub-pixel defect. Most ...
Understanding pixel defects in TFT flat panel monitors
Page 9
... perform in a high residual value for industry-standard best-of-breed products-and our line of LCD monitors is a set by the IEEE 1680 American National Standard for the Environmental Assessment of the optional criteria. Low emissions: HP monitor products meet the demanding emissions, environmental, and ecological guidelines known as TCO 99 and TCO...
... perform in a high residual value for industry-standard best-of-breed products-and our line of LCD monitors is a set by the IEEE 1680 American National Standard for the Environmental Assessment of the optional criteria. Low emissions: HP monitor products meet the demanding emissions, environmental, and ecological guidelines known as TCO 99 and TCO...
Understanding pixel defects in TFT flat panel monitors
Page 11
...listed below. Nothing herein should be liable for HP products and services are trademarks of Intel Corporation in the express warranty statements accompanying such products and services. and other countries. 5981-6351EN July 2009 11 Intel and Pentium are set forth in the U.S. Hewlett-Packard Hong Kong... Ltd. 19/F, Cityplaza One 1111 King's Road Taikoo Shing Hong Kong © 2005-2009 Hewlett-Packard Development Company, L.P. For more information For the HP sales office nearest you, please refer to...
...listed below. Nothing herein should be liable for HP products and services are trademarks of Intel Corporation in the express warranty statements accompanying such products and services. and other countries. 5981-6351EN July 2009 11 Intel and Pentium are set forth in the U.S. Hewlett-Packard Hong Kong... Ltd. 19/F, Cityplaza One 1111 King's Road Taikoo Shing Hong Kong © 2005-2009 Hewlett-Packard Development Company, L.P. For more information For the HP sales office nearest you, please refer to...

HP L2045w LCD Monitor User Guide
Page 2
Microsoft, Windows, and Windows Vista are set forth in connection with the furnishing, performance, or use of merchantability and fitness for incidental or consequential damages in the express limited warranty statements accompanying ...
Microsoft, Windows, and Windows Vista are set forth in connection with the furnishing, performance, or use of merchantability and fitness for incidental or consequential damages in the express limited warranty statements accompanying ...

HP L2045w LCD Monitor User Guide
Page 3
WARNING! CAUTION: Text set off in this manner indicates that failure to follow directions could result in damage to follow directions could result in bodily harm or loss of information. NOTE: Text set off in this manner provides important supplemental information. Text set off in this manner indicates that failure to equipment or loss of life. About This Guide This guide provides information on setting up the monitor, installing drivers, using the on-screen display menu, troubleshooting and technical specifications. iii
WARNING! CAUTION: Text set off in this manner indicates that failure to follow directions could result in damage to follow directions could result in bodily harm or loss of information. NOTE: Text set off in this manner provides important supplemental information. Text set off in this manner indicates that failure to equipment or loss of life. About This Guide This guide provides information on setting up the monitor, installing drivers, using the on-screen display menu, troubleshooting and technical specifications. iii
HP L2045w LCD Monitor User Guide
Page 5
Table of contents 1 Product Features HP L2045w ...1 2 Safety and Maintenance Guidelines Important Safety Information ...3 Maintenance Guidelines ...3 Cleaning the Monitor ...4 Shipping the Monitor ...4 3 Setting Up the Monitor Rear Components ...5 Selecting the Signal Connectors and Cables 6 Connecting the Monitor ...7 Adjusting the Monitor ...10 Turning on the Monitor ...12 Connecting USB Devices ...13 Using the Accessory Rails ...13 Mounting Solutions ...14 Removing the...
Table of contents 1 Product Features HP L2045w ...1 2 Safety and Maintenance Guidelines Important Safety Information ...3 Maintenance Guidelines ...3 Cleaning the Monitor ...4 Shipping the Monitor ...4 3 Setting Up the Monitor Rear Components ...5 Selecting the Signal Connectors and Cables 6 Connecting the Monitor ...7 Adjusting the Monitor ...10 Turning on the Monitor ...12 Connecting USB Devices ...13 Using the Accessory Rails ...13 Mounting Solutions ...14 Removing the...
HP L2045w LCD Monitor User Guide
Page 6
... Conversion 26 Using the HP Display Assistant Utility 26 Identifying Monitor Conditions ...27 Sleep Timer Mode ...27 HP Display LiteSaver ...28 Installing the HP Display LiteSaver Software 28 ...the Worldwide Web ...32 Preparing to Call Technical Support 32 Appendix B Technical Specifications L2045w Model ...33 Recognizing Preset Display Resolutions 34 Entering User Modes ...34 Energy Saver ...37 German Ergonomics Notice ...38 Japanese Notice ...38 Korean Notice ...38 Power Cord Set Requirements ...38 Japanese Power Cord Requirements 38 Product Environmental Notices ...39 Materials Disposal...
... Conversion 26 Using the HP Display Assistant Utility 26 Identifying Monitor Conditions ...27 Sleep Timer Mode ...27 HP Display LiteSaver ...28 Installing the HP Display LiteSaver Software 28 ...the Worldwide Web ...32 Preparing to Call Technical Support 32 Appendix B Technical Specifications L2045w Model ...33 Recognizing Preset Display Resolutions 34 Entering User Modes ...34 Energy Saver ...37 German Ergonomics Notice ...38 Japanese Notice ...38 Korean Notice ...38 Power Cord Set Requirements ...38 Japanese Power Cord Requirements 38 Product Environmental Notices ...39 Materials Disposal...
HP L2045w LCD Monitor User Guide
Page 9
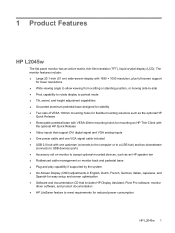
...; Two sets of VESA 100mm mounting holes for flexible mounting solutions such as the optional HP Quick Release... ● Removable pedestal base with VESA 40mm mounting holes for mounting an HP Thin Client with the optional HP...on monitor to accept optional mounted devices, such as an HP speaker bar ● Rubberized cable management on monitor back ...HP Display Assistant, Pivot Pro software, monitor driver software, and product documentation ● HP LiteSaver feature to meet requirements for reduced power consumption HP L2045w 1 1 Product Features HP L2045w The flat panel monitor...
...; Two sets of VESA 100mm mounting holes for flexible mounting solutions such as the optional HP Quick Release... ● Removable pedestal base with VESA 40mm mounting holes for mounting an HP Thin Client with the optional HP...on monitor to accept optional mounted devices, such as an HP speaker bar ● Rubberized cable management on monitor back ...HP Display Assistant, Pivot Pro software, monitor driver software, and product documentation ● HP LiteSaver feature to meet requirements for reduced power consumption HP L2045w 1 1 Product Features HP L2045w The flat panel monitor...

HP L2045w LCD Monitor User Guide
Page 11
..., posture, and health and work habits for the computer and its peripheral devices (such as a monitor, printer, scanner) to some form of the products connected to the Power Cord Set Requirements on or trip over them so that is not operating properly or has been dropped or damaged..., contact an authorized HP dealer, reseller, or service provider. ● Use only a power source and connection appropriate for this monitor, as having this product yourself...
..., posture, and health and work habits for the computer and its peripheral devices (such as a monitor, printer, scanner) to some form of the products connected to the Power Cord Set Requirements on or trip over them so that is not operating properly or has been dropped or damaged..., contact an authorized HP dealer, reseller, or service provider. ● Use only a power source and connection appropriate for this monitor, as having this product yourself...
HP L2045w LCD Monitor User Guide
Page 13
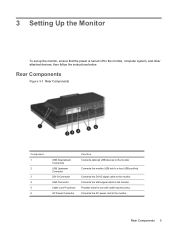
... the VGA signal cable to a host USB port/hub. Connects the DVI-D signal cable to the monitor. Rear Components 5 Connects the AC power cord to the monitor. Rear Components Figure 3-1 Rear Components Component 1 2 3 4 5 6 USB Downstream Connectors USB Upstream Connector ...DVI-D Connector VGA Connector Cable Lock Provisions AC Power Connector Function Connects optional USB devices to the monitor, computer system, and other attached devices, then follow the instructions below. 3 Setting Up the Monitor To set up the monitor, ensure that the power is turned off to the...
... the VGA signal cable to a host USB port/hub. Connects the DVI-D signal cable to the monitor. Rear Components 5 Connects the AC power cord to the monitor. Rear Components Figure 3-1 Rear Components Component 1 2 3 4 5 6 USB Downstream Connectors USB Upstream Connector ...DVI-D Connector VGA Connector Cable Lock Provisions AC Power Connector Function Connects optional USB devices to the monitor, computer system, and other attached devices, then follow the instructions below. 3 Setting Up the Monitor To set up the monitor, ensure that the power is turned off to the...

HP L2045w LCD Monitor User Guide
Page 14
...-D connector and one VGA connector capable of VESA 100mm mounting holes. D connector on the monitor and the other end to the DVI-D connector on the computer. 6 Chapter 3 Setting Up the Monitor The monitor features two sets of supporting either digital or analog input. Connect the DVI-D signal cable to the table ...video mode is determined by the connector and video cable used in landscape mode. Connect the VGA signal cable to a VGA connector on the monitor and the other end to the VGA connector on the computer. ● For analog operation, use an optional DVI-D signal cable. Use ...
...-D connector and one VGA connector capable of VESA 100mm mounting holes. D connector on the monitor and the other end to the DVI-D connector on the computer. 6 Chapter 3 Setting Up the Monitor The monitor features two sets of supporting either digital or analog input. Connect the DVI-D signal cable to the table ...video mode is determined by the connector and video cable used in landscape mode. Connect the VGA signal cable to a VGA connector on the monitor and the other end to the VGA connector on the computer. ● For analog operation, use an optional DVI-D signal cable. Use ...

HP L2045w LCD Monitor User Guide
Page 16
... of the USB hub cable to the USB connector on the rear panel of electric shock or damage to the upstream USB connector on the monitor. Do not pull on power cords or cables. When unplugging from the electrical outlet, grasp the cord by unplugging the power cord from the equipment... by the plug. 8 Chapter 3 Setting Up the Monitor To reduce the risk of the computer or to a USB hub, and the other end to the equipment: • Do not disable the power...
... of the USB hub cable to the USB connector on the rear panel of electric shock or damage to the upstream USB connector on the monitor. Do not pull on power cords or cables. When unplugging from the electrical outlet, grasp the cord by unplugging the power cord from the equipment... by the plug. 8 Chapter 3 Setting Up the Monitor To reduce the risk of the computer or to a USB hub, and the other end to the equipment: • Do not disable the power...

HP L2045w LCD Monitor User Guide
Page 18
Adjusting the Monitor 1. Swivel the monitor to a comfortable eye level. Figure 3-8 Tilting the Monitor 2. Figure 3-9 Swiveling the Monitor 10 Chapter 3 Setting Up the Monitor Tilt the monitor's panel forward or backward to set it to the left or right for the best viewing angle.
Adjusting the Monitor 1. Swivel the monitor to a comfortable eye level. Figure 3-8 Tilting the Monitor 2. Figure 3-9 Swiveling the Monitor 10 Chapter 3 Setting Up the Monitor Tilt the monitor's panel forward or backward to set it to the left or right for the best viewing angle.

HP L2045w LCD Monitor User Guide
Page 19
.../release button on a stable surface. Make sure that it onto objects in the pedestal base tray. Adjusting the Monitor 11 Figure 3-10 Adjusting the Height NOTE: The monitor features two sets of the column. d. Use the top mounting holes to allow the display head to be sure not to the... is lifted. If the display head is safely positioned on the front of VESA 100mm mounting holes. c. Guide the display head up when the monitor is parallel to the table surface, when used in the lowest height position: a. Gently push down /release button on the display head. CAUTION:...
.../release button on a stable surface. Make sure that it onto objects in the pedestal base tray. Adjusting the Monitor 11 Figure 3-10 Adjusting the Height NOTE: The monitor features two sets of the column. d. Use the top mounting holes to allow the display head to be sure not to the... is lifted. If the display head is safely positioned on the front of VESA 100mm mounting holes. c. Guide the display head up when the monitor is parallel to the table surface, when used in the lowest height position: a. Gently push down /release button on the display head. CAUTION:...

HP L2045w LCD Monitor User Guide
Page 20
... on all LCD screens. * A prolonged period of time is not in use . 12 Chapter 3 Setting Up the Monitor Figure 3-11 Pivoting the Monitor NOTE: The monitor pivots from landscape to portrait orientation viewing to adapt to portrait orientation. CAUTION: Burn-in image damage may occur on monitors that may ... activate a screen saver application or turn on the monitor screen, you will need to turn off the monitor when it is 12 or more consecutive hours of non-use for a prolonged period of the monitor. Pivot the monitor from landscape clockwise to your application. Turning on the...
... on all LCD screens. * A prolonged period of time is not in use . 12 Chapter 3 Setting Up the Monitor Figure 3-11 Pivoting the Monitor NOTE: The monitor pivots from landscape to portrait orientation viewing to adapt to portrait orientation. CAUTION: Burn-in image damage may occur on monitors that may ... activate a screen saver application or turn on the monitor screen, you will need to turn off the monitor when it is 12 or more consecutive hours of non-use for a prolonged period of the monitor. Pivot the monitor from landscape clockwise to your application. Turning on the...

HP L2045w LCD Monitor User Guide
Page 22
... Base on page 14 steps in the previous section. 14 Chapter 3 Setting Up the Monitor Figure 3-14 Removing the Monitor from the Pedestal Base Mounting the Monitor An optional HP Quick Release can remove the monitor panel from the back of the monitor panel. If the monitor has a connected audio cable, disconnect it from the pedestal base. Refer...
... Base on page 14 steps in the previous section. 14 Chapter 3 Setting Up the Monitor Figure 3-14 Removing the Monitor from the Pedestal Base Mounting the Monitor An optional HP Quick Release can remove the monitor panel from the back of the monitor panel. If the monitor has a connected audio cable, disconnect it from the pedestal base. Refer...

HP L2045w LCD Monitor User Guide
Page 24
...Chapter 3 Setting Up the Monitor It is important to verify that the manufacturer's mounting solution is compliant with the monitor. CAUTION: This monitor supports the VESA industry-standard 100mm mounting holes. For best performance, it is rated to use the screws previously removed from the monitor base ...to mount the display to the monitor, four 4mm, 0.7 pitch, and 10mm long screws are required (not provided with the mounting fixture for additional...
...Chapter 3 Setting Up the Monitor It is important to verify that the manufacturer's mounting solution is compliant with the monitor. CAUTION: This monitor supports the VESA industry-standard 100mm mounting holes. For best performance, it is rated to use the screws previously removed from the monitor base ...to mount the display to the monitor, four 4mm, 0.7 pitch, and 10mm long screws are required (not provided with the mounting fixture for additional...

HP L2045w LCD Monitor User Guide
Page 28
... the ESC key or any other key on the keyboard to Adjusting the Monitor Settings on page 22 in the disc drive. Select Open Auto-Adjustment Software. Allow the monitor to produce a stable, centered image. 6. Insert the CD in this chapter. ● If the result is not satisfactory, continue with the... procedure. 3. The CD menu is displayed. 5. To use the auto-adjustment feature: 1. Press the −/Auto button on the monitor front panel to warm up for 20 minutes before adjusting. 2. The setup test pattern is displayed. 4. Press the −/Auto button on the...
... the ESC key or any other key on the keyboard to Adjusting the Monitor Settings on page 22 in the disc drive. Select Open Auto-Adjustment Software. Allow the monitor to produce a stable, centered image. 6. Insert the CD in this chapter. ● If the result is not satisfactory, continue with the... procedure. 3. The CD menu is displayed. 5. To use the auto-adjustment feature: 1. Press the −/Auto button on the monitor front panel to warm up for 20 minutes before adjusting. 2. The setup test pattern is displayed. 4. Press the −/Auto button on the...


