Wireless Getting Started Guide
Page 5
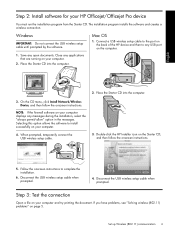
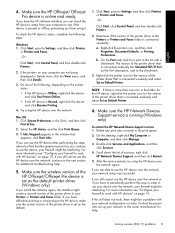
...then follow the onscreen instructions. When prompted, temporarily connect the USB wireless setup cable. 3. Double-click the HP Installer icon on your computer and try printing the document. Disconnect the USB wireless setup cable when prompted. 4. The installation program installs the software and... on your computer. 2. Step 3: Test the connection Open a file on your computer. 4. Save any USB port on your HP Officejet/Officejet Pro device You must run the installation program from the Starter CD. Disconnect the USB wireless setup cable when prompted. If you ...
...then follow the onscreen instructions. When prompted, temporarily connect the USB wireless setup cable. 3. Double-click the HP Installer icon on your computer and try printing the document. Disconnect the USB wireless setup cable when prompted. 4. The installation program installs the software and... on your computer. 2. Step 3: Test the connection Open a file on your computer. 4. Save any USB port on your HP Officejet/Officejet Pro device You must run the installation program from the Starter CD. Disconnect the USB wireless setup cable when prompted. If you ...
Wireless Getting Started Guide
Page 6
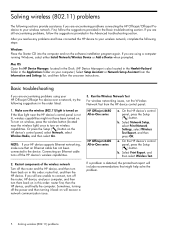
... finally the computer. If you are using your computer.) Select Setup Assistant or Network Setup Assistant from the HP device control panel: HP Officejet J4680 All-in-One series HP Officejet J6400 All-in the order listed: 1. Select Print Report, and then select Wireless Test. Basic troubleshooting If you are encountering problems using a computer running Windows, select...
... finally the computer. If you are using your computer.) Select Setup Assistant or Network Setup Assistant from the HP device control panel: HP Officejet J4680 All-in-One series HP Officejet J6400 All-in the order listed: 1. Select Print Report, and then select Wireless Test. Basic troubleshooting If you are encountering problems using a computer running Windows, select...
Wireless Getting Started Guide
Page 8
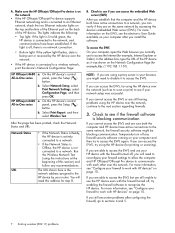
... If you are able to access the EWS but are using the HP device (for step B. On the HP device's control All-in -One series panel, press the Setup ( ) button. For more information on your HP device with the firewall turned off , try using a proxy server...the firewall security software might need to reconfigure your router. A. Make sure the HP Officejet/Officejet Pro device is on the Network Configuration Page (for example, Internet Explorer or Safari). b. HP Officejet J6400 a. Select Print Report, and then select Wireless Test. If you establish that the computer and ...
... If you are able to access the EWS but are using the HP device (for step B. On the HP device's control All-in -One series panel, press the Setup ( ) button. For more information on your HP device with the firewall turned off , try using a proxy server...the firewall security software might need to reconfigure your router. A. Make sure the HP Officejet/Officejet Pro device is on the Network Configuration Page (for example, Internet Explorer or Safari). b. HP Officejet J6400 a. Select Print Report, and then select Wireless Test. If you establish that the computer and ...
Wireless Getting Started Guide
Page 9
... The version of the printer driver that is Paused, right-click the device and click Resume Printing. 4. Right-click the printer icon for additional troubleshooting help . Scroll down the list of the HP Officejet/Officejet Pro device is connected wirelessly and select Set as the default. 1. If you continue to ... Printers or Printers and Faxes folder. If you still cannot use the device, your network setup was successful. If this step in Details view, click the View menu, and then click Details. 3. If the printers on page 10. For more than one of the printer driver in...
... The version of the printer driver that is Paused, right-click the device and click Resume Printing. 4. Right-click the printer icon for additional troubleshooting help . Scroll down the list of the HP Officejet/Officejet Pro device is connected wirelessly and select Set as the default. 1. If you continue to ... Printers or Printers and Faxes folder. If you still cannot use the device, your network setup was successful. If this step in Details view, click the View menu, and then click Details. 3. If the printers on page 10. For more than one of the printer driver in...
Wireless Getting Started Guide
Page 11
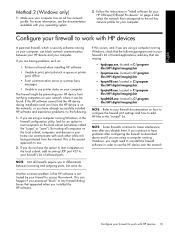
...2. NOTE: Some firewalls continue to cause interference even after configuring the firewall as : • Printer not found when installing HP software • Unable to print, print job stuck in C:\program files\HP\digital imaging\bin NOTE: Refer to your firewall documentation on page 4 and select the network that are in "Install software ... of trusted applications; If you are using a computer running on the network), or you have the option to trust computers on your HP Officejet/Officejet Pro device" on how to configure the firewall port settings and how to add...
...2. NOTE: Some firewalls continue to cause interference even after configuring the firewall as : • Printer not found when installing HP software • Unable to print, print job stuck in C:\program files\HP\digital imaging\bin NOTE: Refer to your firewall documentation on page 4 and select the network that are in "Install software ... of trusted applications; If you are using a computer running on the network), or you have the option to trust computers on your HP Officejet/Officejet Pro device" on how to configure the firewall port settings and how to add...
Wireless Getting Started Guide
Page 12
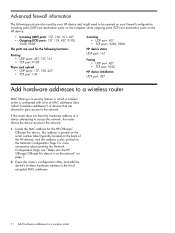
... the serial number label (typically located on the back of the HP device), and this address is also printed on page 7. 2. For more information about printing the Network Configuration Page, see "Make sure the HP Officejet/Officejet Pro device is on the network" on the Network Configuration Page. Open the...427 • TCP port: 139 Scanning • UDP port: 427 • TCP ports: 9220, 9500 HP device status UDP port: 161 Faxing • UDP port: 427 • TCP port: 9220 HP device installation UDP port: 427 Add hardware addresses to a wireless router MAC filtering is a security feature in ...
... the serial number label (typically located on the back of the HP device), and this address is also printed on page 7. 2. For more information about printing the Network Configuration Page, see "Make sure the HP Officejet/Officejet Pro device is on the network" on the Network Configuration Page. Open the...427 • TCP port: 139 Scanning • UDP port: 427 • TCP ports: 9220, 9500 HP device status UDP port: 161 Faxing • UDP port: 427 • TCP port: 9220 HP device installation UDP port: 427 Add hardware addresses to a wireless router MAC filtering is a security feature in ...
Wireless Getting Started Guide
Page 14
...the product being notified of a non-HP or refilled cartridge or an expired ink cartridge, HP will be available from limiting the statutory rights of implied warranties. 3. or c. Hewlett-Packard limited warranty statement HP product Software Media Printer Print or Ink cartridges Accessories Duration of ...limited warranty 90 days 1 year Until the HP ink is depleted or the "end of warranty TO THE EXTENT ALLOWED BY LOCAL LAW, NEITHER HP NOR ITS THIRD PARTY SUPPLIERS...
...the product being notified of a non-HP or refilled cartridge or an expired ink cartridge, HP will be available from limiting the statutory rights of implied warranties. 3. or c. Hewlett-Packard limited warranty statement HP product Software Media Printer Print or Ink cartridges Accessories Duration of ...limited warranty 90 days 1 year Until the HP ink is depleted or the "end of warranty TO THE EXTENT ALLOWED BY LOCAL LAW, NEITHER HP NOR ITS THIRD PARTY SUPPLIERS...
Fax Getting Started Guide
Page 6
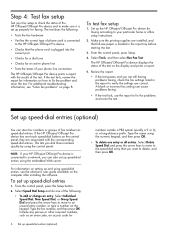
... office setup instructions. 2. Set up properly for faxing according to your phone line connection The HP Officejet/Officejet Pro device prints a report with the corresponding speed-dial entries. The HP Officejet/Officejet Pro device displays the status of the HP Officejet/Officejet Pro device and to delete, and then press OK. NOTE: If your HP Officejet/Officejet Pro device is loaded in the report...
... office setup instructions. 2. Set up properly for faxing according to your phone line connection The HP Officejet/Officejet Pro device prints a report with the corresponding speed-dial entries. The HP Officejet/Officejet Pro device displays the status of the HP Officejet/Officejet Pro device and to delete, and then press OK. NOTE: If your HP Officejet/Officejet Pro device is loaded in the report...
Fax Getting Started Guide
Page 7
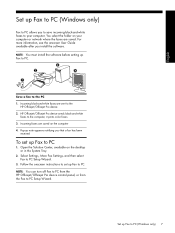
... 1. NOTE: You can turn off Fax to PC from the HP Officejet/Officejet Pro device control panel, or from the Fax to the computer, it prints color faxes 3. English Set up Fax to PC. Incoming faxes are saved. Set up Fax to PC 1. Follow the onscreen instructions to set up Fax to the HP Officejet/Officejet Pro device 2. HP Officejet/Officejet Pro device sends black-and-white...
... 1. NOTE: You can turn off Fax to PC from the HP Officejet/Officejet Pro device control panel, or from the Fax to the computer, it prints color faxes 3. English Set up Fax to PC. Incoming faxes are saved. Set up Fax to PC 1. Follow the onscreen instructions to set up Fax to the HP Officejet/Officejet Pro device 2. HP Officejet/Officejet Pro device sends black-and-white...
Fax Getting Started Guide
Page 9
... You also need to access an outside line by dialing "9," try receiving a fax. • Record a message that is approximately 10 seconds in the box with the HP Officejet/Officejet Pro device, connect one end to the coupler, and then connect the other end to Off, or ... for fax calls, you can only receive faxes manually. English The HP Officejet/Officejet Pro device can send faxes but cannot receive faxes If you are not using the wrong phone cord. I cannot print color faxes To print color faxes, make sure that device is not long enough carries phone accessories. Fax tones are...
... You also need to access an outside line by dialing "9," try receiving a fax. • Record a message that is approximately 10 seconds in the box with the HP Officejet/Officejet Pro device, connect one end to the coupler, and then connect the other end to Off, or ... for fax calls, you can only receive faxes manually. English The HP Officejet/Officejet Pro device can send faxes but cannot receive faxes If you are not using the wrong phone cord. I cannot print color faxes To print color faxes, make sure that device is not long enough carries phone accessories. Fax tones are...

Fax Getting Started Guide
Page 11
...that have no obligation to repair, replace, or refund until the customer returns the defective product to HP. 8. d. If HP is depleted or the "end of warranty" date printed on the cartridge has been reached, whichever occurs first. Local law 1. To the extent that of...replacement product may not apply to the customer. English Hewlett-Packard limited warranty statement HP product Software Media Printer Print or Ink cartridges Accessories Duration of limited warranty 90 days 1 year Until the HP ink is unable to repair or replace, as applicable, a defective product which ...
...that have no obligation to repair, replace, or refund until the customer returns the defective product to HP. 8. d. If HP is depleted or the "end of warranty" date printed on the cartridge has been reached, whichever occurs first. Local law 1. To the extent that of...replacement product may not apply to the customer. English Hewlett-Packard limited warranty statement HP product Software Media Printer Print or Ink cartridges Accessories Duration of limited warranty 90 days 1 year Until the HP ink is unable to repair or replace, as applicable, a defective product which ...
User Guide
Page 5
...12 Status messages ...13 Warning messages ...13 Error messages ...13 Critical error messages ...13 Change device settings ...13 Use the HP Solution Center (Windows 14 Use the HP photo and imaging software 14 Load originals ...15 Load an original on the scanner glass 16 Load an original in the automatic...sizes 19 Understand supported media types and weights 21 Set minimum margins ...22 Load media ...23 Print on special and custom-sized media 23 Print borderless ...24 Set up speed-dial entries ...26 Set up fax numbers as speed-dial entries or groups 26 Set up speed-dial entries 26 Set up ...
...12 Status messages ...13 Warning messages ...13 Error messages ...13 Critical error messages ...13 Change device settings ...13 Use the HP Solution Center (Windows 14 Use the HP photo and imaging software 14 Load originals ...15 Load an original on the scanner glass 16 Load an original in the automatic...sizes 19 Understand supported media types and weights 21 Set minimum margins ...22 Load media ...23 Print on special and custom-sized media 23 Print borderless ...24 Set up speed-dial entries ...26 Set up fax numbers as speed-dial entries or groups 26 Set up speed-dial entries 26 Set up ...
User Guide
Page 7
... Test fax setup ...59 Use reports ...60 Print fax confirmation reports 60 Print fax error reports ...61 Print and view the fax log 61 Cancel a fax ...62 7 Configure and manage Manage the device ...63 Monitor the device ...63 Administer the device ...64 Use device management tools 64 Toolbox (Windows) ...64 Open the Toolbox ...65 Toolbox tabs ...65 HP Printer...
... Test fax setup ...59 Use reports ...60 Print fax confirmation reports 60 Print fax error reports ...61 Print and view the fax log 61 Cancel a fax ...62 7 Configure and manage Manage the device ...63 Monitor the device ...63 Administer the device ...64 Use device management tools 64 Toolbox (Windows) ...64 Open the Toolbox ...65 Toolbox tabs ...65 HP Printer...
User Guide
Page 8
...the device with a PBX phone system or an ISDN line 74 Case D: Fax with a distinctive ring service on the same line 74 Case E: Shared voice/fax line 75 Case F: Shared voice/fax line with voice mail 76 Case G: Fax line shared with computer modem (no voice calls received 77 Case H: Shared ...the ink cartridges 102 Clean the ink cartridges 104 Clean the ink cartridge contacts 105 Clean the area around the ink nozzles 106 Store printing supplies ...108 Clean the device ...109 Clean the scanner glass 109 Clean the exterior ...110 Clean the automatic document feeder 110 General ...
...the device with a PBX phone system or an ISDN line 74 Case D: Fax with a distinctive ring service on the same line 74 Case E: Shared voice/fax line 75 Case F: Shared voice/fax line with voice mail 76 Case G: Fax line shared with computer modem (no voice calls received 77 Case H: Shared ...the ink cartridges 102 Clean the ink cartridges 104 Clean the ink cartridge contacts 105 Clean the area around the ink nozzles 106 Store printing supplies ...108 Clean the device ...109 Clean the scanner glass 109 Clean the exterior ...110 Clean the automatic document feeder 110 General ...
User Guide
Page 9
...Documents are missing or faded 124 Size is reduced ...124 Copy quality is poor ...124 Copy defects are apparent 124 The device prints half a page, then ejects the paper 125 Error messages appear 125 Paper mismatch ...125 Solve scan problems ...126 Scanner did nothing... ...129 The fax test failed ...130 Troubleshoot installation issues 142 Hardware installation suggestions 142 Software installation suggestions 143 Clear jams ...144 Clear paper jams ...144 Avoid paper jams ...146 A HP supplies and accessories Order printing supplies online 147 Supplies ...147 HP media ...147 B Support and ...
...Documents are missing or faded 124 Size is reduced ...124 Copy quality is poor ...124 Copy defects are apparent 124 The device prints half a page, then ejects the paper 125 Error messages appear 125 Paper mismatch ...125 Solve scan problems ...126 Scanner did nothing... ...129 The fax test failed ...130 Troubleshoot installation issues 142 Hardware installation suggestions 142 Software installation suggestions 143 Clear jams ...144 Clear paper jams ...144 Avoid paper jams ...146 A HP supplies and accessories Order printing supplies online 147 Supplies ...147 HP media ...147 B Support and ...

User Guide
Page 10
... (Japan 152 Call HP Korea customer support 152 Prepare the device for shipment 153 Remove the ink cartridges before shipment 153 Pack the device ...154 C Device specifications Physical specifications ...156 Product features and capacities 156 Processor and memory specifications 156 System requirements ...157 Print specifications ...158 Copy specifications ...158 Fax specifications ...158 Scan...
... (Japan 152 Call HP Korea customer support 152 Prepare the device for shipment 153 Remove the ink cartridges before shipment 153 Pack the device ...154 C Device specifications Physical specifications ...156 Product features and capacities 156 Processor and memory specifications 156 System requirements ...157 Print specifications ...158 Copy specifications ...158 Fax specifications ...158 Scan...
User Guide
Page 11
Included on the Starter CD. For more information, see Toolbox (Windows). A printed version of pages printed from the following resources: Resource Description Location Setup poster Provides illustrated setup information. For more information, see HP Printer Utility (Mac OS). HP Printer Utility (Mac OS) Contains tools to maintenance services. Device control panel Provides status, error, and...
Included on the Starter CD. For more information, see Toolbox (Windows). A printed version of pages printed from the following resources: Resource Description Location Setup poster Provides illustrated setup information. For more information, see HP Printer Utility (Mac OS). HP Printer Utility (Mac OS) Contains tools to maintenance services. Device control panel Provides status, error, and...
User Guide
Page 12
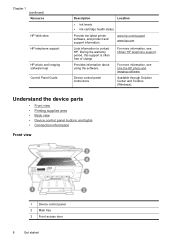
... support. Device control panel instructions Available through Solution Center and Toolbox (Windows). For more information, see Use the HP photo and imaging software. Understand the device parts • Front view • Printing supplies area • Back view • Device control panel buttons and lights • Connection information Front view 1 Device control panel...
... support. Device control panel instructions Available through Solution Center and Toolbox (Windows). For more information, see Use the HP photo and imaging software. Understand the device parts • Front view • Printing supplies area • Back view • Device control panel buttons and lights • Connection information Front view 1 Device control panel...
User Guide
Page 13
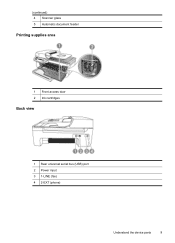
(continued) 4 Scanner glass 5 Automatic document feeder Printing supplies area 1 Front access door 2 Ink cartridges Back view 1 Rear universal serial bus (USB) port 2 Power input 3 1-LINE (fax) 4 2-EXT (phone) Understand the device parts 9
(continued) 4 Scanner glass 5 Automatic document feeder Printing supplies area 1 Front access door 2 Ink cartridges Back view 1 Rear universal serial bus (USB) port 2 Power input 3 1-LINE (fax) 4 2-EXT (phone) Understand the device parts 9
User Guide
Page 15
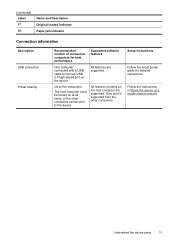
... instructions in Share the device on at all times, or the other computers. Only print is supported from the other computers cannot print to five computers. Setup instructions Follow the setup poster guide for best performance Supported software features One computer connected with a USB cable to the rear USB 2.0 high-speed port on...
... instructions in Share the device on at all times, or the other computers. Only print is supported from the other computers cannot print to five computers. Setup instructions Follow the setup poster guide for best performance Supported software features One computer connected with a USB cable to the rear USB 2.0 high-speed port on...


