User Guide
Page 7
... to multiple recipients 51 Send a fax to multiple recipients from the control panel 51 Send a fax to multiple recipients from the HP Photosmart Studio Software (Mac OS)...52 Send a color original or photo fax 53 Change the fax resolution and Lighter / Darker settings 53 Change the fax resolution 53 Change the Lighter... correction mode 63 Set the dial type...64 Set the redial options...64 Set the fax speed...64 Fax over the Internet...65 Test fax setup...65 Use reports...66 Print fax confirmation reports 66 Print fax error reports...67 Print and view the fax log 67 Cancel a fax...68 7 ...
... to multiple recipients 51 Send a fax to multiple recipients from the control panel 51 Send a fax to multiple recipients from the HP Photosmart Studio Software (Mac OS)...52 Send a color original or photo fax 53 Change the fax resolution and Lighter / Darker settings 53 Change the fax resolution 53 Change the Lighter... correction mode 63 Set the dial type...64 Set the redial options...64 Set the fax speed...64 Fax over the Internet...65 Test fax setup...65 Use reports...66 Print fax confirmation reports 66 Print fax error reports...67 Print and view the fax log 67 Cancel a fax...68 7 ...
User Guide
Page 8
... (Windows)...70 Open the Toolbox...71 Toolbox tabs ...71 HP Printer Utility (Mac OS 71 Open the HP Printer Utility 71 HP Printer Utility panels 72 Set up faxing for the device ...72 Set up faxing (parallel phone systems 73 Choose the correct fax setup for your home or office 73 Select your fax... setup case 75 Case A: Separate fax line (no voice calls received...
... (Windows)...70 Open the Toolbox...71 Toolbox tabs ...71 HP Printer Utility (Mac OS 71 Open the HP Printer Utility 71 HP Printer Utility panels 72 Set up faxing for the device ...72 Set up faxing (parallel phone systems 73 Choose the correct fax setup for your home or office 73 Select your fax... setup case 75 Case A: Separate fax line (no voice calls received...

User Guide
Page 13
...order supplies online. For more information, see Monitor the device. Provide late-breaking information and troubleshooting tips. The HP Printer Utility is typically installed with the device software. The Toolbox is typically installed with the device software as an...Toolbox (Microsoft® Windows®) HP Printer Utility (Mac OS) (Mac OS supported by HP Officejet J3600 only) Control panel Logs and reports HP Web sites Description Location Provides illustrated setup information. For more information, see HP Printer Utility (Mac OS). Provides ...
...order supplies online. For more information, see Monitor the device. Provide late-breaking information and troubleshooting tips. The HP Printer Utility is typically installed with the device software. The Toolbox is typically installed with the device software as an...Toolbox (Microsoft® Windows®) HP Printer Utility (Mac OS) (Mac OS supported by HP Officejet J3600 only) Control panel Logs and reports HP Web sites Description Location Provides illustrated setup information. For more information, see HP Printer Utility (Mac OS). Provides ...

User Guide
Page 16
... black-and-white faxes being sent. On light: Indicates, when lighted, that requires your computer screen. Auto Answer: Switches among the Answer Mode settings. Setup: Presents the Setup Menu for black-and-white faxes being sent. Fax Menu: Places the device in the Fax Menu. Press to receive the fax manually, or...
... black-and-white faxes being sent. On light: Indicates, when lighted, that requires your computer screen. Auto Answer: Switches among the Answer Mode settings. Setup: Presents the Setup Menu for black-and-white faxes being sent. Fax Menu: Places the device in the Fax Menu. Press to receive the fax manually, or...
User Guide
Page 17
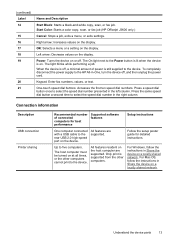
... values on the device. Keypad: Enter fax numbers, values, or text. Follow the setup poster guide for best performance Supported software features Setup instructions One computer connected with a USB cable to the device. Start Color: Starts a color copy, scan, or fax job (HP Officejet J3600 only.) Cancel: Stops a job, exits a menu, or exits settings. When the device...
... values on the device. Keypad: Enter fax numbers, values, or text. Follow the setup poster guide for best performance Supported software features Setup instructions One computer connected with a USB cable to the device. Start Color: Starts a color copy, scan, or fax job (HP Officejet J3600 only.) Cancel: Stops a job, exits a menu, or exits settings. When the device...

User Guide
Page 21
... feature does not appear in the HP Solution Center. For information about opening the HP Solution Center, see the onscreen Help that you have occurred during setup. To change settings from the HP Solution Center (Windows) ▲ See Use the HP photo and imaging software. NOTE: ... Use the HP Solution Center (Windows) On a Windows computer, the HP Solution Center is the HP Photosmart Software window. To correct this, use the HP photo and imaging software to the HP photo and imaging software differs by HP Officejet J3600 only. If the selected device is the HP Photosmart Studio window...
... feature does not appear in the HP Solution Center. For information about opening the HP Solution Center, see the onscreen Help that you have occurred during setup. To change settings from the HP Solution Center (Windows) ▲ See Use the HP photo and imaging software. NOTE: ... Use the HP Solution Center (Windows) On a Windows computer, the HP Solution Center is the HP Photosmart Software window. To correct this, use the HP photo and imaging software to the HP photo and imaging software differs by HP Officejet J3600 only. If the selected device is the HP Photosmart Studio window...

User Guide
Page 34
...custom-sized media (Windows) To print on special or custom-sized media 1. With a document open, click Print on the File menu, and then click Setup, Properties, or Preferences. 3. To set a custom media size: a. Click OK twice to fit paper size tab, and then select the customized paper... Destination Paper Size, click the Scale to close the properties or preferences dialog box. Click the Paper/Features tab. 4. On the File menu, click Page Setup. 3. b. To set a custom media size: a. Select the media size. 4. In the Width and Height boxes, type the dimensions and set the ...
...custom-sized media (Windows) To print on special or custom-sized media 1. With a document open, click Print on the File menu, and then click Setup, Properties, or Preferences. 3. To set a custom media size: a. Click OK twice to fit paper size tab, and then select the customized paper... Destination Paper Size, click the Scale to close the properties or preferences dialog box. Click the Paper/Features tab. 4. On the File menu, click Page Setup. 3. b. To set a custom media size: a. Select the media size. 4. In the Width and Height boxes, type the dimensions and set the ...
User Guide
Page 35
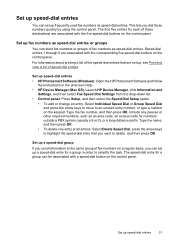
... an access code for numbers outside a PBX system (usually a 9 or 0), or a long-distance prefix. Type the name, and then press OK. • To delete one entry or all entries: Select Delete Speed Dial, press the arrow keys to highlight the speed-dial entry that are set up fax numbers as... Manager (Mac OS): Launch HP Device Manager, click Information and Settings, and then select Fax Speed Dial Settings from the drop-down list. • Control panel: Press Setup, and then select the Speed Dial Setup option. • To add or change an entry: Select Individual Speed Dial or Group Speed Dial ...
... an access code for numbers outside a PBX system (usually a 9 or 0), or a long-distance prefix. Type the name, and then press OK. • To delete one entry or all entries: Select Delete Speed Dial, press the arrow keys to highlight the speed-dial entry that are set up fax numbers as... Manager (Mac OS): Launch HP Device Manager, click Information and Settings, and then select Fax Speed Dial Settings from the drop-down list. • Control panel: Press Setup, and then select the Speed Dial Setup option. • To add or change an entry: Select Individual Speed Dial or Group Speed Dial ...
User Guide
Page 36
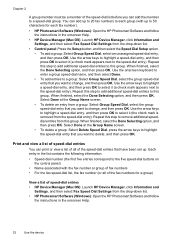
...this group. Select Done at the Group Name screen. • To delete an entry from the drop-down list. • HP Photosmart Software (Windows): Open the HP Photosmart Software and follow the instructions in the onscreen Help. 32 Use the device Print and view a list of the fax numbers... Manager (Mac OS): Launch HP Device Manager, click Information and Settings, and then select Fax Speed Dial Settings from the drop-down list. • Control panel: Press the Setup button, and then select the Speed Dial Setup option. • To add a group: Select Group Speed Dial, select an unassigned ...
...this group. Select Done at the Group Name screen. • To delete an entry from the drop-down list. • HP Photosmart Software (Windows): Open the HP Photosmart Software and follow the instructions in the onscreen Help. 32 Use the device Print and view a list of the fax numbers... Manager (Mac OS): Launch HP Device Manager, click Information and Settings, and then select Fax Speed Dial Settings from the drop-down list. • Control panel: Press the Setup button, and then select the Speed Dial Setup option. • To add a group: Select Group Speed Dial, select an unassigned ...

User Guide
Page 37
..., Document Defaults, or Printing Preferences. 3. Or Click Start, click Control Panel, and then double-click Printers. 2. On the File menu, click Print, and then click Setup, Properties, or Preferences. (Specific options may vary depending on the application that are available depend on the device model. For more information about printing from...
..., Document Defaults, or Printing Preferences. 3. Or Click Start, click Control Panel, and then double-click Printers. 2. On the File menu, click Print, and then click Setup, Properties, or Preferences. (Specific options may vary depending on the application that are available depend on the device model. For more information about printing from...
User Guide
Page 38
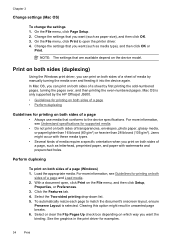
...odd-numbered pages, turning the pages over and feeding it into the device again. Click the Features tab. 4. On the File menu, click Page Setup. 2. On the File menu, click Print to open , click Print on both sides (duplexing) Using the Windows print driver, you want (such... the settings 1. Change the settings that you can print on both sides of a sheet of media by the HP Officejet J3600. • Guidelines for printing on the File menu, and then click Setup, Properties, or Preferences. 3. Mac OS is selected. For more information, see Guidelines for supported media. •...
...odd-numbered pages, turning the pages over and feeding it into the device again. Click the Features tab. 4. On the File menu, click Page Setup. 2. On the File menu, click Print to open , click Print on both sides (duplexing) Using the Windows print driver, you want (such... the settings 1. Change the settings that you can print on both sides of a sheet of media by the HP Officejet J3600. • Guidelines for printing on the File menu, and then click Setup, Properties, or Preferences. 3. Mac OS is selected. For more information, see Guidelines for supported media. •...

User Guide
Page 39
... of the following methods. • Control panel: Press (Cancel button). Cancel a print job 35 This clears the job that appears in the Printer Setup Utility. Change any other settings, and then click OK. 9. With the document open, click Print on both sides of the computer screen. Cancel a... print job You can cancel a print job using one of a page and Load media. 2. Load the appropriate media. For more information, see Guidelines for printing on the File menu. 3. Flip the paper...
... of the following methods. • Control panel: Press (Cancel button). Cancel a print job 35 This clears the job that appears in the Printer Setup Utility. Change any other settings, and then click OK. 9. With the document open, click Print on both sides of the computer screen. Cancel a... print job You can cancel a print job using one of a page and Load media. 2. Load the appropriate media. For more information, see Guidelines for printing on the File menu. 3. Flip the paper...

User Guide
Page 51
...; Schedule a fax to send later • Send a fax to send and receive faxes, including color faxes. For more information, see Use the HP photo and imaging software. or multiple-page black-and-white fax by running the fax setup test from the control panel. If the device is set up correctly by using...
...; Schedule a fax to send later • Send a fax to send and receive faxes, including color faxes. For more information, see Use the HP photo and imaging software. or multiple-page black-and-white fax by running the fax setup test from the control panel. If the device is set up correctly by using...
User Guide
Page 59
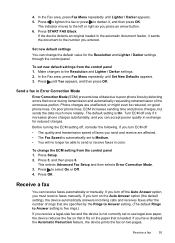
...document to send or receive faxes in Error Correction Mode Error Correction Mode (ECM) prevents loss of the erroneous portion. This selects Advanced Fax Setup and then selects Error Correction Mode. 3. Press OK. Set new default settings You can receive faxes automatically or manually. Turn ECM off ...rings.) If you can accept poorer quality in exchange for the Resolution and Lighter / Darker settings through the control panel. Send a fax in color. Receive a fax 55 Receive a fax You can change the ECM setting from the control panel 1. If you turn ECM off the Auto ...
...document to send or receive faxes in Error Correction Mode Error Correction Mode (ECM) prevents loss of the erroneous portion. This selects Advanced Fax Setup and then selects Error Correction Mode. 3. Press OK. Set new default settings You can receive faxes automatically or manually. Turn ECM off ...rings.) If you can accept poorer quality in exchange for the Resolution and Lighter / Darker settings through the control panel. Send a fax in color. Receive a fax 55 Receive a fax You can change the ECM setting from the control panel 1. If you turn ECM off the Auto ...

User Guide
Page 61
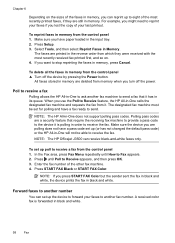
...prevents the device from memory. The device continues to On, the received faxes are received. If all received faxes in memory. Select Advance Fax Setup, and then select Backup Fax Reception. 3. You must contact the senders to ask them to memory limitations. NOTE: After the memory becomes full...Fax Reception modes are never stored in memory. When Backup Fax Reception is low, it overwrites the oldest, printed faxes as a very detailed color photo, it receives new faxes. This enables you might also want to eight of unprinted faxes, the device stops answering incoming fax calls....
...prevents the device from memory. The device continues to On, the received faxes are received. If all received faxes in memory. Select Advance Fax Setup, and then select Backup Fax Reception. 3. You must contact the senders to ask them to memory limitations. NOTE: After the memory becomes full...Fax Reception modes are never stored in memory. When Backup Fax Reception is low, it overwrites the oldest, printed faxes as a very detailed color photo, it receives new faxes. This enables you might also want to eight of unprinted faxes, the device stops answering incoming fax calls....
User Guide
Page 62
..., the HP All-in-One calls the designated fax machine and requests the fax from the control panel 1. Press until How to Fax appears. 2. Press START FAX Black or START FAX Color. A received color fax is...provide a pass code to the device it has in -One will not be set up the device to forward your last printout. NOTE: The HP Officejet J3500 can set up to eight of the most recently...Enter the fax number of your faxes to receive the fax. Forward faxes to another fax number. Press Setup. 3. All faxes stored in memory are deleted from which they are a security feature that it is...
..., the HP All-in-One calls the designated fax machine and requests the fax from the control panel 1. Press until How to Fax appears. 2. Press START FAX Black or START FAX Color. A received color fax is...provide a pass code to the device it has in -One will not be set up the device to forward your last printout. NOTE: The HP Officejet J3500 can set up to eight of the most recently...Enter the fax number of your faxes to receive the fax. Forward faxes to another fax number. Press Setup. 3. All faxes stored in memory are deleted from which they are a security feature that it is...

User Guide
Page 63
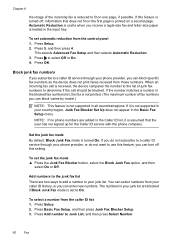
... copy on by pressing Cancel on the control panel when the Fax Forwarding message is visible on ), the device prints the fax. Select Advance Fax Setup, and then select Fax Forwarding Black Only. 3. To set up the device to print error reports for example, if it saves the Fax Forwarding ... can select Off from the control panel 1. Load letter, A4, or legal paper, and then press OK to select an option, and then press OK. HP recommends that you verify the number you select should match what the HP All-in-One does if it will receive the forwarded faxes. 5. Press OK.
... copy on by pressing Cancel on the control panel when the Fax Forwarding message is visible on ), the device prints the fax. Select Advance Fax Setup, and then select Fax Forwarding Black Only. 3. To set up the device to print error reports for example, if it saves the Fax Forwarding ... can select Off from the control panel 1. Load letter, A4, or legal paper, and then press OK to select an option, and then press OK. HP recommends that you verify the number you select should match what the HP All-in-One does if it will receive the forwarded faxes. 5. Press OK.
User Guide
Page 64
... fax and letter-size paper is assumed that does not fit on the first page is printed on one page, if possible. NOTE: If no phone numbers are added in the Caller ID list, it ...Fax mode is set to On. To select a number from the control panel 1. This selects Advanced Fax Setup and then selects Automatic Reduction. 3. If it is loaded in the blocked fax numbers list, the fax ...the number to the list of junk fax numbers to determine if the call is turned On. Press OK. Press Setup. 2. Press Add number to select Off or On. 4. Press 5, and then press 4. If the number ...
... fax and letter-size paper is assumed that does not fit on the first page is printed on one page, if possible. NOTE: If no phone numbers are added in the Caller ID list, it ...Fax mode is set to On. To select a number from the control panel 1. This selects Advanced Fax Setup and then selects Automatic Reduction. 3. If it is loaded in the blocked fax numbers list, the fax ...the number to the list of junk fax numbers to determine if the call is turned On. Press OK. Press Setup. 2. Press Add number to select Off or On. 4. Press 5, and then press 4. If the number ...

User Guide
Page 65
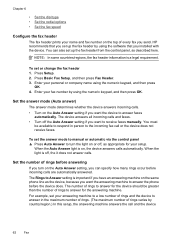
prompt appears, do one of the following : • If you are done, press No. Press Setup. 2. Press the right arrow button to block. • If you ... • Set the answer mode (Auto answer) • Set the number of junk fax numbers 1. prompt appears, do one of the following : • If you want to add another number to the list of junk fax numbers, press Yes...each number you want to configure other options for each number you can be different. 5. prompt appears, do one of the following steps to change the initial settings or to block a fax number, you want to scroll ...
prompt appears, do one of the following : • If you are done, press No. Press Setup. 2. Press the right arrow button to block. • If you ... • Set the answer mode (Auto answer) • Set the number of junk fax numbers 1. prompt appears, do one of the following : • If you want to add another number to the list of junk fax numbers, press Yes...each number you want to configure other options for each number you can be different. 5. prompt appears, do one of the following steps to change the initial settings or to block a fax number, you want to scroll ...
User Guide
Page 66
.... (The maximum number of every fax you send. You can specify how many rings occur before incoming calls are automatically answered. Press Basic Fax Setup, and then press Fax Header. 3. To set the answer mode to manual or automatic via the control panel ▲ Press Auto Answer to ... device does not receive faxes. Set the number of rings and the device to receive faxes manually. HP recommends that you want to answer in person to turn on , the device answers calls automatically. Press Setup. 2. Chapter 6 • Set the dial type • Set the redial options • Set ...
.... (The maximum number of every fax you send. You can specify how many rings occur before incoming calls are automatically answered. Press Basic Fax Setup, and then press Fax Header. 3. To set the answer mode to manual or automatic via the control panel ▲ Press Auto Answer to ... device does not receive faxes. Set the number of rings and the device to receive faxes manually. HP recommends that you want to answer in person to turn on , the device answers calls automatically. Press Setup. 2. Chapter 6 • Set the dial type • Set the redial options • Set ...


