
User Guide - v216 LCD Monitor
Page 9
If it does not display an image, see Technical Support FAQs and Using the Monitor. 9 4 Connect one end of the power cord to the back of the monitor and plug the other end into a grounded outlet. 5 Turn on your monitor displays an image, installation is complete. If your monitor and computer.
If it does not display an image, see Technical Support FAQs and Using the Monitor. 9 4 Connect one end of the power cord to the back of the monitor and plug the other end into a grounded outlet. 5 Turn on your monitor displays an image, installation is complete. If your monitor and computer.
User Guide - v216 LCD Monitor
Page 12
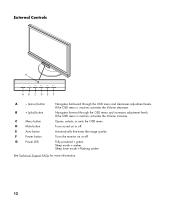
... sound on or off . Fully powered = green Sleep mode = amber Sleep timer mode = flashing amber See Technical Support FAQs for more information. 12 Turns the monitor on or off . Navigates forward through the OSD menu and decreases adjustment levels. External Controls G Menu Mute Auto Power A B C D E F A - (minus) button B + (plus) button C Menu button...
... sound on or off . Fully powered = green Sleep mode = amber Sleep timer mode = flashing amber See Technical Support FAQs for more information. 12 Turns the monitor on or off . Navigates forward through the OSD menu and decreases adjustment levels. External Controls G Menu Mute Auto Power A B C D E F A - (minus) button B + (plus) button C Menu button...
User Guide - v216 LCD Monitor
Page 14
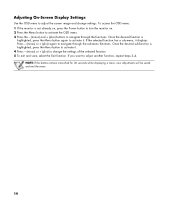
Press - (minus) or + (plus ) buttons to navigate through the functions. To access the OSD menu: 1 If the monitor is not already on, press the Power button to turn the monitor on. 2 Press the Menu button to activate the OSD menu. 3 Press the - (minus) and + (plus ) again to navigate through the sub-menu functions... has a sub-menu, it . Once the desired function is highlighted, press the Menu button to activate it. 4 Press - (minus) or + (plus) to adjust the screen image and change the settings of the selected function. 5 To exit and save, select the Exit function.
Press - (minus) or + (plus ) buttons to navigate through the functions. To access the OSD menu: 1 If the monitor is not already on, press the Power button to turn the monitor on. 2 Press the Menu button to activate the OSD menu. 3 Press the - (minus) and + (plus ) again to navigate through the sub-menu functions... has a sub-menu, it . Once the desired function is highlighted, press the Menu button to activate it. 4 Press - (minus) or + (plus) to adjust the screen image and change the settings of the selected function. 5 To exit and save, select the Exit function.

User Guide - v216 LCD Monitor
Page 15
... level. OSD Menu Levels Level 1 Level 2 Brightness Adjustment Scale Reset Contrast Volume Cancel Save and Return Adjustment Scale Reset Cancel Save and Return Adjustment Scale Image Control Auto Adjustment Horizontal Position Vertical Position Custom Scaling Color Clock Clock Phase Cancel Save and Return 9300 K 6500 K Custom Color sRGB Reset Cancel Save...
... level. OSD Menu Levels Level 1 Level 2 Brightness Adjustment Scale Reset Contrast Volume Cancel Save and Return Adjustment Scale Reset Cancel Save and Return Adjustment Scale Image Control Auto Adjustment Horizontal Position Vertical Position Custom Scaling Color Clock Clock Phase Cancel Save and Return 9300 K 6500 K Custom Color sRGB Reset Cancel Save...
User Guide - v216 LCD Monitor
Page 17
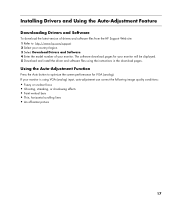
...Feature Downloading Drivers and Software To download the latest version of drivers and software files from the HP Support Web site: 1 Refer to optimize the screen performance for your monitor will be displayed. 5 Download and install the driver and software files using VGA (analog) ...input, auto-adjustment can correct the following image quality conditions: • Fuzzy or unclear focus • Ghosting, streaking, or shadowing ...
...Feature Downloading Drivers and Software To download the latest version of drivers and software files from the HP Support Web site: 1 Refer to optimize the screen performance for your monitor will be displayed. 5 Download and install the driver and software files using VGA (analog) ...input, auto-adjustment can correct the following image quality conditions: • Fuzzy or unclear focus • Ghosting, streaking, or shadowing ...

User Guide - v216 LCD Monitor
Page 19
... image is properly connected to the Web site for the graphics card. Unable to set the monitor to the optimal resolution. • Make sure that the graphics card supports the optimal resolution (1680 x 1050). • Make sure that none of the primary colors (red, green, or blue). For HP ...card. 19 Picture has color defects (white does not look white). • Inspect the monitor's video cable and make sure that the latest supported driver is installed for your system from: http://www.hp.com/support For other systems, refer to the computer. • Adjust horizontal and vertical...
... image is properly connected to the Web site for the graphics card. Unable to set the monitor to the optimal resolution. • Make sure that the graphics card supports the optimal resolution (1680 x 1050). • Make sure that none of the primary colors (red, green, or blue). For HP ...card. 19 Picture has color defects (white does not look white). • Inspect the monitor's video cable and make sure that the latest supported driver is installed for your system from: http://www.hp.com/support For other systems, refer to the computer. • Adjust horizontal and vertical...
User Guide - v216 LCD Monitor
Page 20
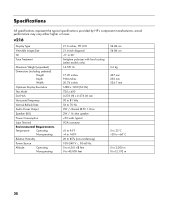
...Image Size Tilt Face Treatment Maximum Weight (unpacked) Dimensions (including pedestal) Height Depth Width Optimum Display Resolution Text Mode Dot Pitch Horizontal Frequency Vertical Refresh Rate Audio Power Output Speaker (R/L) Power Consumption Input Terminal Environmental Requirements Temperature: Operating Non-operating Relative Humidity Power Source Altitude: Operating Non-operating 21.6 inches, TFT LCD 21... performance may vary either higher or lower. Specifications All specifications represent the typical specifications provided by HP's component manufacturers;
...Image Size Tilt Face Treatment Maximum Weight (unpacked) Dimensions (including pedestal) Height Depth Width Optimum Display Resolution Text Mode Dot Pitch Horizontal Frequency Vertical Refresh Rate Audio Power Output Speaker (R/L) Power Consumption Input Terminal Environmental Requirements Temperature: Operating Non-operating Relative Humidity Power Source Altitude: Operating Non-operating 21.6 inches, TFT LCD 21... performance may vary either higher or lower. Specifications All specifications represent the typical specifications provided by HP's component manufacturers;
User's Guide - HP f2105 LCD Monitor
Page 6
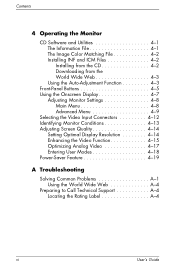
... File 4-1 The Image Color Matching File 4-2 Installing INF and ICM Files 4-2 Installing from the CD 4-2 Downloading from the World Wide Web 4-3 Using the Auto-Adjustment Function 4-3 Front-Panel Buttons 4-5 Using the Onscreen Display 4-7 Adjusting Monitor Settings 4-8 Main ...Menu 4-8 Advanced Menu 4-9 Selecting the Video Input Connectors 4-12 Identifying Monitor Conditions 4-13 Adjusting Screen Quality 4-14 Setting Optimal Display Resolution 4-14 Enhancing...
... File 4-1 The Image Color Matching File 4-2 Installing INF and ICM Files 4-2 Installing from the CD 4-2 Downloading from the World Wide Web 4-3 Using the Auto-Adjustment Function 4-3 Front-Panel Buttons 4-5 Using the Onscreen Display 4-7 Adjusting Monitor Settings 4-8 Main ...Menu 4-8 Advanced Menu 4-9 Selecting the Video Input Connectors 4-12 Identifying Monitor Conditions 4-13 Adjusting Screen Quality 4-14 Setting Optimal Display Resolution 4-14 Enhancing...

User's Guide - HP f2105 LCD Monitor
Page 11
Product Features ■ Compliance with the following regulated specifications: ❏ European Union CE directives. ❏ Swedish MPR II 1990. ❏ TCO environmental requirements. ■ This CD includes: ❏ f2105 User Guide. ❏ An Information (INF) file. ❏ Image Color Matching (ICM) file. ❏ Auto-adjustment pattern software. ❏ Safety information. ❏ TCO environmental requirements. ❏ Adobe Acrobat Reader. User's Guide 1-3
Product Features ■ Compliance with the following regulated specifications: ❏ European Union CE directives. ❏ Swedish MPR II 1990. ❏ TCO environmental requirements. ■ This CD includes: ❏ f2105 User Guide. ❏ An Information (INF) file. ❏ Image Color Matching (ICM) file. ❏ Auto-adjustment pattern software. ❏ Safety information. ❏ TCO environmental requirements. ❏ Adobe Acrobat Reader. User's Guide 1-3
User's Guide - HP f2105 LCD Monitor
Page 38
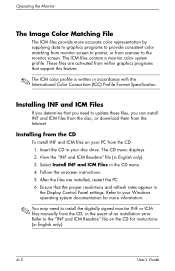
...on the CD for more accurate color representation by supplying data to graphics programs to provide consistent color matching from monitor screen to printer, or from scanner to the monitor screen. Refer to your Windows operating system documentation for instructions (in your PC from the CD: 1. These...written in the event of an installation error. View the "INF and ICM Readme" file (in the CD menu. 4. Operating the Monitor The Image Color Matching File The ICM files provide more information. ✎ You may need to update these files, you determine that the proper ...
...on the CD for more accurate color representation by supplying data to graphics programs to provide consistent color matching from monitor screen to printer, or from scanner to the monitor screen. Refer to your Windows operating system documentation for instructions (in your PC from the CD: 1. These...written in the event of an installation error. View the "INF and ICM Readme" file (in the CD menu. 4. Operating the Monitor The Image Color Matching File The ICM files provide more information. ✎ You may need to update these files, you determine that the proper ...
User's Guide - HP f2105 LCD Monitor
Page 39
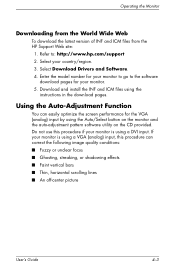
... World Wide Web To download the latest version of INF and ICM files from the HP Support Web site: 1. Select your monitor. 5. Select Download Drivers and Software. 4. Using the Auto-Adjustment Function You can correct the following image quality conditions: ■ Fuzzy or unclear focus ■ Ghosting, streaking, or shadowing ... the auto-adjustment pattern software utility on the CD provided. Enter the model number for your monitor to go to : http://www.hp.com/support 2. Refer to the software download pages for the VGA (analog) input by using a VGA (analog) input, this procedure can ...
... World Wide Web To download the latest version of INF and ICM files from the HP Support Web site: 1. Select your monitor. 5. Select Download Drivers and Software. 4. Using the Auto-Adjustment Function You can correct the following image quality conditions: ■ Fuzzy or unclear focus ■ Ghosting, streaking, or shadowing ... the auto-adjustment pattern software utility on the CD provided. Enter the model number for your monitor to go to : http://www.hp.com/support 2. Refer to the software download pages for the VGA (analog) input by using a VGA (analog) input, this procedure can ...
User's Guide - HP f2105 LCD Monitor
Page 40
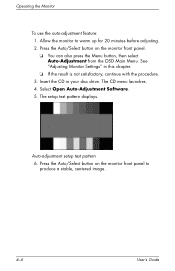
... in your disc drive. Select Open Auto-Adjustment Software. 5. Auto-adjustment setup test pattern 6. Allow the monitor to produce a stable, centered image. 4-4 User's Guide Press the Auto/Select button on the monitor front panel to warm up for 20 minutes before adjusting. 2. The setup test pattern displays. The CD menu... in this chapter. ❏ If the result is not satisfactory, continue with the procedure. 3. Press the Auto/Select button on the monitor front panel. ❏ You can also press the Menu button, then select Auto-Adjustment from the OSD Main Menu. Operating the...
... in your disc drive. Select Open Auto-Adjustment Software. 5. Auto-adjustment setup test pattern 6. Allow the monitor to produce a stable, centered image. 4-4 User's Guide Press the Auto/Select button on the monitor front panel to warm up for 20 minutes before adjusting. 2. The setup test pattern displays. The CD menu... in this chapter. ❏ If the result is not satisfactory, continue with the procedure. 3. Press the Auto/Select button on the monitor front panel. ❏ You can also press the Menu button, then select Auto-Adjustment from the OSD Main Menu. Operating the...

User's Guide - HP f2105 LCD Monitor
Page 45
... Scale Contrast Adjustment Scale Image Control Factory Preset Auto Adjustment (VGA analog only) Horizontal Position Adjustment Scale Vertical Position Adjustment Scale Custom Scaling Fill to Screen Fill to Aspect Ratio One to three levels and can be viewed in one of the monitor until the Main Menu...levels, and factory presets. The Advanced Menu has up to One Sharpness Adjustment Scale (non-native modes) User's Guide 4-9 Operating the Monitor Advanced Menu To access the Advanced Menu, press the Menu button again (twice), or select Advanced Menu from the Main Menu, the Advanced...
... Scale Contrast Adjustment Scale Image Control Factory Preset Auto Adjustment (VGA analog only) Horizontal Position Adjustment Scale Vertical Position Adjustment Scale Custom Scaling Fill to Screen Fill to Aspect Ratio One to three levels and can be viewed in one of the monitor until the Main Menu...levels, and factory presets. The Advanced Menu has up to One Sharpness Adjustment Scale (non-native modes) User's Guide 4-9 Operating the Monitor Advanced Menu To access the Advanced Menu, press the Menu button again (twice), or select Advanced Menu from the Main Menu, the Advanced...
User's Guide - HP f2105 LCD Monitor
Page 48
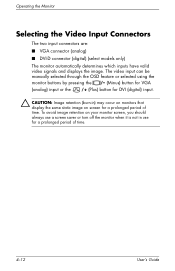
...) input or the /+ (Plus) button for a prolonged period of time. c CAUTION: Image retention (burn-in use a screen saver or turn off the monitor when it is not in ) may occur on monitors that display the same static image on screen for a prolonged period of time. 4-12 User's Guide Operating the... Monitor Selecting the Video Input Connectors The two input connectors are: ■ VGA ...
...) input or the /+ (Plus) button for a prolonged period of time. c CAUTION: Image retention (burn-in use a screen saver or turn off the monitor when it is not in ) may occur on monitors that display the same static image on screen for a prolonged period of time. 4-12 User's Guide Operating the... Monitor Selecting the Video Input Connectors The two input connectors are: ■ VGA ...
User's Guide - HP f2105 LCD Monitor
Page 50
...on the CD. For optimal color, adjust the Color Quality to 1680 x 1050. Setting Optimal Display Resolution Your f2105 monitor looks best when using a display resolution of http://www.hp.com/support 4. Adjust the Screen resolution slider to its highest setting (usually 32-bit). 5. For more precise ...on an open portion of the VGA (analog) input, run the Auto-Adjustment software on the support pages of 1680 x 1050. If additional image quality improvement is not a selectable setting, download and install the latest updates for display size, position, clock, and phase each time a ...
...on the CD. For optimal color, adjust the Color Quality to 1680 x 1050. Setting Optimal Display Resolution Your f2105 monitor looks best when using a display resolution of http://www.hp.com/support 4. Adjust the Screen resolution slider to its highest setting (usually 32-bit). 5. For more precise ...on an open portion of the VGA (analog) input, run the Auto-Adjustment software on the support pages of 1680 x 1050. If additional image quality improvement is not a selectable setting, download and install the latest updates for display size, position, clock, and phase each time a ...

User's Guide - HP f2105 LCD Monitor
Page 51
...: 1. The Custom Scaling feature enhances video performance by adjusting the viewable image to Aspect Ratio display. Select Advanced Menu. 3. User's Guide 4-15 Operating the Monitor Enhancing the Video Function Wide-screen monitors like the HP f2105 have a tendency to stretch the picture when the monitor is set at Fill to scroll down and then select Custom...
...: 1. The Custom Scaling feature enhances video performance by adjusting the viewable image to Aspect Ratio display. Select Advanced Menu. 3. User's Guide 4-15 Operating the Monitor Enhancing the Video Function Wide-screen monitors like the HP f2105 have a tendency to stretch the picture when the monitor is set at Fill to scroll down and then select Custom...

User's Guide - HP f2105 LCD Monitor
Page 52
... display format: ❏ One to Screen - When custom scaling is set to One to fill the screen. Operating the Monitor 4. In the Custom Scaling menu, use the OSD up and down buttons on the resolution setting. The image is not stretched or altered, but it may appear at the edge of the...
... display format: ❏ One to Screen - When custom scaling is set to One to fill the screen. Operating the Monitor 4. In the Custom Scaling menu, use the OSD up and down buttons on the resolution setting. The image is not stretched or altered, but it may appear at the edge of the...

User's Guide - HP f2105 LCD Monitor
Page 53
... Some DVD wide-screen modes may remain visible above and below the displayed image when Fill to Aspect Ratio is highlighted, press the Menu button to fill the screen as much as a standard analog monitor. The OSD returns to close the Main menu. This display format adjusts ... modes, black borders appear on the screen background. To keep the new setting select Save, otherwise select Cancel. 6. Operating the Monitor ❏ Fill to improve analog image performance: ■ Clock - Increase or decrease the value to function as possible while maintaining the selected aspect ratio.
... Some DVD wide-screen modes may remain visible above and below the displayed image when Fill to Aspect Ratio is highlighted, press the Menu button to fill the screen as much as a standard analog monitor. The OSD returns to close the Main menu. This display format adjusts ... modes, black borders appear on the screen background. To keep the new setting select Save, otherwise select Cancel. 6. Operating the Monitor ❏ Fill to improve analog image performance: ■ Clock - Increase or decrease the value to function as possible while maintaining the selected aspect ratio.
User's Guide - HP f2105 LCD Monitor
Page 54
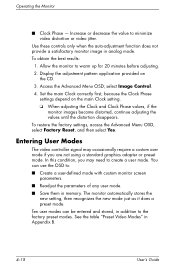
... stored, in Appendix B. 4-18 User's Guide Use these controls only when the auto-adjustment function does not provide a satisfactory monitor image in memory. Display the adjustment pattern application provided on the main Clock setting. ❏ When adjusting the Clock and Clock Phase values..., if the monitor images become distorted, continue adjusting the values until the distortion disappears. To obtain the best results: 1. select Image Control. 4. In this condition, you are not using a standard graphics adapter or...
... stored, in Appendix B. 4-18 User's Guide Use these controls only when the auto-adjustment function does not provide a satisfactory monitor image in memory. Display the adjustment pattern application provided on the main Clock setting. ❏ When adjusting the Clock and Clock Phase values..., if the monitor images become distorted, continue adjusting the values until the distortion disappears. To obtain the best results: 1. select Image Control. 4. In this condition, you are not using a standard graphics adapter or...
User's Guide - HP f2105 LCD Monitor
Page 57
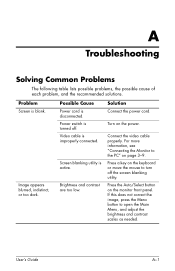
... power cord. Connect the video cable properly. Press a key on the monitor front panel. Press the Auto/Select button on the keyboard or move the mouse to turn off . Power switch is disconnected. If this does not correct the image, press the Menu button to the PC" on the power. Problem Screen...
... power cord. Connect the video cable properly. Press a key on the monitor front panel. Press the Auto/Select button on the keyboard or move the mouse to turn off . Power switch is disconnected. If this does not correct the image, press the Menu button to the PC" on the power. Problem Screen...
