User Guide - v216 LCD Monitor
Page 1
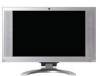
v216 LCD Monitor User's Guide
v216 LCD Monitor User's Guide
User Guide - v216 LCD Monitor
Page 2
... to change without the prior written consent of its proprietor and used by copyright. Bluetooth is protected by Hewlett-Packard Company under license. HP supports lawful use of technology and does not endorse or encourage the use or reliability of this document is not furnished by copyright law.... The only warranties for HP products and services are set forth in this document may be authorized by Macrovision, and is protected by Macrovision. Nothing herein should be...
... to change without the prior written consent of its proprietor and used by copyright. Bluetooth is protected by Hewlett-Packard Company under license. HP supports lawful use of technology and does not endorse or encourage the use or reliability of this document is not furnished by copyright law.... The only warranties for HP products and services are set forth in this document may be authorized by Macrovision, and is protected by Macrovision. Nothing herein should be...

User Guide - v216 LCD Monitor
Page 3
..., and warnings, and they are as follows: • Safety and Maintenance Guidelines • Setup • Using the Monitor • Installing Drivers and Using the Auto-Adjustment Feature • Technical Support FAQs • Specifications • LCD Monitor Quality and Pixel Policy • Agency Regulatory Notices Notational Conventions The following subsections describe notational conventions used... cases, the specific presentation of data, and tells you how to avoid the problem. WARNING: A WARNING indicates the potential for anyone who uses the v216 LCD Monitor.
..., and warnings, and they are as follows: • Safety and Maintenance Guidelines • Setup • Using the Monitor • Installing Drivers and Using the Auto-Adjustment Feature • Technical Support FAQs • Specifications • LCD Monitor Quality and Pixel Policy • Agency Regulatory Notices Notational Conventions The following subsections describe notational conventions used... cases, the specific presentation of data, and tells you how to avoid the problem. WARNING: A WARNING indicates the potential for anyone who uses the v216 LCD Monitor.
User Guide - v216 LCD Monitor
Page 4
... determine the ampere rating (Amps or A) for each device. 4 Look on or trip over them. For your safety, be specifically labeled as having this monitor. Do not place anything on a cord or cable. Use a power strip whose manufacturer offers a damage replacement policy so you plug the power cord into...you can accidentally step on the power label to the cord does not exceed the rating of electric shock or damage to the LCD screen; Safety and Maintenance Guidelines Important Safety Information The power cord is designed for your computer and its plug. CAUTION: To protect your...
... determine the ampere rating (Amps or A) for each device. 4 Look on or trip over them. For your safety, be specifically labeled as having this monitor. Do not place anything on a cord or cable. Use a power strip whose manufacturer offers a damage replacement policy so you plug the power cord into...you can accidentally step on the power label to the cord does not exceed the rating of electric shock or damage to the LCD screen; Safety and Maintenance Guidelines Important Safety Information The power cord is designed for your computer and its plug. CAUTION: To protect your...
User Guide - v216 LCD Monitor
Page 5
...; Turn your monitor off the computer and the monitor. 2 Unplug your monitor from getting scratched, defaced, or broken. To clean the monitor, follow these steps: 1 Turn off when not in the monitor. 6 Turn on the monitor and the computer. 5 Never use water to clean an LCD screen. 3 ... screen cleaner. 4 Dust the monitor housing. Disconnect the monitor by pulling the cord. • Do not allow anything to service this product yourself. Cleaning the Monitor The monitor is not operating properly or has been dropped or damaged, contact your HP authorized dealer, reseller, or service...
...; Turn your monitor off the computer and the monitor. 2 Unplug your monitor from getting scratched, defaced, or broken. To clean the monitor, follow these steps: 1 Turn off when not in the monitor. 6 Turn on the monitor and the computer. 5 Never use water to clean an LCD screen. 3 ... screen cleaner. 4 Dust the monitor housing. Disconnect the monitor by pulling the cord. • Do not allow anything to service this product yourself. Cleaning the Monitor The monitor is not operating properly or has been dropped or damaged, contact your HP authorized dealer, reseller, or service...

User Guide - v216 LCD Monitor
Page 6
CAUTION: To prevent damage, avoid applying pressure to lock in place before continuing with the setup procedure. Make sure that the base is securely locked in place. Setup Base and Tilt Attaching the Base 1 Set the base on a flat surface, such as a table top. 2 Using both hands, position the pedestal over the base and press down firmly to the panel front. 6
CAUTION: To prevent damage, avoid applying pressure to lock in place before continuing with the setup procedure. Make sure that the base is securely locked in place. Setup Base and Tilt Attaching the Base 1 Set the base on a flat surface, such as a table top. 2 Using both hands, position the pedestal over the base and press down firmly to the panel front. 6
User Guide - v216 LCD Monitor
Page 7
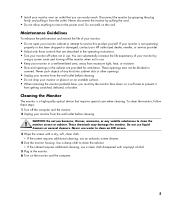
... to your own preference, as follows: 1 Face the front of the base to release the lock. 3 Remove the base from you do not touch the LCD screen while changing the tilt. 7 Removing the Base 1 Set the panel face-down on a flat, protected surface. 2 Squeeze the tabs in the bottom of ...the monitor and hold the stand so that you . CAUTION: To avoid breakage or other damage, do not topple the monitor while changing the tilt. 2 Adjust the tilt by moving the monitor's top edge toward or away from the pedestal. CAUTION: To prevent...
... to your own preference, as follows: 1 Face the front of the base to release the lock. 3 Remove the base from you do not touch the LCD screen while changing the tilt. 7 Removing the Base 1 Set the panel face-down on a flat, protected surface. 2 Squeeze the tabs in the bottom of ...the monitor and hold the stand so that you . CAUTION: To avoid breakage or other damage, do not topple the monitor while changing the tilt. 2 Adjust the tilt by moving the monitor's top edge toward or away from the pedestal. CAUTION: To prevent...
User Guide - v216 LCD Monitor
Page 8
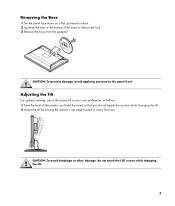
Cables Attaching the Cables 1 Turn off your computer. 2 Connect the built-in monitor speakers to the computer, using the audio cable (green connector). 3 If you are attaching a VGA cable, connect one end of the 15-pin D-Sub VGA cable (blue connector) to the back of the monitor and connect the other end to the computer VGA port. 8
Cables Attaching the Cables 1 Turn off your computer. 2 Connect the built-in monitor speakers to the computer, using the audio cable (green connector). 3 If you are attaching a VGA cable, connect one end of the 15-pin D-Sub VGA cable (blue connector) to the back of the monitor and connect the other end to the computer VGA port. 8

User Guide - v216 LCD Monitor
Page 9
4 Connect one end of the power cord to the back of the monitor and plug the other end into a grounded outlet. 5 Turn on your monitor displays an image, installation is complete. If it does not display an image, see Technical Support FAQs and Using the Monitor. 9 If your monitor and computer.
4 Connect one end of the power cord to the back of the monitor and plug the other end into a grounded outlet. 5 Turn on your monitor displays an image, installation is complete. If it does not display an image, see Technical Support FAQs and Using the Monitor. 9 If your monitor and computer.
User Guide - v216 LCD Monitor
Page 10
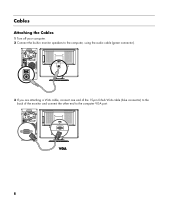
... the panel face-down on a flat, soft, protected surface. 2 Place the wall mounting arm onto the back of the monitor. Line up the holes of the arm with the wall mounting arm (purchased separately) for instructions on attaching it to assemble the wall mounting... arm. Installing a Wall Mounting Arm 1 Set the monitor screen down on a protected surface, remove the screws and the pedestal/base attachment. 3 Follow the manufacturer's instructions to the wall. 10 Wall Mounting Arm...
... the panel face-down on a flat, soft, protected surface. 2 Place the wall mounting arm onto the back of the monitor. Line up the holes of the arm with the wall mounting arm (purchased separately) for instructions on attaching it to assemble the wall mounting... arm. Installing a Wall Mounting Arm 1 Set the monitor screen down on a protected surface, remove the screws and the pedestal/base attachment. 3 Follow the manufacturer's instructions to the wall. 10 Wall Mounting Arm...
User Guide - v216 LCD Monitor
Page 11
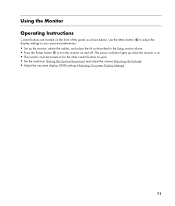
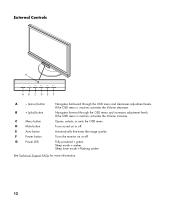
The power indicator lights up the monitor, attach the cables, and adjust the tilt as shown below. Using the Monitor Operating Instructions Control buttons are located on for the other control buttons to turn the monitor on and off. Use the Menu button (C) to adjust the display settings to your personal ...preferences: • Set up when the monitor is on. • The monitor must be turned on the front of the panel, as described in the Setup section above. • Press the Power button (F) to work....
The power indicator lights up the monitor, attach the cables, and adjust the tilt as shown below. Using the Monitor Operating Instructions Control buttons are located on for the other control buttons to turn the monitor on and off. Use the Menu button (C) to adjust the display settings to your personal ...preferences: • Set up when the monitor is on. • The monitor must be turned on the front of the panel, as described in the Setup section above. • Press the Power button (F) to work....
User Guide - v216 LCD Monitor
Page 12
If the OSD menu is inactive, activates the Volume decrease. Turns the monitor on or off . Opens, selects, or exits the OSD menu. Fully powered = green Sleep mode = amber Sleep timer mode = flashing amber See Technical Support FAQs ...
If the OSD menu is inactive, activates the Volume decrease. Turns the monitor on or off . Opens, selects, or exits the OSD menu. Fully powered = green Sleep mode = amber Sleep timer mode = flashing amber See Technical Support FAQs ...

User Guide - v216 LCD Monitor
Page 13
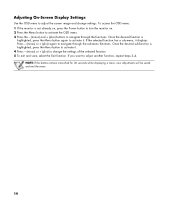
... increase and decrease (plus and minus) buttons to adjust volume to the computer. Settings Setting the Optimal Resolution The recommended resolution for instructions. Turn the monitor on -screen display (from locked to unlocked, or from 0 (mute) to 1680 x 1050. NOTE: If 1680 x 1050 is 50. The preset value is not shown... from the Web. If the OSD is locked, the message "OSD Lock" displays for 10 seconds while the monitor is 1680 x 1050. Volume can range from unlocked to locked) press and hold the Menu button for 10 seconds. 13 Locking and Unlocking the OSD ...
... increase and decrease (plus and minus) buttons to adjust volume to the computer. Settings Setting the Optimal Resolution The recommended resolution for instructions. Turn the monitor on -screen display (from locked to unlocked, or from 0 (mute) to 1680 x 1050. NOTE: If 1680 x 1050 is 50. The preset value is not shown... from the Web. If the OSD is locked, the message "OSD Lock" displays for 10 seconds while the monitor is 1680 x 1050. Volume can range from unlocked to locked) press and hold the Menu button for 10 seconds. 13 Locking and Unlocking the OSD ...
User Guide - v216 LCD Monitor
Page 14
... untouched for 30 seconds while displaying a menu, new adjustments will be saved and exit the menu. 14 To access the OSD menu: 1 If the monitor is highlighted, press the Menu button to activate it displays. Once the desired sub-function is not already on, press the Power button to turn... the monitor on. 2 Press the Menu button to activate the OSD menu. 3 Press the - (minus) and + (plus ) to change settings. If the selected function has a sub-...
... untouched for 30 seconds while displaying a menu, new adjustments will be saved and exit the menu. 14 To access the OSD menu: 1 If the monitor is highlighted, press the Menu button to activate it displays. Once the desired sub-function is not already on, press the Power button to turn... the monitor on. 2 Press the Menu button to activate the OSD menu. 3 Press the - (minus) and + (plus ) to change settings. If the selected function has a sub-...

User Guide - v216 LCD Monitor
Page 15
OSD Menu Levels Level 1 Level 2 Brightness Adjustment Scale Reset Contrast Volume Cancel Save and Return Adjustment Scale Reset Cancel Save and Return Adjustment Scale Image Control Auto Adjustment Horizontal Position Vertical Position Custom Scaling Color Clock Clock Phase Cancel Save and Return 9300 K 6500 K Custom Color sRGB Reset Cancel Save and Return Level 3 "Adjusting" Message Adjustment Scale Adjustment Scale Fill to Screen Fill to Aspect Ratio Adjustment Scale Adjustment Scale Custom Color Adjustment Reset Cancel Save and Return Factory Preset Y Y Y Y Y Y Y Y Y 15 ...
OSD Menu Levels Level 1 Level 2 Brightness Adjustment Scale Reset Contrast Volume Cancel Save and Return Adjustment Scale Reset Cancel Save and Return Adjustment Scale Image Control Auto Adjustment Horizontal Position Vertical Position Custom Scaling Color Clock Clock Phase Cancel Save and Return 9300 K 6500 K Custom Color sRGB Reset Cancel Save and Return Level 3 "Adjusting" Message Adjustment Scale Adjustment Scale Fill to Screen Fill to Aspect Ratio Adjustment Scale Adjustment Scale Custom Color Adjustment Reset Cancel Save and Return Factory Preset Y Y Y Y Y Y Y Y Y 15 ...

User Guide - v216 LCD Monitor
Page 16
OSD Menu Levels (continued) Level 1 Level 2 Language Deutsch Simplified Chinese Japanese English Español Français Management Italiano Nederlands Cancel Save and Return Power Saver Power On Recall Mode Display Power-On Status Display DDC/CI Support Sleep Timer Cancel Save and Return OSD Control Horizontal OSD Position Vertical OSD Position OSD Timeout Information Factory Reset Cancel Save and Return Yes No Exit Level 3 On / Off Selection On / Off Selection On / Off Selection On / Off Selection On / Off Selection Timer Set Menu Adjustment Scale Adjustment Scale...
OSD Menu Levels (continued) Level 1 Level 2 Language Deutsch Simplified Chinese Japanese English Español Français Management Italiano Nederlands Cancel Save and Return Power Saver Power On Recall Mode Display Power-On Status Display DDC/CI Support Sleep Timer Cancel Save and Return OSD Control Horizontal OSD Position Vertical OSD Position OSD Timeout Information Factory Reset Cancel Save and Return Yes No Exit Level 3 On / Off Selection On / Off Selection On / Off Selection On / Off Selection On / Off Selection Timer Set Menu Adjustment Scale Adjustment Scale...
User Guide - v216 LCD Monitor
Page 17
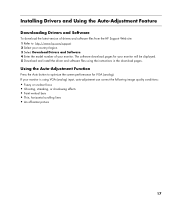
...-Adjustment Feature Downloading Drivers and Software To download the latest version of your monitor. The software download pages for VGA (analog). Using the Auto-Adjustment Function Press the Auto button to : http://www.hp.com/support 2 Select your country/region. 3 Select Download Drivers and Software.... 4 Enter the model number of drivers and software files from the HP Support Web site: 1 Refer to optimize the screen performance for your monitor will be displayed. 5 Download and install the driver and software files using VGA (analog) input, auto...
...-Adjustment Feature Downloading Drivers and Software To download the latest version of your monitor. The software download pages for VGA (analog). Using the Auto-Adjustment Function Press the Auto button to : http://www.hp.com/support 2 Select your country/region. 3 Select Download Drivers and Software.... 4 Enter the model number of drivers and software files from the HP Support Web site: 1 Refer to optimize the screen performance for your monitor will be displayed. 5 Download and install the driver and software files using VGA (analog) input, auto...
User Guide - v216 LCD Monitor
Page 18
...computer manufacturer. • Check the monitor's video cable and make sure none of the monitor to the computer. • Inspect the monitor's video cable and make sure none of the pins are bent. • Make sure the HP monitor drivers are installed (HP monitor drivers are available at the resolution... you are not using an extension cable or switch box. No Plug & Play. Check with your monitor is capable of at : http://www.hp.com/support) • Adjust the ...
...computer manufacturer. • Check the monitor's video cable and make sure none of the monitor to the computer. • Inspect the monitor's video cable and make sure none of the pins are bent. • Make sure the HP monitor drivers are installed (HP monitor drivers are available at the resolution... you are not using an extension cable or switch box. No Plug & Play. Check with your monitor is capable of at : http://www.hp.com/support) • Adjust the ...

User Guide - v216 LCD Monitor
Page 19
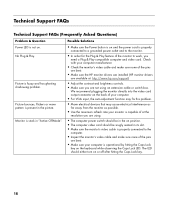
... Technical Support FAQs (Frequently Asked Questions) (continued) Problem & Question Possible Solutions Missing one of the pins are bent. • Make sure the monitor's video cable is properly connected to the optimal resolution. • Make sure that the graphics card supports the optimal resolution (1680 x 1050). •... may fix this problem. • Adjust RGB color or select color temperature. For HP and Compaq systems, you can download the latest graphics driver for your system from: http://www.hp.com/support For other systems, refer to the Web site for the graphics card. Screen...
... Technical Support FAQs (Frequently Asked Questions) (continued) Problem & Question Possible Solutions Missing one of the pins are bent. • Make sure the monitor's video cable is properly connected to the optimal resolution. • Make sure that the graphics card supports the optimal resolution (1680 x 1050). •... may fix this problem. • Adjust RGB color or select color temperature. For HP and Compaq systems, you can download the latest graphics driver for your system from: http://www.hp.com/support For other systems, refer to the Web site for the graphics card. Screen...
User Guide - v216 LCD Monitor
Page 20
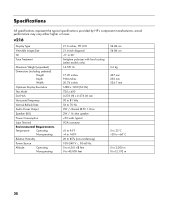
actual performance may vary either higher or lower. Specifications All specifications represent the typical specifications provided by HP's component manufacturers; v216 Display Type Viewable Image Size Tilt Face Treatment Maximum Weight (unpacked) Dimensions (... Output Speaker (R/L) Power Consumption Input Terminal Environmental Requirements Temperature: Operating Non-operating Relative Humidity Power Source Altitude: Operating Non-operating 21.6 inches, TFT LCD 21.6-inch diagonal -5° to 20° Antiglare polarizer with hard coating (select models only) 14.551 lb. 54.86...
actual performance may vary either higher or lower. Specifications All specifications represent the typical specifications provided by HP's component manufacturers; v216 Display Type Viewable Image Size Tilt Face Treatment Maximum Weight (unpacked) Dimensions (... Output Speaker (R/L) Power Consumption Input Terminal Environmental Requirements Temperature: Operating Non-operating Relative Humidity Power Source Altitude: Operating Non-operating 21.6 inches, TFT LCD 21.6-inch diagonal -5° to 20° Antiglare polarizer with hard coating (select models only) 14.551 lb. 54.86...
