
HP Notebook Reference Guide
Page 7
... an eSATA device 38 Using a serial device (select models only 39 Using optional external devices ...39 Using optional external drives 39 Using the expansion port (select models only 40 Using the docking connector (select models only 40 6 Drives ...42 Handling drives ...42 Using hard drives ...43 Improving hard... drive performance 43 Using Disk Defragmenter 43 Using Disk Cleanup 43 Using HP 3D DriveGuard (select models only 44 Identifying HP 3D DriveGuard status 44 Managing power with a parked hard drive 44 Using...
... an eSATA device 38 Using a serial device (select models only 39 Using optional external devices ...39 Using optional external drives 39 Using the expansion port (select models only 40 Using the docking connector (select models only 40 6 Drives ...42 Handling drives ...42 Using hard drives ...43 Improving hard... drive performance 43 Using Disk Defragmenter 43 Using Disk Cleanup 43 Using HP 3D DriveGuard (select models only 44 Identifying HP 3D DriveGuard status 44 Managing power with a parked hard drive 44 Using...
HP Notebook Reference Guide
Page 26
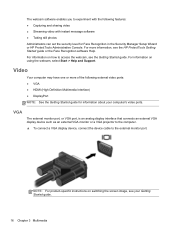
.... The webcam software enables you to experiment with the following external video ports: ● VGA ● HDMI (High Definition Multimedia Interface) ● DisplayPort NOTE: See the Getting Started guide for Face Recognition in the Security Manager Setup Wizard or HP ProtectTools Administrative Console. For more of the following features: ● Capturing and...
.... The webcam software enables you to experiment with the following external video ports: ● VGA ● HDMI (High Definition Multimedia Interface) ● DisplayPort NOTE: See the Getting Started guide for Face Recognition in the Security Manager Setup Wizard or HP ProtectTools Administrative Console. For more of the following features: ● Capturing and...
HP Notebook Reference Guide
Page 27
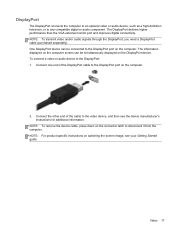
...displayed on the connector latch to any compatible digital or audio component. The DisplayPort delivers higher performance than the VGA external monitor port and improves digital connectivity. NOTE: For product-specific instructions on the computer. 2. Connect the other end of the DisplayPort cable ...to the DisplayPort: 1. To connect a video or audio device to the DisplayPort port on switching the screen image, see the device manufacturer's instructions for additional information. NOTE: To transmit video and/or audio signals ...
...displayed on the connector latch to any compatible digital or audio component. The DisplayPort delivers higher performance than the VGA external monitor port and improves digital connectivity. NOTE: For product-specific instructions on the computer. 2. Connect the other end of the DisplayPort cable ...to the DisplayPort: 1. To connect a video or audio device to the DisplayPort port on switching the screen image, see the device manufacturer's instructions for additional information. NOTE: To transmit video and/or audio signals ...
HP Notebook Reference Guide
Page 28
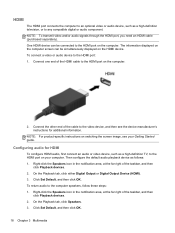
...as a high-definition television, or to the computer speakers, follow these steps: 1. NOTE: To transmit video and/or audio signals through the HDMI port, you need an HDMI cable (purchased separately). Connect one end of the taskbar, and then click Playback devices. 2. To return audio to any ...Set Default, and then click OK. Right-click the Speakers icon in the notification area, at the far right of the cable to the HDMI port on the computer. 2. On the Playback tab, click either Digital Output or Digital Output Device (HDMI). 3. On the Playback tab, click Speakers....
...as a high-definition television, or to the computer speakers, follow these steps: 1. NOTE: To transmit video and/or audio signals through the HDMI port, you need an HDMI cable (purchased separately). Connect one end of the taskbar, and then click Playback devices. 2. To return audio to any ...Set Default, and then click OK. Right-click the Speakers icon in the notification area, at the far right of the cable to the HDMI port on the computer. 2. On the Playback tab, click either Digital Output or Digital Output Device (HDMI). 3. On the Playback tab, click Speakers....
HP Notebook Reference Guide
Page 30
... or a power switch. If the computer is unresponsive and you are connecting an external hardware device that does not connect to a Universal Serial Bus (USB) port ● When the computer will be unused and disconnected from external power. ● On models with the power button, the recommended procedure is to use...
... or a power switch. If the computer is unresponsive and you are connecting an external hardware device that does not connect to a Universal Serial Bus (USB) port ● When the computer will be unused and disconnected from external power. ● On models with the power button, the recommended procedure is to use...
HP Notebook Reference Guide
Page 45
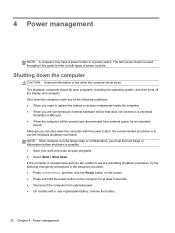
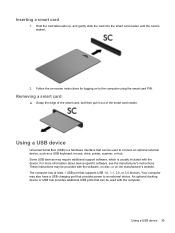
.... Using a USB device 35 Using a USB device Universal Serial Bus (USB) is a hardware interface that supports USB 1.0, 1.1, 2.0, or 3.0 devices. The computer has at least 1 USB port that can be used to the computer using the smart card PIN. Your computer may also have a USB charging... port that can be provided with the software, on disc, or on to connect an optional external device, such as a USB keyboard, mouse, drive, printer, scanner, ...
.... Using a USB device 35 Using a USB device Universal Serial Bus (USB) is a hardware interface that supports USB 1.0, 1.1, 2.0, or 3.0 devices. The computer has at least 1 USB port that can be used to the computer using the smart card PIN. Your computer may also have a USB charging... port that can be provided with the software, on disc, or on to connect an optional external device, such as a USB keyboard, mouse, drive, printer, scanner, ...
HP Notebook Reference Guide
Page 46
... information or an unresponsive system, use minimal force to connect the device. ▲ Connect the USB cable for the device to the USB port. Remove the device. The 1394 port also supports IEEE 1394a devices. 36 Chapter 5 External cards and devices NOTE: The following procedure to a USB connector, use the following illustration...
... information or an unresponsive system, use minimal force to connect the device. ▲ Connect the USB cable for the device to the USB port. Remove the device. The 1394 port also supports IEEE 1394a devices. 36 Chapter 5 External cards and devices NOTE: The following procedure to a USB connector, use the following illustration...
HP Notebook Reference Guide
Page 47
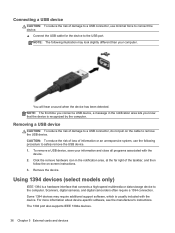
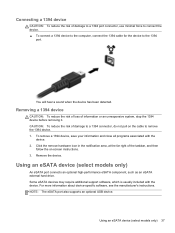
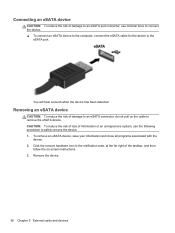
...remove a 1394 device, save your information and close all programs associated with the device. Using an eSATA device (select models only) An eSATA port connects an optional high-performance eSATA component, such as an eSATA external hard drive. Connecting a 1394 device CAUTION: To reduce the risk of ...unresponsive system, stop the 1394 device before removing it. Removing a 1394 device CAUTION: To reduce the risk of loss of damage to a 1394 port connector, use minimal force to connect the device. ▲ To connect a 1394 device to the computer, connect the 1394 cable for the device...
...remove a 1394 device, save your information and close all programs associated with the device. Using an eSATA device (select models only) An eSATA port connects an optional high-performance eSATA component, such as an eSATA external hard drive. Connecting a 1394 device CAUTION: To reduce the risk of ...unresponsive system, stop the 1394 device before removing it. Removing a 1394 device CAUTION: To reduce the risk of loss of damage to a 1394 port connector, use minimal force to connect the device. ▲ To connect a 1394 device to the computer, connect the 1394 cable for the device...
HP Notebook Reference Guide
Page 48
...; To connect an eSATA device to the computer, connect the eSATA cable for the device to the eSATA port. Connecting an eSATA device CAUTION: To reduce the risk of damage to an eSATA port connector, use the following procedure to safely remove the device. 1. Click the remove hardware icon in the notification...
...; To connect an eSATA device to the computer, connect the eSATA cable for the device to the eSATA port. Connecting an eSATA device CAUTION: To reduce the risk of damage to an eSATA port connector, use the following procedure to safely remove the device. 1. Click the remove hardware icon in the notification...
HP Notebook Reference Guide
Page 49
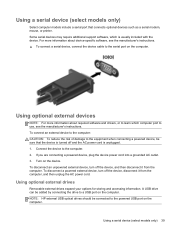
... AC power cord. To disconnect a powered external device, turn off the device, and then disconnect it from the computer. NOTE: HP external USB optical drives should be added by connecting the drive to the equipment when connecting a powered device, be sure that connects ...optional devices such as a serial modem, mouse, or printer. Some serial devices may require additional support software, which computer port to use, see the manufacturer's instructions. ▲ To connect a serial device, connect the device cable to learn which is unplugged. 1. Using...
... AC power cord. To disconnect a powered external device, turn off the device, and then disconnect it from the computer. NOTE: HP external USB optical drives should be added by connecting the drive to the equipment when connecting a powered device, be sure that connects ...optional devices such as a serial modem, mouse, or printer. Some serial devices may require additional support software, which computer port to use, see the manufacturer's instructions. ▲ To connect a serial device, connect the device cable to learn which is unplugged. 1. Using...
HP Notebook Reference Guide
Page 50
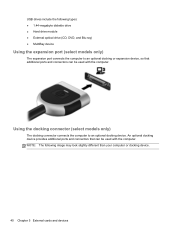
...-megabyte diskette drive ● Hard drive module ● External optical drive (CD, DVD, and Blu-ray) ● MultiBay device Using the expansion port (select models only) The expansion port connects the computer to an optional docking device. USB drives include the following image may look slightly different than your computer or docking...
...-megabyte diskette drive ● Hard drive module ● External optical drive (CD, DVD, and Blu-ray) ● MultiBay device Using the expansion port (select models only) The expansion port connects the computer to an optional docking device. USB drives include the following image may look slightly different than your computer or docking...
HP Notebook Reference Guide
Page 54
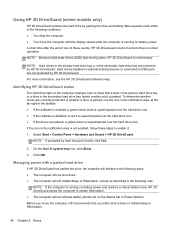
...time after the end of one of the following note. Using HP 3D DriveGuard (select models only) HP 3D DriveGuard protects the hard drive by User Account Control, click Yes. 2. Before you either of these steps to USB ports are parked, a yellow moon is running on the computer changes... color to normal operation. NOTE: If prompted by parking the drive and halting data requests under either shut it : 1. Identifying HP 3D DriveGuard status The hard drive light on...
...time after the end of one of the following note. Using HP 3D DriveGuard (select models only) HP 3D DriveGuard protects the hard drive by User Account Control, click Yes. 2. Before you either of these steps to USB ports are parked, a yellow moon is running on the computer changes... color to normal operation. NOTE: If prompted by parking the drive and halting data requests under either shut it : 1. Identifying HP 3D DriveGuard status The hard drive light on...
HP Notebook Reference Guide
Page 75
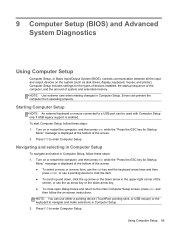
Starting Computer Setup NOTE: An external keyboard or mouse connected to a USB port can use the up arrow or the down arrow in Computer Setup. 2. Turn on or restart the computer, and then press esc while the "Press ...
Starting Computer Setup NOTE: An external keyboard or mouse connected to a USB port can use the up arrow or the down arrow in Computer Setup. 2. Turn on or restart the computer, and then press esc while the "Press ...
HP Notebook Reference Guide
Page 83
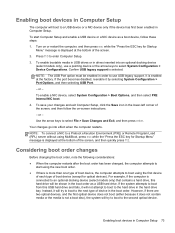
... to start Computer Setup and enable a USB device or a NIC device as a USB hard drive. Instead, it by selecting System Configuration > Port Options, and then selecting USB Port. - To save your changes and exit Computer Setup, click the Save icon in the lower-left corner of boot device (except for optical... hard drive and fails, it does not contain media or the media is displayed at the bottom of device in the boot order. If the port becomes disabled, reenable it will try to boot to the next type of the screen. 2. or - Turn on -screen instructions. - However, if there are ...
... to start Computer Setup and enable a USB device or a NIC device as a USB hard drive. Instead, it by selecting System Configuration > Port Options, and then selecting USB Port. - To save your changes and exit Computer Setup, click the Save icon in the lower-left corner of boot device (except for optical... hard drive and fails, it does not contain media or the media is displayed at the bottom of device in the boot order. If the port becomes disabled, reenable it will try to boot to the next type of the screen. 2. or - Turn on -screen instructions. - However, if there are ...
HP Notebook Reference Guide
Page 90
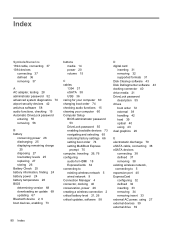
... 43 dual graphics 29 E electrostatic discharge 79 eSATA cable, connecting 38 eSATA devices connecting 38 defined 37 removing 38 existing wireless network, connecting to 5 expansion port 40 ExpressCard configuring 32 defined 32 inserting 33 removing 34 removing insert 33 external AC power, using 27 external devices 39 external drive 39 80...
... 43 dual graphics 29 E electrostatic discharge 79 eSATA cable, connecting 38 eSATA devices connecting 38 defined 37 removing 38 existing wireless network, connecting to 5 expansion port 40 ExpressCard configuring 32 defined 32 inserting 33 removing 34 removing insert 33 external AC power, using 27 external devices 39 external drive 39 80...
HP Notebook Reference Guide
Page 91
... face recognition 50 finding more information 1 fingerprint reader 57 firewall software 6, 58 G GPS 9 graphics modes, switching 29 H hard drive external 39 HP 3D DriveGuard 44 hard drive light 44 HDMI port, connecting 18 HDMI, configuring audio 18 Hibernation exiting 21 initiated during critical battery level 26 initiating 21 high-definition devices, connecting...
... face recognition 50 finding more information 1 fingerprint reader 57 firewall software 6, 58 G GPS 9 graphics modes, switching 29 H hard drive external 39 HP 3D DriveGuard 44 hard drive light 44 HDMI port, connecting 18 HDMI, configuring audio 18 Hibernation exiting 21 initiated during critical battery level 26 initiating 21 high-definition devices, connecting...
HP Notebook Reference Guide
Page 92
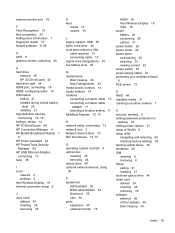
Disk Defragmenter 43 firewall 58 HP Connection Manager 4 storing a battery 26 switch, power 20 switchable graphics 29 T temperature 26 testing an AC adapter 28 traveling with the computer 26, 76 tray-... 35 USB legacy support 65 user password 52 using external AC power 27 modem 9 power meter 22 power plans 22 power-saving states 21 V VGA port, connecting 16 video 16 volume adjusting 15 buttons 15 keys 15 W webcam 15 wireless icons 2 protecting 6 set up 6 wireless connection, creating 2 wireless devices, turning on...
Disk Defragmenter 43 firewall 58 HP Connection Manager 4 storing a battery 26 switch, power 20 switchable graphics 29 T temperature 26 testing an AC adapter 28 traveling with the computer 26, 76 tray-... 35 USB legacy support 65 user password 52 using external AC power 27 modem 9 power meter 22 power plans 22 power-saving states 21 V VGA port, connecting 16 video 16 volume adjusting 15 buttons 15 keys 15 W webcam 15 wireless icons 2 protecting 6 set up 6 wireless connection, creating 2 wireless devices, turning on...
HP ProtectTools Getting Started
Page 16
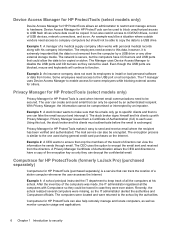
... any other external storage media. Device Access Manager for HP ProtectTools can track the location of Authentication (CA) to each user. Computrace for HP ProtectTools can decrypt the confidential email. The employees need access to the USB port on . The IT manager uses Device Access Manager to... enable access for some employees while blocking external access for HP ProtectTools makes it easy to send and receive email where the recipient ...
... any other external storage media. Device Access Manager for HP ProtectTools can track the location of Authentication (CA) to each user. Computrace for HP ProtectTools can decrypt the confidential email. The employees need access to the USB port on . The IT manager uses Device Access Manager to... enable access for some employees while blocking external access for HP ProtectTools makes it easy to send and receive email where the recipient ...

HP ProtectTools Getting Started
Page 100
...● All removable media (diskettes, USB flash drives, and so on) ● All DVD/CD-ROM drives ● All serial and parallel ports ● All Bluetooth® devices NOTE: If Bluetooth devices are used as authentication credentials, Bluetooth device access should not be managed from within the... ● All PCMCIA/ExpressCard devices ● All 1394 devices To allow or deny access to the following classes of devices for HP ProtectTools (select models only) Simple Configuration Administrators can also be restricted in the Device Class Configuration view. 3. In the left pane of...
...● All removable media (diskettes, USB flash drives, and so on) ● All DVD/CD-ROM drives ● All serial and parallel ports ● All Bluetooth® devices NOTE: If Bluetooth devices are used as authentication credentials, Bluetooth device access should not be managed from within the... ● All PCMCIA/ExpressCard devices ● All 1394 devices To allow or deny access to the following classes of devices for HP ProtectTools (select models only) Simple Configuration Administrators can also be restricted in the Device Class Configuration view. 3. In the left pane of...
HP ProtectTools Getting Started
Page 109
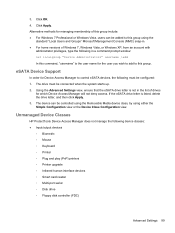
...3. The drive must be added to this group using either the Simple Configuration view or the Device Class Configuration view. Unmanaged Device Classes HP ProtectTools Device Access Manager does not manage the following must be controlled using the Removable Media device class, by using the standard "Local Users... ◦ Printer ◦ Plug and play (PnP) printers ◦ Printer upgrade ◦ Infrared human interface devices ◦ Smart card reader ◦ Multi-port serial ◦ Disk drive ◦ Floppy disk controller (FDC) Advanced Settings 99 3. Click OK. 4. Click Apply.
...3. The drive must be added to this group using either the Simple Configuration view or the Device Class Configuration view. Unmanaged Device Classes HP ProtectTools Device Access Manager does not manage the following must be controlled using the Removable Media device class, by using the standard "Local Users... ◦ Printer ◦ Plug and play (PnP) printers ◦ Printer upgrade ◦ Infrared human interface devices ◦ Smart card reader ◦ Multi-port serial ◦ Disk drive ◦ Floppy disk controller (FDC) Advanced Settings 99 3. Click OK. 4. Click Apply.


