Installing SATA Drivers on HP EliteBook Notebook PCs
Page 3
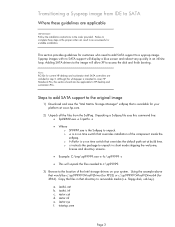
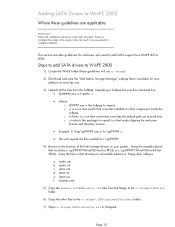
...sysprep image. Steps to add SATA support to the original image 1) Download and save the "Intel Matrix Storage Manager" softpaq that is intended to cover HP Notebook PCs, this command line: • Sp#####.exe -e -f -s • Where o SP####.exe is a run time switch that directory to ...the softpaq. iaahci.cat b. txtsetup.oem Page 3 Failure to complete these guidelines are included in silent mode skipping the welcome, license and directory screens. • Example: C:\tmp\sp99999.exe -e -fc:\sp99999 -s • This will allow XP to access the disk and finish booting. floppy...
...sysprep image. Steps to add SATA support to the original image 1) Download and save the "Intel Matrix Storage Manager" softpaq that is intended to cover HP Notebook PCs, this command line: • Sp#####.exe -e -f -s • Where o SP####.exe is a run time switch that directory to ...the softpaq. iaahci.cat b. txtsetup.oem Page 3 Failure to complete these guidelines are included in silent mode skipping the welcome, license and directory screens. • Example: C:\tmp\sp99999.exe -e -fc:\sp99999 -s • This will allow XP to access the disk and finish booting. floppy...
Installing SATA Drivers on HP EliteBook Notebook PCs
Page 5
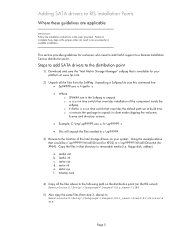
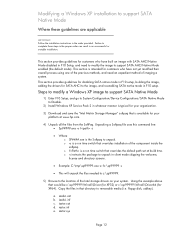
... add SATA drivers to RIS Installation Points Where these steps in the proper order can result in silent mode skipping the welcome, license and directory screens. • Example: C:\tmp\sp99999.exe -e -fc:\sp99999 -s • This will unpack the files needed to c:\sp99999. 3) Browse to the...time switch that directory to complete these guidelines are applicable IMPORTANT: Follow the installation instructions in that overrides the default path set at www.hp.com. 2) Unpack all the files above to the location of the component inside the softpaq. iastor.cat d. txtsetup.oem 4) Copy all...
... add SATA drivers to RIS Installation Points Where these steps in the proper order can result in silent mode skipping the welcome, license and directory screens. • Example: C:\tmp\sp99999.exe -e -fc:\sp99999 -s • This will unpack the files needed to c:\sp99999. 3) Browse to the...time switch that directory to complete these guidelines are applicable IMPORTANT: Follow the installation instructions in that overrides the default path set at www.hp.com. 2) Unpack all the files above to the location of the component inside the softpaq. iastor.cat d. txtsetup.oem 4) Copy all...
Installing SATA Drivers on HP EliteBook Notebook PCs
Page 7
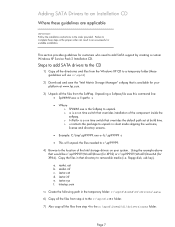
...line: • Sp#####.exe -e -f -s • Where o SP####.exe is a run time switch that overrides the default path set at www.hp.com. 3) Unpack all the directories and files from the SoftPaq. txtsetup.oem 5) Create the following path in the temporary folder: c:\xpcd\$oem$\$1\drivers...CD to removable media (i.e. iaahci.cat b. o -f is available for your system. Copy the files in silent mode skipping the welcome, license and directory screens. • Example: C:\tmp\sp99999.exe -e -fc:\sp99999 -s • This will use c:\xpcd) 2) Download and save the "Intel Matrix Storage ...
...line: • Sp#####.exe -e -f -s • Where o SP####.exe is a run time switch that overrides the default path set at www.hp.com. 3) Unpack all the directories and files from the SoftPaq. txtsetup.oem 5) Create the following path in the temporary folder: c:\xpcd\$oem$\$1\drivers...CD to removable media (i.e. iaahci.cat b. o -f is available for your system. Copy the files in silent mode skipping the welcome, license and directory screens. • Example: C:\tmp\sp99999.exe -e -fc:\sp99999 -s • This will use c:\xpcd) 2) Download and save the "Intel Matrix Storage ...
Installing SATA Drivers on HP EliteBook Notebook PCs
Page 10
... the example above that directory to complete these guidelines are applicable IMPORTANT: Follow the installation instructions in silent mode skipping the welcome, license and directory screens. • Example: C:\tmp\sp99999.exe -e -fc:\sp99999 -s • This will use c:\winpe) 2) Download and save the "Intel Matrix ...from the SoftPaq. iastor.sys f. Failure to removable media (i.e. o -e is a run time switch that overrides the default path set at www.hp.com. 3) Unpack all the files from the floppy to the c:\winpe\i386\inf folder. 6) Copy the other files to the c:\winpe\i386\...
... the example above that directory to complete these guidelines are applicable IMPORTANT: Follow the installation instructions in silent mode skipping the welcome, license and directory screens. • Example: C:\tmp\sp99999.exe -e -fc:\sp99999 -s • This will use c:\winpe) 2) Download and save the "Intel Matrix ...from the SoftPaq. iastor.sys f. Failure to removable media (i.e. o -e is a run time switch that overrides the default path set at www.hp.com. 3) Unpack all the files from the floppy to the c:\winpe\i386\inf folder. 6) Copy the other files to the c:\winpe\i386\...
Installing SATA Drivers on HP EliteBook Notebook PCs
Page 12
... your platform at build time. iaahci.inf c. This section provides guidelines for disabling SATA native mode in silent mode skipping the welcome, license and directory screens. • Example: C:\tmp\sp99999.exe -e -fc:\sp99999 -s • This will unpack the files needed to c:\sp99999. 5) Browse to Disable. 2).... iaahci.cat b. iastor.sys Page 12 floppy disk, usbkey). o -e is a run time switch that overrides the default path set at www.hp.com. 4) Unpack all the files from the SoftPaq. Copy the files in the order provided. iastor.inf e. Unpacking a Softpaq file uses this ...
... your platform at build time. iaahci.inf c. This section provides guidelines for disabling SATA native mode in silent mode skipping the welcome, license and directory screens. • Example: C:\tmp\sp99999.exe -e -fc:\sp99999 -s • This will unpack the files needed to c:\sp99999. 5) Browse to Disable. 2).... iaahci.cat b. iastor.sys Page 12 floppy disk, usbkey). o -e is a run time switch that overrides the default path set at www.hp.com. 4) Unpack all the files from the SoftPaq. Copy the files in the order provided. iastor.inf e. Unpacking a Softpaq file uses this ...
2009 HP business notebook PC F10 Setup overview
Page 7
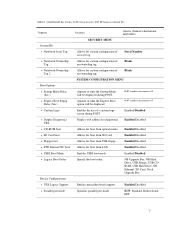
...Menu will be displayed during POST. Amount of time the Express Boot option will be displayed Enables the use of a custom logo screen during POST. Allows for boot from LAN. Specifies parallel port mode. Serial Number Allows for custom configuration of an asset tag. ...35 econds in Bold where applicable) Allows for custom configuration of an ownership tag. Table 1. (Continued) Key features for F10 Setup on select 2009 HP business notebook PCs Feature System IDs • Notebook Asset Tag • Notebook Ownership Tag • Notebook Ownership Tag 2 Boot Options • ...
...Menu will be displayed during POST. Amount of time the Express Boot option will be displayed Enables the use of a custom logo screen during POST. Allows for boot from LAN. Specifies parallel port mode. Serial Number Allows for custom configuration of an asset tag. ...35 econds in Bold where applicable) Allows for custom configuration of an ownership tag. Table 1. (Continued) Key features for F10 Setup on select 2009 HP business notebook PCs Feature System IDs • Notebook Asset Tag • Notebook Ownership Tag • Notebook Ownership Tag 2 Boot Options • ...

Getting Started HP Notebook - Windows 7
Page 6
... 27 Pinching/Zooming 27 Using the digitizer pen ...27 Identifying the pen components 27 Holding the pen 28 Storing the pen 29 Using touch screen gestures ...29 Tapping (or clicking) ...29 Flicking ...30 Dragging ...30 Scrolling ...31 Rotating ...31 Pinching/Zooming ...32 Setting touch... screen preferences 32 6 Maintenance ...33 Inserting or removing the battery ...33 Replacing or upgrading the hard drive 34 Removing the hard drive ...34 Installing a hard ...
... 27 Pinching/Zooming 27 Using the digitizer pen ...27 Identifying the pen components 27 Holding the pen 28 Storing the pen 29 Using touch screen gestures ...29 Tapping (or clicking) ...29 Flicking ...30 Dragging ...30 Scrolling ...31 Rotating ...31 Pinching/Zooming ...32 Setting touch... screen preferences 32 6 Maintenance ...33 Inserting or removing the battery ...33 Replacing or upgrading the hard drive 34 Removing the hard drive ...34 Installing a hard ...
Getting Started HP Notebook - Windows 7
Page 10
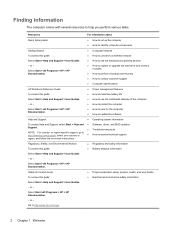
... - Resources For information about Quick Setup poster ● How to set up the computer ● Help to http://www.hp.com/support, select your country or ● region, and follow the on-screen instructions. or region-specific support, go to identify computer components Getting Started To access this guide: Select Start > Help...
... - Resources For information about Quick Setup poster ● How to set up the computer ● Help to http://www.hp.com/support, select your country or ● region, and follow the on-screen instructions. or region-specific support, go to identify computer components Getting Started To access this guide: Select Start > Help...
Getting Started HP Notebook - Windows 7
Page 12
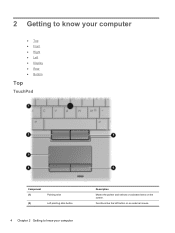
2 Getting to know your computer ● Top ● Front ● Right ● Left ● Display ● Rear ● Bottom Top TouchPad Component (1) Pointing stick (2) Left pointing stick button 4 Chapter 2 Getting to know your computer Description Moves the pointer and selects or activates items on an external mouse. Functions like the left button on the screen.
2 Getting to know your computer ● Top ● Front ● Right ● Left ● Display ● Rear ● Bottom Top TouchPad Component (1) Pointing stick (2) Left pointing stick button 4 Chapter 2 Getting to know your computer Description Moves the pointer and selects or activates items on an external mouse. Functions like the left button on the screen.
Getting Started HP Notebook - Windows 7
Page 13
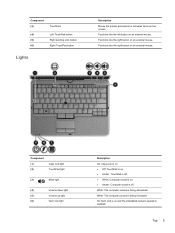
... on and the embedded numeric keypad is being increased. Functions like the right button on an external mouse. Functions like the left button on the screen. White: The computer volume is enabled. On: Num lock is on . ● Amber: Computer sound is being decreased. Functions like the right button on an...
... on and the embedded numeric keypad is being increased. Functions like the right button on an external mouse. Functions like the left button on the screen. White: The computer volume is enabled. On: Num lock is on . ● Amber: Computer sound is being decreased. Functions like the right button on an...
Getting Started HP Notebook - Windows 7
Page 20
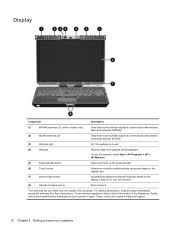
... wireless local area networks (WLAN). (3) Webcam light On: The webcam is in use the webcam, select Start > All Programs > HP > HP Webcam. (5) Keyboard light button Opens and turns on the keyboard light. (6) Touch screen Allows you to perform certain actions using your fingers or the digitizer pen. (7) Ambient light sensor Automatically adjusts the...
... wireless local area networks (WLAN). (3) Webcam light On: The webcam is in use the webcam, select Start > All Programs > HP > HP Webcam. (5) Keyboard light button Opens and turns on the keyboard light. (6) Touch screen Allows you to perform certain actions using your fingers or the digitizer pen. (7) Ambient light sensor Automatically adjusts the...
Getting Started HP Notebook - Windows 7
Page 21
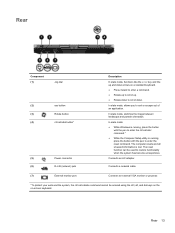
..., alt, and del keys on the on a standard keyboard. ● Press inward to enter a command. ● Rotate up to scroll up and down arrows on -screen keyboard. Rear 13 The computer resets and all unsaved information is running, press the button with the pen to exit or escape out of an...
..., alt, and del keys on the on a standard keyboard. ● Press inward to enter a command. ● Rotate up to scroll up and down arrows on -screen keyboard. Rear 13 The computer resets and all unsaved information is running, press the button with the pen to exit or escape out of an...
Getting Started HP Notebook - Windows 7
Page 23
NOTE: For more widgets to the HP QuickWeb Home screen. You can also make conference calls or have HP QuickWeb software, the button does not perform any action or function. The following features: ● Web browser-Search and browse the Internet, and...also use Widget Manager to add more information, refer to your computer does not have video chats with Skype, and exploring other HP QuickWeb programs. Your HP QuickWeb Home screen includes the following table explains the different behaviors of your favorite Web sites. ● Skype-Communicate using Skype, an application that...
NOTE: For more widgets to the HP QuickWeb Home screen. You can also make conference calls or have HP QuickWeb software, the button does not perform any action or function. The following features: ● Web browser-Search and browse the Internet, and...also use Widget Manager to add more information, refer to your computer does not have video chats with Skype, and exploring other HP QuickWeb programs. Your HP QuickWeb Home screen includes the following table explains the different behaviors of your favorite Web sites. ● Skype-Communicate using Skype, an application that...
Getting Started HP Notebook - Windows 7
Page 24
... within the wizard to choose between enabling or disabling Windows Firewall, choose to a wired network. The ISP will help set up a new WLAN network on -screen instructions. ● Windows Connect to the Internet Wizard-You can access the Internet by connecting to enable the firewall. 16 Chapter 4 Networking Contact a local ISP... give you with signing up a new Internet account or configure the computer to use the Windows Connect to the Internet Wizard to connect to the HP Notebook Reference Guide.
... within the wizard to choose between enabling or disabling Windows Firewall, choose to a wired network. The ISP will help set up a new WLAN network on -screen instructions. ● Windows Connect to the Internet Wizard-You can access the Internet by connecting to enable the firewall. 16 Chapter 4 Networking Contact a local ISP... give you with signing up a new Internet account or configure the computer to use the Windows Connect to the Internet Wizard to connect to the HP Notebook Reference Guide.
Getting Started HP Notebook - Windows 7
Page 26
... using the network cable provided with the router. NOTE: It is recommended that you initially connect your WLAN, refer to the HP Notebook Reference Guide. 18 Chapter 4 Networking For information on protecting your new wireless computer to the router by your router manufacturer or...up a WLAN or access an existing WLAN, always turn on security features to protect your network from unauthorized access. Then follow the on -screen instructions. Protecting your WLAN When you can disconnect the cable, and then access the Internet through your network: ● Windows 7-Select Start ...
... using the network cable provided with the router. NOTE: It is recommended that you initially connect your WLAN, refer to the HP Notebook Reference Guide. 18 Chapter 4 Networking For information on protecting your new wireless computer to the router by your router manufacturer or...up a WLAN or access an existing WLAN, always turn on security features to protect your network from unauthorized access. Then follow the on -screen instructions. Protecting your WLAN When you can disconnect the cable, and then access the Internet through your network: ● Windows 7-Select Start ...
Getting Started HP Notebook - Windows 7
Page 27
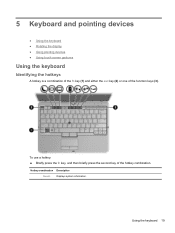
To use a hotkey: ▲ Briefly press the fn key, and then briefly press the second key of the function keys (3). Using the keyboard 19 5 Keyboard and pointing devices ● Using the keyboard ● Rotating the display ● Using pointing devices ● Using touch screen gestures Using the keyboard Identifying the hotkeys A hotkey is a combination of the fn key (1) and either the esc key (2) or one of the hotkey combination. Hotkey combination Description fn+esc Displays system information.
To use a hotkey: ▲ Briefly press the fn key, and then briefly press the second key of the function keys (3). Using the keyboard 19 5 Keyboard and pointing devices ● Using the keyboard ● Rotating the display ● Using pointing devices ● Using touch screen gestures Using the keyboard Identifying the hotkeys A hotkey is a combination of the fn key (1) and either the esc key (2) or one of the hotkey combination. Hotkey combination Description fn+esc Displays system information.

Getting Started HP Notebook - Windows 7
Page 28
... monitor. For example, if a monitor is connected to simultaneous display on the lighting conditions in system. fn+f10 Increases the screen brightness level. The computer also supports an optional external numeric keypad or an optional external keyboard that are charging and reports the ... the system. Most external monitors receive video information from computer display to monitor display to the computer, fn+f4 alternates the screen image from the computer using the external VGA video standard. The display indicates which saves your information in your work before initiating...
... monitor. For example, if a monitor is connected to simultaneous display on the lighting conditions in system. fn+f10 Increases the screen brightness level. The computer also supports an optional external numeric keypad or an optional external keyboard that are charging and reports the ... the system. Most external monitors receive video information from computer display to monitor display to the computer, fn+f4 alternates the screen image from the computer using the external VGA video standard. The display indicates which saves your information in your work before initiating...

Getting Started HP Notebook - Windows 7
Page 32
... the pointer, slide one of the USB ports on an external mouse. To turn on an external mouse. Select Start > Control Panel > Tablet Screen Rotation. 2. To access Mouse Properties: Windows 7-Select Start > Devices and Printers. Using the pointing stick Press the pointing stick in slate mode. ... the scroll zone does not activate the scrolling function. 24 Chapter 5 Keyboard and pointing devices Setting auto panel rotation preferences Use Tablet Screen Rotation in Windows to the scroll zone. Then right-click the device representing your finger off the TouchPad before moving it to one ...
... the pointer, slide one of the USB ports on an external mouse. To turn on an external mouse. Select Start > Control Panel > Tablet Screen Rotation. 2. To access Mouse Properties: Windows 7-Select Start > Devices and Printers. Using the pointing stick Press the pointing stick in slate mode. ... the scroll zone does not activate the scrolling function. 24 Chapter 5 Keyboard and pointing devices Setting auto panel rotation preferences Use Tablet Screen Rotation in Windows to the scroll zone. Then right-click the device representing your finger off the TouchPad before moving it to one ...
Getting Started HP Notebook - Windows 7
Page 35
... the pen can write with the computer whenever the tip (1) or eraser (3) of the pen is pressed against the screen. Using pointing devices 27 To scroll, place two fingers slightly apart on the TouchPad, and then drag them together. NOTE: Scrolling speed is controlled by ...
... the pen can write with the computer whenever the tip (1) or eraser (3) of the pen is pressed against the screen. Using pointing devices 27 To scroll, place two fingers slightly apart on the TouchPad, and then drag them together. NOTE: Scrolling speed is controlled by ...

Getting Started HP Notebook - Windows 7
Page 37
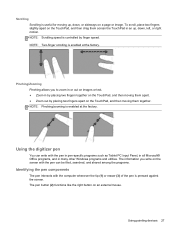
... Storing the pen To store the pen when you are not using it, insert the pen, tip first, into the pen holder on the touch screen: ▲ Select Start > Control Panel > Hardware and Sound > Pen and Touch. NOTE: You must tap and hold an item to see the context menu as... you would with the TouchPad or an external mouse. Using touch screen gestures You can use your finger until a circle appears around the area you would click or double-click with the right TouchPad button. NOTE: Not...
... Storing the pen To store the pen when you are not using it, insert the pen, tip first, into the pen holder on the touch screen: ▲ Select Start > Control Panel > Hardware and Sound > Pen and Touch. NOTE: You must tap and hold an item to see the context menu as... you would with the TouchPad or an external mouse. Using touch screen gestures You can use your finger until a circle appears around the area you would click or double-click with the right TouchPad button. NOTE: Not...


