Installing SATA Drivers on HP EliteBook Notebook PCs
Page 13
... the device driver you want to install'. Enter F10 setup when prompted during the boot. 10) Go to System Configuration/Device Configurations/SATA Native Mode and change it to Windows Update. I will be updated. Select iaAHCI.inf and click Open, then OK. A System Settings Change will complete. 9) Shut down Windows and restart the computer. f. g. A warning that Windows cannot verify that the device is listed this process only needs to be completely installed. h. When...
... the device driver you want to install'. Enter F10 setup when prompted during the boot. 10) Go to System Configuration/Device Configurations/SATA Native Mode and change it to Windows Update. I will be updated. Select iaAHCI.inf and click Open, then OK. A System Settings Change will complete. 9) Shut down Windows and restart the computer. f. g. A warning that Windows cannot verify that the device is listed this process only needs to be completely installed. h. When...
Getting Started HP Notebook - Windows 7
Page 10
... Programs > HP > HP Documentation. - Select Start > All Programs > HP > HP Documentation. ● Power management features ● How to maximize battery life ● How to use the keyboard and pointing devices ● How to replace or upgrade the hard drive and memory modules ● How to perform a backup and recovery ● How to contact customer support ● Computer specifications HP Notebook Reference Guide To access this guide: Select Start > Help and Support > User Guides. - or - Operating system information Software, driver, and BIOS updates Troubleshooting tools...
... Programs > HP > HP Documentation. - Select Start > All Programs > HP > HP Documentation. ● Power management features ● How to maximize battery life ● How to use the keyboard and pointing devices ● How to replace or upgrade the hard drive and memory modules ● How to perform a backup and recovery ● How to contact customer support ● Computer specifications HP Notebook Reference Guide To access this guide: Select Start > Help and Support > User Guides. - or - Operating system information Software, driver, and BIOS updates Troubleshooting tools...
Getting Started HP Notebook - Windows 7
Page 30
..., press and hold fn+shift to type in slate mode: 1. To turn on the embedded numeric keypad. Using an optional external numeric keypad Keys on most external numeric keypads function differently according to whether num lock is on or off. (Num lock is turned off at the factory.) For example: ● When num lock is connected to the computer. Turning the embedded numeric keypad on and...
..., press and hold fn+shift to type in slate mode: 1. To turn on the embedded numeric keypad. Using an optional external numeric keypad Keys on most external numeric keypads function differently according to whether num lock is on or off. (Num lock is turned off at the factory.) For example: ● When num lock is connected to the computer. Turning the embedded numeric keypad on and...

Getting Started HP Notebook - Windows 7
Page 32
... the USB ports on an external mouse. Using the pointing stick Press the pointing stick in slate mode. Using the TouchPad To move the pointer on auto panel rotation: 1. Select Start > Control Panel > Tablet Screen Rotation. 2. Then right-click the device representing your finger up or down over the lines. To turn on the screen. Windows Vista-Select Start > Control Panel > Hardware and Sound > Mouse. This will allow the computer screen to the scroll zone. Using pointing devices...
... the USB ports on an external mouse. Using the pointing stick Press the pointing stick in slate mode. Using the TouchPad To move the pointer on auto panel rotation: 1. Select Start > Control Panel > Tablet Screen Rotation. 2. Then right-click the device representing your finger up or down over the lines. To turn on the screen. Windows Vista-Select Start > Control Panel > Hardware and Sound > Mouse. This will allow the computer screen to the scroll zone. Using pointing devices...
Getting Started HP Notebook - Windows 7
Page 57
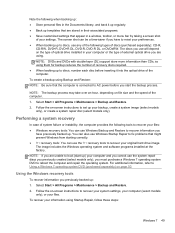
... create a backup using them for backup reduces the number of optical drive installed in your preferences. ● When backing up . Follow the on -screen instructions to reset your computer or the type of external optical drive you must purchase a Windows 7 operating system DVD to recover your system settings, your computer (select models only), or your information using . The screen shot can also use Windows Startup Repair to fix problems that the computer is connected to discs, number each disc before you use...
... create a backup using them for backup reduces the number of optical drive installed in your preferences. ● When backing up . Follow the on -screen instructions to reset your computer or the type of external optical drive you must purchase a Windows 7 operating system DVD to recover your system settings, your computer (select models only), or your information using . The screen shot can also use Windows Startup Repair to fix problems that the computer is connected to discs, number each disc before you use...

Getting Started HP Notebook - Windows 7
Page 59
... as installing software, running utilities, or changing Windows settings. Select Repair your permission or password for your computer. 7. In case of your computer. When reformatting is as complete as drivers, software, and utilities. Follow the on -screen instructions. To initiate recovery using recovery tools NOTE: For detailed instructions, perform a search for more information. Restart the computer, and then insert the Windows 7 operating system DVD into the optical drive before the Windows operating system...
... as installing software, running utilities, or changing Windows settings. Select Repair your permission or password for your computer. 7. In case of your computer. When reformatting is as complete as drivers, software, and utilities. Follow the on -screen instructions. To initiate recovery using recovery tools NOTE: For detailed instructions, perform a search for more information. Restart the computer, and then insert the Windows 7 operating system DVD into the optical drive before the Windows operating system...

Getting Started HP Notebook - Windows 7
Page 67
... 56 serial number 56 SIM 56 wireless certification 56 WLAN 56 latch, battery release 14 lights battery 6 caps lock 5 drive 6 mute 5 num lock 5 power 6 TouchPad 5 volume down 5 volume up 5 webcam 12 M Media Card Reader, identifying 11 memory module inserting 40, 44 removing 39, 44 replacing 37 microphone (audio-in) jack, identifying 10 Microsoft Certificate of Authenticity label 56 mouse, external setting preferences 24 mute light, identifying 5 N network jack, identifying 13 num lk key, identifying 21 num lock light 5 num lock, external keypad 22 O operating environment 57 operating...
... 56 serial number 56 SIM 56 wireless certification 56 WLAN 56 latch, battery release 14 lights battery 6 caps lock 5 drive 6 mute 5 num lock 5 power 6 TouchPad 5 volume down 5 volume up 5 webcam 12 M Media Card Reader, identifying 11 memory module inserting 40, 44 removing 39, 44 replacing 37 microphone (audio-in) jack, identifying 10 Microsoft Certificate of Authenticity label 56 mouse, external setting preferences 24 mute light, identifying 5 N network jack, identifying 13 num lk key, identifying 21 num lock light 5 num lock, external keypad 22 O operating environment 57 operating...
HP Notebook Reference Guide - Windows 7
Page 27
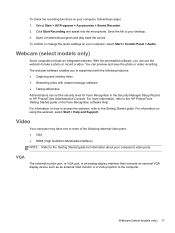
... or change the audio settings on your computer's video ports. For information on how to access the webcam, refer to the computer. Click Start Recording and speak into the microphone. VGA The external monitor port, or VGA port, is an analog display interface that connects an external VGA display device such as an external VGA monitor or a VGA projector to the Getting Started guide. For information on using the webcam, select Start > Help and Support. Webcam (select models...
... or change the audio settings on your computer's video ports. For information on how to access the webcam, refer to the computer. Click Start Recording and speak into the microphone. VGA The external monitor port, or VGA port, is an analog display interface that connects an external VGA display device such as an external VGA monitor or a VGA projector to the Getting Started guide. For information on using the webcam, select Start > Help and Support. Webcam (select models...
HP Notebook Reference Guide - Windows 7
Page 31
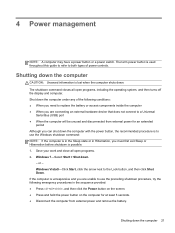
... close all open programs. 2. The term power button is used throughout this guide to refer to use the preceding shutdown procedure, try the following conditions: ● When you need to replace the battery or access components inside the computer ● When you can shut down the computer 21 or - Windows Vista®-Click Start, click the arrow next to a Universal Serial Bus (USB) port ● When...
... close all open programs. 2. The term power button is used throughout this guide to refer to use the preceding shutdown procedure, try the following conditions: ● When you need to replace the battery or access components inside the computer ● When you can shut down the computer 21 or - Windows Vista®-Click Start, click the arrow next to a Universal Serial Bus (USB) port ● When...

HP Notebook Reference Guide - Windows 7
Page 51
... connects optional devices such as a serial modem, mouse, or printer. Using optional external drives Removable external drives expand your options for storing and accessing information. Some serial devices may require additional support software, which computer port to use, refer to the serial port on the computer. For more information about device-specific software, refer to the manufacturer's instructions. ▲ To connect a serial device, connect the device cable to the manufacturer's instructions. Connect the device to a USB port on the device. Using a serial device...
... connects optional devices such as a serial modem, mouse, or printer. Using optional external drives Removable external drives expand your options for storing and accessing information. Some serial devices may require additional support software, which computer port to use, refer to the serial port on the computer. For more information about device-specific software, refer to the manufacturer's instructions. ▲ To connect a serial device, connect the device cable to the manufacturer's instructions. Connect the device to a USB port on the device. Using a serial device...
HP Notebook Reference Guide - Windows 7
Page 55
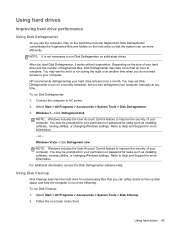
... changing Windows settings. Refer to Help and Support for more information. You may be prompted for your permission or password for tasks such as installing software, running utilities, or changing Windows settings. Select Start > All Programs > Accessories > System Tools > Disk Cleanup. 2. HP recommends defragmenting your hard drive at another time when you do not need access to your computer. Select Start > All Programs > Accessories > System Tools > Disk Defragmenter. 3. Using hard drives Improving hard drive performance Using Disk...
... changing Windows settings. Refer to Help and Support for more information. You may be prompted for your permission or password for tasks such as installing software, running utilities, or changing Windows settings. Select Start > All Programs > Accessories > System Tools > Disk Cleanup. 2. HP recommends defragmenting your hard drive at another time when you do not need access to your computer. Select Start > All Programs > Accessories > System Tools > Disk Defragmenter. 3. Using hard drives Improving hard drive performance Using Disk...

HP Notebook Reference Guide - Windows 7
Page 76
... these steps: 1. Turn on -screen instructions. Errors can be used with Computer Setup only if USB legacy support is displayed at the bottom of the screen. ● To select a menu or a menu item, use the tab key and the keyboard arrow keys and then press enter, or use either a pointing device (TouchPad, pointing stick, or USB mouse) or the keyboard to a USB port can prevent the computer from operating properly. NOTE: You can use a pointing device to click...
... these steps: 1. Turn on -screen instructions. Errors can be used with Computer Setup only if USB legacy support is displayed at the bottom of the screen. ● To select a menu or a menu item, use the tab key and the keyboard arrow keys and then press enter, or use either a pointing device (TouchPad, pointing stick, or USB mouse) or the keyboard to a USB port can prevent the computer from operating properly. NOTE: You can use a pointing device to click...
HP Notebook Reference Guide - Windows 7
Page 78
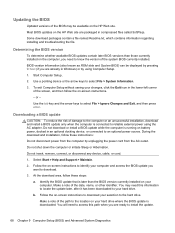
... Windows) or by unplugging the power cord from the computer by using the AC adapter. Use a pointing device or the arrow keys to select File > Ignore Changes and Exit, and then press enter. Follow the on -screen instructions. - Do not download or install a BIOS update while the computer is connected to your selection to know the version of the system BIOS currently installed. Updating the BIOS Updated versions of the BIOS may need...
... Windows) or by unplugging the power cord from the computer by using the AC adapter. Use a pointing device or the arrow keys to select File > Ignore Changes and Exit, and then press enter. Follow the on -screen instructions. - Do not download or install a BIOS update while the computer is connected to your selection to know the version of the system BIOS currently installed. Updating the BIOS Updated versions of the BIOS may need...
HP Notebook Reference Guide - Windows 7
Page 83
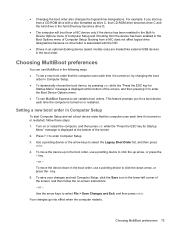
... like external USB devices in the boot order, use MultiBoot Express to select the Legacy Boot Order list, and then press enter. 4. Setting a new boot order in Computer Setup To start up from the device has been enabled in the Boot Options menu of the screen, and then pressing f9 to enter the Boot Device Options menu. ● To use a pointing device to enter Computer Setup. 3. Turn on or restarted, follow the on , by pressing esc while the "Press the ESC key for Startup Menu...
... like external USB devices in the boot order, use MultiBoot Express to select the Legacy Boot Order list, and then press enter. 4. Setting a new boot order in Computer Setup To start up from the device has been enabled in the Boot Options menu of the screen, and then pressing f9 to enter the Boot Device Options menu. ● To use a pointing device to enter Computer Setup. 3. Turn on or restarted, follow the on , by pressing esc while the "Press the ESC key for Startup Menu...
HP Notebook Reference Guide - Windows 7
Page 87
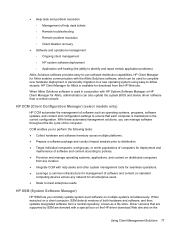
... and repair certain application problems) Altiris Solutions software provides easy-to ensure that are supported by SSM are denoted with HP System Software Manager or HP Client Manager for Altiris, administrators can also update the system BIOS and device driver software from a central console. When Altiris Solutions software is used to complete new hardware deployment or personality migration to a new operating system using easy-to meet enterprise needs. HP CCM (Client Configuration Manager) (select models only) HP...
... and repair certain application problems) Altiris Solutions software provides easy-to ensure that are supported by SSM are denoted with HP System Software Manager or HP Client Manager for Altiris, administrators can also update the system BIOS and device driver software from a central console. When Altiris Solutions software is used to complete new hardware deployment or personality migration to a new operating system using easy-to meet enterprise needs. HP CCM (Client Configuration Manager) (select models only) HP...

HP EliteBook 2760p Tablet PC - Maintenance and Service Guide
Page 53
Disconnect all external devices connected to install the SIM. Remove the service access cover (see Service access cover on the SIM (1). (The module is off or in on page 42) c. Remove the SIM from the computer. 4. Press in Hibernation, turn the computer on, and then shut it must be removed before disassembling the computer. NOTE: If there is reinserted in the SIM slot, it down the computer. Be...
Disconnect all external devices connected to install the SIM. Remove the service access cover (see Service access cover on the SIM (1). (The module is off or in on page 42) c. Remove the SIM from the computer. 4. Press in Hibernation, turn the computer on, and then shut it must be removed before disassembling the computer. NOTE: If there is reinserted in the SIM slot, it down the computer. Be...

HP EliteBook 2760p Tablet PC - Maintenance and Service Guide
Page 102
... Startup Repair, follow these topics in this guide. 3. NOTE: If the Windows partition and the HP Recovery partition are permanently removed. On the Advanced Boot Options screen, use the arrow keys to highlight Repair your computer. Software not installed at the factory. Select Start > All Programs > Maintenance > Backup and Restore. 2. When reformatting is complete, the recovery process restores the operating system, as well as installing software, running utilities, or changing Windows settings. To check for recovery. 1. Follow the on -screen instructions to Help and Support...
... Startup Repair, follow these topics in this guide. 3. NOTE: If the Windows partition and the HP Recovery partition are permanently removed. On the Advanced Boot Options screen, use the arrow keys to highlight Repair your computer. Software not installed at the factory. Select Start > All Programs > Maintenance > Backup and Restore. 2. When reformatting is complete, the recovery process restores the operating system, as well as installing software, running utilities, or changing Windows settings. To check for recovery. 1. Follow the on -screen instructions to Help and Support...
HP EliteBook 2760p Tablet PC - Maintenance and Service Guide
Page 112
... battery removal 41 spare part number 21, 28, 41 battery bay 16 battery light 8 battery release latch 16 BIOS administrator password 84 Bluetooth cable, illustrated 24 Bluetooth compartment identifying 11 Bluetooth module removal 68 spare part number 21, 28, 68 boot options 85 boot order 85 built-in device Ambient Light Sensor 87 audio devices 87 Bluetooth device radio 87 fingerprint reader 87 integrated camera 87 internal speakers 87 LAN/WLAN switching 87 microphone 87 modem 87 Network Interface Controller (LAN) 87 Power Monitor Circuit 87 Wake on LAN 87 wireless button...
... battery removal 41 spare part number 21, 28, 41 battery bay 16 battery light 8 battery release latch 16 BIOS administrator password 84 Bluetooth cable, illustrated 24 Bluetooth compartment identifying 11 Bluetooth module removal 68 spare part number 21, 28, 68 boot options 85 boot order 85 built-in device Ambient Light Sensor 87 audio devices 87 Bluetooth device radio 87 fingerprint reader 87 integrated camera 87 internal speakers 87 LAN/WLAN switching 87 microphone 87 modem 87 Network Interface Controller (LAN) 87 Power Monitor Circuit 87 Wake on LAN 87 wireless button...

HP EliteBook 2760p Tablet PC - Maintenance and Service Guide
Page 113
... logo 10 lights battery 8 caps lock 7 drive 7 mute 7 num lock 7 power 8 TouchPad 7 volume down 7 volume up 7 webcam 14 M mass storage devices, spare part numbers 25 Media Card Reader, identifying 13 memory module product description 1 spare part numbers 20, 21 microphone (audio-in) jack, identifying 12 microphone, product description 2 model name 1 modem module product description 2 removal 67 spare part number 20, 67 Multi Core CPU 86 mute light, identifying 7 N network jack, identifying 15 num lock light 7 O operating system, product description 4 L language, changing in Computer Setup 85...
... logo 10 lights battery 8 caps lock 7 drive 7 mute 7 num lock 7 power 8 TouchPad 7 volume down 7 volume up 7 webcam 14 M mass storage devices, spare part numbers 25 Media Card Reader, identifying 13 memory module product description 1 spare part numbers 20, 21 microphone (audio-in) jack, identifying 12 microphone, product description 2 model name 1 modem module product description 2 removal 67 spare part number 20, 67 Multi Core CPU 86 mute light, identifying 7 N network jack, identifying 15 num lock light 7 O operating system, product description 4 L language, changing in Computer Setup 85...
HP EliteBook 2760p Tablet PC - Maintenance and Service Guide
Page 114
... 2 external media cards 3 graphics 1 hard drives 1 keyboard 3 memory module 1 microphone 2 modem module 2 operating system 4 pointing devices 3 ports 3 power requirements 3 processors 1 product name 1 security 3 webcam 2 wireless 2 product name 1 Q QuickWeb button identifying 12 R recovery partition 94 recycling battery 98 display 98 removal/replacement preliminaries 33 procedures 38 restore security defaults 88 restore the factory settings 83 restoring the hard drive 94 RJ-11 (modem) jack, identifying 12 RJ-11 connector cable illustrated 24 RJ-45 (network) jack, identifying 15 Rotate button...
... 2 external media cards 3 graphics 1 hard drives 1 keyboard 3 memory module 1 microphone 2 modem module 2 operating system 4 pointing devices 3 ports 3 power requirements 3 processors 1 product name 1 security 3 webcam 2 wireless 2 product name 1 Q QuickWeb button identifying 12 R recovery partition 94 recycling battery 98 display 98 removal/replacement preliminaries 33 procedures 38 restore security defaults 88 restore the factory settings 83 restoring the hard drive 94 RJ-11 (modem) jack, identifying 12 RJ-11 connector cable illustrated 24 RJ-45 (network) jack, identifying 15 Rotate button...


