
HP Notebook Hard Drives & Solid State Drives Identifying, Preventing, Diagnosing and Recovering from Drive Failures Care and Mai
Page 6
... RIS (Remote Installation Service) installation points include: Adding SATA drivers to installation CDs, building an image, and switching to SATA AHCI mode Using Sysprep with Serial ATA hard disk drives. The Intel Matrix Storage Technology solution technology provides improved performance and reliability, as well as support for the SATA Advanced Host Controller (AHCI) Interface. Intel Matrix Storage Manager Driver provides support for lower power consumption on...
... RIS (Remote Installation Service) installation points include: Adding SATA drivers to installation CDs, building an image, and switching to SATA AHCI mode Using Sysprep with Serial ATA hard disk drives. The Intel Matrix Storage Technology solution technology provides improved performance and reliability, as well as support for the SATA Advanced Host Controller (AHCI) Interface. Intel Matrix Storage Manager Driver provides support for lower power consumption on...
User Guide - Windows 8
Page 5
... Locating hardware ...3 Locating software ...3 Front ...3 Right side ...4 Left side ...6 Display ...7 Top ...8 TouchPad ...8 Lights ...9 Buttons, speakers, and fingerprint reader 11 Keys ...12 Bottom ...13 Labels ...14 3 Connecting to a network ...16 Connecting to a wireless network ...16 Using the wireless controls 16 Using the wireless button 16 Using operating system controls 16 Using a WLAN ...17 Using an Internet service provider 17 Setting up a WLAN 18 Configuring a wireless router 18 Protecting your WLAN 18 Connecting to a WLAN 19 Using Bluetooth wireless devices 19 Connecting...
... Locating hardware ...3 Locating software ...3 Front ...3 Right side ...4 Left side ...6 Display ...7 Top ...8 TouchPad ...8 Lights ...9 Buttons, speakers, and fingerprint reader 11 Keys ...12 Bottom ...13 Labels ...14 3 Connecting to a network ...16 Connecting to a wireless network ...16 Using the wireless controls 16 Using the wireless button 16 Using operating system controls 16 Using a WLAN ...17 Using an Internet service provider 17 Setting up a WLAN 18 Configuring a wireless router 18 Protecting your WLAN 18 Connecting to a WLAN 19 Using Bluetooth wireless devices 19 Connecting...
User Guide - Windows 8
Page 8
... ...65 Installing software updates ...65 Installing Windows updates 65 Installing HP and third-party software updates 65 Securing your wireless network ...66 Backing up your software applications and information 66 Using an optional security cable lock 66 10 Using Setup Utility (BIOS) and System Diagnostics 67 Starting Setup Utility (BIOS) ...67 Updating the BIOS ...67 Determining the BIOS version 67 Downloading a BIOS update 68 Using System Diagnostics ...69 11 Backing up, restoring, and recovering ...70 Creating recovery media and backups 70 Creating HP Recovery media 71 Restore and...
... ...65 Installing software updates ...65 Installing Windows updates 65 Installing HP and third-party software updates 65 Securing your wireless network ...66 Backing up your software applications and information 66 Using an optional security cable lock 66 10 Using Setup Utility (BIOS) and System Diagnostics 67 Starting Setup Utility (BIOS) ...67 Updating the BIOS ...67 Determining the BIOS version 67 Downloading a BIOS update 68 Using System Diagnostics ...69 11 Backing up, restoring, and recovering ...70 Creating recovery media and backups 70 Creating HP Recovery media 71 Restore and...
User Guide - Windows 8
Page 12
... located with the user guides on the Start screen, select My computer, and then select Warranty and services, or go to information and troubleshooting tips. ● Proper workstation setup. ● Guidelines for posture and work habits that increase your comfort and decrease your risk of how-to http://www.hp.com/go/orderdocuments. Resource Setup Instructions Windows 8 Basics guide Help and Support To access Help and Support...
... located with the user guides on the Start screen, select My computer, and then select Warranty and services, or go to information and troubleshooting tips. ● Proper workstation setup. ● Guidelines for posture and work habits that increase your comfort and decrease your risk of how-to http://www.hp.com/go/orderdocuments. Resource Setup Instructions Windows 8 Basics guide Help and Support To access Help and Support...
User Guide - Windows 8
Page 29
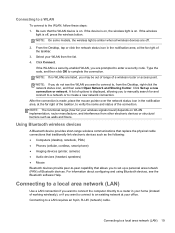
If the wireless light is displayed, allowing you to manually search for and connect to a network or to create a new network connection. Type the code, and then click OK to a LAN requires an 8-pin, RJ-45 (network) cable. A list of the connection. Connecting to complete the connection. If the device is on . Click Connect. If the WLAN is on , the wireless light is a security-enabled WLAN, you do not see the Bluetooth software Help. NOTE: If no...
If the wireless light is displayed, allowing you to manually search for and connect to a network or to create a new network connection. Type the code, and then click OK to a LAN requires an 8-pin, RJ-45 (network) cable. A list of the connection. Connecting to complete the connection. If the device is on . Click Connect. If the WLAN is on , the wireless light is a security-enabled WLAN, you do not see the Bluetooth software Help. NOTE: If no...
User Guide - Windows 8
Page 32
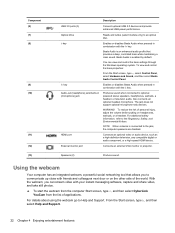
... webcam, you to an optical disc. Beats Audio is enabled by default. Audio-out (headphone) jack/Audio-in combination with the fn key. The jack does not support optional microphone-only devices. NOTE: When a device is connected to optional powered stereo speakers, headphones, earbuds, a headset, or television audio. Using the webcam Your computer has an integrated webcam, a powerful social networking tool that provides a deep, controlled bass while maintaining a clear sound. Component (6) (7) (8) (9) (10) (11) (12) (13) Description USB 3.0 ports (3) Connect optional USB 3.0 devices...
... webcam, you to an optical disc. Beats Audio is enabled by default. Audio-out (headphone) jack/Audio-in combination with the fn key. The jack does not support optional microphone-only devices. NOTE: When a device is connected to optional powered stereo speakers, headphones, earbuds, a headset, or television audio. Using the webcam Your computer has an integrated webcam, a powerful social networking tool that provides a deep, controlled bass while maintaining a clear sound. Component (6) (7) (8) (9) (10) (11) (12) (13) Description USB 3.0 ports (3) Connect optional USB 3.0 devices...
User Guide - Windows 8
Page 53
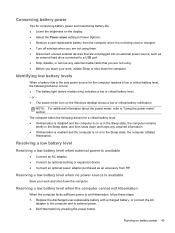
... charged. ● Turn off wireless when you are not using . ● Before you leave your work , initiate Sleep or shut down the computer. NOTE: For additional information about the power meter, refer to a USB port. ● Stop, disable, or remove any unsaved information. ● If Hibernation is enabled and the computer is available ● Connect an AC adapter. ● Connect an optional docking or expansion device. ● Connect...
... charged. ● Turn off wireless when you are not using . ● Before you leave your work , initiate Sleep or shut down the computer. NOTE: For additional information about the power meter, refer to a USB port. ● Stop, disable, or remove any unsaved information. ● If Hibernation is enabled and the computer is available ● Connect an AC adapter. ● Connect an optional docking or expansion device. ● Connect...
User Guide - Windows 8
Page 57
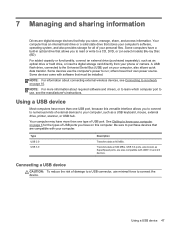
... internal hard drive or a solid state drive that stores your computer's software, operating system, and also provides storage for the types of external devices to the Universal Serial Bus (USB) port on page 16. A USB flash drive, connected to your computer. USB 3.0 ports, also known as SuperSpeed ports, are also compatible with software that help you to connect to numerous kinds of USB ports you have on select models) Blu-ray Disc (BD). Some devices use , see Connecting...
... internal hard drive or a solid state drive that stores your computer's software, operating system, and also provides storage for the types of external devices to the Universal Serial Bus (USB) port on page 16. A USB flash drive, connected to your computer. USB 3.0 ports, also known as SuperSpeed ports, are also compatible with software that help you to connect to numerous kinds of USB ports you have on select models) Blu-ray Disc (BD). Some devices use , see Connecting...
User Guide - Windows 8
Page 60
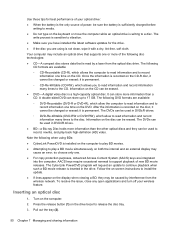
... the disc tray. 3. Pull out the tray (2). 50 Chapter 7 Managing and sharing information The following when using is writing to the CD. Follow the on-screen instructions to install the update. ● If lines appear on the display when viewing a BD, they can store up to media. ● Do not type on the drive bezel to support playback of the following DVD formats are...
... the disc tray. 3. Pull out the tray (2). 50 Chapter 7 Managing and sharing information The following when using is writing to the CD. Follow the on-screen instructions to install the update. ● If lines appear on the display when viewing a BD, they can store up to media. ● Do not type on the drive bezel to support playback of the following DVD formats are...
User Guide - Windows 8
Page 67
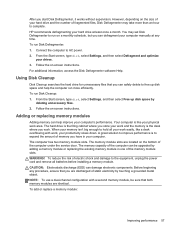
... hour to free up disk space by deleting unnecessary files. 2. Connect the computer to the equipment, unplug the power cord and remove all your work easily, like your productivity slows down. Using Disk Cleanup Disk Cleanup searches the hard drive for unnecessary files that you can safely delete to complete. Adding or replacing memory modules Adding memory can be sure that you start Disk Defragmenter, it works without supervision...
... hour to free up disk space by deleting unnecessary files. 2. Connect the computer to the equipment, unplug the power cord and remove all your work easily, like your productivity slows down. Using Disk Cleanup Disk Cleanup searches the hard drive for unnecessary files that you can safely delete to complete. Adding or replacing memory modules Adding memory can be sure that you start Disk Defragmenter, it works without supervision...
User Guide - Windows 8
Page 78
... displayed on your BIOS, make a note of the path to the location on the screen reports a successful installation, you recorded earlier, open the folder on the screen after it to the BIOS version currently installed on -screen instructions to download your computer to a network, consult the network administrator before installing any device, cable, or cord. 1. If no instructions are ready to install the update. The hard drive designation is connected to reliable external power using the AC adapter. Using...
... displayed on your BIOS, make a note of the path to the location on the screen reports a successful installation, you recorded earlier, open the folder on the screen after it to the BIOS version currently installed on -screen instructions to download your computer to a network, consult the network administrator before installing any device, cable, or cord. 1. If no instructions are ready to install the update. The hard drive designation is connected to reliable external power using the AC adapter. Using...
User Guide - Windows 8
Page 82
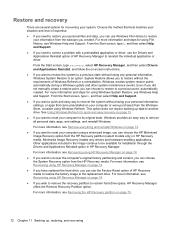
... can use the Factory Reset option of HP Recovery Manager to the replacement drive. Windows creates system restore points automatically during a Windows update and other system maintenance events. From the Start screen, type h, and then select Help and Support. ● If you can use the Drivers and Applications Reinstall option of HP Recovery media to restore the factory image to reinstall the individual application or driver. This option does not require backing up , restoring, and recovering Minimized Image Recovery installs only drivers and hardware-enabling applications...
... can use the Factory Reset option of HP Recovery Manager to the replacement drive. Windows creates system restore points automatically during a Windows update and other system maintenance events. From the Start screen, type h, and then select Help and Support. ● If you can use the Drivers and Applications Reinstall option of HP Recovery media to restore the factory image to reinstall the individual application or driver. This option does not require backing up , restoring, and recovering Minimized Image Recovery installs only drivers and hardware-enabling applications...

User Guide - Windows 8
Page 90
... 13 battery temperature 44 Beats Audio 12, 22, 23, 37 Beats Audio Control Panel 23 Beats Audio hot key 23 best practices 1 BIOS determining version 67 downloading an update 68 updating 67 Bluetooth device 16, 19 Bluetooth label 15 boot order changing HP Recovery Manager 75 buttons left TouchPad 8 optical drive eject 4 power 11 right TouchPad 8 TouchPad on/off 8 C cables USB 48 caps lock light, identifying 9 caring for your computer 60 checking audio functions 24 cleaning your computer 60 components bottom 13 display 7 front...
... 13 battery temperature 44 Beats Audio 12, 22, 23, 37 Beats Audio Control Panel 23 Beats Audio hot key 23 best practices 1 BIOS determining version 67 downloading an update 68 updating 67 Bluetooth device 16, 19 Bluetooth label 15 boot order changing HP Recovery Manager 75 buttons left TouchPad 8 optical drive eject 4 power 11 right TouchPad 8 TouchPad on/off 8 C cables USB 48 caps lock light, identifying 9 caring for your computer 60 checking audio functions 24 cleaning your computer 60 components bottom 13 display 7 front...

User Guide - Windows 8
Page 91
...WLAN 15 latch, battery release 13 lights AC adapter 5 caps lock 9 fingerprint reader 10 hard drive 4 mute 9 optical drive 4 power 4, 9 RJ-45 (network) jack 6 TouchPad 8, 10 webcam 7, 21 wireless 9 low battery level 43 M maintenance Disk Cleanup 57 Disk Defragmenter 56 memory module inserting 59 removing 58 replacing 57 memory module compartment, identifying 14 minimized image creating 74 minimized image recovery 75 mouse, external setting preferences 28 mute light, identifying 9 N network jack, identifying 6 num lock key, identifying 12, 38 O operating environment 77 optical disc inserting 50...
...WLAN 15 latch, battery release 13 lights AC adapter 5 caps lock 9 fingerprint reader 10 hard drive 4 mute 9 optical drive 4 power 4, 9 RJ-45 (network) jack 6 TouchPad 8, 10 webcam 7, 21 wireless 9 low battery level 43 M maintenance Disk Cleanup 57 Disk Defragmenter 56 memory module inserting 59 removing 58 replacing 57 memory module compartment, identifying 14 minimized image creating 74 minimized image recovery 75 mouse, external setting preferences 28 mute light, identifying 9 N network jack, identifying 6 num lock key, identifying 12, 38 O operating environment 77 optical disc inserting 50...
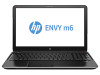
HP ENVY m6 Notebook PC Maintenance and Service Guide
Page 30
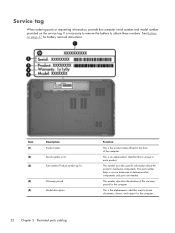
... (1) (2) (3) Description Product name Serial number (s/n) Part number/Product number (p/n) (4) Warranty period (5) Model description Function This is the alphanumeric identifier used to determine what components and parts are needed. See Battery on the service tag. This number describes the duration of the computer. This is the product name affixed to the front of the warranty period for battery removal instructions. This number provides specific information about the product's hardware components.
... (1) (2) (3) Description Product name Serial number (s/n) Part number/Product number (p/n) (4) Warranty period (5) Model description Function This is the alphanumeric identifier used to determine what components and parts are needed. See Battery on the service tag. This number describes the duration of the computer. This is the product name affixed to the front of the warranty period for battery removal instructions. This number provides specific information about the product's hardware components.
HP ENVY m6 Notebook PC Maintenance and Service Guide
Page 107
... (for HP updates now. 3. NOTE: After a message on your selection to reliable external power using the AC adapter. Make a note of the date, name, or other identifier. You may need to access this information to download your hard drive that are displayed on -screen instructions. Follow any instructions that contains the update. 4. From the Start screen, type e, and then select File Explorer. 2. BIOS installation procedures vary. Complete the installation by unplugging the power cord...
... (for HP updates now. 3. NOTE: After a message on your selection to reliable external power using the AC adapter. Make a note of the date, name, or other identifier. You may need to access this information to download your hard drive that are displayed on -screen instructions. Follow any instructions that contains the update. 4. From the Start screen, type e, and then select File Explorer. 2. BIOS installation procedures vary. Complete the installation by unplugging the power cord...
HP ENVY m6 Notebook PC Maintenance and Service Guide
Page 115
... -screen instructions. See Help and Support for quick and easy recovery When your permission or password when using HP Recovery Manager on the system at the factory. To start fresh and keep what you might need to start Refresh: 1. IMPORTANT: Refresh removes any traditional applications that you have replaced the hard drive, you to regain system stability, the Windows Refresh option allows you can choose the System Recovery option from the PC settings screen...
... -screen instructions. See Help and Support for quick and easy recovery When your permission or password when using HP Recovery Manager on the system at the factory. To start fresh and keep what you might need to start Refresh: 1. IMPORTANT: Refresh removes any traditional applications that you have replaced the hard drive, you to regain system stability, the Windows Refresh option allows you can choose the System Recovery option from the PC settings screen...

HP ENVY m6 Notebook PC Maintenance and Service Guide
Page 122
... 18 power 12 TouchPad 15 TouchPad on/off 15 C cables, service considerations 42 caps lock light 14 chipset, product description 2 components bottom 19 button 12 display 11 fingerprint reader 12 front 16 keys 13 left-side 17 lights 14 right-side 18 speakers 12 TouchPad 15 computer major components 23 computer part number 46 computer specifications 101 connectors, service considerations 42 D Digital Media Slot, location 16 display components 11 specifications 102 display assembly removal...
... 18 power 12 TouchPad 15 TouchPad on/off 15 C cables, service considerations 42 caps lock light 14 chipset, product description 2 components bottom 19 button 12 display 11 fingerprint reader 12 front 16 keys 13 left-side 17 lights 14 right-side 18 speakers 12 TouchPad 15 computer major components 23 computer part number 46 computer specifications 101 connectors, service considerations 42 D Digital Media Slot, location 16 display components 11 specifications 102 display assembly removal...

HP ENVY m6 Notebook PC Maintenance and Service Guide
Page 123
... lights AC adapter 19 caps lock 14 fingerprint reader 15 hard drive 18 mute 14 network jack 17 optical drive 18 power 14, 18 RJ-45 jack 17 TouchPad 15 webcam 11 wireless 14 M mass storage device precautions 42 spare part numbers 30 memory module product description 4 removal 55 spare part numbers 28, 34, 55 microphone location 11 product description 5 microphone jack 17 model description 47 model name 1 monitor port 17 mute light 14 N network jack lights 17 location 17 num lock key 13 numeric keypad 13 O operating...
... lights AC adapter 19 caps lock 14 fingerprint reader 15 hard drive 18 mute 14 network jack 17 optical drive 18 power 14, 18 RJ-45 jack 17 TouchPad 15 webcam 11 wireless 14 M mass storage device precautions 42 spare part numbers 30 memory module product description 4 removal 55 spare part numbers 28, 34, 55 microphone location 11 product description 5 microphone jack 17 model description 47 model name 1 monitor port 17 mute light 14 N network jack lights 17 location 17 num lock key 13 numeric keypad 13 O operating...

HP ENVY m6 Notebook PC Maintenance and Service Guide
Page 124
... module 4 microphone 5 operating system 9 optical drive 5 pointing device 8 ports 7 power requirements 8 processors 1 product name 1 security 8 serviceability 9 solid-state drive 5 video 5 wireless 6 product name 1, 46 product number 46 R removal/replacement preliminaries 41 procedures 46 right-side components RJ-45 jack lights 17 location 17 RTC battery removal 51 spare part number 18 28, 34, 51 S Screw Kit, spare part number 32, 36 security cable slot 19 security, product description 8 serial number 46 service considerations cables 42 connectors 42 plastic parts 41 service cover location...
... module 4 microphone 5 operating system 9 optical drive 5 pointing device 8 ports 7 power requirements 8 processors 1 product name 1 security 8 serviceability 9 solid-state drive 5 video 5 wireless 6 product name 1, 46 product number 46 R removal/replacement preliminaries 41 procedures 46 right-side components RJ-45 jack lights 17 location 17 RTC battery removal 51 spare part number 18 28, 34, 51 S Screw Kit, spare part number 32, 36 security cable slot 19 security, product description 8 serial number 46 service considerations cables 42 connectors 42 plastic parts 41 service cover location...


