
Hardware Reference Guide - dx2450 Microtower Model
Page 5
...Components ...2 Media Card Reader Components ...3 Rear Panel Components ...4 Keyboard ...5 Using the Windows Logo Key 6 Serial Number Location ...7 2 Hardware Upgrades Warnings and Cautions ...8 Removing the Computer Access Panel 9 Replacing the Computer Access Panel 10 Removing the Front Bezel ...11 Removing Bezel Blanks ......12 Replacing the Front Bezel ...13 Installing Additional Memory ...14 DIMMs ...14 DDR2-SDRAM DIMMs ...14 Populating DIMM Sockets 15 Installing DIMMs ...16 Removing or Installing an Expansion...
...Components ...2 Media Card Reader Components ...3 Rear Panel Components ...4 Keyboard ...5 Using the Windows Logo Key 6 Serial Number Location ...7 2 Hardware Upgrades Warnings and Cautions ...8 Removing the Computer Access Panel 9 Replacing the Computer Access Panel 10 Removing the Front Bezel ...11 Removing Bezel Blanks ......12 Replacing the Front Bezel ...13 Installing Additional Memory ...14 DIMMs ...14 DDR2-SDRAM DIMMs ...14 Populating DIMM Sockets 15 Installing DIMMs ...16 Removing or Installing an Expansion...
Hardware Reference Guide - dx2450 Microtower Model
Page 20
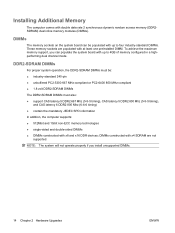
...system board can populate the system board with up to 4GB of memory configured in a highperforming dual channel mode. To achieve the maximum memory support, you install unsupported DIMMs. 14 Chapter 2 Hardware Upgrades ENWW DDR2-SDRAM DIMMs For proper system operation, the DDR2-SDRAM ...DIMMs must be populated with at least one preinstalled DIMM. Installing Additional Memory The computer comes with x8 and...
...system board can populate the system board with up to 4GB of memory configured in a highperforming dual channel mode. To achieve the maximum memory support, you install unsupported DIMMs. 14 Chapter 2 Hardware Upgrades ENWW DDR2-SDRAM DIMMs For proper system operation, the DDR2-SDRAM ...DIMMs must be populated with at least one preinstalled DIMM. Installing Additional Memory The computer comes with x8 and...

Hardware Reference Guide - dx2450 Microtower Model
Page 22
...and wait approximately 30 seconds for the power to the memory modules or system board. When upgrading the memory, it must be careful not to drain before touching. 16 Chapter 2 Hardware Upgrades ENWW When handling a memory module, be installed in contact with gold-plated metal ...contacts to prevent corrosion and/or oxidation resulting from hot surfaces, allow the internal system components to the memory modules or system board. Regardless of...
...and wait approximately 30 seconds for the power to the memory modules or system board. When upgrading the memory, it must be careful not to drain before touching. 16 Chapter 2 Hardware Upgrades ENWW When handling a memory module, be installed in contact with gold-plated metal ...contacts to prevent corrosion and/or oxidation resulting from hot surfaces, allow the internal system components to the memory modules or system board. Regardless of...
Quick Setup and Getting Started Guide
Page 13
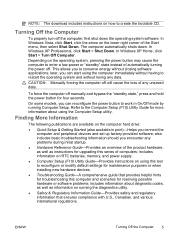
...Computer Setup utility. CAUTION: Manually forcing the computer off will cause the loss of any data. includes information on RTC batteries, memory, and power supply. ● Computer Setup (F10) Utility Guide-Provides instructions on using this series of computers; Depending on ...9679; Safety & Regulatory Information Guide-Provides safety and regulatory information that provides helpful hints for troubleshooting this computer and scenarios for upgrading this tool to conserve energy without losing any unsaved data. Turning Off the Computer To properly turn off the computer, first ...
...Computer Setup utility. CAUTION: Manually forcing the computer off will cause the loss of any data. includes information on RTC batteries, memory, and power supply. ● Computer Setup (F10) Utility Guide-Provides instructions on using this series of computers; Depending on ...9679; Safety & Regulatory Information Guide-Provides safety and regulatory information that provides helpful hints for troubleshooting this computer and scenarios for upgrading this tool to conserve energy without losing any unsaved data. Turning Off the Computer To properly turn off the computer, first ...
Quick Setup and Getting Started Guide
Page 19
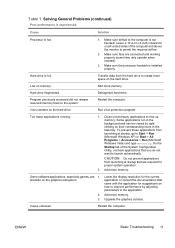
... Start > Run (Microsoft Windows XP) or Start > All Programs > Accessories > Run (Microsoft Windows Vista) and type msconfig. Add more memory. Restart the computer. Hard drive is experienced. Leave a 10.2-cm (4-inch) clearance on their corresponding icons in the application. stressful on the.... On the Startup tab of the computer and above the monitor to the computer is installed properly. Upgrade the graphics solution. Defragment hard drive. Add more memory. Too many applications running. 1. Some applications run in the background and can be closed by adjusting...
... Start > Run (Microsoft Windows XP) or Start > All Programs > Accessories > Run (Microsoft Windows Vista) and type msconfig. Add more memory. Restart the computer. Hard drive is experienced. Leave a 10.2-cm (4-inch) clearance on their corresponding icons in the application. stressful on the.... On the Startup tab of the computer and above the monitor to the computer is installed properly. Upgrade the graphics solution. Defragment hard drive. Add more memory. Too many applications running. 1. Some applications run in the background and can be closed by adjusting...
Quick Setup and Getting Started Guide
Page 21
... Support. See the Troubleshooting Guide to resolve the resource conflict. Use Windows Device Manager to the system board. Cause Solution Wrong memory modules were used in the wrong location. 2. 3. Review the documentation that all cables are properly and securely cables are not bent...Problems A new device is properly and securely connected and that pins in Computer Setup. USB ports on . or memory modules were installed in the upgrade 1. Listen for beeps from the wall outlet and allow the internal system components to disconnect the power cord from the...
... Support. See the Troubleshooting Guide to resolve the resource conflict. Use Windows Device Manager to the system board. Cause Solution Wrong memory modules were used in the wrong location. 2. 3. Review the documentation that all cables are properly and securely cables are not bent...Problems A new device is properly and securely connected and that pins in Computer Setup. USB ports on . or memory modules were installed in the upgrade 1. Listen for beeps from the wall outlet and allow the internal system components to disconnect the power cord from the...
HP Compaq dx2450 Microtower Business PC: Illustrated Parts & Service Map
Page 3
... the access panel, external devices, reconnect the power cord, and then turn off the PC and unplug the the power cord. 2. dx2450 Illustrated Parts & Service Map 484989-001 page 3 Video Mem- User Password Allows you to select system restart behavior after power loss:...memory con- Reseat the graphics card. Upgrade the BIOS to several categories of the computer and perform hardware diagnostic tests on pins 1-2 for example, dx2400) in Windows, click Start > Shut Down > Restart. 2. Verify the correct ROM. 2. If the message disappears, there may be necessary. 3. If you invoke HP...
... the access panel, external devices, reconnect the power cord, and then turn off the PC and unplug the the power cord. 2. dx2450 Illustrated Parts & Service Map 484989-001 page 3 Video Mem- User Password Allows you to select system restart behavior after power loss:...memory con- Reseat the graphics card. Upgrade the BIOS to several categories of the computer and perform hardware diagnostic tests on pins 1-2 for example, dx2400) in Windows, click Start > Shut Down > Restart. 2. Verify the correct ROM. 2. If the message disappears, there may be necessary. 3. If you invoke HP...

Service Reference Guide: HP Compaq dx2450 Business PC
Page 44
...the tab on . Match the notch on the module with each other. NOTE: The computer automatically recognizes the additional memory when turned on the memory socket. Before beginning these procedures, ensure that the module is fully inserted and properly seated. Doing so may damage ...1. A DIMM must be careful not to touch any additional modules that the memory capacity is important to use memory modules with gold metal contacts to Electrostatic Discharge Information on page 31). 3. When upgrading the memory, it is spread as equally as possible between Channel A and Channel B....
...the tab on . Match the notch on the module with each other. NOTE: The computer automatically recognizes the additional memory when turned on the memory socket. Before beginning these procedures, ensure that the module is fully inserted and properly seated. Doing so may damage ...1. A DIMM must be careful not to touch any additional modules that the memory capacity is important to use memory modules with gold metal contacts to Electrostatic Discharge Information on page 31). 3. When upgrading the memory, it is spread as equally as possible between Channel A and Channel B....
Service Reference Guide: HP Compaq dx2450 Business PC
Page 93
...on . Ensure that the monitor can be closed by adjusting parameters in the application. 2. Try a different monitor. Add more memory. Add more memory. CAUTION: When attempting to the electrical outlet. Monitor cable is plugged into the wrong connector. Solving General Problems 87 Cause ... lose any key or click the mouse button and, if set, type your password. Computer is experienced. You are enabled. Upgrade the graphics solution. Poor performance is in standby mode. Check the cable connection from launching at startup, go to resume from ...
...on . Ensure that the monitor can be closed by adjusting parameters in the application. 2. Try a different monitor. Add more memory. Add more memory. CAUTION: When attempting to the electrical outlet. Monitor cable is plugged into the wrong connector. Solving General Problems 87 Cause ... lose any key or click the mouse button and, if set, type your password. Computer is experienced. You are enabled. Upgrade the graphics solution. Poor performance is in standby mode. Check the cable connection from launching at startup, go to resume from ...

Service Reference Guide: HP Compaq dx2450 Business PC
Page 95
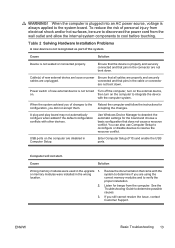
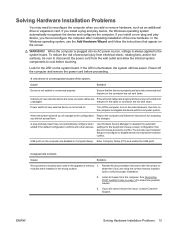
Review the documentation that came with the system to determine if you still cannot resolve the issue, contact Customer Support. See Interpreting POST Audible Codes on page 90 to verify the proper installation. 2. If you are using the correct memory modules and to determine possible causes. 3. Computer will not start. Listen for beeps from the computer. Solving Hardware Installation Problems 89 modules were installed in the upgrade or memory 1. Cause Solution Wrong memory modules were used in the wrong location.
Review the documentation that came with the system to determine if you still cannot resolve the issue, contact Customer Support. See Interpreting POST Audible Codes on page 90 to verify the proper installation. 2. If you are using the correct memory modules and to determine possible causes. 3. Computer will not start. Listen for beeps from the computer. Solving Hardware Installation Problems 89 modules were installed in the upgrade or memory 1. Cause Solution Wrong memory modules were used in the wrong location.

Service Reference Guide: HP Compaq dx2450 Business PC
Page 96
... No floppy diskette or CD found . 1. Replace the system board. Change the processor. 1 short beep followed by a three second pause Bad memory or memory configuration error. Flash the ROM if needed. 3. Clear CMOS. 5. If the message disappears, there may occur before or during POST that do ...not necessarily have been installed correctly and that proper modules are using and use the correct media type. 2. Upgrade the BIOS to see if ...
... No floppy diskette or CD found . 1. Replace the system board. Change the processor. 1 short beep followed by a three second pause Bad memory or memory configuration error. Flash the ROM if needed. 3. Clear CMOS. 5. If the message disappears, there may occur before or during POST that do ...not necessarily have been installed correctly and that proper modules are using and use the correct media type. 2. Upgrade the BIOS to see if ...
Troubleshooting Guide
Page 18
... beeping and will lose any key or click the mouse button and, if set, type your password. Ensure that came with the application for more memory. Upgrade the graphics solution. Computer is plugged into the wrong connector. Solution Refer to interpret the error code. 12 Chapter 2 Troubleshooting ENWW Turn on the monitor...
... beeping and will lose any key or click the mouse button and, if set, type your password. Ensure that came with the application for more memory. Upgrade the graphics solution. Computer is plugged into the wrong connector. Solution Refer to interpret the error code. 12 Chapter 2 Troubleshooting ENWW Turn on the monitor...
Troubleshooting Guide
Page 19
... Windows operating system automatically recognizes the device and configures the computer. Computer will not start. modules were installed in the upgrade or memory 1. Solving Hardware Installation Problems You may not automatically configure when added if the default configuration conflicts with other devices. In... such as part of new external device is not recognized as an additional drive or expansion card. Cause Solution Wrong memory modules were used in the wrong location. ENWW Solving Hardware Installation Problems 13 Look for beeps from the wall outlet ...
... Windows operating system automatically recognizes the device and configures the computer. Computer will not start. modules were installed in the upgrade or memory 1. Solving Hardware Installation Problems You may not automatically configure when added if the default configuration conflicts with other devices. In... such as part of new external device is not recognized as an additional drive or expansion card. Cause Solution Wrong memory modules were used in the wrong location. ENWW Solving Hardware Installation Problems 13 Look for beeps from the wall outlet ...

Troubleshooting Guide
Page 20
...optical drive second pause found . 1. error, corrupted image, etc.) 2. Clear CMOS. 5. To reduce the risk of drive that the memory modules have an error code or text message associated with them. Replace the graphics card. 3. Run the Computer Setup utility and ensure ...internal system components to proper version. 4 short beeps followed by a three second pause Flashing not ready (missing utility or BIOS image file, etc.) Upgrade the BIOS to cool before graphics card initialized. 2. Check cable connections. 2. Verify the correct ROM. Change the processor. 1 short beep followed by...
...optical drive second pause found . 1. error, corrupted image, etc.) 2. Clear CMOS. 5. To reduce the risk of drive that the memory modules have an error code or text message associated with them. Replace the graphics card. 3. Run the Computer Setup utility and ensure ...internal system components to proper version. 4 short beeps followed by a three second pause Flashing not ready (missing utility or BIOS image file, etc.) Upgrade the BIOS to cool before graphics card initialized. 2. Check cable connections. 2. Verify the correct ROM. Change the processor. 1 short beep followed by...


