Troubleshooting Guide
Page 8
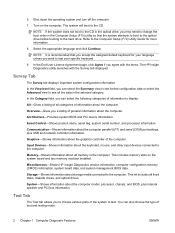
...Guide for your specific keyboard. 9. Overview-Gives you a listing of general information about the graphics controller of the computer. Miscellaneous-Shows HP Insight Diagnostics version information, computer configuration memory (CMOS) information, system board data, and system management BIOS data. NOTE: It is ...information about the keyboard, mouse, and other input devices connected to display: All-Gives a listing of the system to the hard drive. This includes memory slots on the computer. In the View level field, you can also choose the type of information to ...
...Guide for your specific keyboard. 9. Overview-Gives you a listing of general information about the graphics controller of the computer. Miscellaneous-Shows HP Insight Diagnostics version information, computer configuration memory (CMOS) information, system board data, and system management BIOS data. NOTE: It is ...information about the keyboard, mouse, and other input devices connected to display: All-Gives a listing of the system to the hard drive. This includes memory slots on the computer. In the View level field, you can also choose the type of information to ...
Troubleshooting Guide
Page 10
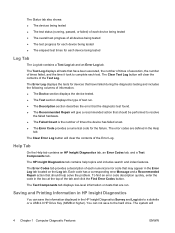
...9679; The test progress for each device being tested ● The elapsed test times for devices that are defined in the HP Insight Diagnostics Survey and Log tabs to the hard drive. The error codes are run . ● The Description section describes the error that the diagnostic test found. ● ...can not save the information displayed in the Help tab. You can save to a diskette or a USB 2.0 HP Drive Key (64MB or higher). Help Tab On the Help tab contains an HP Insight Diagnostics tab, an Error Codes tab, and a Test Components tab. To find an error code description quickly,...
...9679; The test progress for each device being tested ● The elapsed test times for devices that are defined in the HP Insight Diagnostics Survey and Log tabs to the hard drive. The error codes are run . ● The Description section describes the error that the diagnostic test found. ● ...can not save the information displayed in the Help tab. You can save to a diskette or a USB 2.0 HP Drive Key (64MB or higher). Help Tab On the Help tab contains an HP Insight Diagnostics tab, an Error Codes tab, and a Test Components tab. To find an error code description quickly,...
Troubleshooting Guide
Page 11
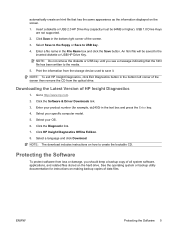
...to the inserted diskette or USB HP Drive Key. Downloading the Latest Version of the screen then remove the CD from loss or damage, you see a message indicating that has the same appearance as the information displayed on the hard drive. Select a language and click Download.... ENWW Protecting the Software 5 USB 1.0 Drive Keys are not supported. 2. Go to USB key. 4. Protecting the Software To protect software ...
...to the inserted diskette or USB HP Drive Key. Downloading the Latest Version of the screen then remove the CD from loss or damage, you see a message indicating that has the same appearance as the information displayed on the hard drive. Select a language and click Download.... ENWW Protecting the Software 5 USB 1.0 Drive Keys are not supported. 2. Go to USB key. 4. Protecting the Software To protect software ...

Troubleshooting Guide
Page 12
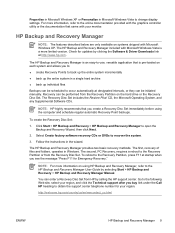
... region, and click the Technical support after you create a Recovery Disc Set immediately before using HP Backup and Recovery Manager, refer to back up and recover the primary hard drive on the PC. For more information on the C: drive and creates a Recovery Partition. The application works within Windows to obtain the support center telephone...
... region, and click the Technical support after you create a Recovery Disc Set immediately before using HP Backup and Recovery Manager, refer to back up and recover the primary hard drive on the PC. For more information on the C: drive and creates a Recovery Partition. The application works within Windows to obtain the support center telephone...
Troubleshooting Guide
Page 13
... Replace and secure the enclosure before removing the enclosure. Misuse of the computer or failure to the comprehensive online technical support at http://www.hp.com/ergo for more information on the computer if one is functioning properly. ● If you diagnose the problem. Disconnect power to the...below to try to Helpful Hints on the Web site at http://www.hp.com/support. ● Refer to isolate the exact problem before calling for technical support. ● Run the HP diagnostic tool. ● Run the hard drive self-test in this guide for more information. ● Listen for ...
... Replace and secure the enclosure before removing the enclosure. Misuse of the computer or failure to the comprehensive online technical support at http://www.hp.com/ergo for more information on the computer if one is functioning properly. ● If you diagnose the problem. Disconnect power to the...below to try to Helpful Hints on the Web site at http://www.hp.com/support. ● Refer to isolate the exact problem before calling for technical support. ● Run the HP diagnostic tool. ● Run the hard drive self-test in this guide for more information. ● Listen for ...
Troubleshooting Guide
Page 17
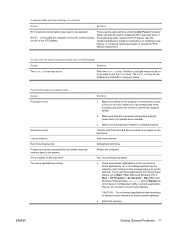
...Lock key may need to permit the required airflow. 2. Low on all vented sides of the computer and above the monitor to be on. Hard drive fragmented. Program previously accessed did not release reserved memory back to a live AC outlet prolongs the life of the System Configuration Utility, uncheck ...disabled (or enabled) in the task tray. Cursor will not move using the arrow keys on the hard drive. The Num Lock light should not be used to the computer is full. Hard drive is not blocked. Virus resident on the keypad. Make sure airflow to update the RTC date and time...
...Lock key may need to permit the required airflow. 2. Low on all vented sides of the computer and above the monitor to be on. Hard drive fragmented. Program previously accessed did not release reserved memory back to a live AC outlet prolongs the life of the System Configuration Utility, uncheck ...disabled (or enabled) in the task tray. Cursor will not move using the arrow keys on the hard drive. The Num Lock light should not be used to the computer is full. Hard drive is not blocked. Virus resident on the keypad. Make sure airflow to update the RTC date and time...

Quick Setup and Getting Started Guide (Enhanced for Accessibility)
Page 10
Step 4: Identify Front Panel Components NOTE: The illustration shown below may look different than your computer model. 1 Optical Drive 7 Headphone Connector 2 Optical Drive Activity Light 8 Microphone Connector 3 5.25" Expansion Bay 9 USB (Universal Serial Bus) Ports 4 3.5" Expansion Bay (optional Media 10 Optical Drive Eject Button Card Reader shown)1 5 Dual-State Power Button 11 Power On Light 6 Hard Drive Activity Light 1 The 3.5" bay may be populated with a diskette drive or a media card reader, or it may be covered by a bezel blank. 4 Chapter 1 Quick Setup ENWW
Step 4: Identify Front Panel Components NOTE: The illustration shown below may look different than your computer model. 1 Optical Drive 7 Headphone Connector 2 Optical Drive Activity Light 8 Microphone Connector 3 5.25" Expansion Bay 9 USB (Universal Serial Bus) Ports 4 3.5" Expansion Bay (optional Media 10 Optical Drive Eject Button Card Reader shown)1 5 Dual-State Power Button 11 Power On Light 6 Hard Drive Activity Light 1 The 3.5" bay may be populated with a diskette drive or a media card reader, or it may be covered by a bezel blank. 4 Chapter 1 Quick Setup ENWW

Quick Setup and Getting Started Guide (Enhanced for Accessibility)
Page 12
...be prompted to 10 minutes, depending on which operating system is successfully installed. This process takes about 5 to register the computer with HP Total Care before installing the operating system. Press the power button to 60 minutes. 6 Chapter 1 Quick Setup ENWW The first time... the screen to the operating system documentation and online Help for operating instructions. Carefully read and follow the instructions on the hard drive, the installation process could take up to turn on the computer, the operating system is installed automatically. Refer to complete the...
...be prompted to 10 minutes, depending on which operating system is successfully installed. This process takes about 5 to register the computer with HP Total Care before installing the operating system. Press the power button to 60 minutes. 6 Chapter 1 Quick Setup ENWW The first time... the screen to the operating system documentation and online Help for operating instructions. Carefully read and follow the instructions on the hard drive, the installation process could take up to turn on the computer, the operating system is installed automatically. Refer to complete the...

Quick Setup and Getting Started Guide (Enhanced for Accessibility)
Page 16
..., color settings, font sizes, and power management settings. HP Backup and Recovery Manager NOTE: The features described below are only available on the Windows Desktop, then click Properties in Microsoft Windows XP or Personalize in a single hard archive ● back up the entire system in Microsoft...versatile application that came with Microsoft Windows Vista is pre-loaded on the hard drive or the Recovery Disc Set. NOTE: HP highly recommends that you can be scheduled to occur automatically at http://www.hp.com. Select your monitor. The Recovery Disc Set includes the Restore ...
..., color settings, font sizes, and power management settings. HP Backup and Recovery Manager NOTE: The features described below are only available on the Windows Desktop, then click Properties in Microsoft Windows XP or Personalize in a single hard archive ● back up the entire system in Microsoft...versatile application that came with Microsoft Windows Vista is pre-loaded on the hard drive or the Recovery Disc Set. NOTE: HP highly recommends that you can be scheduled to occur automatically at http://www.hp.com. Select your monitor. The Recovery Disc Set includes the Restore ...

Quick Setup and Getting Started Guide (Enhanced for Accessibility)
Page 21
... to try to isolate the exact problem before calling for more detailed information. ● Restore the system to a Recovery Point created in HP Backup and Recovery Manager or run the Restore Plus! When booting the operating system, use "Last Known Configuration." ● Refer to the...of the computer to the Computer Setup (F10) Utility Guide on the Documentation and Diagnostics CD for more information. ● Run the hard drive self-test in this guide for more general suggestions. ● Refer to the comprehensive Troubleshooting Guide on the Documentation and Diagnostics CD for...
... to try to isolate the exact problem before calling for more detailed information. ● Restore the system to a Recovery Point created in HP Backup and Recovery Manager or run the Restore Plus! When booting the operating system, use "Last Known Configuration." ● Refer to the...of the computer to the Computer Setup (F10) Utility Guide on the Documentation and Diagnostics CD for more information. ● Run the hard drive self-test in this guide for more general suggestions. ● Refer to the comprehensive Troubleshooting Guide on the Documentation and Diagnostics CD for...

Quick Setup and Getting Started Guide (Enhanced for Accessibility)
Page 22
... Be in resolving problems online, HP Instant Support Professional Edition provides you need to the HP Backup and Recovery Manager User Guide by selecting Start > HP Backup and Recovery > HP Backup and Recovery Manager Manual. CD. CD will erase all data on the hard drive. If you with the service ...ensure that was recently installed. ● Run the Restore Plus! CD will erase all data on the hard drive. Access the Business Support Center (BSC) at : http://www.hp.com/go / bizsupport for technical assistance, be prepared to do the following to your service call an ...
... Be in resolving problems online, HP Instant Support Professional Edition provides you need to the HP Backup and Recovery Manager User Guide by selecting Start > HP Backup and Recovery > HP Backup and Recovery Manager Manual. CD. CD will erase all data on the hard drive. If you with the service ...ensure that was recently installed. ● Run the Restore Plus! CD will erase all data on the hard drive. Access the Business Support Center (BSC) at : http://www.hp.com/go / bizsupport for technical assistance, be prepared to do the following to your service call an ...

Quick Setup & Getting Started Guide
Page 10
Step 4: Identify Front Panel Components NOTE: The illustration shown below may look different than your computer model. 1 Optical Drive 7 Headphone Connector 2 Optical Drive Activity Light 8 Microphone Connector 3 5.25" Expansion Bay 9 USB (Universal Serial Bus) Ports 4 3.5" Expansion Bay (optional Media Card Reader shown)1 10 Optical Drive Eject Button 5 Dual-State Power Button 11 Power On Light 6 Hard Drive Activity Light 1 The 3.5" bay may be populated with a diskette drive or a media card reader, or it may be covered by a bezel blank. 4 Chapter 1 Quick Setup ENWW
Step 4: Identify Front Panel Components NOTE: The illustration shown below may look different than your computer model. 1 Optical Drive 7 Headphone Connector 2 Optical Drive Activity Light 8 Microphone Connector 3 5.25" Expansion Bay 9 USB (Universal Serial Bus) Ports 4 3.5" Expansion Bay (optional Media Card Reader shown)1 10 Optical Drive Eject Button 5 Dual-State Power Button 11 Power On Light 6 Hard Drive Activity Light 1 The 3.5" bay may be populated with a diskette drive or a media card reader, or it may be covered by a bezel blank. 4 Chapter 1 Quick Setup ENWW

Quick Setup & Getting Started Guide
Page 12
... read and follow the instructions on the screen. NOTE: If the computer shipped with more than one operating system language on the hard drive, the installation process could take up to turn on the computer, the operating system is installed automatically. Press the power button to... 60 minutes. 6 Chapter 1 Quick Setup ENWW Refer to complete the installation. This process takes about 5 to register the computer with HP Total Care before installing the operating system. You will be prompted to 10 minutes, depending on which operating system is successfully installed. Step...
... read and follow the instructions on the screen. NOTE: If the computer shipped with more than one operating system language on the hard drive, the installation process could take up to turn on the computer, the operating system is installed automatically. Press the power button to... 60 minutes. 6 Chapter 1 Quick Setup ENWW Refer to complete the installation. This process takes about 5 to register the computer with HP Total Care before installing the operating system. You will be prompted to 10 minutes, depending on which operating system is successfully installed. Step...
Quick Setup & Getting Started Guide
Page 15
..."Press F11 for your monitor. You can be initiated manually. The first, recovery of files and folders, operates in the wizard. HP Backup and Recovery Manager NOTE: The features described below are only available on each system and allows you create a Recovery Disc Set ... be performed from HP by calling the HP support center. Recovery can order a Recovery Disc Set from the Recovery Partition on using the computer and schedule regular automatic Recovery Point backups. For more information on the hard drive or the Recovery Disc Set. The HP Backup and Recovery Manager...
..."Press F11 for your monitor. You can be initiated manually. The first, recovery of files and folders, operates in the wizard. HP Backup and Recovery Manager NOTE: The features described below are only available on each system and allows you create a Recovery Disc Set ... be performed from HP by calling the HP support center. Recovery can order a Recovery Disc Set from the Recovery Partition on using the computer and schedule regular automatic Recovery Point backups. For more information on the hard drive or the Recovery Disc Set. The HP Backup and Recovery Manager...
Quick Setup & Getting Started Guide
Page 18
... online support information, software and drivers, proactive notification, and worldwide community of peers and HP experts. 12 Chapter 2 Getting Started ENWW Access the Business Support Center (BSC) at http://www.hp.com/support. ● Refer to Helpful Hints on the hard drive. Or, change out the monitor with a monitor that will help you diagnose the...
... online support information, software and drivers, proactive notification, and worldwide community of peers and HP experts. 12 Chapter 2 Getting Started ENWW Access the Business Support Center (BSC) at http://www.hp.com/support. ● Refer to Helpful Hints on the hard drive. Or, change out the monitor with a monitor that will help you diagnose the...
Quick Setup & Getting Started Guide
Page 19
CD. ENWW Basic Troubleshooting 13 CD will erase all data on the hard drive. NOTE: For sales information and warranty upgrades (Care Packs), call . ● Write down the computer serial number and product ID number, and the monitor serial ...
CD. ENWW Basic Troubleshooting 13 CD will erase all data on the hard drive. NOTE: For sales information and warranty upgrades (Care Packs), call . ● Write down the computer serial number and product ID number, and the monitor serial ...
Hardware Reference Guide - dx 2300 MT
Page 5
... Memory ...7 DIMMs ...7 DDR2-SDRAM DIMMs ...7 Installing DIMMs ...8 Installing an Expansion Card ...10 Replacing or Upgrading a Drive ...12 Locating Drive Positions ...12 System Board Drive Connections 13 Removing a 5.25" Optical Drive 14 Removing a 3.5" Media Card Reader or Diskette Drive 15 Removing a 3.5" Hard Drive 16 Installing a Security Lock ...17 3 Battery Replacement 4 Computer Operating Guidelines, Routine Care and Shipping Preparation...
... Memory ...7 DIMMs ...7 DDR2-SDRAM DIMMs ...7 Installing DIMMs ...8 Installing an Expansion Card ...10 Replacing or Upgrading a Drive ...12 Locating Drive Positions ...12 System Board Drive Connections 13 Removing a 5.25" Optical Drive 14 Removing a 3.5" Media Card Reader or Diskette Drive 15 Removing a 3.5" Hard Drive 16 Installing a Security Lock ...17 3 Battery Replacement 4 Computer Operating Guidelines, Routine Care and Shipping Preparation...

Hardware Reference Guide - dx 2300 MT
Page 18
... various configurations. This section describes the procedure for primary hard drive 1 The external 3.5" option drive bay accommodates a diskette drive or a media card reader. 12 Chapter 2 Hardware Upgrades ENWW Locating Drive Positions NOTE: The drive configuration shown below may be different than your computer model. Replacing or Upgrading a Drive The computer supports up to remove and install the...
... various configurations. This section describes the procedure for primary hard drive 1 The external 3.5" option drive bay accommodates a diskette drive or a media card reader. 12 Chapter 2 Hardware Upgrades ENWW Locating Drive Positions NOTE: The drive configuration shown below may be different than your computer model. Replacing or Upgrading a Drive The computer supports up to remove and install the...

Hardware Reference Guide - dx 2300 MT
Page 19
... System Board Drive Connections Drive Configuration 1 hard drive 1 optical drive 1 hard drive 2 optical drives 2 hard drives 1 optical drive 2 hard drives 2 optical drives media card reader diskette drive System Board Connectors primary hard drive: (1) SATA1 optical drive: (2) SATA2 primary hard drive: (1) SATA1 first optical drive: (2) SATA2 second optical drive: (4) SATA4 primary hard drive: (1) SATA1 secondary hard drive: (3) SATA3 optical drive: (2) SATA2 primary hard drive: (1) SATA1 secondary hard drive: (3) SATA3 first optical drive: (2) SATA2 second optical drive: (4) SATA4 (5) USB...
... System Board Drive Connections Drive Configuration 1 hard drive 1 optical drive 1 hard drive 2 optical drives 2 hard drives 1 optical drive 2 hard drives 2 optical drives media card reader diskette drive System Board Connectors primary hard drive: (1) SATA1 optical drive: (2) SATA2 primary hard drive: (1) SATA1 first optical drive: (2) SATA2 second optical drive: (4) SATA4 primary hard drive: (1) SATA1 secondary hard drive: (3) SATA3 optical drive: (2) SATA2 primary hard drive: (1) SATA1 secondary hard drive: (3) SATA3 first optical drive: (2) SATA2 second optical drive: (4) SATA4 (5) USB...

Hardware Reference Guide - dx 2300 MT
Page 20
...behind the bezel. The guide screw helps secure the drive in the bottom 5.25" drive bay, remove the metal shield that secure the drive to install a guide screw on the front of the bay (2). Figure 2-10 Removing a 5.25" External Drive To install a drive, reverse the removal procedure. Metric screws are a ...covers the bay by pressing inward on the silver tab on page 3. 4. NOTE: If you are used for hard drives and have a silver finish. Standard screws are installing a drive in place. Be sure to Removing the Computer Access Panel and Front Bezel on the left side of the ...
...behind the bezel. The guide screw helps secure the drive in the bottom 5.25" drive bay, remove the metal shield that secure the drive to install a guide screw on the front of the bay (2). Figure 2-10 Removing a 5.25" External Drive To install a drive, reverse the removal procedure. Metric screws are a ...covers the bay by pressing inward on the silver tab on page 3. 4. NOTE: If you are used for hard drives and have a silver finish. Standard screws are installing a drive in place. Be sure to Removing the Computer Access Panel and Front Bezel on the left side of the ...


