
Bluetooth Wireless Technology Basics
Page 7
... Bluetooth Setup Wizard to your BWT-enabled notebook PC: 1. The logo will appear in the Windows System Tray located in the Folders pane of the connection (Table 1). Enable BWT functionality If the wireless light (ICON) is disabled (red logo), enable it on by right-clicking the Bluetooth icon and selecting Start the Bluetooth Device. Follow the instructions in the same box as follows: 1. Set up the BWT software. Table 1. Bluetooth status Disabled Enabled Connected...
... Bluetooth Setup Wizard to your BWT-enabled notebook PC: 1. The logo will appear in the Windows System Tray located in the Folders pane of the connection (Table 1). Enable BWT functionality If the wireless light (ICON) is disabled (red logo), enable it on by right-clicking the Bluetooth icon and selecting Start the Bluetooth Device. Follow the instructions in the same box as follows: 1. Set up the BWT software. Table 1. Bluetooth status Disabled Enabled Connected...

Bluetooth Wireless Technology Basics
Page 8
... profiles. Bluetooth wireless technology profiles supported by selected models Notebooks/ Tablet PCs Handhelds Printers D D D D D D Profile Description Basic printing Dial-up networking File transfer Enables simpler printing from /to manage and change the default BWT settings and set the level of discoverability of these functions by selecting the Start menu, and then the IPAQ Wireless option. The iPAQ Pocket PC requires a third-party printing application such as pressing Menu > Connect > Bluetooth.
... profiles. Bluetooth wireless technology profiles supported by selected models Notebooks/ Tablet PCs Handhelds Printers D D D D D D Profile Description Basic printing Dial-up networking File transfer Enables simpler printing from /to manage and change the default BWT settings and set the level of discoverability of these functions by selecting the Start menu, and then the IPAQ Wireless option. The iPAQ Pocket PC requires a third-party printing application such as pressing Menu > Connect > Bluetooth.
Drives - Windows Vista
Page 14
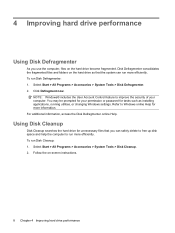
... such as installing applications, running utilities, or changing Windows settings. You may be prompted for unnecessary files that the system can safely delete to free up disk space and help the computer to improve the security of your permission or password for more information. Follow the on the hard drive become fragmented. Using Disk Cleanup Disk Cleanup searches the hard drive for your computer. Select Start > All...
... such as installing applications, running utilities, or changing Windows settings. You may be prompted for unnecessary files that the system can safely delete to free up disk space and help the computer to improve the security of your permission or password for more information. Follow the on the hard drive become fragmented. Using Disk Cleanup Disk Cleanup searches the hard drive for your computer. Select Start > All...

Memory Modules - Windows Vista
Page 7
... first exit Sleep or Hibernation before installing a memory module. Click Start, click the arrow next to the equipment, unplug the power cord and remove all external devices connected to the computer. 5. ENWW 1 Loosen the 2 memory module compartment screws (1). To add or replace a memory module: 1. Unplug the power cord from the computer. 8. Disconnect all batteries before shutdown is off or in the memory module slot. Remove the battery from the AC outlet. 6. Replacing a memory module The...
... first exit Sleep or Hibernation before installing a memory module. Click Start, click the arrow next to the equipment, unplug the power cord and remove all external devices connected to the computer. 5. ENWW 1 Loosen the 2 memory module compartment screws (1). To add or replace a memory module: 1. Unplug the power cord from the computer. 8. Disconnect all batteries before shutdown is off or in the memory module slot. Remove the battery from the AC outlet. 6. Replacing a memory module The...
Security - Windows Vista
Page 8
... saving passwords: ● When creating passwords, follow requirements set a password with keyboard number keys, your password will not be recognized if you choose to enter it in the non-Windows Setup Utility preinstalled on the computer. ● Do not use the same password for a Windows security feature. Use the following topics list Windows and Setup Utility passwords and describe their functions. Because most passwords are not displayed as screen-saver passwords, select Start > Help and Support. 2 Chapter 2 Using passwords NOTE: Select models...
... saving passwords: ● When creating passwords, follow requirements set a password with keyboard number keys, your password will not be recognized if you choose to enter it in the non-Windows Setup Utility preinstalled on the computer. ● Do not use the same password for a Windows security feature. Use the following topics list Windows and Setup Utility passwords and describe their functions. Because most passwords are not displayed as screen-saver passwords, select Start > Help and Support. 2 Chapter 2 Using passwords NOTE: Select models...
Setup Utility - Windows Vista
Page 10
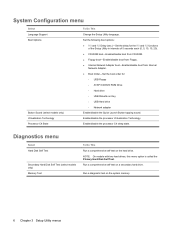
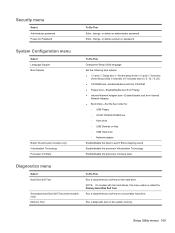
...3 Setup Utility menus Enable/disable the processor Virtualization Technology. NOTE: On models with two hard drives, this menu option is called the Primary Hard Disk Self Test. Run a diagnostic test on the hard drive. System Configuration menu Select Language Support Boot Options Button Sound (select models only) Virtualization Technology Processor C4 State To Do This Change the Setup Utility language. Run a comprehensive self-test on Key ◦ USB Hard drive ◦ Network adapter Enable/disable the Quick Launch Button tapping sound. Set the following boot options: ●...
...3 Setup Utility menus Enable/disable the processor Virtualization Technology. NOTE: On models with two hard drives, this menu option is called the Primary Hard Disk Self Test. Run a diagnostic test on the hard drive. System Configuration menu Select Language Support Boot Options Button Sound (select models only) Virtualization Technology Processor C4 State To Do This Change the Setup Utility language. Run a comprehensive self-test on Key ◦ USB Hard drive ◦ Network adapter Enable/disable the Quick Launch Button tapping sound. Set the following boot options: ●...
Software Updates - Windows Vista
Page 7
... download packages contain a file named Readme.txt, which are packaged in the remainder of your permission or password for tasks such as installing applications, running utilities, or changing Windows settings. NOTE: Windows® includes the User Account Control feature to a network, consult the network administrator before installing any software updates, especially system BIOS updates. Most software and BIOS updates on the HP Web site at http://www.hp.com. 3. The BIOS initializes the operating...
... download packages contain a file named Readme.txt, which are packaged in the remainder of your permission or password for tasks such as installing applications, running utilities, or changing Windows settings. NOTE: Windows® includes the User Account Control feature to a network, consult the network administrator before installing any software updates, especially system BIOS updates. Most software and BIOS updates on the HP Web site at http://www.hp.com. 3. The BIOS initializes the operating...

Software Updates - Windows Vista
Page 8
... need to download your computer. If the Setup Utility does not open with the system information displayed, use the arrow keys to an optional power source. Do not download or install a BIOS update while the computer is displayed. 3. During the download and installation, follow these instructions: Do not disconnect power from the computer by turning on your selection to reliable external power using the AC adapter. Do not insert, remove, connect, or disconnect any device, cable, or cord. b. Downloading a BIOS update...
... need to download your computer. If the Setup Utility does not open with the system information displayed, use the arrow keys to an optional power source. Do not download or install a BIOS update while the computer is displayed. 3. During the download and installation, follow these instructions: Do not disconnect power from the computer by turning on your selection to reliable external power using the AC adapter. Do not insert, remove, connect, or disconnect any device, cable, or cord. b. Downloading a BIOS update...

Wireless (Select Models Only) - Windows Vista
Page 27
... a wireless networking device. NOTE: Wireless networking devices are installed for wireless connection problems include the following: ● Wireless device is not listed in this chapter to diagnose and repair a computer that device drivers are included with select computer models only. Before working your network connection problem, be sure that does not connect to the WLAN you may add wireless networking capability to use. 21 If wireless networking is not installed correctly or has been disabled. ● Wireless device or router hardware has...
... a wireless networking device. NOTE: Wireless networking devices are installed for wireless connection problems include the following: ● Wireless device is not listed in this chapter to diagnose and repair a computer that device drivers are included with select computer models only. Before working your network connection problem, be sure that does not connect to the WLAN you may add wireless networking capability to use. 21 If wireless networking is not installed correctly or has been disabled. ● Wireless device or router hardware has...
Wireless (Select Models Only) - Windows Vista
Page 28
... device from the Network adapters list. If no WLAN device is listed, either your computer does not have a problem connecting to a WLAN, confirm that the integrated WLAN device is not properly installed. In the left pane, click Device Manager. 3. The listing for tasks such as installing software, running utilities, or changing Windows settings. Select Start > Computer > System properties. 2. Refer to Windows Help for more information on your permission or password for a WLAN device...
... device from the Network adapters list. If no WLAN device is listed, either your computer does not have a problem connecting to a WLAN, confirm that the integrated WLAN device is not properly installed. In the left pane, click Device Manager. 3. The listing for tasks such as installing software, running utilities, or changing Windows settings. Select Start > Computer > System properties. 2. Refer to Windows Help for more information on your permission or password for a WLAN device...
HP Pavilion dv9500, dv9600, and dv9700 Entertainment PCs - Maintenance and Service Guide
Page 25
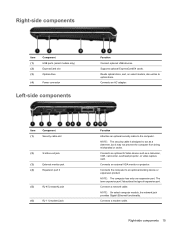
... Security cable slot (2) S-Video-out jack (3) External monitor port (4) Expansion port 3 (5) RJ-45 (network) jack (6) RJ-11 (modem) jack Function Attaches an optional security cable to act as a television, VCR, camcorder, overhead projector, or video capture card. The term expansion port 3 describes the type of expansion port. Connects an AC adapter. Supports optional ExpressCard/54 cards. NOTE: The security cable is designed to the computer. Right-side components Item (1) (2) (3) (4) Component USB ports (select models only) ExpressCard slot Optical drive Power connector...
... Security cable slot (2) S-Video-out jack (3) External monitor port (4) Expansion port 3 (5) RJ-45 (network) jack (6) RJ-11 (modem) jack Function Attaches an optional security cable to act as a television, VCR, camcorder, overhead projector, or video capture card. The term expansion port 3 describes the type of expansion port. Connects an AC adapter. Supports optional ExpressCard/54 cards. NOTE: The security cable is designed to the computer. Right-side components Item (1) (2) (3) (4) Component USB ports (select models only) ExpressCard slot Optical drive Power connector...
HP Pavilion dv9500, dv9600, and dv9700 Entertainment PCs - Maintenance and Service Guide
Page 109
... assembly and installed on page 47). 5. Shut down through the ventilation grill located on page 61) d. Remove the battery (see Battery on the replacement fan/heat sink assembly. Top cover (see Hard drive on page 75) h. The computer uses an electric fan for display switch module removal and spare part number information. Before removing the fan/heat sink assembly, follow these steps: 1. Disconnect the power from the computer. 4. Hard drive (see Top cover on...
... assembly and installed on page 47). 5. Shut down through the ventilation grill located on page 61) d. Remove the battery (see Battery on the replacement fan/heat sink assembly. Top cover (see Hard drive on page 75) h. The computer uses an electric fan for display switch module removal and spare part number information. Before removing the fan/heat sink assembly, follow these steps: 1. Disconnect the power from the computer. 4. Hard drive (see Top cover on...

HP Pavilion dv9500, dv9600, and dv9700 Entertainment PCs - Maintenance and Service Guide
Page 118
... session, use the arrow keys to select Exit > Exit Discarding Changes, and then press enter. Then use either of the screen each time the computer is started or restarted in Windows. The " to the menu display. For more information about the processor, memory size, system BIOS, and keyboard controller version (select models only). 108 Chapter 5 Setup Utility The Setup Utility features available for advanced users include a hard drive self-test, a Network Service Boot, and settings for a Network Service Boot.
... session, use the arrow keys to select Exit > Exit Discarding Changes, and then press enter. Then use either of the screen each time the computer is started or restarted in Windows. The " to the menu display. For more information about the processor, memory size, system BIOS, and keyboard controller version (select models only). 108 Chapter 5 Setup Utility The Setup Utility features available for advanced users include a hard drive self-test, a Network Service Boot, and settings for a Network Service Boot.
HP Pavilion dv9500, dv9600, and dv9700 Entertainment PCs - Maintenance and Service Guide
Page 119
... Hard Disk Self Test (select models only) Memory Test To Do This Run a comprehensive self-test on Key ◦ USB Hard drive ◦ Network adapter Enable/disable the Quick Launch Button tapping sound. Run a comprehensive self-test on the system memory. System Configuration menu Select Language Support Boot Options Button Sound (select models only) Virtualization Technology Processor C4 State To Do This Change the Setup Utility language. Setup Utility menus 109 Run a diagnostic test on a secondary hard drive. Security menu Select Administrator password Power...
... Hard Disk Self Test (select models only) Memory Test To Do This Run a comprehensive self-test on Key ◦ USB Hard drive ◦ Network adapter Enable/disable the Quick Launch Button tapping sound. Run a comprehensive self-test on the system memory. System Configuration menu Select Language Support Boot Options Button Sound (select models only) Virtualization Technology Processor C4 State To Do This Change the Setup Utility language. Setup Utility menus 109 Run a diagnostic test on a secondary hard drive. Security menu Select Administrator password Power...
HP Pavilion dv9500, dv9600, and dv9700 Entertainment PCs - Maintenance and Service Guide
Page 174
... lights battery 14 caps lock 10 drive 14 num lock 9 power 14 wireless 14 M Main menu 108 mass storage devices, spare part numbers 30 media button 11 memory map specifications 126 memory module product description 4 removal 54 spare part numbers 25, 35, 36, 54 memory/WLAN module compartment 17 memory/WLAN module compartment cover illustrated 28 removal 55 microphone location 9 removal 73 spare part number 27, 33, 74 microphone jack location 14 pin assignments 150 model name 1 modem jack location 15 pin assignments 152 modem, product description 6 monitor port location...
... lights battery 14 caps lock 10 drive 14 num lock 9 power 14 wireless 14 M Main menu 108 mass storage devices, spare part numbers 30 media button 11 memory map specifications 126 memory module product description 4 removal 54 spare part numbers 25, 35, 36, 54 memory/WLAN module compartment 17 memory/WLAN module compartment cover illustrated 28 removal 55 microphone location 9 removal 73 spare part number 27, 33, 74 microphone jack location 14 pin assignments 150 model name 1 modem jack location 15 pin assignments 152 modem, product description 6 monitor port location...
HP Pavilion dv9500, dv9600, and dv9700 Entertainment PCs - Maintenance and Service Guide
Page 175
... media cards 7 graphics 2 hard drives 4 keyboard 8 memory module 4 modem 6 operating system 8 optical drives 5 pointing device 8 ports 7 power requirements 8 processors 1 product name 1 security 8 serviceability 8 wireless 6 product name 1 Q QuickPlay buttons 11 R rear USB board removal 90 spare part number 22, 37, 90 rear USB board cable, illustrated 29 recovery discs 146 recovery, system 146, 149 remote control spare part numbers 34 remote control, spare part numbers 31, 34 removal/replacement preliminaries 40 procedures 46 restore points 148 restoring default settings 107 RF input adapter...
... media cards 7 graphics 2 hard drives 4 keyboard 8 memory module 4 modem 6 operating system 8 optical drives 5 pointing device 8 ports 7 power requirements 8 processors 1 product name 1 security 8 serviceability 8 wireless 6 product name 1 Q QuickPlay buttons 11 R rear USB board removal 90 spare part number 22, 37, 90 rear USB board cable, illustrated 29 recovery discs 146 recovery, system 146, 149 remote control spare part numbers 34 remote control, spare part numbers 31, 34 removal/replacement preliminaries 40 procedures 46 restore points 148 restoring default settings 107 RF input adapter...

Notebook Tour - Windows Vista
Page 9
... forward button is pressed. Lights Component (1) Power lights (2)* (2) Battery light (3) Drive light (4) Caps lock light (5) Media button light (6) DVD button light (7) Previous/rewind light (8) Play/pause light (9) Next/fast forward light (10) Stop light (11) Volume mute light (12) Volume down light ENWW Description ● On: The computer is on. ● Blinking: The computer is in the Sleep state. ● Off: The computer is off or in the computer are fully charged. Blinking: The hard drive or optical drive is turned off...
... forward button is pressed. Lights Component (1) Power lights (2)* (2) Battery light (3) Drive light (4) Caps lock light (5) Media button light (6) DVD button light (7) Previous/rewind light (8) Play/pause light (9) Next/fast forward light (10) Stop light (11) Volume mute light (12) Volume down light ENWW Description ● On: The computer is on. ● Blinking: The computer is in the Sleep state. ● Off: The computer is off or in the computer are fully charged. Blinking: The hard drive or optical drive is turned off...
Multimedia - Windows Vista
Page 27
... jacks audio-in (microphone) 1, 3 audio-out (headphone) 1, 3 S-Video-out 7 P ports external monitor 6 programs multimedia 17 using 18 projector, connecting 6 protecting playback 19 Q Quick Launch buttons 5 QuickPlay 5 R region codes, DVD 20 M media activity buttons 15 media activity hotkeys 14 media button 5 microphone (audio-in) jack 1 microphone, internal 1 microphones, supported 3 monitor, connecting 6 multimedia software described 17 using 18 mute button 4 mute button, identifying 1 O optical disc inserting 11 removing, with power 12 removing, without power 13 writing to 17 optical drive...
... jacks audio-in (microphone) 1, 3 audio-out (headphone) 1, 3 S-Video-out 7 P ports external monitor 6 programs multimedia 17 using 18 projector, connecting 6 protecting playback 19 Q Quick Launch buttons 5 QuickPlay 5 R region codes, DVD 20 M media activity buttons 15 media activity hotkeys 14 media button 5 microphone (audio-in) jack 1 microphone, internal 1 microphones, supported 3 monitor, connecting 6 multimedia software described 17 using 18 mute button 4 mute button, identifying 1 O optical disc inserting 11 removing, with power 12 removing, without power 13 writing to 17 optical drive...
Power Management - Windows Vista
Page 20
... the computer to sleep settings to Never. 9. Change the Turn off the display and Put the computer to calibrate a new battery. The battery light on . Click Change advanced power settings. 6. Change the On battery setting to Never. 5. Insert the battery into external power. Click Start > Control Panel > System and Maintenance > Power Options. 2. Step 1: Fully charge the battery WARNING! Under the current power plan, click Change plan settings. 3. Calibrating a battery Calibrate a battery under Hibernate after so that you can reset them after the...
... the computer to sleep settings to Never. 9. Change the Turn off the display and Put the computer to calibrate a new battery. The battery light on . Click Change advanced power settings. 6. Change the On battery setting to Never. 5. Insert the battery into external power. Click Start > Control Panel > System and Maintenance > Power Options. 2. Step 1: Fully charge the battery WARNING! Under the current power plan, click Change plan settings. 3. Calibrating a battery Calibrate a battery under Hibernate after so that you can reset them after the...
Power Management - Windows Vista
Page 28
... all open programs. 2. Click Start, and then click the arrow next to a USB port ● When the computer will be unused and disconnected from external power and remove the battery. 22 Chapter 4 Shutting down . If the computer is unresponsive and you are unable to use the preceding shutdown procedures, try the following emergency procedures in Hibernation, you are connecting an external hardware device...
... all open programs. 2. Click Start, and then click the arrow next to a USB port ● When the computer will be unused and disconnected from external power and remove the battery. 22 Chapter 4 Shutting down . If the computer is unresponsive and you are unable to use the preceding shutdown procedures, try the following emergency procedures in Hibernation, you are connecting an external hardware device...


