HP Pavilion dv6 Entertainment PC - Maintenance and Service Guide
Page 171
...-ray ROM DVD±R/RW SuperMulti DL Drive removal 62 spare part numbers 32, 44, 62 specifications 120 Bluetooth cable, spare part number 41 Bluetooth module removal 94 spare part numbers 41, 94 boot options 113 boot order 113 button sound 112 buttons next/fast forward 12 play/pause 11 power 11 previous/rewind 11 stop 12 TouchPad 8 TouchPad on/off 8 volume mute 11 C Cable Kit contents 38 spare part number 38, 45 cables, service considerations 53 caps lock, lights 9 Card Reader Power Saving 112 changing the Setup Utility language...
...-ray ROM DVD±R/RW SuperMulti DL Drive removal 62 spare part numbers 32, 44, 62 specifications 120 Bluetooth cable, spare part number 41 Bluetooth module removal 94 spare part numbers 41, 94 boot options 113 boot order 113 button sound 112 buttons next/fast forward 12 play/pause 11 power 11 previous/rewind 11 stop 12 TouchPad 8 TouchPad on/off 8 volume mute 11 C Cable Kit contents 38 spare part number 38, 45 cables, service considerations 53 caps lock, lights 9 Card Reader Power Saving 112 changing the Setup Utility language...

HP Pavilion dv6 Entertainment PC - Maintenance and Service Guide
Page 173
...support 112 latch, battery release 17 lights battery 9, 14 caps lock 9 drive 9, 14 next/fast forward 9 num lock 10 play/pause 9 power 9, 14 previous/rewind 9 stop 10 TouchPad 8 volume down 9 volume mute 9 volume up 9 wireless 10 M media activity buttons, identifying 11 memory map specifications 127 memory module product description 3 removal 64 spare part numbers 32, 43, 64 memory module compartment cover illustrated 37 removal 64 memory module compartment, identifying 17 memory test 113 microphone product description 5 microphone (audio-in jack) pin assignments 150 microphone (audio-in) jack...
...support 112 latch, battery release 17 lights battery 9, 14 caps lock 9 drive 9, 14 next/fast forward 9 num lock 10 play/pause 9 power 9, 14 previous/rewind 9 stop 10 TouchPad 8 volume down 9 volume mute 9 volume up 9 wireless 10 M media activity buttons, identifying 11 memory map specifications 127 memory module product description 3 removal 64 spare part numbers 32, 43, 64 memory module compartment cover illustrated 37 removal 64 memory module compartment, identifying 17 memory test 113 microphone product description 5 microphone (audio-in jack) pin assignments 150 microphone (audio-in) jack...
HP Pavilion dv6 Entertainment PC - Maintenance and Service Guide
Page 174
... button, identifying 11 previous/rewind light, identifying 9 processor product description 1 removal 101 spare part numbers 27, 42, 43, 46, 101 Processor C4 State 112 product description audio 5 chipset 2 display panel 3 docking support 6 Ethernet 5 external media cards 6 graphics 2 hard drives 4 keyboard 6 memory module 3 microphone 5 modem 5 operating system 7 optical drives 4 pointing device 6 ports 6 power requirements 6 processors 1 product name 1 security 7 serviceability 7 TV tuner 5 webcam 5 wireless 5 product name 1 program recovery 145 R recovery discs 145 from the recovery discs...
... button, identifying 11 previous/rewind light, identifying 9 processor product description 1 removal 101 spare part numbers 27, 42, 43, 46, 101 Processor C4 State 112 product description audio 5 chipset 2 display panel 3 docking support 6 Ethernet 5 external media cards 6 graphics 2 hard drives 4 keyboard 6 memory module 3 microphone 5 modem 5 operating system 7 optical drives 4 pointing device 6 ports 6 power requirements 6 processors 1 product name 1 security 7 serviceability 7 TV tuner 5 webcam 5 wireless 5 product name 1 program recovery 145 R recovery discs 145 from the recovery discs...

Notebook PC User Guide - Windows 7
Page 6
... Setting touch screen preferences 29 Connecting an external mouse 29 Using the action keys ...29 Using the hotkey ...31 Cleaning the TouchPad and keyboard 32 5 Multimedia Multimedia features ...33 Identifying your multimedia components 34 Adjusting the volume ...35 Using the media activity keys 36 Multimedia software ...37 Using HP MediaSmart or TouchSmart (select models only) software 37 Using other preinstalled multimedia software 37 Installing multimedia software from a disc 37 Audio ...39 Connecting external audio devices 39 Checking your audio functions 39 Video ...40 Connecting...
... Setting touch screen preferences 29 Connecting an external mouse 29 Using the action keys ...29 Using the hotkey ...31 Cleaning the TouchPad and keyboard 32 5 Multimedia Multimedia features ...33 Identifying your multimedia components 34 Adjusting the volume ...35 Using the media activity keys 36 Multimedia software ...37 Using HP MediaSmart or TouchSmart (select models only) software 37 Using other preinstalled multimedia software 37 Installing multimedia software from a disc 37 Audio ...39 Connecting external audio devices 39 Checking your audio functions 39 Video ...40 Connecting...
Notebook PC User Guide - Windows 7
Page 15
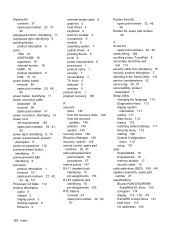
To view or change pointing device preferences: 1. Components 5 Select Start > Devices and Printers. 2. Select Mouse settings. Functions like the left button on an external mouse. Right-click the device representing your computer. 3. Functions like the right button on and off, quickly double-tap the TouchPad off indicator Left TouchPad button Right TouchPad button Function To switch the TouchPad on an external mouse. TouchPad buttons Item 1 2 3 Description TouchPad off indicator.
To view or change pointing device preferences: 1. Components 5 Select Start > Devices and Printers. 2. Select Mouse settings. Functions like the left button on an external mouse. Right-click the device representing your computer. 3. Functions like the right button on and off, quickly double-tap the TouchPad off indicator Left TouchPad button Right TouchPad button Function To switch the TouchPad on an external mouse. TouchPad buttons Item 1 2 3 Description TouchPad off indicator.
Notebook PC User Guide - Windows 7
Page 20
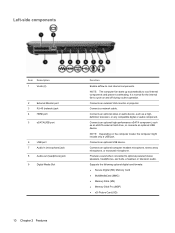
Connects an optional video or audio device, such as an eSATA external hard drive, or connects an optional USB device. Produces sound when connected to cool internal components. Connects an optional USB device. Left-side components Item Description 1 Vents (2) 2 External Monitor port 3 RJ-45 (network) jack 4 HDMI port 5 eSATA/USB port 6 USB port 7 Audio-in (microphone) jack 8 Audio-out (headphone) jack 9 Digital Media Slot Function Enable airflow to optional powered stereo speakers, headphones, ear buds, a headset, or television audio. NOTE: Depending on ...
Connects an optional video or audio device, such as an eSATA external hard drive, or connects an optional USB device. Produces sound when connected to cool internal components. Connects an optional USB device. Left-side components Item Description 1 Vents (2) 2 External Monitor port 3 RJ-45 (network) jack 4 HDMI port 5 eSATA/USB port 6 USB port 7 Audio-in (microphone) jack 8 Audio-out (headphone) jack 9 Digital Media Slot Function Enable airflow to optional powered stereo speakers, headphones, ear buds, a headset, or television audio. NOTE: Depending on ...
Notebook PC User Guide - Windows 7
Page 34
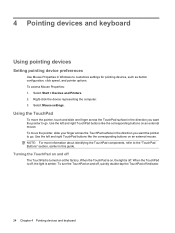
... factory. Use the left and right TouchPad buttons like the corresponding buttons on an external mouse. Select Start > Devices and Printers. 2. Select Mouse settings. When the TouchPad is off, the light is off indicator. 24 Chapter 4 Pointing devices and keyboard Turning the TouchPad on and off The TouchPad is turned on and off, quickly double-tap the TouchPad off . 4 Pointing devices and keyboard Using pointing devices Setting pointing device preferences Use Mouse Properties in Windows to the "TouchPad Buttons" section, earlier in this guide. Use...
... factory. Use the left and right TouchPad buttons like the corresponding buttons on an external mouse. Select Start > Devices and Printers. 2. Select Mouse settings. When the TouchPad is off, the light is off indicator. 24 Chapter 4 Pointing devices and keyboard Turning the TouchPad on and off The TouchPad is turned on and off, quickly double-tap the TouchPad off . 4 Pointing devices and keyboard Using pointing devices Setting pointing device preferences Use Mouse Properties in Windows to the "TouchPad Buttons" section, earlier in this guide. Use...
Notebook PC User Guide - Windows 7
Page 51
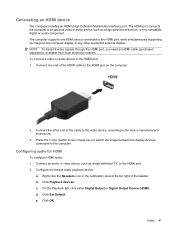
... HDMI device connected to the HDMI port, while simultaneously supporting an image on the computer. 2. Connect the other supported external display. Press the f4 key (switch screen image key) to switch the image between the display devices connected to the HDMI port: 1. Connect an audio or video device, such as a high-definition television, or any other end of the taskbar. b. On the Playback tab, click either Digital Output or Digital Output Device (HDMI). Click Set Default. e. c. Click Playback devices. Connecting...
... HDMI device connected to the HDMI port, while simultaneously supporting an image on the computer. 2. Connect the other supported external display. Press the f4 key (switch screen image key) to switch the image between the display devices connected to the HDMI port: 1. Connect an audio or video device, such as a high-definition television, or any other end of the taskbar. b. On the Playback tab, click either Digital Output or Digital Output Device (HDMI). Click Set Default. e. c. Click Playback devices. Connecting...

Notebook PC User Guide - Windows 7
Page 53
... audio and video degradation, loss of audio or video playback functionality, or loss of information, do not initiate Sleep or Hibernation while reading from or writing to a disc or an external media card. Your work is set at the factory: Sleep and Hibernation. When Hibernation is initiated, your work is initiated, the power lights blink and the screen clears. Initiating and exiting Sleep The system is saved to a hibernation file on external power. 6 Power management Setting power options Using power...
... audio and video degradation, loss of audio or video playback functionality, or loss of information, do not initiate Sleep or Hibernation while reading from or writing to a disc or an external media card. Your work is set at the factory: Sleep and Hibernation. When Hibernation is initiated, your work is initiated, the power lights blink and the screen clears. Initiating and exiting Sleep The system is saved to a hibernation file on external power. 6 Power management Setting power options Using power...

Notebook PC User Guide - Windows 7
Page 60
... on the display. ● Check the Power saver setting in Power Options. ● Remove the battery from the computer when it is not being used or charged. ● Store the battery in use, but it charges faster when the computer is plugged into external power through normal use before charging it. ● If the battery has been unused for two weeks or more, or is new, has been...
... on the display. ● Check the Power saver setting in Power Options. ● Remove the battery from the computer when it is not being used or charged. ● Store the battery in use, but it charges faster when the computer is plugged into external power through normal use before charging it. ● If the battery has been unused for two weeks or more, or is new, has been...

Notebook PC User Guide - Windows 7
Page 62
... then connect the adapter or device to Hibernate after the calibration. Select Start > Control Panel > System and Security > Power Options. Record the Turn off or in the On battery column so they can be reset after . Record the On battery setting under Hibernate after the calibration. c. Click the plus sign next to Sleep, and then click the plus sign next to an external power source. A heavily used battery...
... then connect the adapter or device to Hibernate after the calibration. Select Start > Control Panel > System and Security > Power Options. Record the Turn off or in the On battery column so they can be reset after . Record the On battery setting under Hibernate after the calibration. c. Click the plus sign next to Sleep, and then click the plus sign next to an external power source. A heavily used battery...
Notebook PC User Guide - Windows 7
Page 77
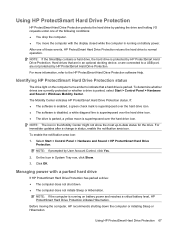
... Start > Control Panel > Hardware and Sound > HP ProtectSmart Hard Drive Protection. Managing power with the display closed while the computer is parked. Before moving the computer, HP recommends shutting down . ● The computer does not initiate Sleep or Hibernation. After one of these events, HP ProtectSmart Hard Drive Protection returns the hard drive to indicate that are in status, enable the notification area icon. Identifying HP ProtectSmart Hard Drive Protection status The drive light on battery power...
... Start > Control Panel > Hardware and Sound > HP ProtectSmart Hard Drive Protection. Managing power with the display closed while the computer is parked. Before moving the computer, HP recommends shutting down . ● The computer does not initiate Sleep or Hibernation. After one of these events, HP ProtectSmart Hard Drive Protection returns the hard drive to indicate that are in status, enable the notification area icon. Identifying HP ProtectSmart Hard Drive Protection status The drive light on battery power...
Notebook PC User Guide - Windows 7
Page 95
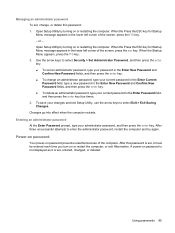
Open Setup Utility by turning on password is set, entered, changed, or deleted. When the Press the ESC key for Startup Menu message appears in the lower left corner of the screen, press the f10 key. - or - Use the arrow keys to select Security > Set Administrator Password, and then press the enter key. ● To set an administrator password, type your password in the Enter New Password and Confirm New Password fields, and then press the enter key. ● To change , or...
Open Setup Utility by turning on password is set, entered, changed, or deleted. When the Press the ESC key for Startup Menu message appears in the lower left corner of the screen, press the f10 key. - or - Use the arrow keys to select Security > Set Administrator Password, and then press the enter key. ● To set an administrator password, type your password in the Enter New Password and Confirm New Password fields, and then press the enter key. ● To change , or...
Notebook PC User Guide - Windows 7
Page 109
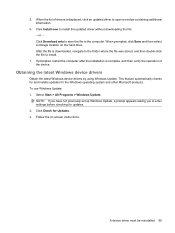
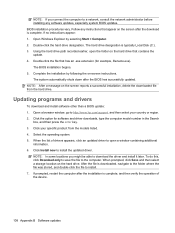
... Start > All Programs > Windows Update. When the list of the device. When prompted, click Save and then select a storage location on -screen instructions. NOTE: If you have not previously set up Windows Update, a prompt appears asking you to open a window containing additional information. 6. Click Download only to save the file to install. 7. After the file is complete, and then verify the operation of drivers is displayed, click an updated driver...
... Start > All Programs > Windows Update. When the list of the device. When prompted, click Save and then select a storage location on -screen instructions. NOTE: If you have not previously set up Windows Update, a prompt appears asking you to open a window containing additional information. 6. Click Download only to save the file to install. 7. After the file is complete, and then verify the operation of drivers is displayed, click an updated driver...
Notebook PC User Guide - Windows 7
Page 117
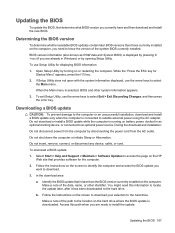
... Main menu. While the "Press the ESC key for displaying BIOS information: 1. To exit Setup Utility, use the arrow keys to download. 3. Make a note of the path to the hard drive. Updating the BIOS To update the BIOS, first determine what BIOS version you are ready to reliable external power using the AC adapter. Select Start > Help and Support > Maintain > Software Updates to access the page on the computer. In the download area a. If Setup Utility does not open with...
... Main menu. While the "Press the ESC key for displaying BIOS information: 1. To exit Setup Utility, use the arrow keys to download. 3. Make a note of the path to the hard drive. Updating the BIOS To update the BIOS, first determine what BIOS version you are ready to reliable external power using the AC adapter. Select Start > Help and Support > Maintain > Software Updates to access the page on the computer. In the download area a. If Setup Utility does not open with...
Notebook PC User Guide - Windows 7
Page 118
... a storage location on the hard drive that has an .exe extension (for software and driver downloads, type the computer model number in the Search box, and then press the enter key. 3. Using the hard drive path recorded earlier, open a window containing additional information. 6. When the list of the device. 108 Appendix B Software updates Open a browser window, go to install. 7. NOTE: After a message on the screen reports a successful installation, delete the downloaded file from the models listed. 4. BIOS installation procedures vary...
... a storage location on the hard drive that has an .exe extension (for software and driver downloads, type the computer model number in the Search box, and then press the enter key. 3. Using the hard drive path recorded earlier, open a window containing additional information. 6. When the list of the device. 108 Appendix B Software updates Open a browser window, go to install. 7. NOTE: After a message on the screen reports a successful installation, delete the downloaded file from the models listed. 4. BIOS installation procedures vary...
Notebook PC User Guide - Windows 7
Page 125
... keys adjusting volume 30 audio CD, DVD, or BD controls 30 decrease screen brightness 29 Help and Support 29 increase screen brightness 29 muting speaker sound 30 switching screen image 29 using 29 volume 35 wireless 30 administrator password creating 85 entering 85 managing 85 airport security devices 57 antennas 13 antivirus software 87 Applications key, Windows 8 audio devices, connecting external 39 audio features 39 audio functions, checking 39 audio-in (microphone) jack 34 audio-out (headphone) jacks 34 AutoPlay 61 B backing up customized window, toolbar, and menu bar settings...
... keys adjusting volume 30 audio CD, DVD, or BD controls 30 decrease screen brightness 29 Help and Support 29 increase screen brightness 29 muting speaker sound 30 switching screen image 29 using 29 volume 35 wireless 30 administrator password creating 85 entering 85 managing 85 airport security devices 57 antennas 13 antivirus software 87 Applications key, Windows 8 audio devices, connecting external 39 audio features 39 audio functions, checking 39 audio-in (microphone) jack 34 audio-out (headphone) jacks 34 AutoPlay 61 B backing up customized window, toolbar, and menu bar settings...
Notebook PC User Guide - Windows 7
Page 126
.../USB port, identifying 10 esc key, identifying 8 exiting Setup Utility 103 external audio devices, connecting 39 external drive 65 external monitor port 10, 40 F f11 113, 114 fan always on 104 fingerprint reader, identifying 7, 89 firewall 20 firewall software 87 flicks changing assignments 28 creating assignments 28 performing 28 fn key, identifying 8, 31 full system recovery 109 function keys, identifying 8 G graphic modes, switching 55 H hard drive external 65 HP ProtectSmart Hard Drive Protection 67 installing 70 hard drive bay, identifying 11 hard drive self test 105 hard drive, replacing...
.../USB port, identifying 10 esc key, identifying 8 exiting Setup Utility 103 external audio devices, connecting 39 external drive 65 external monitor port 10, 40 F f11 113, 114 fan always on 104 fingerprint reader, identifying 7, 89 firewall 20 firewall software 87 flicks changing assignments 28 creating assignments 28 performing 28 fn key, identifying 8, 31 full system recovery 109 function keys, identifying 8 G graphic modes, switching 55 H hard drive external 65 HP ProtectSmart Hard Drive Protection 67 installing 70 hard drive bay, identifying 11 hard drive self test 105 hard drive, replacing...
Notebook PC User Guide - Windows 7
Page 127
... language support 104 latch, battery release 11 light, drive 67 lights caps lock 6 mute 6 power 6 TouchPad 6 volume mute 6 webcam 12 wireless 6 local area network (LAN) cable required 23 connecting cable 23 low battery level 51 M Main menu 103 maintenance Disk Cleanup 66 Disk Defragmenter 66 managing a power-on password 86 managing an administrator password 85 media activity keys 36 media controls, keys 30 memory module inserting 79 removing 79 memory module compartment cover removing 79 replacing 80 memory module compartment, identifying 11 memory test 105 microphones, internal 34 Microsoft...
... language support 104 latch, battery release 11 light, drive 67 lights caps lock 6 mute 6 power 6 TouchPad 6 volume mute 6 webcam 12 wireless 6 local area network (LAN) cable required 23 connecting cable 23 low battery level 51 M Main menu 103 maintenance Disk Cleanup 66 Disk Defragmenter 66 managing a power-on password 86 managing an administrator password 85 media activity keys 36 media controls, keys 30 memory module inserting 79 removing 79 memory module compartment cover removing 79 replacing 80 memory module compartment, identifying 11 memory test 105 microphones, internal 34 Microsoft...
Notebook PC User Guide - Windows 7
Page 128
... optical drive detection 95 Windows drivers 99 turning off the computer 55 U unresponsive system 55 USB cable, connecting 72 USB devices connecting 72 description 72 removing 73 USB hubs 72 USB ports, identifying 9, 10, 72 using Setup Utility 101 using system restore 112 V vents, identifying 11 video, using 40 Virtualization Technology 104 volume adjust 35 keys 35 mute 35 volume keys, identifying 30 volume mute light, identifying 6 W webcam 34 webcam light 34 webcam, identifying 12 webcam, using 42 Windows Applications key, identifying 8 Windows logo key, identifying 8 Windows, passwords set...
... optical drive detection 95 Windows drivers 99 turning off the computer 55 U unresponsive system 55 USB cable, connecting 72 USB devices connecting 72 description 72 removing 73 USB hubs 72 USB ports, identifying 9, 10, 72 using Setup Utility 101 using system restore 112 V vents, identifying 11 video, using 40 Virtualization Technology 104 volume adjust 35 keys 35 mute 35 volume keys, identifying 30 volume mute light, identifying 6 W webcam 34 webcam light 34 webcam, identifying 12 webcam, using 42 Windows Applications key, identifying 8 Windows logo key, identifying 8 Windows, passwords set...


