
User Guide 1
Page 7
... Image Adjustment Menu ...43 PIP Control Menu ...45 Language Menu ...46 Management Menu ...46 Menu and Message Control Menu 50 Information and Factory Reset Menus 51 Introduction to Color Calibration ...52 Preparing to Calibrate ...53 Calibrating the Z27x Using the Onscreen Menus 53 Recalibrate the Current Preset 54 Select and Modify a Preset 54 Auto EDID Update ...55 Appendix A Technical Specifications ...57 Z27x Model ...57 Recognizing Preset Display Resolutions 58 Z27x Model ...58 Appendix B Support and Troubleshooting ...60 Solving Common Problems ...60 Button...
... Image Adjustment Menu ...43 PIP Control Menu ...45 Language Menu ...46 Management Menu ...46 Menu and Message Control Menu 50 Information and Factory Reset Menus 51 Introduction to Color Calibration ...52 Preparing to Calibrate ...53 Calibrating the Z27x Using the Onscreen Menus 53 Recalibrate the Current Preset 54 Select and Modify a Preset 54 Auto EDID Update ...55 Appendix A Technical Specifications ...57 Z27x Model ...57 Recognizing Preset Display Resolutions 58 Z27x Model ...58 Appendix B Support and Troubleshooting ...60 Solving Common Problems ...60 Button...

User Guide 1
Page 9
...; Updatable monitor firmware to enable HP to quickly and easily provide solutions to identified problems and provide custom solutions ● Four reconfigurable front bezel Function buttons to quickly select the most commonly used operations ● Wide viewing angle to allow viewing from a sitting or standing position, or moving from side-toside ● Adjustable tilt, height, swivel, and pivot capabilities ● Removable stand for flexible monitor panel mounting solutions ● HP Quick Release 2 to quickly install the monitor...
...; Updatable monitor firmware to enable HP to quickly and easily provide solutions to identified problems and provide custom solutions ● Four reconfigurable front bezel Function buttons to quickly select the most commonly used operations ● Wide viewing angle to allow viewing from a sitting or standing position, or moving from side-toside ● Adjustable tilt, height, swivel, and pivot capabilities ● Removable stand for flexible monitor panel mounting solutions ● HP Quick Release 2 to quickly install the monitor...

User Guide 1
Page 10
...; Video signal input to support HDMI digital with one upstream port (cable provided) that connects to the computer and four downstream ports that includes monitor drivers, product documentation, and Windows-based calibration software ● For safety and regulatory information, refer to http://www.hp.com/support, and select your documentation kit. Select Drivers & Downloads, and then follow the on rear of monitor for optional cable lock ● Cable management feature for connecting a color calibration tool or updating firmware ● USB...
...; Video signal input to support HDMI digital with one upstream port (cable provided) that connects to the computer and four downstream ports that includes monitor drivers, product documentation, and Windows-based calibration software ● For safety and regulatory information, refer to http://www.hp.com/support, and select your documentation kit. Select Drivers & Downloads, and then follow the on rear of monitor for optional cable lock ● Cable management feature for connecting a color calibration tool or updating firmware ● USB...

User Guide 1
Page 11
... the power cord, plug the cord into an AC outlet that are covered in your media disc, if one may fall over them. If the monitor is included, or in the operating instructions. For information on your documentation kit. Use a power strip whose manufacturer offers a Damage Replacement Policy so you can not be specifically labeled as a monitor, printer, scanner) to service this monitor, as a power...
... the power cord, plug the cord into an AC outlet that are covered in your media disc, if one may fall over them. If the monitor is included, or in the operating instructions. For information on your documentation kit. Use a power strip whose manufacturer offers a Damage Replacement Policy so you can not be specifically labeled as a monitor, printer, scanner) to service this monitor, as a power...

User Guide 1
Page 12
... the power cord. You may need it from excessive light, heat or moisture. ● When removing the monitor stand, you move or ship the monitor. 4 Chapter 2 Safety and Maintenance Guidelines Never disconnect the monitor by grasping the plug firmly and pulling it on an unstable surface. ● Do not allow anything to rest on the screen surface. For more difficult cleaning situations, use...
... the power cord. You may need it from excessive light, heat or moisture. ● When removing the monitor stand, you move or ship the monitor. 4 Chapter 2 Safety and Maintenance Guidelines Never disconnect the monitor by grasping the plug firmly and pulling it on an unstable surface. ● Do not allow anything to rest on the screen surface. For more difficult cleaning situations, use...

User Guide 1
Page 13
... this occurs the screen will not recover to the monitor, computer system, and other attached devices, then follow the instructions below. NOTE: Be sure the master power switch, located on a flat surface covered with a protective sheet foam or non-abrasive cloth. Use Caution When Setting Up the Monitor 5 The master power switch turns off all power to the front panel buttons. Use Caution When Setting Up the Monitor To prevent damage...
... this occurs the screen will not recover to the monitor, computer system, and other attached devices, then follow the instructions below. NOTE: Be sure the master power switch, located on a flat surface covered with a protective sheet foam or non-abrasive cloth. Use Caution When Setting Up the Monitor 5 The master power switch turns off all power to the front panel buttons. Use Caution When Setting Up the Monitor To prevent damage...

User Guide 1
Page 15
... color calibration or firmware update. Digital Audio Out Connects a digital audio component to a host USB port/hub. Connects a DisplayPort cable to the monitor. USB 3.0 Downstream Ports Connects optional USB devices to the monitor. Connects a DisplayPort cable to the monitor. Rear Components 7 Connectors (side panel) Master Power Switch Turns off all power to the monitor. HDMI DisplayPort 2 Connects an HDMI cable to the monitor. Analog Audio Out DisplayPort 1 Connects headphones or optional HP Speaker Bar to the monitor. NOTE: Putting the switch in use. Rear...
... color calibration or firmware update. Digital Audio Out Connects a digital audio component to a host USB port/hub. Connects a DisplayPort cable to the monitor. USB 3.0 Downstream Ports Connects optional USB devices to the monitor. Connects a DisplayPort cable to the monitor. Rear Components 7 Connectors (side panel) Master Power Switch Turns off all power to the monitor. HDMI DisplayPort 2 Connects an HDMI cable to the monitor. Analog Audio Out DisplayPort 1 Connects headphones or optional HP Speaker Bar to the monitor. NOTE: Putting the switch in use. Rear...

User Guide 1
Page 24
... inputs, then the monitor will display the default input source. The message shows which input is not one of a static image. If two or more inputs are not covered under the HP warranty. * A prolonged period of time is DisplayPort), the current preset display resolution, and the recommended preset display resolution. NOTE: If pressing the power button has no effect, the Power Button Lockout feature may occur on all LCD screens. To disable...
... inputs, then the monitor will display the default input source. The message shows which input is not one of a static image. If two or more inputs are not covered under the HP warranty. * A prolonged period of time is DisplayPort), the current preset display resolution, and the recommended preset display resolution. NOTE: If pressing the power button has no effect, the Power Button Lockout feature may occur on all LCD screens. To disable...
User Guide 1
Page 25
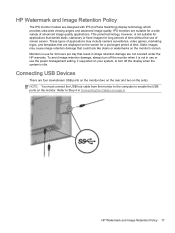
..., always turn off the monitor when it is not in use or use the power management setting, if supported on page 8. NOTE: You must connect the USB hub cable from the monitor to the computer to Step 4 in image retention damage are not covered under the HP warranty. This panel technology, however, is idle. Refer to enable the USB ports on the side). Static images may cause image retention...
..., always turn off the monitor when it is not in use or use the power management setting, if supported on page 8. NOTE: You must connect the USB hub cable from the monitor to the computer to Step 4 in image retention damage are not covered under the HP warranty. This panel technology, however, is idle. Refer to enable the USB ports on the side). Static images may cause image retention...

User Guide 1
Page 36
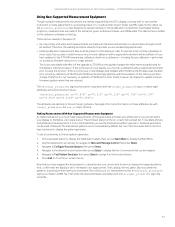
... version of an installation error. Go to the HP Monitor Software Information file on the disc. is required for updated display firmware and install newer firmware if available. TIP: A bezel button shortcut, Display Info..., is on the fourth bezel button in the Windows Display control panel. Find the latest firmware on -screen instructions. 5. View the HP Monitor Software Information file. 3. Refer to http://www.hp.com/support and select the appropriate country and language. 2. Downloading from the Disc...
... version of an installation error. Go to the HP Monitor Software Information file on the disc. is required for updated display firmware and install newer firmware if available. TIP: A bezel button shortcut, Display Info..., is on the fourth bezel button in the Windows Display control panel. Find the latest firmware on -screen instructions. 5. View the HP Monitor Software Information file. 3. Refer to http://www.hp.com/support and select the appropriate country and language. 2. Downloading from the Disc...

User Guide 1
Page 39
.../Down buttons to navigate to the Use Video Levels option then press the Select button to note that the source and pre-processing of the source video will impact whether this setting. NOTE: The Adjust Luminance option displays the current luminance value to support the accurate display of "video legal" signals that include footroom below black and headroom above white. The following situations: ● Viewing the HDMI or...
.../Down buttons to navigate to the Use Video Levels option then press the Select button to note that the source and pre-processing of the source video will impact whether this setting. NOTE: The Adjust Luminance option displays the current luminance value to support the accurate display of "video legal" signals that include footroom below black and headroom above white. The following situations: ● Viewing the HDMI or...

User Guide 1
Page 40
.... The Z27x allows the user to view just the blue channel, temporarily turning the red and green channels off, so that may be stretched horizontally (for narrower aspect ratios) or vertically (for these options are used to determine how the source input is displayed onscreen if its resolution is irrelevant and you want the entire screen to open the OSD. 3. 1. Select Image Adjustment to display the adjustment options screen. 4. Press any button on...
.... The Z27x allows the user to view just the blue channel, temporarily turning the red and green channels off, so that may be stretched horizontally (for narrower aspect ratios) or vertically (for these options are used to determine how the source input is displayed onscreen if its resolution is irrelevant and you want the entire screen to open the OSD. 3. 1. Select Image Adjustment to display the adjustment options screen. 4. Press any button on...

User Guide 1
Page 49
... button label display for the display. Using Auto-Sleep Mode The display supports an OSD (On-Screen Display) option called Auto-Sleep Mode, that is disabled. When Auto-Sleep Mode is reduced. Once you can change the color of the LEDs if the fade-out feature is active by default. b. Press one of the buttons on the front bezel. In the OSD, select Menu and Message Control > Bezel Button color and select either Always White, Always Red, or Switch to red when ambient lighting...
... button label display for the display. Using Auto-Sleep Mode The display supports an OSD (On-Screen Display) option called Auto-Sleep Mode, that is disabled. When Auto-Sleep Mode is reduced. Once you can change the color of the LEDs if the fade-out feature is active by default. b. Press one of the buttons on the front bezel. In the OSD, select Menu and Message Control > Bezel Button color and select either Always White, Always Red, or Switch to red when ambient lighting...

User Guide 1
Page 50
... the menu or sub-menu that are grayed out are not supported with the selected video input and settings. by default), the monitor will wake from the sleep mode when the host PC sends an active signal to navigate, select, and adjust the menu choices. You can disable the Auto-Sleep Mode in the following : 1. Press one of either horizontal or vertical sync signal). Press the bottom Open Menu button to open the OSD. The monitor draws...
... the menu or sub-menu that are grayed out are not supported with the selected video input and settings. by default), the monitor will wake from the sleep mode when the host PC sends an active signal to navigate, select, and adjust the menu choices. You can disable the Auto-Sleep Mode in the following : 1. Press one of either horizontal or vertical sync signal). Press the bottom Open Menu button to open the OSD. The monitor draws...
User Guide 1
Page 60
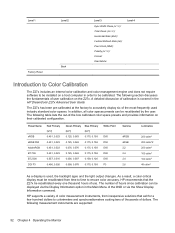
... the HP DreamColor Z27x Advanced User Guide. HP recommends that sell for a few hundred dollars to colorimeters and spectroradiometers costing tens of thousands of user calibration on the Z27x. Level 1 Level 2 Factory Reset Back Level 3 Sync Width Pixels (H / V): Total Pixels (H × V): Horizontal Rate (KHz): Vertical Refresh Rate (Hz): Pixel Clock (MHz): Polarity (H / V): Format: Scan Mode: Level 4 Introduction to Color Calibration The Z27x includes an internal color calibration and color management engine and does not require software to be installed...
... the HP DreamColor Z27x Advanced User Guide. HP recommends that sell for a few hundred dollars to colorimeters and spectroradiometers costing tens of thousands of user calibration on the Z27x. Level 1 Level 2 Factory Reset Back Level 3 Sync Width Pixels (H / V): Total Pixels (H × V): Horizontal Rate (KHz): Vertical Refresh Rate (Hz): Pixel Clock (MHz): Polarity (H / V): Format: Scan Mode: Level 4 Introduction to Color Calibration The Z27x includes an internal color calibration and color management engine and does not require software to be installed...

User Guide 1
Page 66
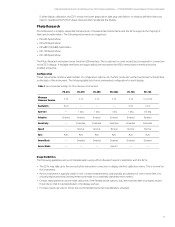
This monitor automatically recognizes these preset modes and they will appear properly sized and centered on the screen. Z27x Model Preset Pixel Format 1 640 × 480 2 720 × 480 3 720 × 480 4 720 × 480 5 720 ×....020 60.000 60.000 24(p) 30(p) 50(i) 50(p) 60(i) 60(p) 59.950 59.995 24(p) Pixel Clk (MHz) 25.175 27.000 27.000 27.000 27.000 27.000 27.000 27.000 27....000 193.250 58.2382 58 Appendix A Technical Specifications Recognizing Preset Display Resolutions The display resolutions listed below are the most commonly used modes and are set as factory defaults.
This monitor automatically recognizes these preset modes and they will appear properly sized and centered on the screen. Z27x Model Preset Pixel Format 1 640 × 480 2 720 × 480 3 720 × 480 4 720 × 480 5 720 ×....020 60.000 60.000 24(p) 30(p) 50(i) 50(p) 60(i) 60(p) 59.950 59.995 24(p) Pixel Clk (MHz) 25.175 27.000 27.000 27.000 27.000 27.000 27.000 27.000 27....000 193.250 58.2382 58 Appendix A Technical Specifications Recognizing Preset Display Resolutions The display resolutions listed below are the most commonly used modes and are set as factory defaults.

User Guide 1
Page 68
Connect the power cord. Video card compatibility. of the monitor is off but are set auto-sleep to unlock the power button function. Image appears blurred, indistinct, or too dark. Video resolution and/or refresh rate are not on. The monitor's Power Button Lockout function is turned Off. Bezel button LEDs are set the bezel button LEDs so that the computer power is turned off in the OSD and the brightness needs adjustment. By default, the Bezel button LEDs are too bright or too dim. Bezel button auto-fade has...
Connect the power cord. Video card compatibility. of the monitor is off but are set auto-sleep to unlock the power button function. Image appears blurred, indistinct, or too dark. Video resolution and/or refresh rate are not on. The monitor's Power Button Lockout function is turned Off. Bezel button LEDs are set the bezel button LEDs so that the computer power is turned off in the OSD and the brightness needs adjustment. By default, the Bezel button LEDs are too bright or too dim. Bezel button auto-fade has...
Calibration Best Practices for the DreamColor Z27x Professional Display
Page 3
... that it is perpendicular to the display surface. • For best results, be sure to recalibrate the K10-A's black level and then recalibrate the display. Z7X230/Z7X240 Firmware Release | Technical white paper If, after display calibration, the Z27x shows the lower grayscale as light gray with the Z27x: • The Z27x may take up to five seconds after instrument connection to the Z27x display. Spectro - -
... that it is perpendicular to the display surface. • For best results, be sure to recalibrate the K10-A's black level and then recalibrate the display. Z7X230/Z7X240 Firmware Release | Technical white paper If, after display calibration, the Z27x shows the lower grayscale as light gray with the Z27x: • The Z27x may take up to five seconds after instrument connection to the Z27x display. Spectro - -

Calibration Best Practices for the DreamColor Z27x Professional Display
Page 6
... the LEDs will begin to customize the Z27x calibration. Calibration Frequency Recommendations HP has been performing real-time continuous ageing on the lower right bezel, hold the top bezel button down ." Power the display on . New capabilities have observed stability (to be extendable so that allow you have accumulated over 2500 hours between full-screen white, red, green, blue, cyan, magenta and yellow. This mode...
... the LEDs will begin to customize the Z27x calibration. Calibration Frequency Recommendations HP has been performing real-time continuous ageing on the lower right bezel, hold the top bezel button down ." Power the display on . New capabilities have observed stability (to be extendable so that allow you have accumulated over 2500 hours between full-screen white, red, green, blue, cyan, magenta and yellow. This mode...
Calibration Best Practices for the DreamColor Z27x Professional Display
Page 13
... button function keys can be set to the test pattern generator: 1. There are two caveats to display the list of the native red, green, and blue primaries, and 100% white. If this memory partition change. See page 8 for gamma to the Z7X240 firmware any bezel button to display the initial button labels, then choose Open Menu to close the on your display, you may wish to use...
... button function keys can be set to the test pattern generator: 1. There are two caveats to display the list of the native red, green, and blue primaries, and 100% white. If this memory partition change. See page 8 for gamma to the Z7X240 firmware any bezel button to display the initial button labels, then choose Open Menu to close the on your display, you may wish to use...


