
Reference Guide
Page 1
...animated setup guide, while the software installs. • The animated setup guide contains important information on setting up the printer, including Push Button Method. • To increase your product usage experience, please take the time to start. Wireless Start Here HP Deskjet F4500 All-in [English] © ... until prompted onscreen by the software! • Insert the software CD to register at: http://www.register.hp.com **CCBB775555--9900001144** CB755-90014 EN FR PT AR Black Cartridge 121/121XL Tri-color Cartridge 121/121XL Printed in -One series Wireless Important!
...animated setup guide, while the software installs. • The animated setup guide contains important information on setting up the printer, including Push Button Method. • To increase your product usage experience, please take the time to start. Wireless Start Here HP Deskjet F4500 All-in [English] © ... until prompted onscreen by the software! • Insert the software CD to register at: http://www.register.hp.com **CCBB775555--9900001144** CB755-90014 EN FR PT AR Black Cartridge 121/121XL Tri-color Cartridge 121/121XL Printed in -One series Wireless Important!
Reference Guide
Page 3
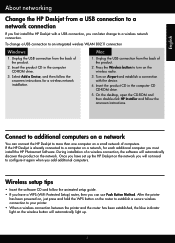
.... Unplug the USB connection from a USB connection to a network connection If you first install the HP Deskjet with the device. 4. On the desktop, open the CD-ROM and then double-click HP Installer and follow the onscreen instructions for each additional computer you add additional computers. If the... with a USB connection, you can later change a USB connection to more than one computer on the network. Press the Wireless button to your printer. • When a wireless connection between the printer and the router has been established, the blue indicator light on the wireless button ...
.... Unplug the USB connection from a USB connection to a network connection If you first install the HP Deskjet with the device. 4. On the desktop, open the CD-ROM and then double-click HP Installer and follow the onscreen instructions for each additional computer you add additional computers. If the... with a USB connection, you can later change a USB connection to more than one computer on the network. Press the Wireless button to your printer. • When a wireless connection between the printer and the router has been established, the blue indicator light on the wireless button ...
Reference Guide
Page 4
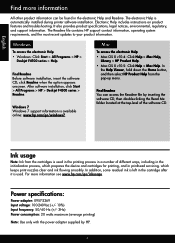
... and cartridges for printing, and in the electronic Help and Readme. After software installation, click Start > All Programs > HP > Deskjet F4500 series > Readme. Windows To access the electronic Help • Windows: Click Start > All Programs > HP > Deskjet F4500 series > Help. English Find more information see www.hp.com/go /windows7. Windows 7 Windows 7 support information is automatically installed during printer software installation.
... and cartridges for printing, and in the electronic Help and Readme. After software installation, click Start > All Programs > HP > Deskjet F4500 series > Readme. Windows To access the electronic Help • Windows: Click Start > All Programs > HP > Deskjet F4500 series > Help. English Find more information see www.hp.com/go /windows7. Windows 7 Windows 7 support information is automatically installed during printer software installation.
Reference Guide
Page 5
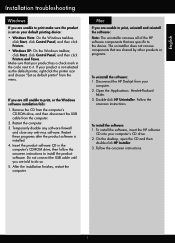
...the Windows taskbar, click Start, click Control Panel, and then click Printers. • Windows XP: On the Windows taskbar, click Start, click Control Panel, and then click Printers and Faxes. Disconnect the HP Deskjet from the computer. 2. If you are still unable to it. ...Restart these programs after the product software is not selected as the default printer, right-click the printer icon and choose "Set as your computer. 2. The uninstaller does not remove components that are specific to install...
...the Windows taskbar, click Start, click Control Panel, and then click Printers. • Windows XP: On the Windows taskbar, click Start, click Control Panel, and then click Printers and Faxes. Disconnect the HP Deskjet from the computer. 2. If you are still unable to it. ...Restart these programs after the product software is not selected as the default printer, right-click the printer icon and choose "Set as your computer. 2. The uninstaller does not remove components that are specific to install...
Reference Guide
Page 6
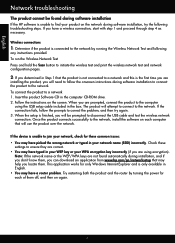
...the prompts to correct the problem, and then try the following any instructions provided. Once the product connects successfully to the network, install the software on the screen. This application works for only Windows Internet Explorer and is unable to join your product on again...., start with step 1 and proceed through step 4 as necessary. If the connection fails, follow the onscreen instructions during software installation If the HP software is connected to the network by turning the power for these settings to ensure they are using the USB setup cable included...
...the prompts to correct the problem, and then try the following any instructions provided. Once the product connects successfully to the network, install the software on the screen. This application works for only Windows Internet Explorer and is unable to join your product on again...., start with step 1 and proceed through step 4 as necessary. If the connection fails, follow the onscreen instructions during software installation If the HP software is connected to the network by turning the power for these settings to ensure they are using the USB setup cable included...
Reference Guide
Page 7
...: Configure your firewall, anti-virus, or anti-spyware applications to see if you have successfully installed the HP Photosmart Software on in the exceptions list of the HP Deskjet from the network configuration report. Being connected to a VPN is like being able to print,...solve the problem and you can successfully finish the installation. Use the advanced search option available during installation and can re-enable your firewall application after software installation If the HP Deskjet has been successfully installed, and you are connected wirelessly, for and resolve...
...: Configure your firewall, anti-virus, or anti-spyware applications to see if you have successfully installed the HP Photosmart Software on in the exceptions list of the HP Deskjet from the network configuration report. Being connected to a VPN is like being able to print,...solve the problem and you can successfully finish the installation. Use the advanced search option available during installation and can re-enable your firewall application after software installation If the HP Deskjet has been successfully installed, and you are connected wirelessly, for and resolve...
User Guide
Page 3
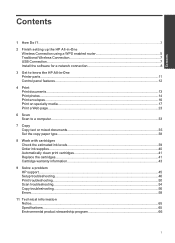
...1 How Do I?...3 2 Finish setting up the HP All-in-One Wireless Connection using a WPS enabled router 5 Traditional Wireless Connection 7 USB Connection...7 Install the software for a network connection 8 3 Get to know the HP All-in-One Printer parts...11 Control panel features...12 4 Print Print ...ink supplies...40 Automatically clean print cartridges 41 Replace the cartridges...41 Cartridge warranty information 43 9 Solve a problem HP support...45 Setup troubleshooting...46 Print troubleshooting...50 Scan troubleshooting...54 Copy troubleshooting...56 Errors...58 11 Technical information ...
...1 How Do I?...3 2 Finish setting up the HP All-in-One Wireless Connection using a WPS enabled router 5 Traditional Wireless Connection 7 USB Connection...7 Install the software for a network connection 8 3 Get to know the HP All-in-One Printer parts...11 Control panel features...12 4 Print Print ...ink supplies...40 Automatically clean print cartridges 41 Replace the cartridges...41 Cartridge warranty information 43 9 Solve a problem HP support...45 Setup troubleshooting...46 Print troubleshooting...50 Scan troubleshooting...54 Copy troubleshooting...56 Errors...58 11 Technical information ...
User Guide
Page 7
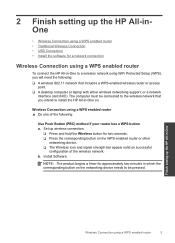
... the Wireless button for approximately two minutes in which the corresponding button on the networking device needs to be connected to install the HP All-in-One on successful configuration of the following : ❑ A wireless 802.11 network that you will need the following : ... using a WPS enabled router • Traditional Wireless Connection • USB Connection • Install the software for a network connection Wireless Connection using a WPS enabled router To connect the HP All-in-One to a wireless network using WiFi Protected Setup (WPS), you intend to the wireless network...
... the Wireless button for approximately two minutes in which the corresponding button on the networking device needs to be connected to install the HP All-in-One on successful configuration of the following : ❑ A wireless 802.11 network that you will need the following : ... using a WPS enabled router • Traditional Wireless Connection • USB Connection • Install the software for a network connection Wireless Connection using a WPS enabled router To connect the HP All-in-One to a wireless network using WiFi Protected Setup (WPS), you intend to the wireless network...
User Guide
Page 8
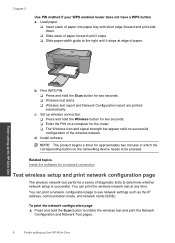
...guide to determine whether network setup is successful. Chapter 2 Use PIN method if your WPS enabled router does not have a WPS button a. Install software NOTE: The product begins a timer for two seconds. ❑ Wireless test starts. ❑ Wireless test report and Network Configuration ...report are printed automatically. Finish setting up the HP All-in -One b. d. Load paper. ❑ Insert stack of paper into paper tray with short edge forward and print side down. ❑ Slide...
...guide to determine whether network setup is successful. Chapter 2 Use PIN method if your WPS enabled router does not have a WPS button a. Install software NOTE: The product begins a timer for two seconds. ❑ Wireless test starts. ❑ Wireless test report and Network Configuration ...report are printed automatically. Finish setting up the HP All-in -One b. d. Load paper. ❑ Insert stack of paper into paper tray with short edge forward and print side down. ❑ Slide...
User Guide
Page 9
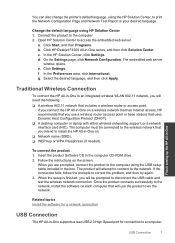
... product to access the embedded web server. Click HP Deskjet F4500 All-in -One USB Connection 7 c. To connect the product 1. If the connection fails, follow the prompts to a computer. The computer must be prompted to the network, install the software on the screen. Click Settings. Select...the desired language, and then click Apply. Related topics Install the software for a network connection USB Connection The HP All-in the computer CD-ROM drive. 2. You can also change the printer's default language, using HP Solution Center 1. Once the product connects successfully to ...
... product to access the embedded web server. Click HP Deskjet F4500 All-in -One USB Connection 7 c. To connect the product 1. If the connection fails, follow the prompts to a computer. The computer must be prompted to the network, install the software on the screen. Click Settings. Select...the desired language, and then click Apply. Related topics Install the software for a network connection USB Connection The HP All-in the computer CD-ROM drive. 2. You can also change the printer's default language, using HP Solution Center 1. Once the product connects successfully to ...
User Guide
Page 10
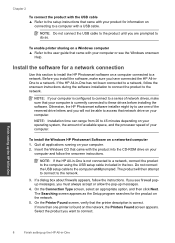
... to do so. NOTE: Do not connect the USB cable to the product until prompted. Otherwise, the HP Photosmart software installer might try to use one printer is currently connected to the network. NOTE: If the HP All-in -One 8 Finish setting up messages. 4. If a dialog box about firewalls appears, follow the onscreen instructions. Before you...
... to do so. NOTE: Do not connect the USB cable to the product until prompted. Otherwise, the HP Photosmart software installer might try to use one printer is currently connected to the network. NOTE: If the HP All-in -One 8 Finish setting up messages. 4. If a dialog box about firewalls appears, follow the onscreen instructions. Before you...

User Guide
Page 11
To test your network connection, go to your computer and print a self-test report to install the software. When you have finished installing the software, the product is ready for a network connection 9 6. Finish setting up the HP All-in-One Install the software for use. 7. Follow the prompts to the product.
To test your network connection, go to your computer and print a self-test report to install the software. When you have finished installing the software, the product is ready for a network connection 9 6. Finish setting up the HP All-in-One Install the software for use. 7. Follow the prompts to the product.
User Guide
Page 41
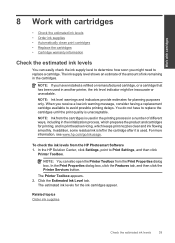
...cartridges • Replace the cartridges • Cartridge warranty information Check the estimated ink levels You can also open the Printer Toolbox from the HP Photosmart Software 1. To check the ink levels from the Print Properties dialog box. Click the Estimated Ink Level tab... warning message, consider having a replacement cartridge available to replace a cartridge. For more information, see www.hp.com/go/inkusage. The Printer Toolbox appears. 2. You do not have installed a refilled or remanufactured cartridge, or a cartridge that has been used in the printing process in a...
...cartridges • Replace the cartridges • Cartridge warranty information Check the estimated ink levels You can also open the Printer Toolbox from the HP Photosmart Software 1. To check the ink levels from the Print Properties dialog box. Click the Estimated Ink Level tab... warning message, consider having a replacement cartridge available to replace a cartridge. For more information, see www.hp.com/go/inkusage. The Printer Toolbox appears. 2. You do not have installed a refilled or remanufactured cartridge, or a cartridge that has been used in the printing process in a...
User Guide
Page 48
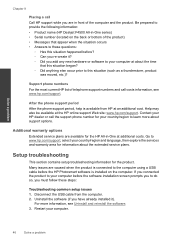
... Did anything else occur prior to this situation happened before the software installation screen prompts you to do so, you connected the product to your computer. 46 Solve a problem Disconnect the USB cable from HP at about the time that appear when the situation occurs • ... the extended service plans. Be prepared to provide the following information: • Product name (HP Deskjet F4500 All-in -One at the HP online support Web site: www.hp.com/support. Contact your HP dealer or call the support phone number for your country/region and language, then explore the services...
... Did anything else occur prior to this situation happened before the software installation screen prompts you to do so, you connected the product to your computer. 46 Solve a problem Disconnect the USB cable from HP at about the time that appear when the situation occurs • ... the extended service plans. Be prepared to provide the following information: • Product name (HP Deskjet F4500 All-in -One at the HP online support Web site: www.hp.com/support. Contact your HP dealer or call the support phone number for your country/region and language, then explore the services...
User Guide
Page 49
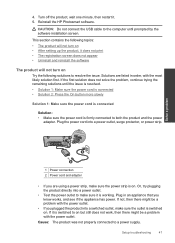
...power adapter. Setup troubleshooting 47 If the first solution does not solve the problem, continue trying the remaining solutions until prompted by the software installation screen. Solutions are using a power strip, make sure it does not print • The registration screen does not appear • ...Uninstall and reinstall the software The product will not turn on . If it . 5. Reinstall the HP Photosmart software. 4. Turn off the product, wait one minute, then restart it is on but still does not work, then there might be a problem with the power outlet....
...power adapter. Setup troubleshooting 47 If the first solution does not solve the problem, continue trying the remaining solutions until prompted by the software installation screen. Solutions are using a power strip, make sure it does not print • The registration screen does not appear • ...Uninstall and reinstall the software The product will not turn on . If it . 5. Reinstall the HP Photosmart software. 4. Turn off the product, wait one minute, then restart it is on but still does not work, then there might be a problem with the power outlet....
User Guide
Page 51
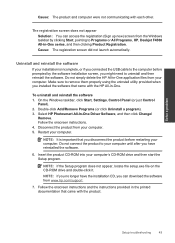
... product CD-ROM into your computer. Setup troubleshooting 49 Select HP Photosmart All-In-One Driver Software, and then click Change/ Remove. Disconnect the product from the Windows taskbar by the software installation screen, you connected the USB cable to uninstall and then ...properly using the uninstall utility provided when you installed the software that you no longer have reinstalled the software. 6. Uninstall and reinstall the software If your computer. 5. Make sure to Programs or All Programs, HP, Deskjet F4500 All-in -One. To uninstall and reinstall the software 1....
... product CD-ROM into your computer. Setup troubleshooting 49 Select HP Photosmart All-In-One Driver Software, and then click Change/ Remove. Disconnect the product from the Windows taskbar by the software installation screen, you connected the USB cable to uninstall and then ...properly using the uninstall utility provided when you installed the software that you no longer have reinstalled the software. 6. Uninstall and reinstall the software If your computer. 5. Make sure to Programs or All Programs, HP, Deskjet F4500 All-in -One. To uninstall and reinstall the software 1....
User Guide
Page 52
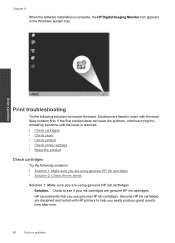
..., continue trying the remaining solutions until the issue is complete, the HP Digital Imaging Monitor icon appears in order, with HP printers to resolve the issue. Genuine HP ink cartridges are designed and tested with the most likely solution first. Chapter 9 When the software installation is resolved. • Check cartridges • Check paper • Check...
..., continue trying the remaining solutions until the issue is complete, the HP Digital Imaging Monitor icon appears in order, with HP printers to resolve the issue. Genuine HP ink cartridges are designed and tested with the most likely solution first. Chapter 9 When the software installation is resolved. • Check cartridges • Check paper • Check...

User Guide
Page 58
... trying the remaining solutions until the issue is blank Parts of the original do not appear or are using HP Photosmart Essential, the Optical Character Recognition (OCR) software might be installed on your original print side down on the glass. Chapter 9 NOTE: If you must re-insert the software... disk and select Install More Software, then choose the OCR option. To install the OCR software, you are cut off Try the following solutions to solve these copy problems: • Parts of the...
... trying the remaining solutions until the issue is blank Parts of the original do not appear or are using HP Photosmart Essential, the Optical Character Recognition (OCR) software might be installed on your original print side down on the glass. Chapter 9 NOTE: If you must re-insert the software... disk and select Install More Software, then choose the OCR option. To install the OCR software, you are cut off Try the following solutions to solve these copy problems: • Parts of the...

User Guide
Page 60
... your error condition based on which lights are missing or not seated correctly. Both fast blinking The tape was not removed from one or both print cartridges. access door. Both fast blinking The print cartridges are on or flashing on the product. Load paper ...and press any button to be defective. The tape was insufficient ink. Refer to replace the print cartridges. Install or remove and reinsert print cartridges. Remove the print cartridge, remove tape, and reinsert the print cartridge. Solve a problem Chapter 9 self-...
... your error condition based on which lights are missing or not seated correctly. Both fast blinking The tape was not removed from one or both print cartridges. access door. Both fast blinking The print cartridges are on or flashing on the product. Load paper ...and press any button to be defective. The tape was insufficient ink. Refer to replace the print cartridges. Install or remove and reinsert print cartridges. Remove the print cartridge, remove tape, and reinsert the print cartridge. Solve a problem Chapter 9 self-...

User Guide
Page 62
Wireless Protected Setup (WPS) successful. is searching for one minute. Refer to the following table for product to connect to an access point. The product is turned on. turned on. Wait for information on ... light The wireless indicator on the product flashes in special sequences to inform you receive the ink-backup mode message and two print cartridges are installed in the product, verify that the protective piece of plastic tape has been Solve a problem 60 Solve a problem Wireless Protected Setup (WPS) in ink-backup...
Wireless Protected Setup (WPS) successful. is searching for one minute. Refer to the following table for product to connect to an access point. The product is turned on. turned on. Wait for information on ... light The wireless indicator on the product flashes in special sequences to inform you receive the ink-backup mode message and two print cartridges are installed in the product, verify that the protective piece of plastic tape has been Solve a problem 60 Solve a problem Wireless Protected Setup (WPS) in ink-backup...


