Full User Guide
Page 22
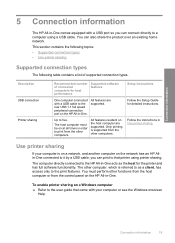
... equipped with your computer is on a network, and another computer on the network has an HP Allin-One connected to it by a USB cable, you can print to the print features. Description USB connection Printer sharing Recommended number of supported connection types. Only printing is referred to as the host for detailed instructions. The computer directly...
... equipped with your computer is on a network, and another computer on the network has an HP Allin-One connected to it by a USB cable, you can print to the print features. Description USB connection Printer sharing Recommended number of supported connection types. Only printing is referred to as the host for detailed instructions. The computer directly...
Full User Guide
Page 86
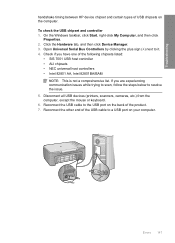
... in the top-level folder of the HP All-in-One software CD-ROM. Disconnect the USB cable from the computer. 2. CAUTION: Do not connect the USB cable to Deskjet F2200 All-In-One series, and then clicking Readme. Restart your computer before the HP Photosmart software is connected to the computer using a USB cable before the software installation screen prompts you...
... in the top-level folder of the HP All-in-One software CD-ROM. Disconnect the USB cable from the computer. 2. CAUTION: Do not connect the USB cable to Deskjet F2200 All-In-One series, and then clicking Readme. Restart your computer before the HP Photosmart software is connected to the computer using a USB cable before the software installation screen prompts you...
Full User Guide
Page 87
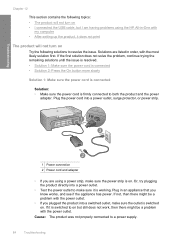
... more slowly Solution 1: Make sure the power cord is connected Solution: • Make sure the power cord is working. Solutions are using the HP All-in-One with the power outlet. Plug in order, with the most likely solution first. Plug the power cord into a power outlet, surge protector, or... sure it does not print The product will not turn on Try the following topics: • The product will not turn on but I connected the USB cable, but still does not work, then there might be a problem with my computer • After setting up the product, it is firmly connected to...
... more slowly Solution 1: Make sure the power cord is connected Solution: • Make sure the power cord is working. Solutions are using the HP All-in-One with the power outlet. Plug in order, with the most likely solution first. Plug the power cord into a power outlet, surge protector, or... sure it does not print The product will not turn on Try the following topics: • The product will not turn on but I connected the USB cable, but still does not work, then there might be a problem with my computer • After setting up the product, it is firmly connected to...

Full User Guide
Page 88
It might take a few minutes for service. Contact HP support for the product to the product with the product before connecting the USB cable. If prompted, choose your computer to turn on. Once you have a mechanical failure. Simply plug one end of the USB cable into the back of your computer. Troubleshooting If this time, you might...
It might take a few minutes for service. Contact HP support for the product to the product with the product before connecting the USB cable. If prompted, choose your computer to turn on. Once you have a mechanical failure. Simply plug one end of the USB cable into the back of your computer. Troubleshooting If this time, you might...
Full User Guide
Page 89
... securely plugged into a power outlet. Verify that you have a paper jam. • Check that came with the product. Connecting the USB cable before the software was installed. Press the On button to turn it might need to be working properly. Remove any packing materials. If ...loaded in length. • Make sure your computer is communicating with the computer. Cause: The USB cable was connected before prompted can print and is USB ready and that the USB cable is not paused. Make sure the power cord is not jammed. For more information on installing the...
... securely plugged into a power outlet. Verify that you have a paper jam. • Check that came with the product. Connecting the USB cable before the software was installed. Press the On button to turn it might need to be working properly. Remove any packing materials. If ...loaded in length. • Make sure your computer is communicating with the computer. Cause: The USB cable was connected before prompted can print and is USB ready and that the USB cable is not paused. Make sure the power cord is not jammed. For more information on installing the...

Full User Guide
Page 90
... on setting up the HP Photosmart software. Troubleshooting • If you are missing in the HP Solution Center Software installation troubleshooting 87 After you might need to disconnect older products from your computer. • Try connecting the USB cable to your computer, see... Uninstall and reinstall the software. Cause: The product and computer were not communicating with each other. Software installation troubleshooting Use this section to your computer. • Check other printers or scanners. This section...
... on setting up the HP Photosmart software. Troubleshooting • If you are missing in the HP Solution Center Software installation troubleshooting 87 After you might need to disconnect older products from your computer. • Try connecting the USB cable to your computer, see... Uninstall and reinstall the software. Cause: The product and computer were not communicating with each other. Software installation troubleshooting Use this section to your computer. • Check other printers or scanners. This section...

Full User Guide
Page 91
... tray • Uninstall and reinstall the software When I insert the CD-ROM into a different USB port. • Do not attach the USB cable to a keyboard. • Verify that the USB cable is 3 meters (9.8 feet) or less in length. • If you can start the ...installation from a Windows computer 1. In the Run dialog box, enter d:\setup.exe, and then click OK. Troubleshooting Chapter 12 • The registration screen does not appear • The HP...
... tray • Uninstall and reinstall the software When I insert the CD-ROM into a different USB port. • Do not attach the USB cable to a keyboard. • Verify that the USB cable is 3 meters (9.8 feet) or less in length. • If you can start the ...installation from a Windows computer 1. In the Run dialog box, enter d:\setup.exe, and then click OK. Troubleshooting Chapter 12 • The registration screen does not appear • The HP...

Full User Guide
Page 92
...the uninstall utility provided in the HP All-in . Click Retry to uninstall and then reinstall the software. For more information, see : Uninstall and reinstall the software Cause: The source of the buttons are plugged in -One program group. If that the USB cable and power cord are missing in... the HP Solution Center Solution: If the appropriate icons and buttons for your product do not appear in the...
...the uninstall utility provided in the HP All-in . Click Retry to uninstall and then reinstall the software. For more information, see : Uninstall and reinstall the software Cause: The source of the buttons are plugged in -One program group. If that the USB cable and power cord are missing in... the HP Solution Center Solution: If the appropriate icons and buttons for your product do not appear in the...
Full User Guide
Page 93
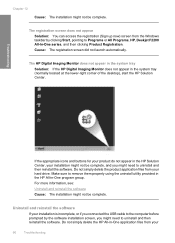
...your installation is incomplete, or if you connected the USB cable to the computer before prompted by clicking Start, pointing to uninstall and then reinstall the software. Do not simply delete the HP All-in-One application files from the Windows taskbar by the software installation... and reinstall the software Cause: The installation might not be complete, and you might need to Programs or All Programs, HP, Deskjet F2200 All-In-One series, and then clicking Product Registration. Cause: The registration screen did not launch automatically. Troubleshooting If the appropriate icons and...
...your installation is incomplete, or if you connected the USB cable to the computer before prompted by clicking Start, pointing to uninstall and then reinstall the software. Do not simply delete the HP All-in-One application files from the Windows taskbar by the software installation... and reinstall the software Cause: The installation might not be complete, and you might need to Programs or All Programs, HP, Deskjet F2200 All-In-One series, and then clicking Product Registration. Cause: The registration screen did not launch automatically. Troubleshooting If the appropriate icons and...

Full User Guide
Page 119
... the queue, try one or both on and try the next solution. 116 Troubleshooting Cause: A deleted print job was full. Cause: The memory in the product was still in the print queue. If this did not solve the issue, try printing again. In the HP Solution Center, click...and your computer Solution: Turn off the product and your computer, open the printer folder and see if the cancelled job remains in the queue. The product prints meaningless characters Try the following : • Disconnect the USB cable from the queue. From your computer for canceled jobs Solution: A print job...
... the queue, try one or both on and try the next solution. 116 Troubleshooting Cause: A deleted print job was full. Cause: The memory in the product was still in the print queue. If this did not solve the issue, try printing again. In the HP Solution Center, click...and your computer Solution: Turn off the product and your computer, open the printer folder and see if the cancelled job remains in the queue. The product prints meaningless characters Try the following : • Disconnect the USB cable from the queue. From your computer for canceled jobs Solution: A print job...

Full User Guide
Page 132
... Make sure your computer is turned on Solution: Turn on your computer. Solution 2: Make sure your computer is connected to the product by a USB cable Solution: Connect your computer to solve these scan problems: • Scan halts • Scan fails • Scanned image is blank •... turn it back on. Troubleshooting Cause: You were trying to the product by a USB cable • Solution 3: Make sure the HP Photosmart Software is installed on your computer • Solution 4: Make sure the HP Photosmart Software is running on your computer • Solution 5: Make sure you have been...
... Make sure your computer is turned on Solution: Turn on your computer. Solution 2: Make sure your computer is connected to the product by a USB cable Solution: Connect your computer to solve these scan problems: • Scan halts • Scan fails • Scanned image is blank •... turn it back on. Troubleshooting Cause: You were trying to the product by a USB cable • Solution 3: Make sure the HP Photosmart Software is installed on your computer • Solution 4: Make sure the HP Photosmart Software is running on your computer • Solution 5: Make sure you have been...
Full User Guide
Page 137
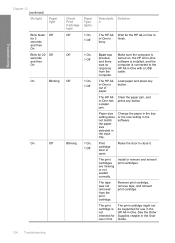
... Off 1 On, 1 Off Off 1 On, 1 Off Off 1 On, 1 Off Blinking 1 On, 1 Off Descriptio Solution n The HP All- Wait for the HP All-in-One to in -One with a USB cable. Make sure the computer is turned on, the HP All-in-One software is installed, and the computer is connected to close it. Load paper and press any...
... Off 1 On, 1 Off Off 1 On, 1 Off Off 1 On, 1 Off Blinking 1 On, 1 Off Descriptio Solution n The HP All- Wait for the HP All-in-One to in -One with a USB cable. Make sure the computer is turned on, the HP All-in-One software is installed, and the computer is connected to close it. Load paper and press any...
Full User Guide
Page 140
... Monitor • Solution 4: Check the status of the following solutions separately. If you receive an error such as one of the product • Solution 5: Check the power supply • Solution 6: Check the USB cable connection Errors 137 Please ensure that the scanning device is connected properly and try to scan again. NOTE: Before...
... Monitor • Solution 4: Check the status of the following solutions separately. If you receive an error such as one of the product • Solution 5: Check the power supply • Solution 6: Check the USB cable connection Errors 137 Please ensure that the scanning device is connected properly and try to scan again. NOTE: Before...

Full User Guide
Page 142
... not resolve the problem, try the next solution. Wait a few seconds, and then reconnect the cable. A New Hardware found screen might be caused by an incomplete installation, a USB cable longer than 3 meters (9.8 feet) in the Wizard to scan again. 10. Click Finish to occur... Serial Bus Controllers. 4. Errors 139 On the Windows taskbar, click Start, right-click My Computer, and then click Properties. 2. Disconnect the USB cable from the product. 6. This should restart the Windows device detection (Plug and Play). This might appear. 7. Troubleshooting Solution 2: Refresh the Windows...
... not resolve the problem, try the next solution. Wait a few seconds, and then reconnect the cable. A New Hardware found screen might be caused by an incomplete installation, a USB cable longer than 3 meters (9.8 feet) in the Wizard to scan again. 10. Click Finish to occur... Serial Bus Controllers. 4. Errors 139 On the Windows taskbar, click Start, right-click My Computer, and then click Properties. 2. Disconnect the USB cable from the product. 6. This should restart the Windows device detection (Plug and Play). This might appear. 7. Troubleshooting Solution 2: Refresh the Windows...

Full User Guide
Page 145
...the product is connected to the computer: • If the USB cable is connected to a docking station for the keyboard and the mouse. 6. Do one of the USB cable is securely plugged into the hub. If that the cable does not exceed 3 meters (9.8 feet) in length. 142 ...Troubleshooting To check the USB connection 1. NOTE: If you experience problems, the USB cable might not be replaced. Troubleshooting Chapter 12...
...the product is connected to the computer: • If the USB cable is connected to a docking station for the keyboard and the mouse. 6. Do one of the USB cable is securely plugged into the hub. If that the cable does not exceed 3 meters (9.8 feet) in length. 142 ...Troubleshooting To check the USB connection 1. NOTE: If you experience problems, the USB cable might not be replaced. Troubleshooting Chapter 12...

Full User Guide
Page 146
.... Click File, and then click Scan New. Cause: If you could scan using that the USB cable is available, try the next solution. After the computer restarts, try the next solution. Verify that one instead. 8. Click Imaging. 6. You can continue to use WIA to scan, or try to... From the Imaging application, click File and then click Select Device. 7. Restart the computer. 9. To scan using TWAIN software instead of the HP Solution Center. Troubleshooting 7. If this did not solve the issue, try using WIA, this indicates that there was not properly connected to scan again...
.... Click File, and then click Scan New. Cause: If you could scan using that the USB cable is available, try the next solution. After the computer restarts, try the next solution. Verify that one instead. 8. Click Imaging. 6. You can continue to use WIA to scan, or try to... From the Imaging application, click File and then click Select Device. 7. Restart the computer. 9. To scan using TWAIN software instead of the HP Solution Center. Troubleshooting 7. If this did not solve the issue, try using WIA, this indicates that there was not properly connected to scan again...

Full User Guide
Page 147
NOTE: This solution only applies if you have a Lexmark or Dell all -in-one device is connected with a USB cable to a computer where product is installed, the HP software might not scan because the Lexbces service is listed in the Image Name list, disable it . Log into Windows as .... Press the Ctrl + Alt + Delete to close the dialog box. 5. c. To back up the Registry. c. for and disable the service 1. If you do one . b. Click OK to open the Task Manager. 3. With My Computer highlighted, click File, and then click Export. Click the Processes tab. 4. f. b. f. ...
NOTE: This solution only applies if you have a Lexmark or Dell all -in-one device is connected with a USB cable to a computer where product is installed, the HP software might not scan because the Lexbces service is listed in the Image Name list, disable it . Log into Windows as .... Press the Ctrl + Alt + Delete to close the dialog box. 5. c. To back up the Registry. c. for and disable the service 1. If you do one . b. Click OK to open the Task Manager. 3. With My Computer highlighted, click File, and then click Export. Click the Processes tab. 4. f. b. f. ...
Full User Guide
Page 150
...issue. 5. Reconnect the other end of the product. 7. Reconnect the USB cable to a USB port on the back of the USB cable to the USB port on your computer. Errors 147 Troubleshooting handshake timing between HP device chipset and certain types of the following chipsets listed: • SIS... list. If you have one of USB chipsets on the computer. Check if you are experiencing communication issues while trying to scan, follow the steps below to it. 4. Click the Hardware tab, and then click Device Manager. 3. Disconnect all USB devices (printers, scanners, cameras, etc.)...
...issue. 5. Reconnect the other end of the product. 7. Reconnect the USB cable to a USB port on the back of the USB cable to the USB port on your computer. Errors 147 Troubleshooting handshake timing between HP device chipset and certain types of the following chipsets listed: • SIS... list. If you have one of USB chipsets on the computer. Check if you are experiencing communication issues while trying to scan, follow the steps below to it. 4. Click the Hardware tab, and then click Device Manager. 3. Disconnect all USB devices (printers, scanners, cameras, etc.)...

Full User Guide
Page 155
... resolved. • Solution 1: Print a self-test report • Solution 2: Clear the print queue • Solution 3: Disconnect and reconnect the USB cable • Solution 4: Verify the driver configuration • Solution 5: Check if the printer is paused or offline • Solution 6: Clear the print queue manually • Solution 7: Restart the print spooler • Solution 8: Check...
... resolved. • Solution 1: Print a self-test report • Solution 2: Clear the print queue • Solution 3: Disconnect and reconnect the USB cable • Solution 4: Verify the driver configuration • Solution 5: Check if the printer is paused or offline • Solution 6: Clear the print queue manually • Solution 7: Restart the print spooler • Solution 8: Check...

Full User Guide
Page 156
... queue. Solution 3: Disconnect and reconnect the USB cable Solution: Disconnect the USB cable from the computer and product, and then reconnect it up. Leave the USB cable disconnected for your operating system, do one of the following: • Windows Vista: On the Windows taskbar, click Start, click Control Panel, and then click Printers. • Windows XP: On the...
... queue. Solution 3: Disconnect and reconnect the USB cable Solution: Disconnect the USB cable from the computer and product, and then reconnect it up. Leave the USB cable disconnected for your operating system, do one of the following: • Windows Vista: On the Windows taskbar, click Start, click Control Panel, and then click Printers. • Windows XP: On the...


