Reference Guide
Page 1
...Printed in [English] Deskjet 2050 All-in-One J510 series Deskjet 1050 All-in your computer and follow the on product features and troubleshooting. The Readme file contains HP support contact information, operating system requirements, and the most recent updates to your device. For computers without a CD/DVD drive, please go to www.hp... software CD in -One J410 series Information For setup information, see the setup poster. Click ReadMe.chm to download and install the printer software. The electronic Help is automatically installed during printer software installation. Register ...
...Printed in [English] Deskjet 2050 All-in-One J510 series Deskjet 1050 All-in your computer and follow the on product features and troubleshooting. The Readme file contains HP support contact information, operating system requirements, and the most recent updates to your device. For computers without a CD/DVD drive, please go to www.hp... software CD in -One J410 series Information For setup information, see the setup poster. Click ReadMe.chm to download and install the printer software. The electronic Help is automatically installed during printer software installation. Register ...
Reference Guide
Page 2
...the CD and then double-click HP Installer. 4. If your printer is installed. 4. Disconnect the HP product from the cartridges is used in the printing process in the cartridge after the printer software is not selected as the default printer, right-click the printer icon and choose "Set as ... connect the USB cable until you are still unable to print, or the Windows software installation fails: 1. Insert the HP software CD into your default printing device: • Windows® 7: From the Windows Start menu, click Devices and Printers. • Windows Vista® : On the Windows ...
...the CD and then double-click HP Installer. 4. If your printer is installed. 4. Disconnect the HP product from the cartridges is used in the printing process in the cartridge after the printer software is not selected as the default printer, right-click the printer icon and choose "Set as ... connect the USB cable until you are still unable to print, or the Windows software installation fails: 1. Insert the HP software CD into your default printing device: • Windows® 7: From the Windows Start menu, click Devices and Printers. • Windows Vista® : On the Windows ...
Reference Guide
Page 3
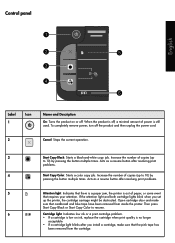
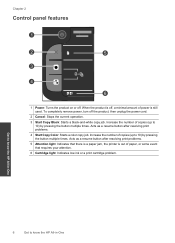
.... Control panel ! Increase the number of paper, or some event that the pink tape has been removed from inside the printer. Acts as a resume button after resolving print problems. 5 ! Then press Start Copy Black or Start Copy Color to 10) by pressing the button multiple times. Open..., a minimal amount of copies (up to resume. 6 Cartridge light: Indicates low ink or a print cartridge problem. • If a cartridge is low on or off. Attention light: Indicates that there is a paper jam, the printer is still used. Increase the number of power is out of copies (up the...
.... Control panel ! Increase the number of paper, or some event that the pink tape has been removed from inside the printer. Acts as a resume button after resolving print problems. 5 ! Then press Start Copy Black or Start Copy Color to 10) by pressing the button multiple times. Open..., a minimal amount of copies (up to resume. 6 Cartridge light: Indicates low ink or a print cartridge problem. • If a cartridge is low on or off. Attention light: Indicates that there is a paper jam, the printer is still used. Increase the number of power is out of copies (up the...
Reference Guide
Page 4
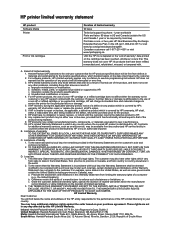
HP printer limited warranty statement HP product Software Media Printer Print or Ink cartridges Duration of liability 1. b. c. Unauthorized modification or misuse. 4. Contracts for additional warranty services, such as required by phone: 1 year worldwide Parts and labor: 90 days in this HP Limited Warranty. Limitations of limited warranty 90 days Technical support by local law) Purchase a one- To the...
HP printer limited warranty statement HP product Software Media Printer Print or Ink cartridges Duration of liability 1. b. c. Unauthorized modification or misuse. 4. Contracts for additional warranty services, such as required by phone: 1 year worldwide Parts and labor: 90 days in this HP Limited Warranty. Limitations of limited warranty 90 days Technical support by local law) Purchase a one- To the...
User Guide
Page 3
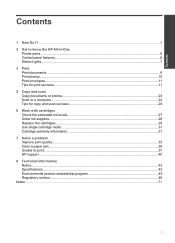
Contents Contents 1 How Do I?...3 2 Get to know the HP All-in-One Printer parts...5 Control panel features...6 Status Lights...7 3 Print Print documents...9 Print photos...10 Print envelopes...11 Tips for print success...11 5 Copy and scan Copy documents or photos...23 Scan to a computer...... cartridges...29 Use single-cartridge mode...31 Cartridge warranty information 31 7 Solve a problem Improve print quality...33 Clear a paper jam...35 Unable to print...37 HP support...40 8 Technical information Notice...43 Specifications...43 Environmental product stewardship program 45 Regulatory notices...
Contents Contents 1 How Do I?...3 2 Get to know the HP All-in-One Printer parts...5 Control panel features...6 Status Lights...7 3 Print Print documents...9 Print photos...10 Print envelopes...11 Tips for print success...11 5 Copy and scan Copy documents or photos...23 Scan to a computer...... cartridges...29 Use single-cartridge mode...31 Cartridge warranty information 31 7 Solve a problem Improve print quality...33 Clear a paper jam...35 Unable to print...37 HP support...40 8 Technical information Notice...43 Specifications...43 Environmental product stewardship program 45 Regulatory notices...
User Guide
Page 8
...to 10) by pressing the button multiple times. Acts as a resume button after resolving print problems. 4 Start Copy Color: Starts a color copy job. When the product is out of copies (up to know the HP All-in -One Chapter 2 Control panel features ! 1 Power: Turns the product on or off. Increase ...the number of paper, or some event that there is a paper jam, the printer is off the product, then unplug the power cord. 2 ...
...to 10) by pressing the button multiple times. Acts as a resume button after resolving print problems. 4 Start Copy Color: Starts a color copy job. When the product is out of copies (up to know the HP All-in -One Chapter 2 Control panel features ! 1 Power: Turns the product on or off. Increase ...the number of paper, or some event that there is a paper jam, the printer is off the product, then unplug the power cord. 2 ...
User Guide
Page 9
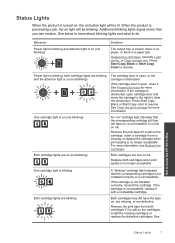
...closed, there is no longer acceptable. Behavior Power light is blinking and attention light is on the cartridge, insert a cartridge if one is missing, or replace the cartridge when print quality is no longer acceptable. Replace the cartridges, correctly Load media, or Clear a paper jam. If the cartridge is incompatible,... errors that the corresponding cartridge still has the tape on ink. Press Start Copy Black or Start Copy Color to know the HP All-in-One Status Lights 7 If the cartridge door is blinking Both cartridge lights are low on , is not installed, or is a paper jam...
...closed, there is no longer acceptable. Behavior Power light is blinking and attention light is on the cartridge, insert a cartridge if one is missing, or replace the cartridge when print quality is no longer acceptable. Replace the cartridges, correctly Load media, or Clear a paper jam. If the cartridge is incompatible,... errors that the corresponding cartridge still has the tape on ink. Press Start Copy Black or Start Copy Color to know the HP All-in-One Status Lights 7 If the cartridge door is blinking Both cartridge lights are low on , is not installed, or is a paper jam...
User Guide
Page 11
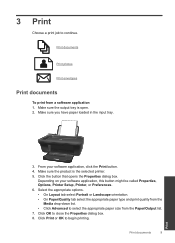
... the Paper/Output list. 7. From your software application, this button might be called Properties, Options, Printer Setup, Printer, or Preferences. 6. Make sure the product is open. 2. Depending on your software application, click the Print button. 4. Select the appropriate options. • On Layout tab select Portrait or Landscape orientation. • On Paper/Quality tab...
... the Paper/Output list. 7. From your software application, this button might be called Properties, Options, Printer Setup, Printer, or Preferences. 6. Make sure the product is open. 2. Depending on your software application, click the Print button. 4. Select the appropriate options. • On Layout tab select Portrait or Landscape orientation. • On Paper/Quality tab...
User Guide
Page 12
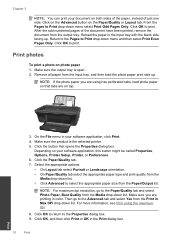
...Printer, or Preferences. 6. Make sure the product is open. 2. Click the Paper/Quality tab. 7. Select the appropriate options. • On Layout tab select Portrait or Landscape orientation. • On Paper/Quality tab select the appropriate paper type and print quality from the Paper/Output list. After the odd numbered pages of just one... software application, click Print. 4. Make sure the output tray is the selected printer. 5. Print photos To print a photo on both sides of the paper, instead of the document have been printed, remove the document from the Print in Max DPI drop...
...Printer, or Preferences. 6. Make sure the product is open. 2. Click the Paper/Quality tab. 7. Select the appropriate options. • On Layout tab select Portrait or Landscape orientation. • On Paper/Quality tab select the appropriate paper type and print quality from the Paper/Output list. After the odd numbered pages of just one... software application, click Print. 4. Make sure the output tray is the selected printer. 5. Print photos To print a photo on both sides of the paper, instead of the document have been printed, remove the document from the Print in Max DPI drop...
User Guide
Page 13
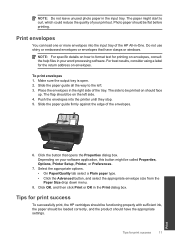
... tray. NOTE: For specific details on how to be printed on envelopes, consult the help files in -One. The side to format text for print success To successfully print, the HP cartridges should be functioning properly with sufficient ink, the paper should be called Properties, Options, Printer Setup, Printer, or Preferences. 7. Push the envelopes into the input...
... tray. NOTE: For specific details on how to be printed on envelopes, consult the help files in -One. The side to format text for print success To successfully print, the HP cartridges should be functioning properly with sufficient ink, the paper should be called Properties, Options, Printer Setup, Printer, or Preferences. 7. Push the envelopes into the input...
User Guide
Page 14
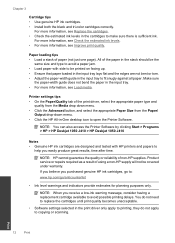
... cartridges to avoid possible printing delays. Make sure the paper-width guide does not bend the paper in -One desktop icon to : www.hp.com/go to open the Printer Software. Product service or repairs required as a result of non-HP supplies. NOTE: When ...also access the Printer Software by clicking Start > Programs > HP > HP Deskjet 1050 J410 > HP Deskjet 1050 J410 Notes • Genuine HP ink cartridges are not bent or torn. • Adjust the paper-width guide in the print driver only apply to printing, they do not need to replace the cartridges until print quality becomes unacceptable...
... cartridges to avoid possible printing delays. Make sure the paper-width guide does not bend the paper in -One desktop icon to : www.hp.com/go to open the Printer Software. Product service or repairs required as a result of non-HP supplies. NOTE: When ...also access the Printer Software by clicking Start > Programs > HP > HP Deskjet 1050 J410 > HP Deskjet 1050 J410 Notes • Genuine HP ink cartridges are not bent or torn. • Adjust the paper-width guide in the print driver only apply to printing, they do not need to replace the cartridges until print quality becomes unacceptable...

User Guide
Page 15
..., Best Quality must be called Properties, Options, Printer Setup, Printer, or Preferences. 5. On the File menu in Grayscale drop-down list on the Paper/Quality tab to Print drop-down list. 9. Click the Advanced button. 8. Click OK to go online for the print resolution of just one side. Print Print using black ink only, click the Advanced...
..., Best Quality must be called Properties, Options, Printer Setup, Printer, or Preferences. 5. On the File menu in Grayscale drop-down list on the Paper/Quality tab to Print drop-down list. 9. Click the Advanced button. 8. Click OK to go online for the print resolution of just one side. Print Print using black ink only, click the Advanced...

User Guide
Page 16
Chapter 3 Print 14 Print
Chapter 3 Print 14 Print
User Guide
Page 17
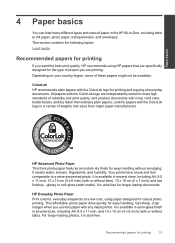
...- It is available in semi-gloss finish in -One, including letter or A4 paper, photo paper, transparencies, and envelopes. This affordable, photo paper dries quickly for printing 15 All papers with the ColorLok logo are printing. Get sharp, crisp images when you are independently ...printing If you want the best print quality, HP recommends using paper designed for printing and copying of project you use this paper with the ColorLok logo for casual photo printing. It resists water, smears, fingerprints, and humidity. ColorLok HP recommends plain papers with any inkjet printer...
...- It is available in semi-gloss finish in -One, including letter or A4 paper, photo paper, transparencies, and envelopes. This affordable, photo paper dries quickly for printing 15 All papers with the ColorLok logo are printing. Get sharp, crisp images when you are independently ...printing If you want the best print quality, HP recommends using paper designed for printing and copying of project you use this paper with the ColorLok logo for casual photo printing. It resists water, smears, fingerprints, and humidity. ColorLok HP recommends plain papers with any inkjet printer...
User Guide
Page 18
... is a high-quality multifunction paper. It is opaque enough for an impressive look and feel . Original HP inks and HP Advanced Photo Paper have been designed to work together so your product, and then click one of printing affordable professional photos with no show-through, which makes it ideal for copies, drafts, memos, and...
... is a high-quality multifunction paper. It is opaque enough for an impressive look and feel . Original HP inks and HP Advanced Photo Paper have been designed to work together so your product, and then click one of printing affordable professional photos with no show-through, which makes it ideal for copies, drafts, memos, and...
User Guide
Page 20
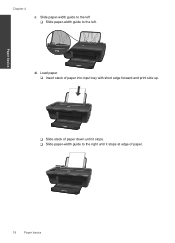
Slide paper-width guide to the left . Load paper. ❑ Insert stack of paper into input tray with short edge forward and print side up. ❑ Slide stack of paper down until it stops. ❑ Slide paper-width guide to the left ❑ Slide paper-width guide to the right until it stops at edge of paper. 18 Paper basics d. Paper basics Chapter 4 c.
Slide paper-width guide to the left . Load paper. ❑ Insert stack of paper into input tray with short edge forward and print side up. ❑ Slide stack of paper down until it stops. ❑ Slide paper-width guide to the left ❑ Slide paper-width guide to the right until it stops at edge of paper. 18 Paper basics d. Paper basics Chapter 4 c.

User Guide
Page 22
NOTE: If the photo paper you are using has perforated tabs, load photo paper so that tabs are on top. ❑ Slide paper-width guide to the left. d. Slide paper-width guide to the left. ❑ Slide paper-width guide to the right until it stops at edge of paper forward until it stops. Load paper. ❑ Insert stack of photo paper with short edge down and print side up. ❑ Slide stack of paper. 20 Paper basics Paper basics Chapter 4 c.
NOTE: If the photo paper you are using has perforated tabs, load photo paper so that tabs are on top. ❑ Slide paper-width guide to the left. d. Slide paper-width guide to the left. ❑ Slide paper-width guide to the right until it stops at edge of paper forward until it stops. Load paper. ❑ Insert stack of photo paper with short edge down and print side up. ❑ Slide stack of paper. 20 Paper basics Paper basics Chapter 4 c.

User Guide
Page 24
The side to the right against stack of the input tray. The flap should be printed on the left side and facing down. ❑ Slide stack of envelopes down until it stops. ❑ Slide paper-width guide to be on should face up. Paper basics 22 Paper basics Chapter 4 ❑ Remove all paper from the main input tray. d. Load envelopes. ❑ Insert one or more envelopes into far-right side of envelopes until it stops.
The side to the right against stack of the input tray. The flap should be printed on the left side and facing down. ❑ Slide stack of envelopes down until it stops. ❑ Slide paper-width guide to be on should face up. Paper basics 22 Paper basics Chapter 4 ❑ Remove all paper from the main input tray. d. Load envelopes. ❑ Insert one or more envelopes into far-right side of envelopes until it stops.
User Guide
Page 25
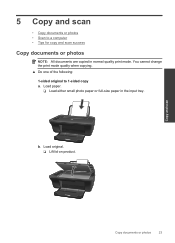
b. Copy and scan Copy documents or photos 23 You cannot change the print mode quality when copying. ▲ Do one of the following: 1-sided original to a computer • Tips for copy and scan success Copy documents or photos NOTE: All documents are copied in the input tray. Load paper. ❑ Load either small photo paper or full-size paper in normal quality print mode. Load original. ❑ Lift lid on product. 5 Copy and scan • Copy documents or photos • Scan to 1-sided copy a.
b. Copy and scan Copy documents or photos 23 You cannot change the print mode quality when copying. ▲ Do one of the following: 1-sided original to a computer • Tips for copy and scan success Copy documents or photos NOTE: All documents are copied in the input tray. Load paper. ❑ Load either small photo paper or full-size paper in normal quality print mode. Load original. ❑ Lift lid on product. 5 Copy and scan • Copy documents or photos • Scan to 1-sided copy a.

User Guide
Page 26
Copy and scan 24 Copy and scan Increase the number of glass. ❑ Close lid. Scan to a computer NOTE: To scan to a computer, the HP All-in-One and computer must be connected and turned on right front corner of copies by pressing the button multiple times. Start copy. ❑ Press either Start Copy Black or Start Copy Color. c. Chapter 5 ❑ Load original print side down on .
Copy and scan 24 Copy and scan Increase the number of glass. ❑ Close lid. Scan to a computer NOTE: To scan to a computer, the HP All-in-One and computer must be connected and turned on right front corner of copies by pressing the button multiple times. Start copy. ❑ Press either Start Copy Black or Start Copy Color. c. Chapter 5 ❑ Load original print side down on .


