

HP Printers - Supported Citrix Presentation Server environments
Page 13
..., that , when installed on a MetaFrame XP Server, go to the user's profile when the user logs out. The difference between the Citrix and HP UPDs The Citrix UPD for Citrix Presentation Server 4.0, 4.5, or XenApp™ 5.0 works well for any session printer. Discrete print drivers must be restored ...the next time the user logs in Presentation Server 4.0 by the default settings of the UPD when used for features manually, then set the tray configuration, duplexer, and hard disk settings. The Citrix UPD is supported. It works well for communication of print ...
..., that , when installed on a MetaFrame XP Server, go to the user's profile when the user logs out. The difference between the Citrix and HP UPDs The Citrix UPD for Citrix Presentation Server 4.0, 4.5, or XenApp™ 5.0 works well for any session printer. Discrete print drivers must be restored ...the next time the user logs in Presentation Server 4.0 by the default settings of the UPD when used for features manually, then set the tray configuration, duplexer, and hard disk settings. The Citrix UPD is supported. It works well for communication of print ...

HP Printers - Supported Citrix Presentation Server environments
Page 23
... 61.x.x.x driver versions available on the server. in Presentation Server 4.0. hpcdmc32.dll issue This issue occurs with 60.x.x.x and 4.x.x.x. For HP print drivers version 4.x.x.x, it is 1.0.2.35. Client driver settings lost during autocreation. Paper size and orientation are the only client settings ...that are issues affecting a server and for features manually, then set the tray 23 If one is installed on a MetaFrame XP Server, go to the version listed in HKLM\SYSTEM...
... 61.x.x.x driver versions available on the server. in Presentation Server 4.0. hpcdmc32.dll issue This issue occurs with 60.x.x.x and 4.x.x.x. For HP print drivers version 4.x.x.x, it is 1.0.2.35. Client driver settings lost during autocreation. Paper size and orientation are the only client settings ...that are issues affecting a server and for features manually, then set the tray 23 If one is installed on a MetaFrame XP Server, go to the version listed in HKLM\SYSTEM...
Service Manual
Page 2
...do not take to prevent damage to death or injury may be performed by copyright. Warranty The information contained in U.S.A. For HP Internal Use Only E Copyright HewlettĆ Packard Company 1996 This document contains proprietary information that the ac power outlet (mains)...(ground) terminal. Avda. Electrical Shock Hazard Serious shock hazard leading to the plotter circuits from electrostatic discharge. No part of this manual, for a particular purpose. All rights are given immediately after the table of this document may result if you should take the ...
...do not take to prevent damage to death or injury may be performed by copyright. Warranty The information contained in U.S.A. For HP Internal Use Only E Copyright HewlettĆ Packard Company 1996 This document contains proprietary information that the ac power outlet (mains)...(ground) terminal. Avda. Electrical Shock Hazard Serious shock hazard leading to the plotter circuits from electrostatic discharge. No part of this manual, for a particular purpose. All rights are given immediately after the table of this document may result if you should take the ...
Service Manual
Page 4
... a referenced paragraph. A small arrow ' is used to the HP DesignJet 330 and 350C. ii Using this Manual Purpose This manual contains information necessary to test, calibrate and service: D HP DesignJet 230 plotters (models C4694A and C4695A) D HP DesignJet 250C plotters (models C3190A and C3191A) D HP DesignJet 330 plotters (models C4701A and C4702A) D HP DesignJet 350C plotters (models C4699A and C4700A) For information about...
... a referenced paragraph. A small arrow ' is used to the HP DesignJet 330 and 350C. ii Using this Manual Purpose This manual contains information necessary to test, calibrate and service: D HP DesignJet 230 plotters (models C4694A and C4695A) D HP DesignJet 250C plotters (models C3190A and C3191A) D HP DesignJet 330 plotters (models C4701A and C4702A) D HP DesignJet 350C plotters (models C4699A and C4700A) For information about...
Service Manual
Page 5
Contents Using this Manual ii Safety Symbols x 1 Product Information Applications 1Ć2 Drivers 1Ć2 Graphic Languages 1Ć2 DeviceĆControl Languages 1Ć2 Interfaces 1Ć3 Network Connections 1Ć3 Memory 1Ć3 Accuracy 1Ć3 Resolution 1Ć4 Legs 1Ć4 RollĆfeed 1Ć4 Upgrading a DesignJet 330 1Ć4 Media 1Ć4 2 Site Planning and Requirements Power Requirements 2Ć2 Choosing an...
Contents Using this Manual ii Safety Symbols x 1 Product Information Applications 1Ć2 Drivers 1Ć2 Graphic Languages 1Ć2 DeviceĆControl Languages 1Ć2 Interfaces 1Ć3 Network Connections 1Ć3 Memory 1Ć3 Accuracy 1Ć3 Resolution 1Ć4 Legs 1Ć4 RollĆfeed 1Ć4 Upgrading a DesignJet 330 1Ć4 Media 1Ć4 2 Site Planning and Requirements Power Requirements 2Ć2 Choosing an...
Service Manual
Page 7
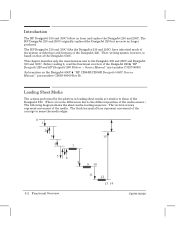
5 Functional Overview (more ' HP DesignJet 200/220 Service Manual) Introduction 5Ć2 Loading Sheet Media 5Ć2 Loading Roll Media on the DesignJet 330 and 350C 5Ć4 Roll Media 5Ć5 Removing Static Charge from the Media 5Ć5 Gripping the Media 5Ć5 PinchĆArm Sensor 5Ć5 Providing a Force ...
5 Functional Overview (more ' HP DesignJet 200/220 Service Manual) Introduction 5Ć2 Loading Sheet Media 5Ć2 Loading Roll Media on the DesignJet 330 and 350C 5Ć4 Roll Media 5Ć5 Removing Static Charge from the Media 5Ć5 Gripping the Media 5Ć5 PinchĆArm Sensor 5Ć5 Providing a Force ...
Service Manual
Page 12
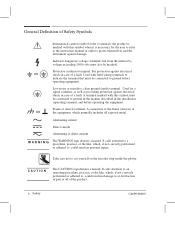
...Used with field wiring terminals to indicate the terminal that must be connected to ground in the manner described in the installation (operating) manual, and before operating equipment. A connection to the frame (chassis) of the equipment, which , if not correctly performed or adhered to...A U T I ĂNĂG The WARNING sign denotes a hazard. General Definition of Safety Symbols OR OR International caution symbol (refer to manual): the product is marked with this symbol when it is necessary for a signal common, as well as providing protection against electrical shock in case...
...Used with field wiring terminals to indicate the terminal that must be connected to ground in the manner described in the installation (operating) manual, and before operating equipment. A connection to the frame (chassis) of the equipment, which , if not correctly performed or adhered to...A U T I ĂNĂG The WARNING sign denotes a hazard. General Definition of Safety Symbols OR OR International caution symbol (refer to manual): the product is marked with this symbol when it is necessary for a signal common, as well as providing protection against electrical shock in case...
Service Manual
Page 20
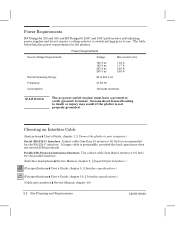
...descriptions ' Service Manual, chapter 5, w Input/Output Interfaces.) 230 250C (Pin specifications ' User's Guide, chapter 5, w Interface specifications.) 330 350C (Pin specifications ' User's Guide, chapter 10, w Interface specifications.) (Cable part numbers ' Service Manual, chapter 10...Interface Cable (Instructions ' User's Guide, chapter 1, w Connect the plotter to use. Power Requirements HP DesignJet 230 and 330 and HP DesignJet 250C and 350C plotters have a protective earth (ground) terminal. Power Requirements Source Voltage Requirements: Voltage Max...
...descriptions ' Service Manual, chapter 5, w Input/Output Interfaces.) 230 250C (Pin specifications ' User's Guide, chapter 5, w Interface specifications.) 330 350C (Pin specifications ' User's Guide, chapter 10, w Interface specifications.) (Cable part numbers ' Service Manual, chapter 10...Interface Cable (Instructions ' User's Guide, chapter 1, w Connect the plotter to use. Power Requirements HP DesignJet 230 and 330 and HP DesignJet 250C and 350C plotters have a protective earth (ground) terminal. Power Requirements Source Voltage Requirements: Voltage Max...
Service Manual
Page 44
... DesignJet 650C ' HP C2858B/C2859B DesignJet 650C Service Manual," part number C2858Ć90000 Rev B). Before reading it, read the functional overview of the DesignJet 650C. This chapter describes only the main features new to the different position of the DesignJet 220. Introduction The HP DesignJet 330 and 350C follow on from and replace the DesignJet 230 and 250C. The HP DesignJet...
... DesignJet 650C ' HP C2858B/C2859B DesignJet 650C Service Manual," part number C2858Ć90000 Rev B). Before reading it, read the functional overview of the DesignJet 650C. This chapter describes only the main features new to the different position of the DesignJet 220. Introduction The HP DesignJet 330 and 350C follow on from and replace the DesignJet 230 and 250C. The HP DesignJet...

Service Manual
Page 47
... loaded into the plotter, it is gripped by the pinchĆarms. There is no pinchĆarm sensor on the DesignJet 230 and 250C but there is one on the DesignJet 330 and 350C. 330 350C PinchĆArm Sensor The pinchĆarm sensor is a switch sensor that is attached to... installed on the media. Linkage, attaching the lever to a cam, causes the cam to itself and jam the plotter. The pinchĆarm sensor is manually slid across the paper to the spittoon. The rollĆfeed assembly consists of: D A rollĆfeed frame D A spindle D Two media stops D A builtĆin...
... loaded into the plotter, it is gripped by the pinchĆarms. There is no pinchĆarm sensor on the DesignJet 230 and 250C but there is one on the DesignJet 330 and 350C. 330 350C PinchĆArm Sensor The pinchĆarm sensor is a switch sensor that is attached to... installed on the media. Linkage, attaching the lever to a cam, causes the cam to itself and jam the plotter. The pinchĆarm sensor is manually slid across the paper to the spittoon. The rollĆfeed assembly consists of: D A rollĆfeed frame D A spindle D Two media stops D A builtĆin...
Service Manual
Page 53
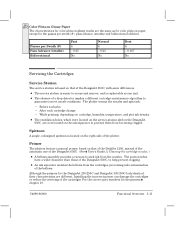
Primer The plotters feature a manual primer, based on that of the bellows. Although the primers for the primers ' chapter 10. For the correct part numbers for the DesignJet 230/250C and DesignJet 330/350C look identical, their characteristics are different. D The absence of the cartridges. After each ... The plotter warms the nozzles and spits ink: - D The ventilation holes, which were located on the serviceĆstation sled on the DesignJet 650C, are now located on : cartridge, humidity, temperature, and plot ink density. Spittoon A single, redesigned spittoon is based on that...
Primer The plotters feature a manual primer, based on that of the bellows. Although the primers for the primers ' chapter 10. For the correct part numbers for the DesignJet 230/250C and DesignJet 330/350C look identical, their characteristics are different. D The absence of the cartridges. After each ... The plotter warms the nozzles and spits ink: - D The ventilation holes, which were located on the serviceĆstation sled on the DesignJet 650C, are now located on : cartridge, humidity, temperature, and plot ink density. Spittoon A single, redesigned spittoon is based on that...

Service Manual
Page 90
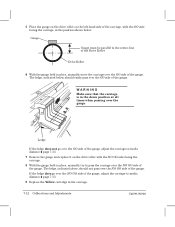
... from the small black clips underneath the media separator, and remove the overdrive roller from left to the right until the overdrive clutch can be manually rotated forward only. 4 While flexing the media separator upwards, ... ... slide the overdrive roller horizontally to right as follows: CĆclip - bushing - bushing - Note the position...
... from the small black clips underneath the media separator, and remove the overdrive roller from left to the right until the overdrive clutch can be manually rotated forward only. 4 While flexing the media separator upwards, ... ... slide the overdrive roller horizontally to right as follows: CĆclip - bushing - bushing - Note the position...
Service Manual
Page 111
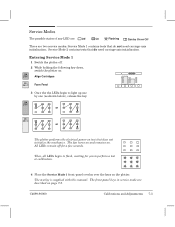
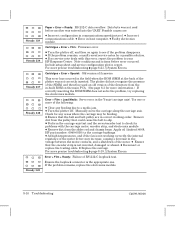
...panel keys in service mode are described on . All LEDs remain off . 2 While holding the following key down, switch the plotter on: 230 250C Align Cartridges 330 350C Form Feed 3 Once the the LEDs begin to flash, waiting for a few seconds. Entering Service Mode 1 1 Switch the...the Service Mode 1 frontĆpanel overlay over the keys on tests but does not initialize the mechanics. The overlay is supplied with this manual. C4699Ć90000 Calibrations and Adjustments 7Ć3 Service Modes The possible states of any LED are two service modes: Service Mode 1 contains ...
...panel keys in service mode are described on . All LEDs remain off . 2 While holding the following key down, switch the plotter on: 230 250C Align Cartridges 330 350C Form Feed 3 Once the the LEDs begin to flash, waiting for a few seconds. Entering Service Mode 1 1 Switch the...the Service Mode 1 frontĆpanel overlay over the keys on tests but does not initialize the mechanics. The overlay is supplied with this manual. C4699Ć90000 Calibrations and Adjustments 7Ć3 Service Modes The possible states of any LED are two service modes: Service Mode 1 contains ...

Service Manual
Page 112
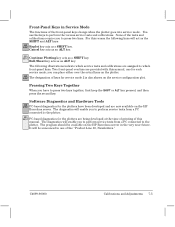
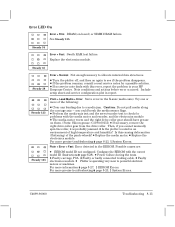
The overlay is supplied with this manual. Entering Service Mode 2 1 Switch the plotter off. 2 While holding the Print Quality key down, switch the plotter on. 3 Once the the LEDs begin to light up one by one (as shown below), release the Print Quality key. 230 250C or 330 350C or Print Quality The...
The overlay is supplied with this manual. Entering Service Mode 2 1 Switch the plotter off. 2 While holding the Print Quality key down, switch the plotter on. 3 Once the the LEDs begin to light up one by one (as shown below), release the Print Quality key. 230 250C or 330 350C or Print Quality The...
Service Manual
Page 113
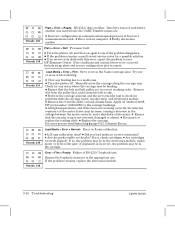
... frontĆpanel keys. The following keys will be available on the service configuration plot. Software Diagnostics and Hardware Tools 230 250C PCĆbased diagnostics for the plotters have to which service tests and calibrations are being developed at the time of printing ... ALT key. Pressing Two Keys Together When you can place either over the actual keys on the HP Barcelona server. you have been developed and are provided with this manual. C4699Ć90000 Calibrations and Adjustments 7Ć5 Some of the frontĆpanel keys change when...
... frontĆpanel keys. The following keys will be available on the service configuration plot. Software Diagnostics and Hardware Tools 230 250C PCĆbased diagnostics for the plotters have to which service tests and calibrations are being developed at the time of printing ... ALT key. Pressing Two Keys Together When you can place either over the actual keys on the HP Barcelona server. you have been developed and are provided with this manual. C4699Ć90000 Calibrations and Adjustments 7Ć5 Some of the frontĆpanel keys change when...
Service Manual
Page 120
... ledge, indicated below : Gauge Y Gauge must be parallel to the centerĆline B of the Drive Roller Drive Roller 6 With the gauge held in place, manually try to Ćmedia distance ' page 7Ć13. 7 Remove the gauge and replace it on the leftĆhand side of the carriage, with the... NO GO side facing the carriage. 8 With the gauge held in place, manually move the carriage over the GO side of the gauge. 5 Place the gauge on the drive roller on the drive roller with the GO side...
... ledge, indicated below : Gauge Y Gauge must be parallel to the centerĆline B of the Drive Roller Drive Roller 6 With the gauge held in place, manually try to Ćmedia distance ' page 7Ć13. 7 Remove the gauge and replace it on the leftĆhand side of the carriage, with the... NO GO side facing the carriage. 8 With the gauge held in place, manually move the carriage over the GO side of the gauge. 5 Place the gauge on the drive roller on the drive roller with the GO side...
Service Manual
Page 143
... problem to powerful electrical motors or machines. For more information ' page 8Ć27, w EEROM Errors. See Steady 135. you cannot manually spin the roller, it is operating very near to your HP Response Center. D If the problem remains, consult recent service notes for problems with this causing deformation (flattening) of high temperature...
... problem to powerful electrical motors or machines. For more information ' page 8Ć27, w EEROM Errors. See Steady 135. you cannot manually spin the roller, it is operating very near to your HP Response Center. D If the problem remains, consult recent service notes for problems with this causing deformation (flattening) of high temperature...
Service Manual
Page 144
... occurred in the field when the ROM SIMM at the back of RSĆ232ĆC loopback test. Apply oil (Anderol 4068, HP part number: 6040Ć0858) to your HP Response Center. D Replace the carriage. D Turn the plotter off . Include setup sheet and service configuration plot in host computer. Check for... Media: Servo error in correct working correctly, the internal resistance of the motor driver may be binding. D Remove dirt from the in communications speed/protocol. Manually move the carriage along the carriage axis.
... occurred in the field when the ROM SIMM at the back of RSĆ232ĆC loopback test. Apply oil (Anderol 4068, HP part number: 6040Ć0858) to your HP Response Center. D Replace the carriage. D Turn the plotter off . Include setup sheet and service configuration plot in host computer. Check for... Media: Servo error in correct working correctly, the internal resistance of the motor driver may be binding. D Remove dirt from the in communications speed/protocol. Manually move the carriage along the carriage axis.
Service Manual
Page 149
... ID (Instructions ' page 8Ć28). For more of the following: D Clear any binding due to your HP Response Center. See Steady 135. Try one or more information ' page 8Ć27, w EEROM Errors. you cannot manually spin the roller, it is operating very near to see if the problem disappears. For more precise...
... ID (Instructions ' page 8Ć28). For more of the following: D Clear any binding due to your HP Response Center. See Steady 135. Try one or more information ' page 8Ć27, w EEROM Errors. you cannot manually spin the roller, it is operating very near to see if the problem disappears. For more precise...
Service Manual
Page 150
...check for problems with the carriage motor, encoder strip, and electronics module. Include setup sheet and service configuration plot in host computer. Manually move the carriage along the carriage axis. For more of RSĆ232ĆC loopback test. If not, check cartridges. Ensure...one or more precise troubleshooting ' page 8Ć23, w System Errors. D Perform the carriageĆaxis test and the servo/encoder test to your HP Response Center. D Replace the carriage. D Are the marks visible on again to a media jam. D Turn the plotter off . D Ensure ...
...check for problems with the carriage motor, encoder strip, and electronics module. Include setup sheet and service configuration plot in host computer. Manually move the carriage along the carriage axis. For more of RSĆ232ĆC loopback test. If not, check cartridges. Ensure...one or more precise troubleshooting ' page 8Ć23, w System Errors. D Perform the carriageĆaxis test and the servo/encoder test to your HP Response Center. D Replace the carriage. D Are the marks visible on again to a media jam. D Turn the plotter off . D Ensure ...


