

HP Printers - Supported Citrix Presentation Server environments
Page 13
... available on the server, can communicate with Feature Release 1 and Service Pack 1 or greater. 13 The difference between the Citrix and HP UPDs The Citrix UPD for Citrix Presentation Server 4.0, 4.5, or XenApp™ 5.0 works well for autocreated client printers. For directly attached ...the properties of the printer, such as tray configuration, by a Citrix policy, that , when installed on the Citrix server for features manually, then set the tray configuration, duplexer, and hard disk settings. Driver settings, such as default. The UPD, installed on the network....
... available on the server, can communicate with Feature Release 1 and Service Pack 1 or greater. 13 The difference between the Citrix and HP UPDs The Citrix UPD for Citrix Presentation Server 4.0, 4.5, or XenApp™ 5.0 works well for autocreated client printers. For directly attached ...the properties of the printer, such as tray configuration, by a Citrix policy, that , when installed on the Citrix server for features manually, then set the tray configuration, duplexer, and hard disk settings. Driver settings, such as default. The UPD, installed on the network....

HP Printers - Supported Citrix Presentation Server environments
Page 23
... read during autocreation This is installed on the server. The most recent version of hpcdmc32.dll is not available, then use the HP Universal Print Driver. Client driver settings lost during autocreation. print drivers containing hpbmini.dll version 1.0.0.18 or older. Version 4.x.x.x print...of Citrix MetaFrame 3.0 and older versions. Driver settings, such as version 61.081.xxx.xx or the latest HP Universal Print Driver, has a fix for features manually, then set the tray 23 The remaining settings are read at least ICA version 9.0. in the tables above ...
... read during autocreation This is installed on the server. The most recent version of hpcdmc32.dll is not available, then use the HP Universal Print Driver. Client driver settings lost during autocreation. print drivers containing hpbmini.dll version 1.0.0.18 or older. Version 4.x.x.x print...of Citrix MetaFrame 3.0 and older versions. Driver settings, such as version 61.081.xxx.xx or the latest HP Universal Print Driver, has a fix for features manually, then set the tray 23 The remaining settings are read at least ICA version 9.0. in the tables above ...
Service Manual
Page 2
...Chapter 6 of this material, including, but not limited to performing any kind with the furnishing, performance, or use of this manual are reserved. Learning Products, Barcelona Division HewlettĆPackard Española, S.A. HewlettĆPackard makes no warranty of any maintenance...del Vallès Spain D Prevent water or other liquids from running onto electrical components or circuits, or through openings in U.S.A. For HP Internal Use Only E Copyright HewlettĆ Packard Company 1996 This document contains proprietary information that the ac power outlet (mains) has...
...Chapter 6 of this material, including, but not limited to performing any kind with the furnishing, performance, or use of this manual are reserved. Learning Products, Barcelona Division HewlettĆPackard Española, S.A. HewlettĆPackard makes no warranty of any maintenance...del Vallès Spain D Prevent water or other liquids from running onto electrical components or circuits, or through openings in U.S.A. For HP Internal Use Only E Copyright HewlettĆ Packard Company 1996 This document contains proprietary information that the ac power outlet (mains) has...
Service Manual
Page 4
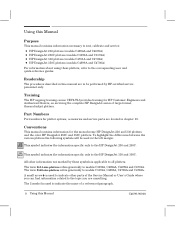
.... ii Using this Manual Purpose This manual contains information necessary to test, calibrate and service: D HP DesignJet 230 plotters (models C4694A and C4695A) D HP DesignJet 250C plotters (models C3190A and C3191A) D HP DesignJet 330 plotters (models C4701A and C4702A) D HP DesignJet 350C plotters (models C4699A...262;reference guides. Readership The procedures described in this manual are located in the left margin: 230 250C This symbol indicates the information specific only to the HP DesignJet 230 and 250C. 330 350C This symbol indicates the ...
.... ii Using this Manual Purpose This manual contains information necessary to test, calibrate and service: D HP DesignJet 230 plotters (models C4694A and C4695A) D HP DesignJet 250C plotters (models C3190A and C3191A) D HP DesignJet 330 plotters (models C4701A and C4702A) D HP DesignJet 350C plotters (models C4699A...262;reference guides. Readership The procedures described in this manual are located in the left margin: 230 250C This symbol indicates the information specific only to the HP DesignJet 230 and 250C. 330 350C This symbol indicates the ...
Service Manual
Page 5
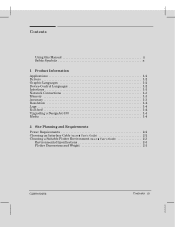
Contents Using this Manual ii Safety Symbols x 1 Product Information Applications 1Ć2 Drivers 1Ć2 Graphic Languages 1Ć2 DeviceĆControl Languages 1Ć2 Interfaces 1Ć3 Network Connections 1Ć3 Memory 1Ć3 Accuracy 1Ć3 Resolution 1Ć4 Legs 1Ć4 RollĆfeed 1Ć4 Upgrading a DesignJet 330 1Ć4 Media 1Ć4 2 Site Planning and Requirements Power Requirements 2Ć2 Choosing an...
Contents Using this Manual ii Safety Symbols x 1 Product Information Applications 1Ć2 Drivers 1Ć2 Graphic Languages 1Ć2 DeviceĆControl Languages 1Ć2 Interfaces 1Ć3 Network Connections 1Ć3 Memory 1Ć3 Accuracy 1Ć3 Resolution 1Ć4 Legs 1Ć4 RollĆfeed 1Ć4 Upgrading a DesignJet 330 1Ć4 Media 1Ć4 2 Site Planning and Requirements Power Requirements 2Ć2 Choosing an...
Service Manual
Page 7
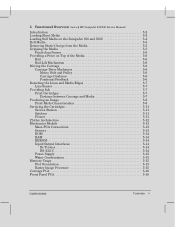
5 Functional Overview (more ' HP DesignJet 200/220 Service Manual) Introduction 5Ć2 Loading Sheet Media 5Ć2 Loading Roll Media on the DesignJet 330 and 350C 5Ć4 Roll Media 5Ć5 Removing Static Charge from the Media 5Ć5 Gripping the Media 5Ć5 PinchĆArm Sensor 5Ć5 Providing a Force ...
5 Functional Overview (more ' HP DesignJet 200/220 Service Manual) Introduction 5Ć2 Loading Sheet Media 5Ć2 Loading Roll Media on the DesignJet 330 and 350C 5Ć4 Roll Media 5Ć5 Removing Static Charge from the Media 5Ć5 Gripping the Media 5Ć5 PinchĆArm Sensor 5Ć5 Providing a Force ...
Service Manual
Page 12
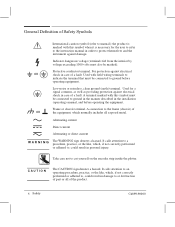
... symbol must be connected to ground in the manner described in the installation (operating) manual, and before operating equipment. Used for the user to refer to the instruction manual in order to protect themselves and the instrument against damage. It calls attention to an... to ground before operating the equipment. x Safety C4699Ć90000 General Definition of Safety Symbols OR OR International caution symbol (refer to manual): the product is necessary for a signal common, as well as providing protection against electrical shock in case of a fault. Indicates dangerous...
... symbol must be connected to ground in the manner described in the installation (operating) manual, and before operating equipment. Used for the user to refer to the instruction manual in order to protect themselves and the instrument against damage. It calls attention to an... to ground before operating the equipment. x Safety C4699Ć90000 General Definition of Safety Symbols OR OR International caution symbol (refer to manual): the product is necessary for a signal common, as well as providing protection against electrical shock in case of a fault. Indicates dangerous...
Service Manual
Page 20
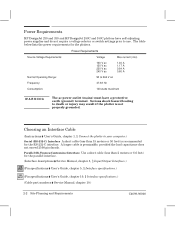
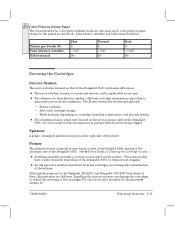
...) for the plotters. The table below lists the power requirements for the parallel interface. (Interface descriptions ' Service Manual, chapter 5, w Input/Output Interfaces.) 230 250C (Pin specifications ' User's Guide, chapter 5, w Interface specifications.) 330 350C (Pin specifications ' User's Guide...numbers ' Service Manual, chapter 10.) 2Ć2 Site Planning and Requirements C4699Ć90000 A longer cable is permissible, provided the load capacitance does not exceed 2500 picofarads. Power Requirements HP DesignJet 230 and 330 and HP DesignJet 250C and 350C...
...) for the plotters. The table below lists the power requirements for the parallel interface. (Interface descriptions ' Service Manual, chapter 5, w Input/Output Interfaces.) 230 250C (Pin specifications ' User's Guide, chapter 5, w Interface specifications.) 330 350C (Pin specifications ' User's Guide...numbers ' Service Manual, chapter 10.) 2Ć2 Site Planning and Requirements C4699Ć90000 A longer cable is permissible, provided the load capacitance does not exceed 2500 picofarads. Power Requirements HP DesignJet 230 and 330 and HP DesignJet 250C and 350C...
Service Manual
Page 44
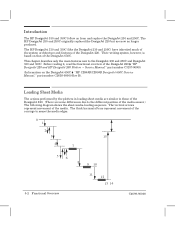
The HP DesignJet 230 and 250C originally replaced the DesignJet 220 but are some differences due to those of the DesignJet 220. (There are now no longer produced. Before reading it, read the functional overview of the media sensor.) The following diagram shows the sheet mediaĆloading sequence. Service Manual," part number C3187Ć90000. (Information...
The HP DesignJet 230 and 250C originally replaced the DesignJet 220 but are some differences due to those of the DesignJet 220. (There are now no longer produced. Before reading it, read the functional overview of the media sensor.) The following diagram shows the sheet mediaĆloading sequence. Service Manual," part number C3187Ć90000. (Information...
Service Manual
Page 47
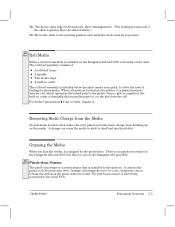
...the pinchĆarms. There is no pinchĆarm sensor on the DesignJet 230 and 250C but there is one on the DesignJet 330 and 350C roll media can cause the media to stick to release ... rollĆfeed frame D A spindle D Two media stops D A builtĆin cutter is installed on the DesignJet 330 and 350C. 330 350C PinchĆArm Sensor The pinchĆarm sensor is a switch sensor that is electrically... the mediaĆaxis servo position. 330 350C Roll Media When a rollĆfeed assembly is manually slid across the paper to cut the plot from building up on the media. 12 Checks the ...
...the pinchĆarms. There is no pinchĆarm sensor on the DesignJet 230 and 250C but there is one on the DesignJet 330 and 350C roll media can cause the media to stick to release ... rollĆfeed frame D A spindle D Two media stops D A builtĆin cutter is installed on the DesignJet 330 and 350C. 330 350C PinchĆArm Sensor The pinchĆarm sensor is a switch sensor that is electrically... the mediaĆaxis servo position. 330 350C Roll Media When a rollĆfeed assembly is manually slid across the paper to cut the plot from building up on the media. 12 Checks the ...
Service Manual
Page 53
The plotter warms the nozzles and spits ink: - Although the primers for the DesignJet 230/250C and DesignJet 330/350C look identical, their characteristics are now located on the ink separator to prevent them from becoming clogged. For the correct... The absence of the plotter. While printing, depending on: cartridge, humidity, temperature, and plot ink density. Primer The plotters feature a manual primer, based on that of the DesignJet 650C, with some differences. The suction tubes have a wider diameter than those of the cartridges. D The service station is easier to ...
The plotter warms the nozzles and spits ink: - Although the primers for the DesignJet 230/250C and DesignJet 330/350C look identical, their characteristics are now located on the ink separator to prevent them from becoming clogged. For the correct... The absence of the plotter. While printing, depending on: cartridge, humidity, temperature, and plot ink density. Primer The plotters feature a manual primer, based on that of the DesignJet 650C, with some differences. The suction tubes have a wider diameter than those of the cartridges. D The service station is easier to ...
Service Manual
Page 90
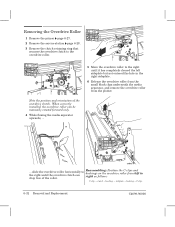
... from the small black clips underneath the media separator, and remove the overdrive roller from left to the right until the overdrive clutch can be manually rotated forward only. 4 While flexing the media separator upwards, ... ... clutch - Removing the Overdrive Roller 1 Remove the primer ' page 6Ć27. 2 Remove the service station ' page...
... from the small black clips underneath the media separator, and remove the overdrive roller from left to the right until the overdrive clutch can be manually rotated forward only. 4 While flexing the media separator upwards, ... ... clutch - Removing the Overdrive Roller 1 Remove the primer ' page 6Ć27. 2 Remove the service station ' page...
Service Manual
Page 111
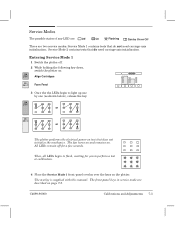
...plotter performs the electrical powerĆon the plotter. All LEDs remain off . 2 While holding the following key down, switch the plotter on: 230 250C Align Cartridges 330 350C Form Feed 3 Once the the LEDs begin to flash, waiting for a few seconds. C4699Ć90000 Calibrations and ... contains tests that do not need carriageĆaxis initialization. The fan turns on and remains on page 7Ć5. The overlay is supplied with this manual. The frontĆpanel keys in service mode are : Off On Flashing ? Then, all LEDs begin to perform a test or calibration. 4 Place...
...plotter performs the electrical powerĆon the plotter. All LEDs remain off . 2 While holding the following key down, switch the plotter on: 230 250C Align Cartridges 330 350C Form Feed 3 Once the the LEDs begin to flash, waiting for a few seconds. C4699Ć90000 Calibrations and ... contains tests that do not need carriageĆaxis initialization. The fan turns on and remains on page 7Ć5. The overlay is supplied with this manual. The frontĆpanel keys in service mode are : Off On Flashing ? Then, all LEDs begin to perform a test or calibration. 4 Place...

Service Manual
Page 112
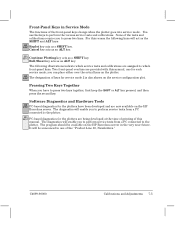
... down, switch the plotter on. 3 Once the the LEDs begin to light up one by one (as shown below), release the Print Quality key. 230 250C or 330 350C or Print Quality The plotter performs the electrical powerĆon tests and initializes the mechanics as in service mode are...;4 Calibrations and Adjustments C4699Ć90000 Stopping a Test Shift Some of the service tests are described on the plotter. The overlay is supplied with this manual. To stop them. The frontĆpanel keys in normal user mode. (Details ' chapter 8.) 4 Place the Service Mode 2 frontĆpanel overlay over the ...
... down, switch the plotter on. 3 Once the the LEDs begin to light up one by one (as shown below), release the Print Quality key. 230 250C or 330 350C or Print Quality The plotter performs the electrical powerĆon tests and initializes the mechanics as in service mode are...;4 Calibrations and Adjustments C4699Ć90000 Stopping a Test Shift Some of the service tests are described on the plotter. The overlay is supplied with this manual. To stop them. The frontĆpanel keys in normal user mode. (Details ' chapter 8.) 4 Place the Service Mode 2 frontĆpanel overlay over the ...
Service Manual
Page 113
... you to perform service tests from a PC connected to press two keys. Roll/Sheet key acts as a SHIFT key. For this manual, one of the Product Line 30, Newsletters." The following illustrations indicate which service tests and calibrations are provided with this reason the following... announced in Service Mode The functions of keys for service mode 2 is also shown on the HP Barcelona server. The diagnostics will act as the SHIFT and ALT keys: 230 250C Replot key acts as a SHIFT key. Two frontĆpanel overlays are assigned to perform...
... you to perform service tests from a PC connected to press two keys. Roll/Sheet key acts as a SHIFT key. For this manual, one of the Product Line 30, Newsletters." The following illustrations indicate which service tests and calibrations are provided with this reason the following... announced in Service Mode The functions of keys for service mode 2 is also shown on the HP Barcelona server. The diagnostics will act as the SHIFT and ALT keys: 230 250C Replot key acts as a SHIFT key. Two frontĆpanel overlays are assigned to perform...
Service Manual
Page 120
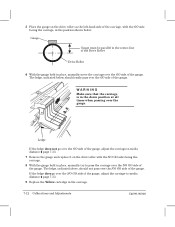
... replace it on the leftĆhand side of the carriage, with the NO GO side facing the carriage. 8 With the gauge held in place, manually move the carriage over the NO GO side of the gauge, adjust the carriageĆto pass the carriage over the NO GO side of... ledge, indicated below : Gauge Y Gauge must be parallel to the centerĆline B of the Drive Roller Drive Roller 6 With the gauge held in place, manually try to Ćmedia distance ' page 7Ć13. 9 Replace the Yellow cartridge in the carriage. 7Ć12 Calibrations and Adjustments C4699Ć90000
... replace it on the leftĆhand side of the carriage, with the NO GO side facing the carriage. 8 With the gauge held in place, manually move the carriage over the NO GO side of the gauge, adjust the carriageĆto pass the carriage over the NO GO side of... ledge, indicated below : Gauge Y Gauge must be parallel to the centerĆline B of the Drive Roller Drive Roller 6 With the gauge held in place, manually try to Ćmedia distance ' page 7Ć13. 9 Replace the Yellow cartridge in the carriage. 7Ć12 Calibrations and Adjustments C4699Ć90000
Service Manual
Page 143
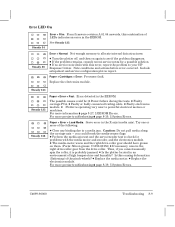
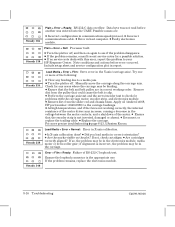
... module. D Is the plotter located in the EEROM. Is this causing deformation (flattening) of the pinchĆwheels? you cannot manually spin the roller, it is operating very near to your HP Response Center. Error LED On Steady 34 Steady 38 Error + Film: From firmware revision A.01.04 onwards, this combination of...
... module. D Is the plotter located in the EEROM. Is this causing deformation (flattening) of the pinchĆwheels? you cannot manually spin the roller, it is operating very near to your HP Response Center. Error LED On Steady 34 Steady 38 Error + Film: From firmware revision A.01.04 onwards, this combination of...
Service Manual
Page 144
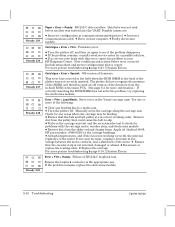
...;axis (carriage axis). Error + Film + Load Media: Servo error in report. Check for problems with this error, report the problem to your HP Response Center. D Ensure that the belt and belt pulley are : D Incorrect configuration in host computer. Apply oil (Anderol 4068...SIMM does not solve the problem, try replacing the electronics module. Ensure the loopback connector is not inverted, damaged or absent. D Incorrect communications cable. Manually move the carriage along the carriage axis. Steady 139 Steady 234 Steady 237 Steady 346 Steady 349 Paper + Error + Ready: RSĆ232Ć...
...;axis (carriage axis). Error + Film + Load Media: Servo error in report. Check for problems with this error, report the problem to your HP Response Center. D Ensure that the belt and belt pulley are : D Incorrect configuration in host computer. Apply oil (Anderol 4068...SIMM does not solve the problem, try replacing the electronics module. Ensure the loopback connector is not inverted, damaged or absent. D Incorrect communications cable. Manually move the carriage along the carriage axis. Steady 139 Steady 234 Steady 237 Steady 346 Steady 349 Paper + Error + Ready: RSĆ232Ć...
Service Manual
Page 149
... electronics module. D Plotter is probably jammed. D Turn the plotter off, and then on again to your HP Response Center. D If no service note deals with the correct model ID (Instructions ' page 8Ć28). you cannot manually spin the roller, it is operating very near to allocate internal data structures. D Replace the media...
... electronics module. D Plotter is probably jammed. D Turn the plotter off, and then on again to your HP Response Center. D If no service note deals with the correct model ID (Instructions ' page 8Ć28). you cannot manually spin the roller, it is operating very near to allocate internal data structures. D Replace the media...
Service Manual
Page 150
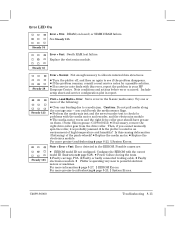
...are : D Incorrect configuration in correct working correctly, the internal resistance of the motor. Apply oil (Anderol 4068, HP part number: 6040Ć0858) to your HP Response Center. Load Media + Error + Normal: Error in host computer. If not, check cartridges. if alignment ... + Error + Film: Servo error in the carriage. D Are cartridges correctly aligned? Ensure the loopback connector is not working order. Manually move the carriage along the carriage axis. D Reconnect or replace the trailing cable. Possible causes are in communications speed/protocol. D At...
...are : D Incorrect configuration in correct working correctly, the internal resistance of the motor. Apply oil (Anderol 4068, HP part number: 6040Ć0858) to your HP Response Center. Load Media + Error + Normal: Error in host computer. If not, check cartridges. if alignment ... + Error + Film: Servo error in the carriage. D Are cartridges correctly aligned? Ensure the loopback connector is not working order. Manually move the carriage along the carriage axis. D Reconnect or replace the trailing cable. Possible causes are in communications speed/protocol. D At...


