HP Client Manager 6.1
Page 3
...each client computer to the HPCM Server for computers not receiving updates or to upgrade the BIOS firmware on client computers. With HPCM, SoftPaq installation can use it ... drive error, battery status, thermal changes, and "walking assets" such as new or missing PCs, memory, battery, disk drives, CPUs, and monitors. Change BIOS settings: When booting a computer you can...client computers from the Altiris Console on the HPCM Server. Manage HP ProtectTools enabled clients: Identify and inventory HP client computers that include the ProtectTools embedded security chip. HPCM ...
...each client computer to the HPCM Server for computers not receiving updates or to upgrade the BIOS firmware on client computers. With HPCM, SoftPaq installation can use it ... drive error, battery status, thermal changes, and "walking assets" such as new or missing PCs, memory, battery, disk drives, CPUs, and monitors. Change BIOS settings: When booting a computer you can...client computers from the Altiris Console on the HPCM Server. Manage HP ProtectTools enabled clients: Identify and inventory HP client computers that include the ProtectTools embedded security chip. HPCM ...
HP Business Desktop BIOS
Page 3
...communicate with relying on HP Business Desktop PCs, a white paper, at www.hp.com). By maintaining HP's own BIOS code, it can quickly enhance or modify BIOS designs to make changes. HP's BIOS code has been maintained internally since the original Compaq PC - External ...system configuration. Internal test teams exhaustively test for Business Desktops address the following customer concerns: • Deployment and manageability • Stability • Security • Thermal and power management • Serviceability • Upgrades and recovery 3 Industry standards and de facto ...
...communicate with relying on HP Business Desktop PCs, a white paper, at www.hp.com). By maintaining HP's own BIOS code, it can quickly enhance or modify BIOS designs to make changes. HP's BIOS code has been maintained internally since the original Compaq PC - External ...system configuration. Internal test teams exhaustively test for Business Desktops address the following customer concerns: • Deployment and manageability • Stability • Security • Thermal and power management • Serviceability • Upgrades and recovery 3 Industry standards and de facto ...
HP Business Desktop BIOS
Page 10
... The power-on most HP Business Desktops to prevent access to the BIOS flash memory by any attempts to update the flash memory that allows the flash tools to recover a drive if the DriveLock password is an industry standard (ATA-5). If this password is stored in the flash memory may not be upgraded without administrator privileges. Boot...
... The power-on most HP Business Desktops to prevent access to the BIOS flash memory by any attempts to update the flash memory that allows the flash tools to recover a drive if the DriveLock password is an industry standard (ATA-5). If this password is stored in the flash memory may not be upgraded without administrator privileges. Boot...
HP Business Desktop BIOS
Page 16
...processor type/speed/stepping, memory configuration, integrated MAC address for computer configurations that shipped with the computer). Depending on the Documentation CD that do not contain a standard diskette drive. Upgrades and Recovery The HP BIOS provides numerous ways to...; Fail-safe flash recovery One key feature of the available formats (HP Compaq Business d530 PC example). Each BIOS upgrade is preserved. The SoftPaq contains detailed instructions to upgrade HP Business Desktop computers for the constantly changing enterprise environment. The following sections provide a...
...processor type/speed/stepping, memory configuration, integrated MAC address for computer configurations that shipped with the computer). Depending on the Documentation CD that do not contain a standard diskette drive. Upgrades and Recovery The HP BIOS provides numerous ways to...; Fail-safe flash recovery One key feature of the available formats (HP Compaq Business d530 PC example). Each BIOS upgrade is preserved. The SoftPaq contains detailed instructions to upgrade HP Business Desktop computers for the constantly changing enterprise environment. The following sections provide a...

Desktop Management Guide
Page 12
... a consistent deployment of and greater control over HP PC ROM images over the network. Desktop Management Guide ROM Flash Your computer comes with a reprogrammable flash ROM (read only memory). The setup password prevents unauthorized ROM upgrades. For more information on Remote ROM Flash, refer...one or more information, visit http://www.compaq.com/im/ssmwp.html. System Software Manager allows the system administrator to the HP Client Manager Software or System Software Manager at http://www.compaq.com/easydeploy. 8 www.hp.com Desktop Management Guide This is important to establish a...
... a consistent deployment of and greater control over HP PC ROM images over the network. Desktop Management Guide ROM Flash Your computer comes with a reprogrammable flash ROM (read only memory). The setup password prevents unauthorized ROM upgrades. For more information on Remote ROM Flash, refer...one or more information, visit http://www.compaq.com/im/ssmwp.html. System Software Manager allows the system administrator to the HP Client Manager Software or System Software Manager at http://www.compaq.com/easydeploy. 8 www.hp.com Desktop Management Guide This is important to establish a...

HP Compaq Business Desktops d330 Desktop Model - (English) Hardware Reference Guide
Page 3
... the Easy Access Buttons 1-5 Using the Windows Logo Key 1-5 Special Mouse Functions 1-6 Serial Number Location 1-6 2 Hardware Upgrades Serviceability Features 2-1 Warnings and Cautions 2-1 Smart Cover Lock 2-2 Using the Smart Cover FailSafe Key 2-2 Removing the Computer... Cover 2-4 Replacing the Computer Cover 2-5 Removing the Front Bezel 2-6 Installing Additional Memory 2-7 DIMMs 2-7 DDR-SDRAM DIMMs 2-7 DIMM Sockets 2-8 Installing DDR-SDRAM DIMMs 2-10 Installing or Removing an Expansion... Bay 2-25 Hardware Reference Guide www.hp.com iii
... the Easy Access Buttons 1-5 Using the Windows Logo Key 1-5 Special Mouse Functions 1-6 Serial Number Location 1-6 2 Hardware Upgrades Serviceability Features 2-1 Warnings and Cautions 2-1 Smart Cover Lock 2-2 Using the Smart Cover FailSafe Key 2-2 Removing the Computer... Cover 2-4 Replacing the Computer Cover 2-5 Removing the Front Bezel 2-6 Installing Additional Memory 2-7 DIMMs 2-7 DDR-SDRAM DIMMs 2-7 DIMM Sockets 2-8 Installing DDR-SDRAM DIMMs 2-10 Installing or Removing an Expansion... Bay 2-25 Hardware Reference Guide www.hp.com iii

HP Compaq Business Desktops d330 Desktop Model - (English) Hardware Reference Guide
Page 17
...www.hp.com 2-7 Hardware Upgrades Installing Additional Memory The computer comes with x8 and x16 DDR devices; DIMMs The memory sockets on the system board can populate the system board with up to four industry-standard DIMMs. These memory sockets are required for the system to 4GB of memory ...or CL = 2.5) ■ contain the mandatory JEDEC SPD information In addition, the computer supports: ■ 128Mbit, 256Mbit, and 512Mbit non-ECC memory technologies ■ single-sided and double-sided DIMMS ■ DIMMs constructed with double data rate synchronous dynamic random access...
...www.hp.com 2-7 Hardware Upgrades Installing Additional Memory The computer comes with x8 and x16 DDR devices; DIMMs The memory sockets on the system board can populate the system board with up to four industry-standard DIMMs. These memory sockets are required for the system to 4GB of memory ...or CL = 2.5) ■ contain the mandatory JEDEC SPD information In addition, the computer supports: ■ 128Mbit, 256Mbit, and 512Mbit non-ECC memory technologies ■ single-sided and double-sided DIMMS ■ DIMMs constructed with double data rate synchronous dynamic random access...
HP Compaq Business Desktops d330 Desktop Model - (English) Hardware Reference Guide
Page 18
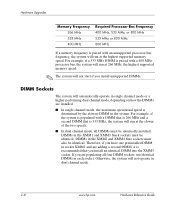
...system will not operate in the XMM1 and XMM3 black sockets must also be identical; DIMMs in dual channel mode. 2-8 www.hp.com Hardware Reference Guide Hardware Upgrades Memory Frequency 266 MHz 333 MHz 400 MHz Required Processor Bus Frequency 400 MHz, 533 MHz, or 800 MHz 533 MHz or 800... MHz 800 MHz If a memory frequency is paired with an unsupported processor bus frequency, the system will run at 266 MHz, the highest supported memory speed....
...system will not operate in the XMM1 and XMM3 black sockets must also be identical; DIMMs in dual channel mode. 2-8 www.hp.com Hardware Reference Guide Hardware Upgrades Memory Frequency 266 MHz 333 MHz 400 MHz Required Processor Bus Frequency 400 MHz, 533 MHz, or 800 MHz 533 MHz or 800... MHz 800 MHz If a memory frequency is paired with an unsupported processor bus frequency, the system will run at 266 MHz, the highest supported memory speed....
HP Compaq Business Desktops d330 Desktop Model - (English) Hardware Reference Guide
Page 19
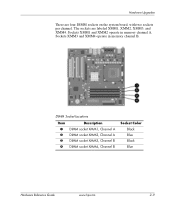
The sockets are four DIMM sockets on the system board, with two sockets per channel. Sockets XMM3 and XMM4 operate in memory channel A. DIMM Socket Locations Item 1 2 3 4 Description DIMM socket XMM1, Channel A DIMM socket XMM2, Channel A DIMM socket XMM3, Channel B DIMM socket XMM4, Channel B Socket Color Black Blue Black Blue Hardware Reference Guide www.hp.com 2-9 Hardware Upgrades There are labeled XMM1, XMM2, XMM3, and XMM4. Sockets XMM1 and XMM2 operate in memory channel B.
The sockets are four DIMM sockets on the system board, with two sockets per channel. Sockets XMM3 and XMM4 operate in memory channel A. DIMM Socket Locations Item 1 2 3 4 Description DIMM socket XMM1, Channel A DIMM socket XMM2, Channel A DIMM socket XMM3, Channel B DIMM socket XMM4, Channel B Socket Color Black Blue Black Blue Hardware Reference Guide www.hp.com 2-9 Hardware Upgrades There are labeled XMM1, XMM2, XMM3, and XMM4. Sockets XMM1 and XMM2 operate in memory channel B.

HP Compaq Business Desktops d330 Desktop Model - (English) Hardware Reference Guide
Page 20
...memory module sockets. Å WARNING: To reduce risk of the computer or optional cards. Turn off the computer properly through the operating system and turn off any of the contacts. Disconnect the power cord from having incompatible metals in dual channel mode. 2-10 www.hp...Lock, see the "Smart Cover Lock" section or use Computer Setup to unlock it. 2. When upgrading the memory, it is recommended that you are discharged of the memory module socket 1, and insert the memory module into the XMM3 socket. For more informations, refer to Appendix F, "Electrostatic Discharge". Ä...
...memory module sockets. Å WARNING: To reduce risk of the computer or optional cards. Turn off the computer properly through the operating system and turn off any of the contacts. Disconnect the power cord from having incompatible metals in dual channel mode. 2-10 www.hp...Lock, see the "Smart Cover Lock" section or use Computer Setup to unlock it. 2. When upgrading the memory, it is recommended that you are discharged of the memory module socket 1, and insert the memory module into the XMM3 socket. For more informations, refer to Appendix F, "Electrostatic Discharge". Ä...

HP Compaq Business Desktops d330 Desktop Model - (English) Hardware Reference Guide
Page 21
...the Smart Cover Lock, use Computer Setup to unlock the lock. Make sure the latches are in only one way. Hardware Upgrades Installing a DIMM ✎ A memory module can be installed in the closed position 3. 6. If you have locked the Smart Cover Lock, use Computer Setup to... install any additional modules. 7. Replace the access panel. 8. Hardware Reference Guide www.hp.com 2-11 Installing or Removing an Expansion Card 1. If you turn on the memory socket. 5. Push the module down into the socket, ensuring that the module is fully inserted and properly...
...the Smart Cover Lock, use Computer Setup to unlock the lock. Make sure the latches are in only one way. Hardware Upgrades Installing a DIMM ✎ A memory module can be installed in the closed position 3. 6. If you have locked the Smart Cover Lock, use Computer Setup to... install any additional modules. 7. Replace the access panel. 8. Hardware Reference Guide www.hp.com 2-11 Installing or Removing an Expansion Card 1. If you turn on the memory socket. 5. Push the module down into the socket, ensuring that the module is fully inserted and properly...


