Basics Guide
Page 4
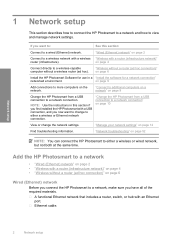
... NOTE: You can connect the HP Photosmart to a wired (Ethernet) network. Ethernet cable. 2 Network setup "Connect to additional computers on a network" on page 9 Change the HP Photosmart from a USB connection to a network connection" on page 6 Wired (Ethernet) network Before you connect the HP Photosmart to a network, make sure you now want to either a wireless or wired network, but...
... NOTE: You can connect the HP Photosmart to a wired (Ethernet) network. Ethernet cable. 2 Network setup "Connect to additional computers on a network" on page 9 Change the HP Photosmart from a USB connection to a network connection" on page 6 Wired (Ethernet) network Before you connect the HP Photosmart to a network, make sure you now want to either a wireless or wired network, but...

Basics Guide
Page 6
... the down arrow button to access this information, see the access point documentation. This runs the Wireless Setup Wizard. The setup wizard searches for the access point. If you connect the HP Photosmart on a wireless network that has Internet access, HP recommends that you are using a password instead of detected network names (SSIDs). WEP key or WPA...
... the down arrow button to access this information, see the access point documentation. This runs the Wireless Setup Wizard. The setup wizard searches for the access point. If you connect the HP Photosmart on a wireless network that has Internet access, HP recommends that you are using a password instead of detected network names (SSIDs). WEP key or WPA...
Basics Guide
Page 7
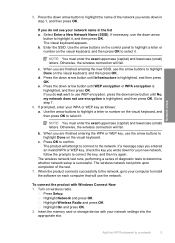
... the product connects successfully to the network, go to your computer to highlight it . Highlight Network and press OK. Add the HP Photosmart to step 7. 6. If necessary, use the arrow buttons to highlight Done on the visual keyboard, and then press OK to determine whether network... test prints upon completion of diagnostic tests to select it. Turn on each computer that will fail. Press Setup. Highlight Wireless Radio and press OK. b. Otherwise, the wireless connection will attempt to connect to highlight a letter or number on the visual keyboard. Press the down for your WPA ...
... the product connects successfully to the network, go to your computer to highlight it . Highlight Network and press OK. Add the HP Photosmart to step 7. 6. If necessary, use the arrow buttons to highlight Done on the visual keyboard, and then press OK to determine whether network... test prints upon completion of diagnostic tests to select it. Turn on each computer that will fail. Press Setup. Highlight Wireless Radio and press OK. b. Otherwise, the wireless connection will attempt to connect to highlight a letter or number on the visual keyboard. Press the down for your WPA ...
Basics Guide
Page 8
... network security and possibly reduced performance when compared to the product. Once the ad hoc network profile has been created, run the Wireless Setup Wizard from the Network menu on the HP Photosmart and select the ad hoc network profile you may result in a lower level of hpsetup. Connect to print a network configuration page...
... network security and possibly reduced performance when compared to the product. Once the ad hoc network profile has been created, run the Wireless Setup Wizard from the Network menu on the HP Photosmart and select the ad hoc network profile you may result in a lower level of hpsetup. Connect to print a network configuration page...

Basics Guide
Page 9
...enabled. 3. Click the Wireless Networks tab. 5. In... key incorrectly on your wireless LAN card. f. Select...Wireless Network Properties Connection window. Otherwise, go to a network 7 However, HP...HP Photosmart to the next step. On the Network Connections window, right-click the Wireless Network Connection. Right-click the Wireless... Network Connection icon, and then click Properties. 4. If there is possible to close the Wireless..., the wireless connection will...configure my wireless network ...HP recommends you might enter ABCDEF1234567....
...enabled. 3. Click the Wireless Networks tab. 5. In... key incorrectly on your wireless LAN card. f. Select...Wireless Network Properties Connection window. Otherwise, go to a network 7 However, HP...HP Photosmart to the next step. On the Network Connections window, right-click the Wireless Network Connection. Right-click the Wireless... Network Connection icon, and then click Properties. 4. If there is possible to close the Wireless..., the wireless connection will...configure my wireless network ...HP recommends you might enter ABCDEF1234567....

Basics Guide
Page 10
..., and then displays a list of detected network names (SSIDs). NOTE: You must remember which can print the Wireless Network Test report at the end of a successful Wireless Setup Wizard connection which letters are finished entering the WEP key, use the arrow buttons to highlight Done on the visual...create a network name that the network name is unable to discover the network, you to step 7. Press the down arrow button to highlight Wireless Setup Wizard, and then press OK. Otherwise go to your WEP key as follows. If a message says you entered an invalid WEP key, check...
..., and then displays a list of detected network names (SSIDs). NOTE: You must remember which can print the Wireless Network Test report at the end of a successful Wireless Setup Wizard connection which letters are finished entering the WEP key, use the arrow buttons to highlight Done on the visual...create a network name that the network name is unable to discover the network, you to step 7. Press the down arrow button to highlight Wireless Setup Wizard, and then press OK. Otherwise go to your WEP key as follows. If a message says you entered an invalid WEP key, check...
Basics Guide
Page 11
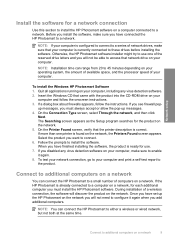
... network, and then click Next. If more than one of the reserved drive letters and you disabled any virus detection software. 2. Connect to additional computers on a network You can connect the HP Photosmart to either a wireless or wired network, but not both at the same...space, and the processor speed of a wireless connection, the software will not need to configure it again. 8. up messages, you must install the HP Photosmart software. Network setup Install the software for a network connection Use this section to install the HP Photosmart software on a network 9 On the ...
... network, and then click Next. If more than one of the reserved drive letters and you disabled any virus detection software. 2. Connect to additional computers on a network You can connect the HP Photosmart to either a wireless or wired network, but not both at the same...space, and the processor speed of a wireless connection, the software will not need to configure it again. 8. up messages, you must install the HP Photosmart software. Network setup Install the software for a network connection Use this section to install the HP Photosmart software on a network 9 On the ...
Basics Guide
Page 12
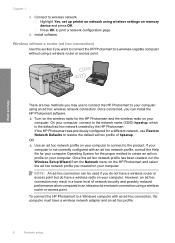
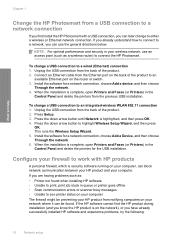
...the down arrow button to highlight Wireless Setup Wizard, and then press OK. If the HP software cannot find the HP product during installation (and you know the HP product is highlighted, and then press OK. 4. NOTE: For optimal performance and security in your wireless network, use the general directions..., you can use an access point (such as : • Printer not found . If you are having problems such as a wireless router) to connect the HP Photosmart. Unplug the USB connection from the back of the product. 2. To change a USB connection to a wired (Ethernet) connection 1. ...
...the down arrow button to highlight Wireless Setup Wizard, and then press OK. If the HP software cannot find the HP product during installation (and you know the HP product is highlighted, and then press OK. 4. NOTE: For optimal performance and security in your wireless network, use the general directions..., you can use an access point (such as : • Printer not found . If you are having problems such as a wireless router) to connect the HP Photosmart. Unplug the USB connection from the back of the product. 2. To change a USB connection to a wired (Ethernet) connection 1. ...

Basics Guide
Page 14
...the network defaults. Press the down arrow button until Wireless Radio is on the HP Photosmart control panel, or you can display a summary of the network settings on . Network setup Chapter 1 Manage your network settings The HP Photosmart control panel enables you to perform a variety of... mDNS. 1. Turn the wireless radio on automatically. Press Setup. 2. Press the down arrow button until Network is highlighted, and then press OK. 3. Press the down arrow button until Network is highlighted, and then press OK. 3. Do one of the HP Photosmart indicates that you want to...
...the network defaults. Press the down arrow button until Wireless Radio is on the HP Photosmart control panel, or you can display a summary of the network settings on . Network setup Chapter 1 Manage your network settings The HP Photosmart control panel enables you to perform a variety of... mDNS. 1. Turn the wireless radio on automatically. Press Setup. 2. Press the down arrow button until Network is highlighted, and then press OK. 3. Press the down arrow button until Network is highlighted, and then press OK. 3. Do one of the HP Photosmart indicates that you want to...

Basics Guide
Page 15
You can print the wireless network test at any time. 1. Press Setup. 2. Network setup Manage your network settings 13 Press the down arrow button until Network is detected, a recommendation on how to determine whether network setup is highlighted, and then press OK. If an issue is highlighted..., and then press OK. 3. Press the down arrow button until Wireless Network Test is successful. Print the wireless network test The wireless network test performs a series of ...
You can print the wireless network test at any time. 1. Press Setup. 2. Network setup Manage your network settings 13 Press the down arrow button until Network is detected, a recommendation on how to determine whether network setup is highlighted, and then press OK. If an issue is highlighted..., and then press OK. 3. Press the down arrow button until Wireless Network Test is successful. Print the wireless network test The wireless network test performs a series of ...
Basics Guide
Page 54
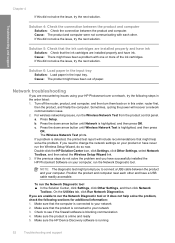
..., and computer, and then turn them back on your HP Photosmart over a network, try the next solution. a. c. Double-click the HP Solution Center icon, click Settings, click Other Settings, select Network Toolbox, and then select the Wireless Setup Wizard link. 3. NOTE: The diagnostic test might help ...solve the problem, check the following steps in the input tray. Make sure the product is running 52 Troubleshooting and support Cause: The product and computer were not communicating with one or more ...
..., and computer, and then turn them back on your HP Photosmart over a network, try the next solution. a. c. Double-click the HP Solution Center icon, click Settings, click Other Settings, select Network Toolbox, and then select the Wireless Setup Wizard link. 3. NOTE: The diagnostic test might help ...solve the problem, check the following steps in the input tray. Make sure the product is running 52 Troubleshooting and support Cause: The product and computer were not communicating with one or more ...

Basics Guide
Page 55
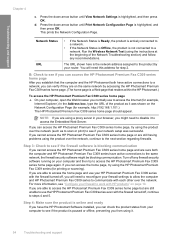
... on the network To see if the indicator lights are two indicator lights, one that is on and another that blinks. To print the Network Configuration Page a. Network troubleshooting 53 Make sure that the HP Photosmart is connected to your network If your product is not connected to a wired... Configuration Page, and then check the Network Status and URL. The lights indicate the following steps can also access the HP Network Assistant at www.hp.com/sbso/wireless/tools-setup for help you continue to Network Connections, and then select View/Details. b. OR Windows XP: Click Start, point to...
... on the network To see if the indicator lights are two indicator lights, one that is on and another that blinks. To print the Network Configuration Page a. Network troubleshooting 53 Make sure that the HP Photosmart is connected to your network If your product is not connected to a wired... Configuration Page, and then check the Network Status and URL. The lights indicate the following steps can also access the HP Network Assistant at www.hp.com/sbso/wireless/tools-setup for help you continue to Network Connections, and then select View/Details. b. OR Windows XP: Click Start, point to...
Basics Guide
Page 56
... to allow the computer and HP Photosmart Premium Fax C309 series to reconfigure your browser, you are still having problems using the instructions at the beginning of the Network Troubleshooting section) and follow any firewall security software running on your network setup was shown on the Network ...home page and use your HP Photosmart Premium Fax C309 series with the firewall turned off, continue to the next section regarding firewalls. For more information, see if your computer and then try using it to see "Configure your router. Run the Wireless Network Test (using the ...
... to allow the computer and HP Photosmart Premium Fax C309 series to reconfigure your browser, you are still having problems using the instructions at the beginning of the Network Troubleshooting section) and follow any firewall security software running on your network setup was shown on the Network ...home page and use your HP Photosmart Premium Fax C309 series with the firewall turned off, continue to the next section regarding firewalls. For more information, see if your computer and then try using it to see "Configure your router. Run the Wireless Network Test (using the ...

Full User Guide
Page 8
... as cable or DSL. Chapter 2 Finish setting up the HP Photosmart Related topics • Install the software for a network connection Wireless with a router (infrastructure network) To connect the HP Photosmart to an available port on wireless radio. ❑ Press Setup. ❑ Highlight Network and press OK. ❑ Highlight Wireless Radio and press OK. ❑ Highlight On and press...
... as cable or DSL. Chapter 2 Finish setting up the HP Photosmart Related topics • Install the software for a network connection Wireless with a router (infrastructure network) To connect the HP Photosmart to an available port on wireless radio. ❑ Press Setup. ❑ Highlight Network and press OK. ❑ Highlight Wireless Radio and press OK. ❑ Highlight On and press...

Full User Guide
Page 9
... to connect the HP Photosmart to create an ad hoc profile on wireless radio. ❑ Press Setup. ❑ Highlight Network and press OK. ❑ Highlight Wireless Radio and press OK. ❑ Highlight On and press OK. Use Wireless Setup Wizard a. If the HP Photosmart was previously configured for the HP Photosmart and the wireless radio on your computer using a wireless router or access...
... to connect the HP Photosmart to create an ad hoc profile on wireless radio. ❑ Press Setup. ❑ Highlight Network and press OK. ❑ Highlight Wireless Radio and press OK. ❑ Highlight On and press OK. Use Wireless Setup Wizard a. If the HP Photosmart was previously configured for the HP Photosmart and the wireless radio on your computer using a wireless router or access...

Full User Guide
Page 10
... for you typed in the previous step. i. Click the Wireless Networks tab. 5. Select the Use Windows to the next step. e. j. Just remember that does not use HEX (hexadecimal) characters for This is a Network Authentication list, select Open. Press Setup. 8 Finish setting up the HP Photosmart To create a network profile NOTE: The product comes configured...
... for you typed in the previous step. i. Click the Wireless Networks tab. 5. Select the Use Windows to the next step. e. j. Just remember that does not use HEX (hexadecimal) characters for This is a Network Authentication list, select Open. Press Setup. 8 Finish setting up the HP Photosmart To create a network profile NOTE: The product comes configured...

Full User Guide
Page 11
... to the SSID. Otherwise go to your new network, follow the prompts to correct the WEP key, and then try running the Wireless Setup Wizard again to install the software. a. b. Before you install the software, make sure you wrote down arrow button until Yes, ... key you have connected the HP Photosmart to step 7. Press the down arrow button to highlight a letter or number on the visual keyboard. 7. Use the arrow buttons on the control panel to highlight Wireless Setup Wizard, and then press OK. e. b. Finish setting up the HP Photosmart 2. c. Select Enter a ...
... to the SSID. Otherwise go to your new network, follow the prompts to correct the WEP key, and then try running the Wireless Setup Wizard again to install the software. a. b. Before you install the software, make sure you wrote down arrow button until Yes, ... key you have connected the HP Photosmart to step 7. Press the down arrow button to highlight a letter or number on the visual keyboard. 7. Use the arrow buttons on the control panel to highlight Wireless Setup Wizard, and then press OK. e. b. Finish setting up the HP Photosmart 2. c. Select Enter a ...
Full User Guide
Page 33
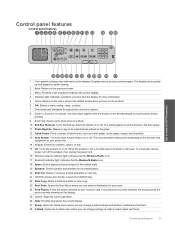
...panel features Control panel features Get to know the HP Photosmart OK CD/DVD 1 2 abc 3 def 4 ghi 5 jkl 6 mno 7 pqrs 8 tuv 9 wxyz * 0 # 1 Color graphics display (also referred to as school paper,...Fax: Sends or receives a black-and-white or color fax. 21 CD/DVD access door handle: Lowers the CD/DVD tray. 22 ...Start Copy: Starts a black-and-white or color copy. 23 Start Scan: Opens the Scan Menu where you can...current operation. 26 Help: Provides help about the current display. 27 Setup: Opens the Setup menu where you can change settings to the Home screen (the default...
...panel features Control panel features Get to know the HP Photosmart OK CD/DVD 1 2 abc 3 def 4 ghi 5 jkl 6 mno 7 pqrs 8 tuv 9 wxyz * 0 # 1 Color graphics display (also referred to as school paper,...Fax: Sends or receives a black-and-white or color fax. 21 CD/DVD access door handle: Lowers the CD/DVD tray. 22 ...Start Copy: Starts a black-and-white or color copy. 23 Start Scan: Opens the Scan Menu where you can...current operation. 26 Help: Provides help about the current display. 27 Setup: Opens the Setup menu where you can change settings to the Home screen (the default...
Full User Guide
Page 34
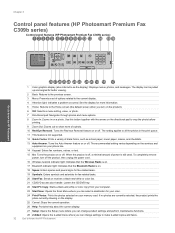
...Control panel features (HP Photosmart Premium Fax C309b series) Control panel features (HP Photosmart Premium Fax C309b series) Get to know the HP Photosmart To completely remove...Setup: Opens the Setup menu where you can change product settings and perform maintenance functions. 28 2-Sided: Opens the 2-sided menu where you can change settings to make 2-sided copies and faxes. 32 Get to know the HP Photosmart OK CD/DVD 1 2 abc 3 def 4 ghi 5 jkl 6 mno 7 pqrs 8 tuv 9 wxyz * 0 # 1 Color... power cord. 16 Wireless network indicator light: Indicates that the Wireless Radio is on. ...
...Control panel features (HP Photosmart Premium Fax C309b series) Control panel features (HP Photosmart Premium Fax C309b series) Get to know the HP Photosmart To completely remove...Setup: Opens the Setup menu where you can change product settings and perform maintenance functions. 28 2-Sided: Opens the 2-sided menu where you can change settings to make 2-sided copies and faxes. 32 Get to know the HP Photosmart OK CD/DVD 1 2 abc 3 def 4 ghi 5 jkl 6 mno 7 pqrs 8 tuv 9 wxyz * 0 # 1 Color... power cord. 16 Wireless network indicator light: Indicates that the Wireless Radio is on. ...

Full User Guide
Page 136
If this did not solve the issue, try the next solution. If the product is connected to the computer through a wired, wireless, or Bluetooth connection, make sure that the respective connections are active and the product is turned on your computer. Follow the onscreen instructions ... it to the computer. 134 Solve a problem Solve a problem When prompted, click Install More Software to your computer's CD-ROM drive and then start the Setup program. 2. Verify that the USB cable is plugged into a USB port on . If this did not solve the issue, try the next solution. Solution ...
If this did not solve the issue, try the next solution. If the product is connected to the computer through a wired, wireless, or Bluetooth connection, make sure that the respective connections are active and the product is turned on your computer. Follow the onscreen instructions ... it to the computer. 134 Solve a problem Solve a problem When prompted, click Install More Software to your computer's CD-ROM drive and then start the Setup program. 2. Verify that the USB cable is plugged into a USB port on . If this did not solve the issue, try the next solution. Solution ...


