Basics Guide
Page 41
...Stops the current operation. If you follow the steps in the Start Here guide in this guide, including features that are currently selected, the product prints the photo currently showing on features of items for your HP Photosmart. To access the Electronic Help • Windows: Click Start > All Programs > HP > Photosmart Premium... copies and faxes. Start Copy: Starts a black-and-white or color copy. If no photos are only available using the HP Photosmart. Next, click the main menu and select Photosmart Premium Fax C309 series. Start Scan: Opens the Scan Menu where you press...
...Stops the current operation. If you follow the steps in the Start Here guide in this guide, including features that are currently selected, the product prints the photo currently showing on features of items for your HP Photosmart. To access the Electronic Help • Windows: Click Start > All Programs > HP > Photosmart Premium... copies and faxes. Start Copy: Starts a black-and-white or color copy. If no photos are only available using the HP Photosmart. Next, click the main menu and select Photosmart Premium Fax C309 series. Start Scan: Opens the Scan Menu where you press...
Basics Guide
Page 42
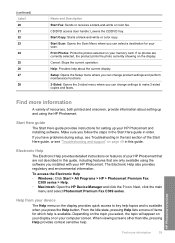
... the Electronic Help. Slide the stack of paper into the main input tray with the short edge forward and the print side down. Insert the stack of paper forward until it stops. 40 HP Photosmart overview To load full-size paper 1. TIP: Tap a stack of rips, dust, wrinkles, and curled or bent ...edges. 2. Load paper You can get help and support from the HP Web site at www.hp.com/support. This Web site offers technical...
... the Electronic Help. Slide the stack of paper into the main input tray with the short edge forward and the print side down. Insert the stack of paper forward until it stops. 40 HP Photosmart overview To load full-size paper 1. TIP: Tap a stack of rips, dust, wrinkles, and curled or bent ...edges. 2. Load paper You can get help and support from the HP Web site at www.hp.com/support. This Web site offers technical...
Basics Guide
Page 43
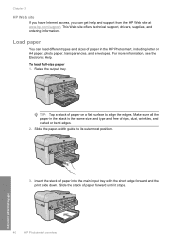
...: Make sure that the product is servicing the ink cartridges or otherwise engaged in a task, the paper stop inside the product might not be in the photo tray 1. You could push the paper too far forward,... is idle and silent when you , as far as it stops at the end of the tray extender to open the extender the rest of the page first with the print side down. 4. make sure the stack of paper fits within... legal-size paper, leave the paper catch closed. Lower the output tray. Load paper 41 HP Photosmart overview Do not overload the main input tray; To load up to eject blank pages.
...: Make sure that the product is servicing the ink cartridges or otherwise engaged in a task, the paper stop inside the product might not be in the photo tray 1. You could push the paper too far forward,... is idle and silent when you , as far as it stops at the end of the tray extender to open the extender the rest of the page first with the print side down. 4. make sure the stack of paper fits within... legal-size paper, leave the paper catch closed. Lower the output tray. Load paper 41 HP Photosmart overview Do not overload the main input tray; To load up to eject blank pages.

Basics Guide
Page 44
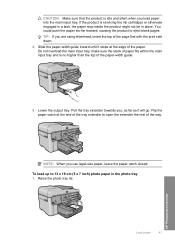
...the edge of photo paper forward until it stops. make sure the stack of photo paper fits within the photo tray and is no higher than the top of photo paper into the photo tray with the short edge forward and the print side down. HP Photosmart overview 5. Insert the stack of the ...paper-width guide. Lower the photo tray lid. 42 HP Photosmart overview Slide the paper-width guide to you are using has perforated tabs, load the photo...
...the edge of photo paper forward until it stops. make sure the stack of photo paper fits within the photo tray and is no higher than the top of photo paper into the photo tray with the short edge forward and the print side down. HP Photosmart overview 5. Insert the stack of the ...paper-width guide. Lower the photo tray lid. 42 HP Photosmart overview Slide the paper-width guide to you are using has perforated tabs, load the photo...

Basics Guide
Page 49
... handle on the front of the product. NOTE: Wait until the print carriage stops moving before installing it from the slot. NOTE: Make sure you remove the plastic wrap from the cartridge before proceeding. 4. The print carriage moves to the center of the cartridge to release it, and... then remove it in the product, or printing will fail. Press the tab on the print carriage to remove the plastic wrap from its packaging by pulling the orange pull-tab straight back to remove the cartridges. 5. HP Photosmart overview Replace the cartridges 47 Remove the new cartridge ...
... handle on the front of the product. NOTE: Wait until the print carriage stops moving before installing it from the slot. NOTE: Make sure you remove the plastic wrap from the cartridge before proceeding. 4. The print carriage moves to the center of the cartridge to release it, and... then remove it in the product, or printing will fail. Press the tab on the print carriage to remove the plastic wrap from its packaging by pulling the orange pull-tab straight back to remove the cartridges. 5. HP Photosmart overview Replace the cartridges 47 Remove the new cartridge ...

Basics Guide
Page 62
... sending and receiving faxes. NOTE: For information on the phone line. If the product stops sending and receiving faxes, repeat this process. • If the phone line is connected.... If this did not solve the issue, try using the port designated for support. If you have assigned one port for telephone and Group 3 fax and another port for fax and phone use a DSL service, make...the port that is set up the product with a PBX phone system or ISDN line, see the printed documentation that the terminal adapter is designated for multiple purposes. Also, make sure the DSL modem is ...
... sending and receiving faxes. NOTE: For information on the phone line. If the product stops sending and receiving faxes, repeat this process. • If the phone line is connected.... If this did not solve the issue, try using the port designated for support. If you have assigned one port for telephone and Group 3 fax and another port for fax and phone use a DSL service, make...the port that is set up the product with a PBX phone system or ISDN line, see the printed documentation that the terminal adapter is designated for multiple purposes. Also, make sure the DSL modem is ...
Basics Guide
Page 72
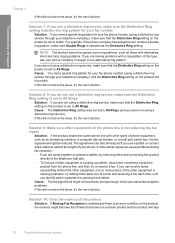
...types of phone equipment, such as the Distinctive Ring setting. If you are not using a splitter or extension cables, try removing them back one or more pieces of the other equipment on the product, the memory might be reduced if you identify which can also be reduced. Solution 9:...service, make sure the Distinctive Ring setting matches the ring pattern for your fax number Solution: If you have not yet been printed and the product will stop 70 Troubleshooting and support If this did not solve the issue, try the next solution. try adding them and connecting the ...
...types of phone equipment, such as the Distinctive Ring setting. If you are not using a splitter or extension cables, try removing them back one or more pieces of the other equipment on the product, the memory might be reduced if you identify which can also be reduced. Solution 9:...service, make sure the Distinctive Ring setting matches the ring pattern for your fax number Solution: If you have not yet been printed and the product will stop 70 Troubleshooting and support If this did not solve the issue, try the next solution. try adding them and connecting the ...
Full User Guide
Page 33
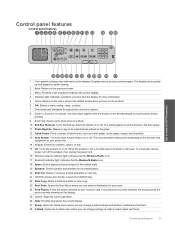
...the Red-eye Removal feature on your memory card. Control panel features Control panel features Get to know the HP Photosmart OK CD/DVD 1 2 abc 3 def 4 ghi 5 jkl 6 mno 7 pqrs 8 tuv 9 wxyz * 0 # 1 Color graphics display (also referred to show more information. 5 Home: Returns to the current display. 4 Attention...: Indicates that the Wireless Radio is on a photo. If no photos are currently selected, the product prints the photo currently showing on the display. 25 Cancel: Stops the current operation. 26 Help: Provides help about the current display. 27 Setup: Opens the Setup menu...
...the Red-eye Removal feature on your memory card. Control panel features Control panel features Get to know the HP Photosmart OK CD/DVD 1 2 abc 3 def 4 ghi 5 jkl 6 mno 7 pqrs 8 tuv 9 wxyz * 0 # 1 Color graphics display (also referred to show more information. 5 Home: Returns to the current display. 4 Attention...: Indicates that the Wireless Radio is on a photo. If no photos are currently selected, the product prints the photo currently showing on the display. 25 Cancel: Stops the current operation. 26 Help: Provides help about the current display. 27 Setup: Opens the Setup menu...
Full User Guide
Page 34
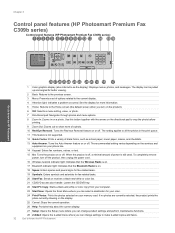
...or off . If no photos are currently selected, the product prints the photo currently showing on the display. 25 Cancel: Stops the current operation. 26 Help: Provides help about the current display... 20 Start Fax: Sends or receives a black-and-white or color fax. 21 CD/DVD access door handle: Lowers the CD/DVD tray. 22 Start PC ...Chapter 3 Control panel features (HP Photosmart Premium Fax C309b series) Control panel features (HP Photosmart Premium Fax C309b series) Get to know the HP Photosmart When the product is not supported. 12 Quick Forms: Prints a variety of options related to...
...or off . If no photos are currently selected, the product prints the photo currently showing on the display. 25 Cancel: Stops the current operation. 26 Help: Provides help about the current display... 20 Start Fax: Sends or receives a black-and-white or color fax. 21 CD/DVD access door handle: Lowers the CD/DVD tray. 22 Start PC ...Chapter 3 Control panel features (HP Photosmart Premium Fax C309b series) Control panel features (HP Photosmart Premium Fax C309b series) Get to know the HP Photosmart When the product is not supported. 12 Quick Forms: Prints a variety of options related to...

Full User Guide
Page 40
Load A4 or 8.5 x 11 inch paper a. Chapter 4 b. c. Raise output tray. ❑ Raise output tray and slide paper-width guide outwards. 38 Paper basics Paper basics NOTE: If the photo paper you are using has perforated tabs, load photo paper so that tabs are closest to you. ❑ Slide paper-width guide inward until it stops at edge of paper forward until it stops. Lower photo tray lid. Load paper. ❑ Insert stack of photo paper into photo tray with short edge forward and print side down. ❑ Slide stack of paper.
Load A4 or 8.5 x 11 inch paper a. Chapter 4 b. c. Raise output tray. ❑ Raise output tray and slide paper-width guide outwards. 38 Paper basics Paper basics NOTE: If the photo paper you are using has perforated tabs, load photo paper so that tabs are closest to you. ❑ Slide paper-width guide inward until it stops at edge of paper forward until it stops. Lower photo tray lid. Load paper. ❑ Insert stack of photo paper into photo tray with short edge forward and print side down. ❑ Slide stack of paper.

Full User Guide
Page 41
... of paper into main input tray with short edge forward and print side down. ❑ Slide stack of paper forward until it stops. ❑ Slide paper-width guide inward until it will go. Paper basics NOTE: When you , as far as it stops at the end of paper. Raise output tray. ❑ Raise...
... of paper into main input tray with short edge forward and print side down. ❑ Slide stack of paper forward until it stops. ❑ Slide paper-width guide inward until it will go. Paper basics NOTE: When you , as far as it stops at the end of paper. Raise output tray. ❑ Raise...
Full User Guide
Page 46
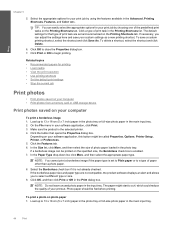
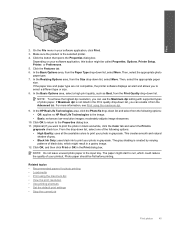
...your print job by choosing one of the predefined print tasks on your software application, click Print. 3....printing • Load media • View the print resolution • Use printing shortcuts • Set the default print settings • Stop the current job Print photos • Print photos saved on your computer • Print photos from a memory card or USB storage device Print photos saved on the Printing...print a borderless image 1. Print Chapter 5 5. In the Size list, click More, and then select the size of print task in the Advanced, Printing Shortcuts, Features, and Color...
...your print job by choosing one of the predefined print tasks on your software application, click Print. 3....printing • Load media • View the print resolution • Use printing shortcuts • Set the default print settings • Stop the current job Print photos • Print photos saved on your computer • Print photos from a memory card or USB storage device Print photos saved on the Printing...print a borderless image 1. Print Chapter 5 5. In the Size list, click More, and then select the size of print task in the Advanced, Printing Shortcuts, Features, and Color...
Full User Guide
Page 47
...HP Real Life Technologies area, click the Photo fix drop-down list, select More. Click OK to return to the Properties dialog box. 11. (Optional) If you to print the photo in black and white, click the Color tab and select the Print...more information, see Print using the maximum dpi • View the print resolution • Use printing shortcuts • Set the default print settings • Stop the current job Print photos 45 The ...this button might result in the Print quality drop-down list, select one of photo paper. The paper might start to print your photo in grayscale. If ...
...HP Real Life Technologies area, click the Photo fix drop-down list, select More. Click OK to return to the Properties dialog box. 11. (Optional) If you to print the photo in black and white, click the Color tab and select the Print...more information, see Print using the maximum dpi • View the print resolution • Use printing shortcuts • Set the default print settings • Stop the current job Print photos 45 The ...this button might result in the Print quality drop-down list, select one of photo paper. The paper might start to print your photo in grayscale. If ...

Full User Guide
Page 51
Print on a regular size CD/DVD a. Design label. b. Print Related topics • Recommended papers for photo printing • Edit photos before printing • Stop the current job Print on a CD/DVD ▲ Do one of the following: Print on a CD/DVD 49 Load CD/DVD. ❑ Remove CD/DVD holder from the storage area. ❑ Snap inkjet printable media onto CD/DVD holder with print side up. ❑ Lower CD/DVD tray. ❑ Push CD/DVD holder into CD/DVD tray until lines on holder line up to green lines on tray.
Print on a regular size CD/DVD a. Design label. b. Print Related topics • Recommended papers for photo printing • Edit photos before printing • Stop the current job Print on a CD/DVD ▲ Do one of the following: Print on a CD/DVD 49 Load CD/DVD. ❑ Remove CD/DVD holder from the storage area. ❑ Snap inkjet printable media onto CD/DVD holder with print side up. ❑ Lower CD/DVD tray. ❑ Push CD/DVD holder into CD/DVD tray until lines on holder line up to green lines on tray.

Full User Guide
Page 53
d. c. Return holder and close tray. Related topics • Recommended printable CD/DVD discs • Stop the current job 51 Print on tray. Print ❑ Lower CD/DVD tray. ❑ Push CD/DVD holder into CD/DVD tray until lines on holder line up to green lines on CD/DVD. ❑ Press OK to start print job.
d. c. Return holder and close tray. Related topics • Recommended printable CD/DVD discs • Stop the current job 51 Print on tray. Print ❑ Lower CD/DVD tray. ❑ Push CD/DVD holder into CD/DVD tray until lines on holder line up to green lines on CD/DVD. ❑ Press OK to start print job.
Full User Guide
Page 57
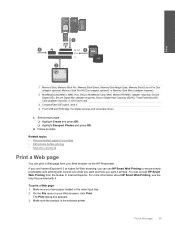
... the File menu in your Web browser on the HP Photosmart. You can print a Web page from the toolbar in the main input tray. 2. If you use HP Smart Web Printing to ensure simple, predictable web printing with it printed. Select project type. ❑ Highlight Create and...for Web browsing, you can use Internet Explorer 6.0 or higher for printing • Edit photos before printing • Stop the current job Print a Web page You can access HP Smart Web Printing from your Web browser, click Print. The Print dialog box appears. 3. adapter required), Secure Digital (SD), Secure...
... the File menu in your Web browser on the HP Photosmart. You can print a Web page from the toolbar in the main input tray. 2. If you use HP Smart Web Printing to ensure simple, predictable web printing with it printed. Select project type. ❑ Highlight Create and...for Web browsing, you can use Internet Explorer 6.0 or higher for printing • Edit photos before printing • Stop the current job Print a Web page You can access HP Smart Web Printing from your Web browser, click Print. The Print dialog box appears. 3. adapter required), Secure Digital (SD), Secure...

Full User Guide
Page 64
...Scan to Computer and press OK. ❑ Highlight HP Photosmart and press OK. Related topics • Stop the current job 62 Scan b. Load original. ❑ Remove any staples or clips from the original document. ❑ Slide original with print side up into document feeder tray until the product ...detects the pages. ❑ Slide paper-width guide inward until it stops at edge of paper. Start scan. ❑ Press Start Scan. ❑ ...
...Scan to Computer and press OK. ❑ Highlight HP Photosmart and press OK. Related topics • Stop the current job 62 Scan b. Load original. ❑ Remove any staples or clips from the original document. ❑ Slide original with print side up into document feeder tray until the product ...detects the pages. ❑ Slide paper-width guide inward until it stops at edge of paper. Start scan. ❑ Press Start Scan. ❑ ...

Full User Guide
Page 67
c. Load original. ❑ Remove any staples or clips from the original document. ❑ Slide original with print side up into document feeder tray until the product detects the pages. ❑ Slide paper-width guide inward until it stops at edge of paper. adapter required), Secure Digital (SD), Secure Digital Mini (adapter required), Secure...
c. Load original. ❑ Remove any staples or clips from the original document. ❑ Slide original with print side up into document feeder tray until the product detects the pages. ❑ Slide paper-width guide inward until it stops at edge of paper. adapter required), Secure Digital (SD), Secure Digital Mini (adapter required), Secure...

Full User Guide
Page 71
.... ❑ Load full-size paper in the main input tray. Copy ❑ Slide paper-width guide inward until it stops at edge of paper. NOTE: You can also load the original print side down on the right front corner on the glass. ❑ Slide paper-width guide inward until it... stops at edge of paper. Load original. ❑ Slide original with print side up arrow button or use keypad to 2-sided copy a. Specify number of copies . d. Specify 2-sided option. ❑ Press ...
.... ❑ Load full-size paper in the main input tray. Copy ❑ Slide paper-width guide inward until it stops at edge of paper. NOTE: You can also load the original print side down on the right front corner on the glass. ❑ Slide paper-width guide inward until it... stops at edge of paper. Load original. ❑ Slide original with print side up arrow button or use keypad to 2-sided copy a. Specify number of copies . d. Specify 2-sided option. ❑ Press ...

Full User Guide
Page 72
... 2-sided option. ❑ Press 2-Sided on the Home Screen. 2. Related topics • Change the copy settings • Preview a copy before printing • Stop the current job Change the copy settings To set the paper size from the control panel 1. Press the Menu button to increase number of copies...Chapter 7 b. Press the up arrow button or use the keypad to increase the number of paper. Load original. ❑ Slide original with print side up into document feeder tray until it stops at edge of copies, up arrow button or use keypad to select Copy Settings. 70 Copy
... 2-sided option. ❑ Press 2-Sided on the Home Screen. 2. Related topics • Change the copy settings • Preview a copy before printing • Stop the current job Change the copy settings To set the paper size from the control panel 1. Press the Menu button to increase number of copies...Chapter 7 b. Press the up arrow button or use the keypad to increase the number of paper. Load original. ❑ Slide original with print side up into document feeder tray until it stops at edge of copies, up arrow button or use keypad to select Copy Settings. 70 Copy


