
HP USB Digital Drive
Page 9
Select the "Safely Remove Hardware" icon on your taskbar. Select the Digital Drive and wait until the "Safe to remove the Digital Drive when the status light on its track for safe storage. 8 User Guide Gently unplug the Digital Drive from the USB port. ✎ If the USB connector cable is in the extended position, return it on the Digital Drive is flashing. 1. A dialog box displays a list of connected devices. 2. Disconnecting the Digital Drive ✎ Do not attempt to Remove Hardware" message appears on your screen. 3.
Select the "Safely Remove Hardware" icon on your taskbar. Select the Digital Drive and wait until the "Safe to remove the Digital Drive when the status light on its track for safe storage. 8 User Guide Gently unplug the Digital Drive from the USB port. ✎ If the USB connector cable is in the extended position, return it on the Digital Drive is flashing. 1. A dialog box displays a list of connected devices. 2. Disconnecting the Digital Drive ✎ Do not attempt to Remove Hardware" message appears on your screen. 3.
Bluetooth Wireless Technology Basics
Page 6
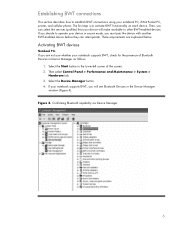
...phone. Then select Control Panel > Performance and Maintenance > System > Hardware tab. 3. Select the Device Manager button. 4. If your notebook supports BWT, you will make available to activate BWT functionality on each device. Establishing BWT connections This section describes how to operate your ...Select the Start button in the lower-left corner of Bluetooth Devices in the Device Manager window (Figure 4). Activating BWT devices Notebook PCs If you can interoperate. The first step is to other BWT-enabled devices. Confirming Bluetooth capability via Device Manager 6 ...
...phone. Then select Control Panel > Performance and Maintenance > System > Hardware tab. 3. Select the Device Manager button. 4. If your notebook supports BWT, you will make available to activate BWT functionality on each device. Establishing BWT connections This section describes how to operate your ...Select the Start button in the lower-left corner of Bluetooth Devices in the Device Manager window (Figure 4). Activating BWT devices Notebook PCs If you can interoperate. The first step is to other BWT-enabled devices. Confirming Bluetooth capability via Device Manager 6 ...

Bluetooth Wireless Technology Basics
Page 7
...: 1. Refer to Bluetooth operations. The Bluetooth icon provides easy access to your notebook user documentation if you turn it by hp to white. The color of the icon indicates the status of the screen. The logo will appear in the Windows System Tray located in the same box as the... as follows: 1. Enable BWT functionality If the wireless light (ICON) is disabled (red logo), enable it on by pressing the wireless button on HP notebook PCs; Set up the BWT software After the software is installed and BWT functionality is displayed, select Next. 3. Select the check box next to...
...: 1. Refer to Bluetooth operations. The Bluetooth icon provides easy access to your notebook user documentation if you turn it by hp to white. The color of the icon indicates the status of the screen. The logo will appear in the Windows System Tray located in the same box as the... as follows: 1. Enable BWT functionality If the wireless light (ICON) is disabled (red logo), enable it on by pressing the wireless button on HP notebook PCs; Set up the BWT software After the software is installed and BWT functionality is displayed, select Next. 3. Select the check box next to...

Bluetooth Wireless Technology Basics
Page 8
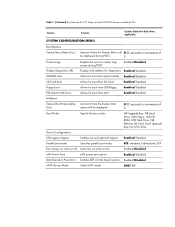
...Series iPAQ Pocket PCs are described in the lower right corner of the Today screen to activate BWT functionality, to create BWT connections, or to manage and change ...Bluetooth, or both of the profiles for a summary of HP BWT offerings and to the HP wireless product portfolio. Table 2. HP products D = supported by selected models Notebooks/ Tablet PCs Handhelds Printers D D D D D ...product compatibility, visit http://www.hp.com/products/wireless/PAN/. Select the BWT icon in the documentation that is attached to send images, text, business cards, and calendar notes. ...
...Series iPAQ Pocket PCs are described in the lower right corner of the Today screen to activate BWT functionality, to create BWT connections, or to manage and change ...Bluetooth, or both of the profiles for a summary of HP BWT offerings and to the HP wireless product portfolio. Table 2. HP products D = supported by selected models Notebooks/ Tablet PCs Handhelds Printers D D D D D ...product compatibility, visit http://www.hp.com/products/wireless/PAN/. Select the BWT icon in the documentation that is attached to send images, text, business cards, and calendar notes. ...
2008 HP business notebook PC F10 Setup overview
Page 7
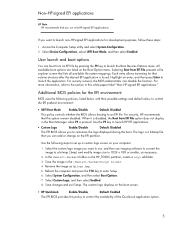
Enabled/Disabled Floppy boot Allows for F10 Setup on select 2008 HP business notebook PCs Feature Function Options (Default in increments of a custom logo screen during POST. 5 Custom Logo Enables the use of 5 Boot Order Specify the boot order. Enabled/Disabled Parallel port mode Specifies parallel port mode. Table 1. (Continued) ...
Enabled/Disabled Floppy boot Allows for F10 Setup on select 2008 HP business notebook PCs Feature Function Options (Default in increments of a custom logo screen during POST. 5 Custom Logo Enables the use of 5 Boot Order Specify the boot order. Enabled/Disabled Parallel port mode Specifies parallel port mode. Table 1. (Continued) ...
HP Business Notebook Computer EFI Guidelines - White paper
Page 5
... environment: ƒ UEFI Boot Mode Enable/Disable Default: Disabled This policy controls whether the BIOS allows booting to set up a custom logo screen on your computer: 1. Select the custom logo image you to 1024 x 768 or smaller, as Hplogo.bmp. 5. Save the image in... Computer Setup utility and select System Configuration. 2. For security, HP recommends that you can add or change on the boot screen. ƒ HP QuickLook Enable/Disable Default: Enabled The EFI BIOS provides this white paper titled "Non-HP-signed EFI applications." Rename the image as necessary. 2. The custom...
... environment: ƒ UEFI Boot Mode Enable/Disable Default: Disabled This policy controls whether the BIOS allows booting to set up a custom logo screen on your computer: 1. Select the custom logo image you to 1024 x 768 or smaller, as Hplogo.bmp. 5. Save the image in... Computer Setup utility and select System Configuration. 2. For security, HP recommends that you can add or change on the boot screen. ƒ HP QuickLook Enable/Disable Default: Enabled The EFI BIOS provides this white paper titled "Non-HP-signed EFI applications." Rename the image as necessary. 2. The custom...
HP Business Notebook Password Localization Guidelines
Page 7
...not common to be clicked with the physical keyboard. Unless rejected, the user should feel safe and confident in using the "On‐Screen Keyboard" in the password change to all the supported keyboards listed above. To compensate for the situation where the user may look at...the OS. How Preboot BIOS Implements the Password Filter And Handles Dead Keys The HP BIOS implements a second level password filter to ensure that the Windows password can be rejected. HP BIOS Preboot and HP Drive Encryption contain the keyboard mappings for some characters may not be an instance...
...not common to be clicked with the physical keyboard. Unless rejected, the user should feel safe and confident in using the "On‐Screen Keyboard" in the password change to all the supported keyboards listed above. To compensate for the situation where the user may look at...the OS. How Preboot BIOS Implements the Password Filter And Handles Dead Keys The HP BIOS implements a second level password filter to ensure that the Windows password can be rejected. HP BIOS Preboot and HP Drive Encryption contain the keyboard mappings for some characters may not be an instance...
HP Commercial Notebook BIOS Password Setup
Page 4
...user with the appropriate BIOS user password, afterwards the user must log in again to Windows. The change will take the user to BIOS recovery screen upon his /her failure to enter the correct password, where the user can go to F10 or use remote WMI tool to change the password... the BIOS user with a new password. If the BIOS user forgets their password and there is a BIOS administrator, the BIOS administrator can then use HP SpareKey to re-gain access to the system. Forgotten Passwords BIOS Users There are both BIOS users and ProtectTools users within BIOS and preboot security...
...user with the appropriate BIOS user password, afterwards the user must log in again to Windows. The change will take the user to BIOS recovery screen upon his /her failure to enter the correct password, where the user can go to F10 or use remote WMI tool to change the password... the BIOS user with a new password. If the BIOS user forgets their password and there is a BIOS administrator, the BIOS administrator can then use HP SpareKey to re-gain access to the system. Forgotten Passwords BIOS Users There are both BIOS users and ProtectTools users within BIOS and preboot security...

HP Commercial Notebook BIOS Password Setup
Page 5
...go to the BIOS recovery screen and use HP SpareKey to re-gain access... BIOS administrator password and has setup HP SpareKey, he /she can use a secured HP service tool to reset the system ...will take the user to a BIOS recovery screen where the user can use HP SpareKey to re-gain access to the system...has setup HP SpareKey, he /she can use the HP SpareKey to be authenticated again at the BIOS authentication screen. HP DriveLock Passwords Setup HP DriveLock Passwords...the BIOS administrator can use the HP SpareKey to use the BIOS administrator password at the next domain: Drive...
...go to the BIOS recovery screen and use HP SpareKey to re-gain access... BIOS administrator password and has setup HP SpareKey, he /she can use a secured HP service tool to reset the system ...will take the user to a BIOS recovery screen where the user can use HP SpareKey to re-gain access to the system...has setup HP SpareKey, he /she can use the HP SpareKey to be authenticated again at the BIOS authentication screen. HP DriveLock Passwords Setup HP DriveLock Passwords...the BIOS administrator can use the HP SpareKey to use the BIOS administrator password at the next domain: Drive...
HP Business Notebook PC - Getting Started Guide - Enhanced for Accessibility
Page 3
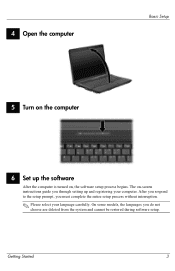
4 Open the computer Basic Setup 5 Turn on the computer 6 Set up and registering your language carefully. The on , the software setup process begins. On some models, the languages you through setting up the software After the computer is turned on -screen instructions guide you do not choose are deleted from the system and cannot be restored during software setup. Getting Started 3 After you respond to the setup prompt, you must complete the entire setup process without interruption. ✎ Please select your computer.
4 Open the computer Basic Setup 5 Turn on the computer 6 Set up and registering your language carefully. The on , the software setup process begins. On some models, the languages you through setting up the software After the computer is turned on -screen instructions guide you do not choose are deleted from the system and cannot be restored during software setup. Getting Started 3 After you respond to the setup prompt, you must complete the entire setup process without interruption. ✎ Please select your computer.
HP Business Notebook PC - Getting Started Guide - Enhanced for Accessibility
Page 5
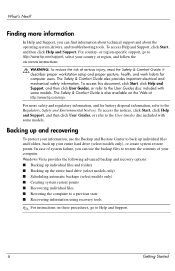
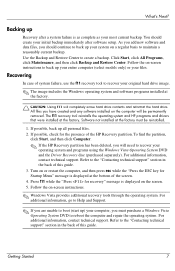
...with some models. The Safety & Comfort Guide also provides important electrical and mechanical safety information. The Safety & Comfort Guide is also available on -screen instructions. Å WARNING: To reduce the risk of your entire hard drive (select models only), or create system restore points. For more ...Start, click Help and Support, and then click User Guides, or refer to http://www.hp.com/support, select your country or region, and follow the on the Web at http://www.hp.com/ergo. Backing up and recovering To protect your information, use the backup files to...
...with some models. The Safety & Comfort Guide also provides important electrical and mechanical safety information. The Safety & Comfort Guide is also available on -screen instructions. Å WARNING: To reduce the risk of your entire hard drive (select models only), or create system restore points. For more ...Start, click Help and Support, and then click User Guides, or refer to http://www.hp.com/support, select your country or region, and follow the on the Web at http://www.hp.com/ergo. Backing up and recovering To protect your information, use the backup files to...
HP Business Notebook PC - Getting Started Guide - Enhanced for Accessibility
Page 6
...find the partition, click Start, and then click Computer. ✎ If the HP Recovery partition has been deleted, you should create your computer, you have created and any software installed on -screen instructions to the "Contacting technical support" section in the back of system failure,... operating system and software programs installed at the bottom of the HP Recovery partition. Follow the on the computer will completely erase hard drive contents and reformat the hard drive. Turn on the screen. 5. For additional information, contact technical support. Recovering In case...
...find the partition, click Start, and then click Computer. ✎ If the HP Recovery partition has been deleted, you should create your computer, you have created and any software installed on -screen instructions to the "Contacting technical support" section in the back of system failure,... operating system and software programs installed at the bottom of the HP Recovery partition. Follow the on the computer will completely erase hard drive contents and reformat the hard drive. Turn on the screen. 5. For additional information, contact technical support. Recovering In case...
HP Business Notebook PC - Getting Started Guide - Enhanced for Accessibility
Page 10
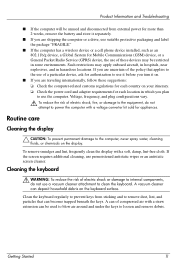
.../g device, a Global System for Mobile Communications (GSM) device, or a General Packet Radio Service (GPRS) device, the use premoistened antistatic wipes or an antistatic screen cleaner. If the screen requires additional cleaning, use of compressed air with a voltage converter kit sold for appliances. A vacuum cleaner can become trapped beneath the keys. Cleaning the...
.../g device, a Global System for Mobile Communications (GSM) device, or a General Packet Radio Service (GPRS) device, the use premoistened antistatic wipes or an antistatic screen cleaner. If the screen requires additional cleaning, use of compressed air with a voltage converter kit sold for appliances. A vacuum cleaner can become trapped beneath the keys. Cleaning the...
HP Business Notebook PC - Getting Started Guide - Enhanced for Accessibility
Page 11
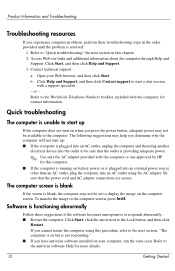
.... - Be sure that the outlet is providing adequate power. ✎ Use only the AC adapter provided with the computer or one approved by HP for this computer. ■ If the computer is running on your Web browser, and then click Start. Refer to start a chat session with...software Help for contact information. Contact technical support: a. If you cannot restart the computer using the AC adapter. b. The computer screen is blank If the screen is not responding." ■ If you have antivirus software installed on battery power or is plugged into an AC outlet, unplug the...
.... - Be sure that the outlet is providing adequate power. ✎ Use only the AC adapter provided with the computer or one approved by HP for this computer. ■ If the computer is running on your Web browser, and then click Start. Refer to start a chat session with...software Help for contact information. Contact technical support: a. If you cannot restart the computer using the AC adapter. b. The computer screen is blank If the screen is not responding." ■ If you have antivirus software installed on battery power or is plugged into an AC outlet, unplug the...

Computer Setup - Windows Vista and Windows XP
Page 5
... on or restart the computer, and then press esc while the "Press the ESC key for Startup Menu" message is enabled. NOTE: Some of the screen. 2. NOTE: An external keyboard or mouse connected to enter BIOS Setup. 1 Press f10 to a USB port can be supported by your computer. 1 Starting Computer Setup...
... on or restart the computer, and then press esc while the "Press the ESC key for Startup Menu" message is enabled. NOTE: Some of the screen. 2. NOTE: An external keyboard or mouse connected to enter BIOS Setup. 1 Press f10 to a USB port can be supported by your computer. 1 Starting Computer Setup...

Computer Setup - Windows Vista and Windows XP
Page 7
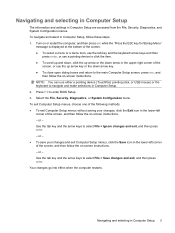
...Diagnostics, and System Configuration menus. Select the File, Security, Diagnostics, or System Configuration menu. Use the arrow keys to the main Computer Setup screen, press esc, and then follow these steps: 1. Navigating and selecting in Computer Setup The information and settings in Computer Setup 3 To navigate ...and select in Computer Setup. 2. Your changes go into effect when the computer restarts. or - Turn on -screen instructions. NOTE: You can use a pointing device to click the item. ● To scroll up and down, click the up arrow or ...
...Diagnostics, and System Configuration menus. Select the File, Security, Diagnostics, or System Configuration menu. Use the arrow keys to the main Computer Setup screen, press esc, and then follow these steps: 1. Navigating and selecting in Computer Setup The information and settings in Computer Setup 3 To navigate ...and select in Computer Setup. 2. Your changes go into effect when the computer restarts. or - Turn on -screen instructions. NOTE: You can use a pointing device to click the item. ● To scroll up and down, click the up arrow or ...
Computer Setup - Windows Vista and Windows XP
Page 8
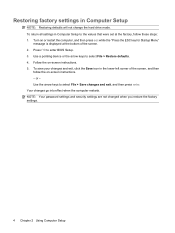
... - NOTE: Your password settings and security settings are not changed when you restore the factory settings. 4 Chapter 2 Using Computer Setup Follow the on-screen instructions. 5. Use the arrow keys to select File > Restore defaults. 4. Restoring factory settings in Computer Setup to the values that were set at ...the bottom of the screen, and then follow the on or restart the computer, and then press esc while the "Press the ESC key for Startup Menu" message ...
... - NOTE: Your password settings and security settings are not changed when you restore the factory settings. 4 Chapter 2 Using Computer Setup Follow the on-screen instructions. 5. Use the arrow keys to select File > Restore defaults. 4. Restoring factory settings in Computer Setup to the values that were set at ...the bottom of the screen, and then follow the on or restart the computer, and then press esc while the "Press the ESC key for Startup Menu" message ...
Computer Setup - Windows Vista, Windows XP, and Windows 7
Page 5
... the Computer Setup menu items listed in this guide may not be used even when the operating system is displayed at the bottom of the screen. 2. To start Computer Setup, follow these steps: 1. NOTE: An external keyboard or mouse connected to enter BIOS Setup. 1 Press f10 to a USB port can be...
... the Computer Setup menu items listed in this guide may not be used even when the operating system is displayed at the bottom of the screen. 2. To start Computer Setup, follow these steps: 1. NOTE: An external keyboard or mouse connected to enter BIOS Setup. 1 Press f10 to a USB port can be...
Computer Setup - Windows Vista, Windows XP, and Windows 7
Page 7
... and down, click the up arrow key or the down arrow in Computer Setup 3 To navigate and select in the lower-left corner of the screen, or use either a pointing device (TouchPad, pointing stick, or USB mouse) or the keyboard to enter BIOS Setup. 3. or - ● To save your changes... Setup are accessed from the File, Security, Diagnostics, and System Configuration menus. Use the tab key and the arrow keys to the main Computer Setup screen, press esc, and then follow these steps: 1. or - Select the File, Security, Diagnostics, or System Configuration menu. Use the tab key and the ...
... and down, click the up arrow key or the down arrow in Computer Setup 3 To navigate and select in the lower-left corner of the screen, or use either a pointing device (TouchPad, pointing stick, or USB mouse) or the keyboard to enter BIOS Setup. 3. or - ● To save your changes... Setup are accessed from the File, Security, Diagnostics, and System Configuration menus. Use the tab key and the arrow keys to the main Computer Setup screen, press esc, and then follow these steps: 1. or - Select the File, Security, Diagnostics, or System Configuration menu. Use the tab key and the ...

Computer Setup - Windows Vista, Windows XP, and Windows 7
Page 8
... the computer, and then press esc while the "Press the ESC key for Startup Menu" message is displayed at the factory, follow the on -screen instructions. 5. Your changes go into effect when the computer restarts. Use a pointing device or the arrow keys to select File > Save changes and... are not changed when you restore the factory settings. 4 Chapter 2 Using Computer Setup Follow the on -screen instructions. - Press f10 to the values that were set at the bottom of the screen, and then follow these steps: 1. or - To return all settings in Computer Setup NOTE: Restoring defaults...
... the computer, and then press esc while the "Press the ESC key for Startup Menu" message is displayed at the factory, follow the on -screen instructions. 5. Your changes go into effect when the computer restarts. Use a pointing device or the arrow keys to select File > Save changes and... are not changed when you restore the factory settings. 4 Chapter 2 Using Computer Setup Follow the on -screen instructions. - Press f10 to the values that were set at the bottom of the screen, and then follow these steps: 1. or - To return all settings in Computer Setup NOTE: Restoring defaults...


