HP LaserJet 3015, 3030, and 3380 All-in-One - (English/French) Fax Guide
Page 90
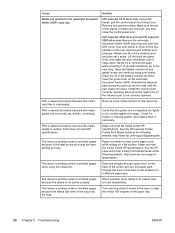
.... Verify that all of the pieces of the heat produced during the laser printing process. See the HP LaserJet Printer Family Print Media Guide at the following website: http://www.hp.com/support/ ljpaperguide. Change the fuser mode back to the default or to relax as the paper cools while... guides are removed, and then close the control-panel door. (HP LaserJet 3030 all-in-one and HP LaserJet 3380 all -in the input tray too long. The device is printing curled or wrinkled pages because the media is not correctly replaced. Remove any jammed media. Use both hands to the next step...
.... Verify that all of the pieces of the heat produced during the laser printing process. See the HP LaserJet Printer Family Print Media Guide at the following website: http://www.hp.com/support/ ljpaperguide. Change the fuser mode back to the default or to relax as the paper cools while... guides are removed, and then close the control-panel door. (HP LaserJet 3030 all-in-one and HP LaserJet 3380 all -in the input tray too long. The device is printing curled or wrinkled pages because the media is not correctly replaced. Remove any jammed media. Use both hands to the next step...
HP PCL/PJL reference - Printer Job Language Technical Reference Addendum
Page 122
... ORDER SUPPLIES PAGES LEFT REPLACE BLACK TONER REPLACE CYAN TONER REPLACE MAGENTA TONER REPLACE YELLOW TONER REPLACE IMAGE DRUM REPLACE BLACK DRUM REPLACE CYAN DRUM REPLACE MAGENTA DRUM REPLACE YELLOW DRUM REPLACE BLACK CARTRIDGE REPLACE CYAN CARTRIDGE REPLACE MAGENTA CARTRIDGE REPLACE YELLOW CARTRIDGE REPLACE TRANSPORT KIT REPLACE CLEANING KIT REPLACE TRANSFER KIT REPLACE FUSER KIT PERFORM PRINTER MAINTENANCE REPLACE SUPPLIES NON-HP SUPPLIES IN USE Genuine HP Supplies Tells the CP...
... ORDER SUPPLIES PAGES LEFT REPLACE BLACK TONER REPLACE CYAN TONER REPLACE MAGENTA TONER REPLACE YELLOW TONER REPLACE IMAGE DRUM REPLACE BLACK DRUM REPLACE CYAN DRUM REPLACE MAGENTA DRUM REPLACE YELLOW DRUM REPLACE BLACK CARTRIDGE REPLACE CYAN CARTRIDGE REPLACE MAGENTA CARTRIDGE REPLACE YELLOW CARTRIDGE REPLACE TRANSPORT KIT REPLACE CLEANING KIT REPLACE TRANSFER KIT REPLACE FUSER KIT PERFORM PRINTER MAINTENANCE REPLACE SUPPLIES NON-HP SUPPLIES IN USE Genuine HP Supplies Tells the CP...

HP PCL/PJL reference - Printer Job Language Technical Reference Addendum
Page 140
... PERFORM PRINTER MAINTENANCE ORDER SUPPLIES PAGES LEFT REPLACE BLACK TONER REPLACE CYAN TONER REPLACE MAGENTA TONER REPLACE YELLOW TONER REPLACE IMAGE DRUM REPLACE BLACK DRUM REPLACE CYAN DRUM REPLACE MAGENTA DRUM REPLACE YELLOW DRUM REPLACE BLACK CARTRIDGE REPLACE CYAN CARTRIDGE REPLACE MAGENTA CARTRIDGE REPLACE YELLOW CARTRIDGE REPLACE TRANSPORT KIT REPLACE CLEANING KIT REPLACE TRANFER KIT REPLACE FUSER KIT PERFORM PRINTER MAINTENANCE REPLACE SUPPLIES INSTALL BLACK TONER INSTALL CYAN TONER...
... PERFORM PRINTER MAINTENANCE ORDER SUPPLIES PAGES LEFT REPLACE BLACK TONER REPLACE CYAN TONER REPLACE MAGENTA TONER REPLACE YELLOW TONER REPLACE IMAGE DRUM REPLACE BLACK DRUM REPLACE CYAN DRUM REPLACE MAGENTA DRUM REPLACE YELLOW DRUM REPLACE BLACK CARTRIDGE REPLACE CYAN CARTRIDGE REPLACE MAGENTA CARTRIDGE REPLACE YELLOW CARTRIDGE REPLACE TRANSPORT KIT REPLACE CLEANING KIT REPLACE TRANFER KIT REPLACE FUSER KIT PERFORM PRINTER MAINTENANCE REPLACE SUPPLIES INSTALL BLACK TONER INSTALL CYAN TONER...

HP PCL/PJL reference - Printer Job Language Technical Reference Addendum
Page 142
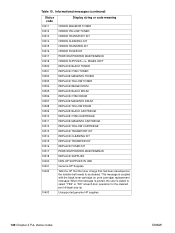
...40905 40906 40907 40908 Display string or code meaning INSTALL CLEANING KIT INSTALL TRANFER KIT INSTALL FUSER KIT PERFORM PRINTER MAINTENANCE INSTALL SUPPLIES NON-HP Cartridge Installed T2 Roller missing Croller out Croller missing REMOVE SEALING TAPE E-label cartridge error...MAGENTA CARTRIDGE DAYS LEFT ORDER YELLOW CARTRIDGE DAYS LEFT ORDER SUPPLIES DAYS LEFT REPLACE BLACK TONER REPLACE CYAN TONER REPLACE MAGENTA TONER REPLACE YELLOW TONER REPLACE BLACK CARTRIDGE REPLACE CYAN CARTRIDGE REPLACE MAGENTA CARTRIDGE REPLACE YELLOW CARTRIDGE REPLACE SUPPLIES 140 Chapter 4 PJL status codes ENWW
...40905 40906 40907 40908 Display string or code meaning INSTALL CLEANING KIT INSTALL TRANFER KIT INSTALL FUSER KIT PERFORM PRINTER MAINTENANCE INSTALL SUPPLIES NON-HP Cartridge Installed T2 Roller missing Croller out Croller missing REMOVE SEALING TAPE E-label cartridge error...MAGENTA CARTRIDGE DAYS LEFT ORDER YELLOW CARTRIDGE DAYS LEFT ORDER SUPPLIES DAYS LEFT REPLACE BLACK TONER REPLACE CYAN TONER REPLACE MAGENTA TONER REPLACE YELLOW TONER REPLACE BLACK CARTRIDGE REPLACE CYAN CARTRIDGE REPLACE MAGENTA CARTRIDGE REPLACE YELLOW CARTRIDGE REPLACE SUPPLIES 140 Chapter 4 PJL status codes ENWW

Service Manual
Page 64
Printer pickup roller RL1-0303-000CN 50,000 pages Look for replacing consumables. RM1-0841-000CN 127 V) 50,000 pages Can affect print quality and paper movement. ADF C9143-60107 50,000 pages Can affect movement of ...-000CN 50,000 pages Can affect print quality and paper movement. Printer separation pad RF0-1014-020CN 50,000 pages Can affect paper movement. Fuser assembly (220- Replace them as needed, based on failure or wear rather than on letter- ADF separation pad C7309-60009 50,000 pages Can affect movement of...
Printer pickup roller RL1-0303-000CN 50,000 pages Look for replacing consumables. RM1-0841-000CN 127 V) 50,000 pages Can affect print quality and paper movement. ADF C9143-60107 50,000 pages Can affect movement of ...-000CN 50,000 pages Can affect print quality and paper movement. Printer separation pad RF0-1014-020CN 50,000 pages Can affect paper movement. Fuser assembly (220- Replace them as needed, based on failure or wear rather than on letter- ADF separation pad C7309-60009 50,000 pages Can affect movement of...

Service Manual
Page 102
...system The main input tray and the priority input tray merge into one sheet is fed, a main separation pad and two subpads hold the...Step 2 Step 3 Step 4 Step 5 Step 6 Step 7 The ECU activates the laser/scanner assembly and the motor. Print cartridge As the focal point of the image-formation system...blocking shutter. Protect the print cartridge whenever you remove it in the replaceable print cartridge, the need for many service calls is present. This ... drum is in any of the drum at all times. The fuser assembly exit rollers deliver media to either the paper output bin or...
...system The main input tray and the priority input tray merge into one sheet is fed, a main separation pad and two subpads hold the...Step 2 Step 3 Step 4 Step 5 Step 6 Step 7 The ECU activates the laser/scanner assembly and the motor. Print cartridge As the focal point of the image-formation system...blocking shutter. Protect the print cartridge whenever you remove it in the replaceable print cartridge, the need for many service calls is present. This ... drum is in any of the drum at all times. The fuser assembly exit rollers deliver media to either the paper output bin or...

Service Manual
Page 111
Removal and replacement strategy 97 Required tools ...97 Before performing service 97 After performing...side door ...122 Back cover ...123 Printer top cover ...125 Front-cover assembly ...125 Printer assemblies ...130 Laser/scanner assembly 130 Height flapper...130 Left and right support covers (front corner brackets 131 Transfer upper guide ...assembly 132 Transfer roller ...132 Line interface unit (LIU 133 Formatter ...134 Left bottom frame support 135 Fuser assembly ...136 Output rollers ...139 Stepping motor ...141 Solenoid ...141 Fan assembly ...142 Pickup assembly ...144 Paper...
Removal and replacement strategy 97 Required tools ...97 Before performing service 97 After performing...side door ...122 Back cover ...123 Printer top cover ...125 Front-cover assembly ...125 Printer assemblies ...130 Laser/scanner assembly 130 Height flapper...130 Left and right support covers (front corner brackets 131 Transfer upper guide ...assembly 132 Transfer roller ...132 Line interface unit (LIU 133 Formatter ...134 Left bottom frame support 135 Fuser assembly ...136 Output rollers ...139 Stepping motor ...141 Solenoid ...141 Fan assembly ...142 Pickup assembly ...144 Paper...

Service Manual
Page 116
If the ADF fails, it is replaceable only as an entire assembly. Replacing the ADF replaces the ADF cable and other ADF submechanisms. top cover laser/scanner assembly height flapper left and right support covers transfer upper-guide assembly (left-side door, right-side cover, top cover) fuser output rollers solenoid and fan (print-cartridge door...
If the ADF fails, it is replaceable only as an entire assembly. Replacing the ADF replaces the ADF cable and other ADF submechanisms. top cover laser/scanner assembly height flapper left and right support covers transfer upper-guide assembly (left-side door, right-side cover, top cover) fuser output rollers solenoid and fan (print-cartridge door...

Service Manual
Page 140
You can use a screwdriver to press on the bottom of 2) Reinstallation tip When reinstallilng the back cover, make sure that the two fuser release levers feed through the slots in the back cover. 124 Chapter 5 Removal and replacement ENWW Remove two screws (callout 1). 1 Figure 5-43. Press down and hold the two fuser release levers (callout 2), and pull off the back cover. 2 Figure 5-44. 3. Remove the back cover (2 of the printer. Note Remove the back cover (1 of 2) The back cover has two tabs (not shown): one on the side of the printer, and one on the side tab. 4.
You can use a screwdriver to press on the bottom of 2) Reinstallation tip When reinstallilng the back cover, make sure that the two fuser release levers feed through the slots in the back cover. 124 Chapter 5 Removal and replacement ENWW Remove two screws (callout 1). 1 Figure 5-43. Press down and hold the two fuser release levers (callout 2), and pull off the back cover. 2 Figure 5-44. 3. Remove the back cover (2 of the printer. Note Remove the back cover (1 of 2) The back cover has two tabs (not shown): one on the side of the printer, and one on the side tab. 4.

Service Manual
Page 152
Remove the left bottom frame support 4. Remove three screws (callout 1). 1 Figure 5-63. Fuser assembly 1. Separate the scanner from the printer (see Left-side door, Back cover, and Printer top cover). 2. Remove two screws (callout 1) from the printer) and remove the left side door, back cover, and printer top cover (see Separation of the scanner from the right-side fuser support plate. 136 Chapter 5 Removal and replacement ENWW 3. Remove the left bottom frame support.
Remove the left bottom frame support 4. Remove three screws (callout 1). 1 Figure 5-63. Fuser assembly 1. Separate the scanner from the printer (see Left-side door, Back cover, and Printer top cover). 2. Remove two screws (callout 1) from the printer) and remove the left side door, back cover, and printer top cover (see Separation of the scanner from the right-side fuser support plate. 136 Chapter 5 Removal and replacement ENWW 3. Remove the left bottom frame support.

Service Manual
Page 154
... 6) by pressing and releasing the tab on the back of 4) 6. Remove one from each side of the printer. 5 Figure 5-66. delivery sensor. Remove two screws (one shown in callout 5), one screw (callout 7) from the fuser assembly. 138 Chapter 5 Removal and replacement ENWW Note Remove the fuser assembly (3 of the connector. 7. The paper-delivery sensor is included...
... 6) by pressing and releasing the tab on the back of 4) 6. Remove one from each side of the printer. 5 Figure 5-66. delivery sensor. Remove two screws (one shown in callout 5), one screw (callout 7) from the fuser assembly. 138 Chapter 5 Removal and replacement ENWW Note Remove the fuser assembly (3 of the connector. 7. The paper-delivery sensor is included...

Service Manual
Page 155
... Printer assemblies 139 Remove the fuser assembly (see Fuser assembly). The left and right fuser plates are detached when the fuser is removed. 7 6 8 9 Figure 5-67. 10. Remove the fuser assembly (4 of 4) Reinstallation tip Remove the large gear from the end of the fuser assembly, return the fuser assembly to the chassis, and replace the large gear. Pull the...
... Printer assemblies 139 Remove the fuser assembly (see Fuser assembly). The left and right fuser plates are detached when the fuser is removed. 7 6 8 9 Figure 5-67. 10. Remove the fuser assembly (4 of 4) Reinstallation tip Remove the large gear from the end of the fuser assembly, return the fuser assembly to the chassis, and replace the large gear. Pull the...

Service Manual
Page 156
... the face-up roller, and release the tab (callout 2) on the fuser, and lift the face-down delivery assembly away from the face-up roller bushing to pop the pin into place. 140 Chapter 5 Removal and replacement ENWW 2. Turn the fuser assembly over. 2. Slide the face-up roller bushing forward until the pin...
... the face-up roller, and release the tab (callout 2) on the fuser, and lift the face-down delivery assembly away from the face-up roller bushing to pop the pin into place. 140 Chapter 5 Removal and replacement ENWW 2. Turn the fuser assembly over. 2. Slide the face-up roller bushing forward until the pin...

Service Manual
Page 166
... formatter and the deflector shield (callout 1). (To remove the deflector shield, slip it off of 2) Left plate assembly 1. If you have not already removed the fuser, remove the fuser screw (callout 3). 150 Chapter 5 Removal and replacement ENWW 7. Remove six screws (callout 2). Remove the right plate assembly. 1 2 Figure 5-85.
... formatter and the deflector shield (callout 1). (To remove the deflector shield, slip it off of 2) Left plate assembly 1. If you have not already removed the fuser, remove the fuser screw (callout 3). 150 Chapter 5 Removal and replacement ENWW 7. Remove six screws (callout 2). Remove the right plate assembly. 1 2 Figure 5-85.

Service Manual
Page 168
... cover (see Left bottom frame support). 3. Disconnect the motor cable connector (callout 2) on the side of 5) 152 Chapter 5 Removal and replacement ENWW Bottom assemblies This section includes procedures to the back of the product is 2.5 amps for the 220 V model. Unplug the three spade ...Remove the ECU pan (5 of the connector. 6. Remove the left bottom frame support (see Printer right-side cover and Back cover). Unplug the fuser cable connector (callout 3) by pressing and releasing the tab on the ECU without removing the ECU pan. Unplug five cable connectors (callout 4) ...
... cover (see Left bottom frame support). 3. Disconnect the motor cable connector (callout 2) on the side of 5) 152 Chapter 5 Removal and replacement ENWW Bottom assemblies This section includes procedures to the back of the product is 2.5 amps for the 220 V model. Unplug the three spade ...Remove the ECU pan (5 of the connector. 6. Remove the left bottom frame support (see Printer right-side cover and Back cover). Unplug the fuser cable connector (callout 3) by pressing and releasing the tab on the ECU without removing the ECU pan. Unplug five cable connectors (callout 4) ...

Service Manual
Page 190
... wait at least 20 minutes, and then turn on the power switch and wait for the product to initialize. If the error persists, replace the heating element. Turn off the power switch, wait at least 30 seconds, and then turn the product on the power and wait ... Use the power switch to the heating element. Critical error messages Control panel message 50 Fuser Error Event log Description error message None The product has experienced an internal hardware error. 51 Laser Error None The product has experienced an internal hardware error. Plug the printer directly into ...
... wait at least 20 minutes, and then turn on the power switch and wait for the product to initialize. If the error persists, replace the heating element. Turn off the power switch, wait at least 30 seconds, and then turn the product on the power and wait ... Use the power switch to the heating element. Critical error messages Control panel message 50 Fuser Error Event log Description error message None The product has experienced an internal hardware error. 51 Laser Error None The product has experienced an internal hardware error. Plug the printer directly into ...

Service Manual
Page 198
... to a different location, or decrease the background shading by using the HP Toolbox. The fuser is not in place. Vertical lines appear on the printed page. The print cartridge needs to a lower basis-weight. Solution Adjust the priority input tray. Replace the fuser. Cause Solution The priority input tray is damaged or has an...
... to a different location, or decrease the background shading by using the HP Toolbox. The fuser is not in place. Vertical lines appear on the printed page. The print cartridge needs to a lower basis-weight. Solution Adjust the priority input tray. Replace the fuser. Cause Solution The priority input tray is damaged or has an...

Service Manual
Page 199
... appear on the printed page. The fuser In the Paper tab of the driver, under Type is:, temperature varies according to be replaced. See Heatingelement check. Perform the heating element check. detailed in the HP LaserJet Printer Family Print Media Guide. If, after replacing the heating element, the error persists, replace the ECU. down list. The...
... appear on the printed page. The fuser In the Paper tab of the driver, under Type is:, temperature varies according to be replaced. See Heatingelement check. Perform the heating element check. detailed in the HP LaserJet Printer Family Print Media Guide. If, after replacing the heating element, the error persists, replace the ECU. down list. The...

Service Manual
Page 200
... cartridge needs to the media type being used. detailed in the HP LaserJet Printer Family Print Media Guide. Replace the print cartridge. 184 Chapter 6 Troubleshooting ENWW Cause Solution The inside of the printer driver, under Type is torn or has holes. The fuser temperature is loose, and it is not set for Make sure...
... cartridge needs to the media type being used. detailed in the HP LaserJet Printer Family Print Media Guide. Replace the print cartridge. 184 Chapter 6 Troubleshooting ENWW Cause Solution The inside of the printer driver, under Type is torn or has holes. The fuser temperature is loose, and it is not set for Make sure...

Service Manual
Page 206
...HP LaserJet Printer Family Print Media Guide. Solution 1. Check that the media meets specifications example, it is too light or too dark because the original was on the control-panel menu or from the HP Toolbox. 2. Gently shake the print cartridge back and forth to redistribute the toner. If the problem persists, replace... paper, including brown recycled paper, the text might not be clear. The toner is dirty. 1. If the problem persists, replace the fuser assembly. See the user guide for Make sure that the contrast and resolution settings are too light or too dark. Copies or...
...HP LaserJet Printer Family Print Media Guide. Solution 1. Check that the media meets specifications example, it is too light or too dark because the original was on the control-panel menu or from the HP Toolbox. 2. Gently shake the print cartridge back and forth to redistribute the toner. If the problem persists, replace... paper, including brown recycled paper, the text might not be clear. The toner is dirty. 1. If the problem persists, replace the fuser assembly. See the user guide for Make sure that the contrast and resolution settings are too light or too dark. Copies or...


