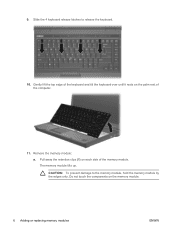
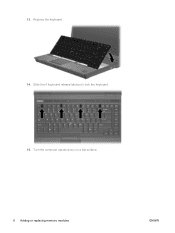
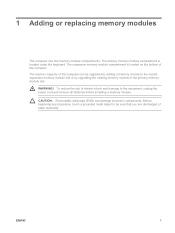
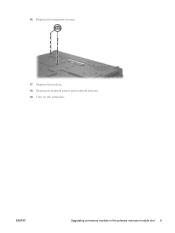
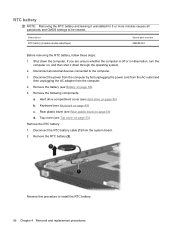
Bluetooth Wireless Technology Basics
Page 9
... two BWT-enabled devices to exchange Personal Information Manager data such as business cards, calendar items, email messages, and notes. Allows one BWT-enabled...transfer an image to a BWT-enabled device. Allows input devices such as a keyboard or mouse to be wirelessly connected to another BWT-enabled device (such as a ...computer. HP products D = supported by selected models Notebooks/ Tablet PCs Handhelds Printers D D D D D D D D D D D D D D D D D D D D D D D D Profile Description Generic access Generic object exchange (OBEX) Hard copy replacement Headset ...
Computer Setup - Windows XP and Windows Vista
Page 10
Replace the configuration settings in the system. ● View specification information for the processor, cache and memory size, system ROM, video revision, and keyboard controller version. Then exit and restart the computer. Your changes go into effect when the computer restarts. 4 Chapter 3 Computer Setup menus ENWW NOTE: Some of ...
Memory Modules - Windows Vista
Page 7
.... CAUTION: Electrostatic discharge (ESD) can be sure that you are discharged of static electricity. WARNING! ENWW 1 The expansion memory module compartment is located under the keyboard. The memory capacity of the computer. Adding or replacing memory modules The computer has two memory module compartments.
Memory Modules - Windows Vista
Page 12
9. Slide the 4 keyboard release latches to the memory module, hold the memory module by the edges only. CAUTION: To prevent damage to release the keyboard. 10. Pull away the retention clips (1) on each side of the computer. 11. The memory module tilts up. Do not touch the components on the palm rest of the memory module. Remove the memory module: a. Gently lift the top edge of the keyboard and tilt the keyboard over until it rests on the memory module. 6 Adding or replacing memory modules ENWW
Memory Modules - Windows Vista
Page 14
Slide the 4 keyboard release latches to lock the keyboard. 15. 13. Turn the computer upside down on a flat surface. 8 Adding or replacing memory modules ENWW Replace the keyboard. 14.
Memory Modules - Windows Vista
Page 15
Reconnect external power and external devices. 19. Replace the battery. 18. Turn on the computer. Replace the keyboard screws. 17. 16. ENWW Upgrading a memory module in the primary memory module slot 9
Memory Modules - Windows Vista
Page 16
Index K keyboard screws removing 5 replacing 9 M memory module inserting 7 removing 2, 6 replacing 2, 5 upgrading primary 5 memory module compartment cover removing 2 replacing 3 memory, replacing memory modules 2, 5 10 Index ENWW
Memory Modules - Windows XP
Page 7
The expansion memory module compartment is located under the keyboard. Before beginning any procedure, touch a grounded metal object to the equipment, unplug the power cord and remove all batteries before installing a memory module. 1 Adding or replacing memory modules The computer has two memory module compartments. The primary memory module compartment is located on...
Memory Modules - Windows XP
Page 12
Slide the 4 keyboard release latches to the memory module, hold the memory module by the edges only. CAUTION: To prevent damage to release the keyboard. 10. Remove the memory module: a. Do not touch the components on the palm rest of the memory module. The memory module tilts up. Pull away the retention clips (1) on each side of the computer. 11. Gently lift the top edge of the keyboard and tilt the keyboard over until it rests on the memory module. 6 Chapter 1 Adding or replacing memory modules ENWW 9.
Memory Modules - Windows XP
Page 14
Slide the 4 keyboard release latches to lock the keyboard. 15. Replace the keyboard. 14. Turn the computer upside down on a flat surface. 8 Chapter 1 Adding or replacing memory modules ENWW 13.
Memory Modules - Windows XP
Page 15
Replace the keyboard screws. 17. Reconnect external power and external devices. 19. ENWW Upgrading a memory module in the primary memory module slot 9 Turn on the computer. Replace the battery. 18. 16.
Memory Modules - Windows XP
Page 17
Index H hard disk drive space 10 hard drive space 10 Hibernation 10 Hibernation file 10 K keyboard screws removing 5 replacing 9 M memory increasing 10 memory module inserting 7 removing 2, 6 replacing 2, 5 upgrading primary 5 memory module compartment cover removing 2 replacing 3 memory, replacing memory modules 2, 5 ENWW Index 11
HP Compaq 2710p Notebook PC - Maintenance and Service Guide
Page 6
Unknown user password 36 Component replacement procedures 37 Serial number ...37 Computer feet ...37 Battery ...38 SIM ...39 Hard drive ...40 WLAN module ...42 WWAN module ...46 Memory module ...48 Keyboard ...49 Rear plastic bezel ...51 Top cover ...53 RTC battery ...56 Audio connector board ...57 Bluetooth module ...58 Speaker ...59 Display assembly...
HP Compaq 2710p Notebook PC - Maintenance and Service Guide
Page 36
...fingerprint reader, inverter board, microphones, WLAN antenna cables, and WWAN antenna cables) 12.1-inch, WXGA, WVA display assembly with keyboard light (includes ambient light sensor, fingerprint reader, inverter board, microphones, WLAN antenna cables, and WWAN antenna cables) 12.1-...replacement thermal material) Fingerprint reader Microphone Speaker Keyboard for use in the United States Keyboard for use in the United Kingdom Keyboard for use in France Keyboard for use in Germany Keyboard for use in Italy Keyboard for use in Spain Keyboard for use in Denmark Keyboard for use in Norway Keyboard...
HP Compaq 2710p Notebook PC - Maintenance and Service Guide
Page 37
...Keyboard for use in Greece 455080-001 Base enclosure (includes display release latch and rubber feet) 455082-001 System board equipped with Intel Core 2 Duo U7500 1.06-MHz processor (includes replacement thermal material) 455083-001 System board equipped with Intel Core 2 Duo U7600 1.20-MHz processor (includes replacement thermal material) 455953-001 HP... 2700 Ultra-Slim Expansion Base 458406-001 Heat shield, system board 459350-001 HP hs2300 HSDPA Mobile Broadband module for use in Australia,...
HP Compaq 2710p Notebook PC - Maintenance and Service Guide
Page 57
Component replacement procedures 49 Disconnect all external devices connected to the computer. 3. Keyboard For use in: Belgium Brazil The Czech Republic Denmark France French Canada Germany Greece Hungary Iceland Israel Italy Japan Latin America The Netherlands and Europe ... 454696-231 454696-BA1 454696-AD1 454696-071 454696-B71 454696-111 454696-AB1 454696-281 454696-141 454696-031 454696-001 Before removing the keyboard, follow these steps: 1.
HP Compaq 2710p Notebook PC - Maintenance and Service Guide
Page 58
Open the computer as far as possible. 4. Remove the keyboard: 1. Remove the following: (1) One small Mylar screw cover. The screw covers detailed in this section are available in the Rubber Kit, spare part number 454686-... until the pointing stick cable is attached, and disconnect the pointing stick cable (4) from the system board. 6. Swing the top edge of the keyboard (1) and slide it rests upside down on the palm rest. 50 Chapter 4 Removal and replacement procedures Lift the rear edge of the keyboard (1) up , with the front toward you. 3.
HP Compaq 2710p Notebook PC - Maintenance and Service Guide
Page 59
...AC outlet and then unplugging the AC adapter from the system board. 8. Reverse this procedure to the computer. 3. Remove the battery (see Keyboard on , and then shut it down the computer. Before removing the rear plastic bezel, follow these steps: 1. Shut down through the operating ... the computer is off or in the Plastics Kit, spare part number 454685-001. Component replacement procedures 51 If you . Disconnect all external devices connected to install the keyboard. Remove the keyboard (see Battery on page 40). 6. Rear plastic bezel NOTE: The rear plastic bezel is...
HP Compaq 2710p Notebook PC - Maintenance and Service Guide
Page 61
Hard drive compartment cover (see Keyboard on page 49) c. Keyboard (see Hard drive on , and then shut it down the computer. If you . Turn the computer upside down, with the front toward you are unsure ... then unplugging the AC adapter from the computer. 4. Rear plastic bezel (see Battery on page 51) Remove the top cover: 1. Remove the following components: a. Component replacement procedures 53 Remove the battery (see Rear plastic bezel on page 38). 5. Top cover Description Top cover (includes LED board and cable and display alignment...
HP Compaq 2710p Notebook PC - Maintenance and Service Guide
Page 64
... the battery (see Top cover on page 38). 5. Remove the RTC battery (2). Keyboard (see Keyboard on , and then shut it uninstalled for 5 or more minutes causes all external devices connected to install the RTC battery. 56 Chapter 4 Removal and replacement procedures Shut down through the operating system. 2. If you are unsure whether the...