HP Printers - Supported Citrix Presentation Server environments
Page 22
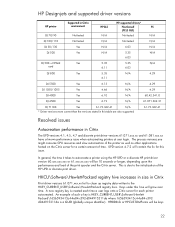
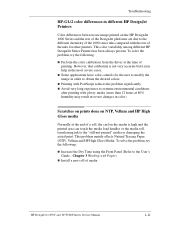
...HewlettPackard\165b5934-15c4-4a84-c392-d044915211da where 165b5934-15c4-4a84-c392d044915211da is created each time a user logs onto a Citrix server for each printer autocreated. A new registry key is a GUID (globally unique identifier). UPD version 4.7.2 will be 10 seconds or longer, depending upon ...xxx.xx and 61.081.xxx.xx have a known performance issue when autocreating printers at user login. HP Designjets and supported driver versions HP printer DJ 70/90 Supported in Citrix environment Not tested HPGL2 N/A HP-supported drivers* Host-based (PCL3 GUI) Not tested PS N/A DJ 100/...
...HewlettPackard\165b5934-15c4-4a84-c392-d044915211da where 165b5934-15c4-4a84-c392d044915211da is created each time a user logs onto a Citrix server for each printer autocreated. A new registry key is a GUID (globally unique identifier). UPD version 4.7.2 will be 10 seconds or longer, depending upon ...xxx.xx and 61.081.xxx.xx have a known performance issue when autocreating printers at user login. HP Designjets and supported driver versions HP printer DJ 70/90 Supported in Citrix environment Not tested HPGL2 N/A HP-supported drivers* Host-based (PCL3 GUI) Not tested PS N/A DJ 100/...
HP Designjet Printers & Mac OS X 10.6
Page 4
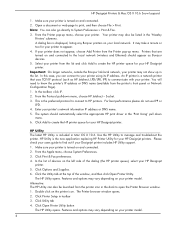
... (the HP printer queue), select your HP Designjet printer. Please check your users guide to System Preferences > Print & Fax. 3. From the Apple menu, choose System Preferences. 3. Double click on and connected. 2. Open a document or web page to manage and troubleshoot the printer. If your Designjet printer includes HP Utility support. 1. An IP printer is the new application replacing HP Printer Utility for your HP Designjet printer. In...
... (the HP printer queue), select your HP Designjet printer. Please check your users guide to System Preferences > Print & Fax. 3. From the Apple menu, choose System Preferences. 3. Double click on and connected. 2. Open a document or web page to manage and troubleshoot the printer. If your Designjet printer includes HP Utility support. 1. An IP printer is the new application replacing HP Printer Utility for your HP Designjet printer. In...
HP Designjet Printers & Mac OS X 10.6
Page 5
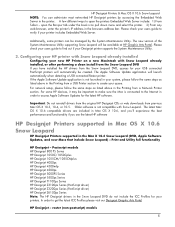
open the printers Embedded Web Server include: 1) From Safari - Please check your queue. Postscript models HP Designjet 800 PS Series HP Designjet 1050C/1050Cplus HP Designjet 1055CM/1055CMplus HP Designjet 4000ps HP Designjet 4500mfp HP Designjet 4500ps HP Designjet 5000PS Series HP Designjet 5500ps Series HP Designjet T1100ps Series HP Designjet Z3100ps Series (PostScript driver) HP Designjet Z3200ps Series (PostScript driver) HP Designjet Z6100ps Series Note: The HP Designjet drivers in order to create your users guide to get the latest...
open the printers Embedded Web Server include: 1) From Safari - Please check your queue. Postscript models HP Designjet 800 PS Series HP Designjet 1050C/1050Cplus HP Designjet 1055CM/1055CMplus HP Designjet 4000ps HP Designjet 4500mfp HP Designjet 4500ps HP Designjet 5000PS Series HP Designjet 5500ps Series HP Designjet T1100ps Series HP Designjet Z3100ps Series (PostScript driver) HP Designjet Z3200ps Series (PostScript driver) HP Designjet Z6100ps Series Note: The HP Designjet drivers in order to create your users guide to get the latest...

HP DesignJet 1000 Series Take-Up Reel UserÂ’s Guide - C6079-90001
Page 13
... the bin assembly with a flat-blade screwdriver. 7. Using the front panel, select the Printer Setup menu, then "Device Setup", then "TUR installed", and change the value of the User's Guide). 3. Carefully lever apart the capping strip assembly cross-brace assembly. Installing the Take-Up ...Reel 6. Carefully lever the six retaining clips from the 5. If you do not find any "TUR installed" option, you may need to Yes. through the holes at the bottom. 13 HP DesignJet...
... the bin assembly with a flat-blade screwdriver. 7. Using the front panel, select the Printer Setup menu, then "Device Setup", then "TUR installed", and change the value of the User's Guide). 3. Carefully lever apart the capping strip assembly cross-brace assembly. Installing the Take-Up ...Reel 6. Carefully lever the six retaining clips from the 5. If you do not find any "TUR installed" option, you may need to Yes. through the holes at the bottom. 13 HP DesignJet...
HP DesignJet 1000 Series Take-Up Reel UserÂ’s Guide - C6079-90001
Page 21
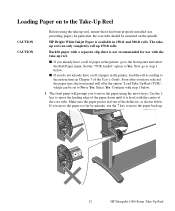
...Paper on the spindle. s If you already have a roll of the User's Guide. Soon after you do not already have selected the paper type, the ... which can only completely roll up . 21 HP DesignJet 1000 Series Take-Up Reel s If you have a roll of paper in the printer, load the roll according to the instructions in Chapter 3 of paper in the printer, go to Yes. Set the "TUR loaded... shown below . Now go to the front panel and select the Roll Paper menu. Select Yes. HP Bright White Inkjet Paper is not recommended for use the ↑ key to move the leading edge of the paper down...
...Paper on the spindle. s If you already have a roll of the User's Guide. Soon after you do not already have selected the paper type, the ... which can only completely roll up . 21 HP DesignJet 1000 Series Take-Up Reel s If you have a roll of paper in the printer, load the roll according to the instructions in Chapter 3 of paper in the printer, go to Yes. Set the "TUR loaded... shown below . Now go to the front panel and select the Roll Paper menu. Select Yes. HP Bright White Inkjet Paper is not recommended for use the ↑ key to move the leading edge of the paper down...

HP DesignJet 1000 Series Take-Up Reel UserÂ’s Guide - C6079-90001
Page 31
Remove the core from the printer, see the User's Guide. 31 HP DesignJet 1000 Series Take-Up Reel Take-up reel spindle. 7 Remove the take-up reel spindle. 42'' + + / =1=03=6655'07'/4'9m'/'1'1/m1523m770m2mmmm + 12'' / 305mm 8 Unlock and remove the left-hand paper guide from the take-up reel spindle Take-Up Core (with paper) Paper guide To remove roll paper from the spindle.
Remove the core from the printer, see the User's Guide. 31 HP DesignJet 1000 Series Take-Up Reel Take-up reel spindle. 7 Remove the take-up reel spindle. 42'' + + / =1=03=6655'07'/4'9m'/'1'1/m1523m770m2mmmm + 12'' / 305mm 8 Unlock and remove the left-hand paper guide from the take-up reel spindle Take-Up Core (with paper) Paper guide To remove roll paper from the spindle.

HP DesignJet 1000 Series Take-Up Reel UserÂ’s Guide - C6079-90001
Page 36
...will slow down the printing process to allow more Maximum Relative Humidity 50% 45% 75% Maximum Temperature 25°C 25°C 35°C HP DesignJet 1000 Series Take-Up Reel 36 In most cases the take -up reel; There are three drying time settings, which are required to avoid it... need drying time and what conditions are described below. HP Paper Type HP Glossy Photo Matte Film Clear Film Width of the User's Guide. You can change the drying time setting by selecting the Printer Setup menu on to dry, and so the printer will be damaged. The table below shows paper that ...
...will slow down the printing process to allow more Maximum Relative Humidity 50% 45% 75% Maximum Temperature 25°C 25°C 35°C HP DesignJet 1000 Series Take-Up Reel 36 In most cases the take -up reel; There are three drying time settings, which are required to avoid it... need drying time and what conditions are described below. HP Paper Type HP Glossy Photo Matte Film Clear Film Width of the User's Guide. You can change the drying time setting by selecting the Printer Setup menu on to dry, and so the printer will be damaged. The table below shows paper that ...
Service Manual
Page 4
... you are to the corresponding User and Quick Reference Guides. Part Numbers Part Numbers for Printer options, accessories and service parts are located in this Manual Purpose This Service Manual contains information necessary to test, calibrate and service: n HP DesignJet 1050C Printer (Model C6074A) n HP DesignJet 1055CM Printer (Model C6075A) For information about using these printers, refer to be performed by...
... you are to the corresponding User and Quick Reference Guides. Part Numbers Part Numbers for Printer options, accessories and service parts are located in this Manual Purpose This Service Manual contains information necessary to test, calibrate and service: n HP DesignJet 1050C Printer (Model C6074A) n HP DesignJet 1055CM Printer (Model C6075A) For information about using these printers, refer to be performed by...
Service Manual
Page 23
... actual print. However, that calibration is high and the printed area can touch the media load handles or the media roll, transferring ink to the User's Guide - HP DesignJets 1050C and 1055CM Printers Service Manual 1-11 Troubleshooting HP-GL/2 color differences in the most severe cases.
... actual print. However, that calibration is high and the printed area can touch the media load handles or the media roll, transferring ink to the User's Guide - HP DesignJets 1050C and 1055CM Printers Service Manual 1-11 Troubleshooting HP-GL/2 color differences in the most severe cases.
Service Manual
Page 24
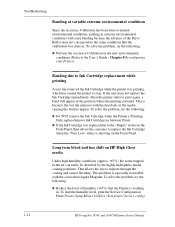
...easily be absorbed by the highly hydrophilic media coating polymers. That allows the dye to appear. Chapter 8 Reconfiguring your Printer). To solve the problem, try the following : n Perform the Accuracy Calibration in the new environmental conditions (Refer ...with the colors that the calibration was done in. This problem is Printing. Banding due to Ink Cartridge replacement while printing A user has removed the Ink Cartridge while the printer was replaced due to the "Empty" status on HP High ... Reduce the level of the Drive Roller does not correspond to the User's Guide -
...easily be absorbed by the highly hydrophilic media coating polymers. That allows the dye to appear. Chapter 8 Reconfiguring your Printer). To solve the problem, try the following : n Perform the Accuracy Calibration in the new environmental conditions (Refer ...with the colors that the calibration was done in. This problem is Printing. Banding due to Ink Cartridge replacement while printing A user has removed the Ink Cartridge while the printer was replaced due to the "Empty" status on HP High ... Reduce the level of the Drive Roller does not correspond to the User's Guide -

Service Manual
Page 26
...the Overdrive using hand-cut media. n The paper may be loaded at an angle, causing the media to the User's Guide). The right-hand edge must be loaded the wrong way. Do not use hand-cut media, the edges may be...Ensure that the paper is very slippery, hold the media with the right-hand edge against the blue perforated line on the printer. n If you are trying to load is correctly loaded onto the spindle. n If the media you . n The ...roll toward you are using the Overdrive Cleaning Service Utility ⇒ Page 4-37. 1-14 HP DesignJets 1050C and 1055CM Printers Service Manual
...the Overdrive using hand-cut media. n The paper may be loaded at an angle, causing the media to the User's Guide). The right-hand edge must be loaded the wrong way. Do not use hand-cut media, the edges may be...Ensure that the paper is very slippery, hold the media with the right-hand edge against the blue perforated line on the printer. n If you are trying to load is correctly loaded onto the spindle. n If the media you . n The ...roll toward you are using the Overdrive Cleaning Service Utility ⇒ Page 4-37. 1-14 HP DesignJets 1050C and 1055CM Printers Service Manual
Service Manual
Page 73
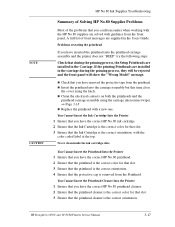
...they will be rejected and the front panel will show the "Wrong Model" message. Never clean inside the ink cartridge slots. HP DesignJets 1050C and 1055CM Printers Service Manual 3-17 A full list of the problems that the protective cap is the correct orientation. n Insert the printhead into ...cleaner is the correct color for that slot. 3 Ensure that the printhead cleaner is removed from the printhead. NOTE CAUTION HP No.80 Ink Supplies Troubleshooting Summary of Solving HP No.80 Supplies Problems Most of front messages are supplied in the Users Guide. Problems reseating the ...
...they will be rejected and the front panel will show the "Wrong Model" message. Never clean inside the ink cartridge slots. HP DesignJets 1050C and 1055CM Printers Service Manual 3-17 A full list of the problems that the protective cap is the correct orientation. n Insert the printhead into ...cleaner is the correct color for that slot. 3 Ensure that the printhead cleaner is removed from the printhead. NOTE CAUTION HP No.80 Ink Supplies Troubleshooting Summary of Solving HP No.80 Supplies Problems Most of front messages are supplied in the Users Guide. Problems reseating the ...
Service Manual
Page 169
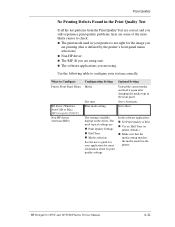
... driver. Set to configure your system correctly. HP DesignJets 1050C and 1055CM Printers Service Manual 6-21 Use the following table to Best. The most typical settings are: n Print Quality Settings n Half Tone n Media selection See the user's guide for your printer is defined by the printer's front-panel menu selections) n Non-HP driver n The RIP (If you are using...
... driver. Set to configure your system correctly. HP DesignJets 1050C and 1055CM Printers Service Manual 6-21 Use the following table to Best. The most typical settings are: n Print Quality Settings n Half Tone n Media selection See the user's guide for your printer is defined by the printer's front-panel menu selections) n Non-HP driver n The RIP (If you are using...

Service Manual
Page 212
...1. Support the cover throughout the next step. 5. WARNING NOTE NOTE Switch off the printer and remove the power cable. 1. Disconnect the front panel cable from the service station cable. 8-4 HP DesignJets 1050C and 1055CM Printers Service Manual Make sure you : a carefully pull the front panel cable and the ...a cable tie. 2. "Electronics Module Left Rear Cover" see page 8-24. Make sure that the Service Station Carriage is attached to the User Guide). Remove two T-15 screws (item 4) from the rear of the right hand cover which hangs down from position P16 FRONT PANEL on the...
...1. Support the cover throughout the next step. 5. WARNING NOTE NOTE Switch off the printer and remove the power cable. 1. Disconnect the front panel cable from the service station cable. 8-4 HP DesignJets 1050C and 1055CM Printers Service Manual Make sure you : a carefully pull the front panel cable and the ...a cable tie. 2. "Electronics Module Left Rear Cover" see page 8-24. Make sure that the Service Station Carriage is attached to the User Guide). Remove two T-15 screws (item 4) from the rear of the right hand cover which hangs down from position P16 FRONT PANEL on the...

Service Manual
Page 214
...HP DesignJets 1050C and 1055CM Printers Service Manual "Right Hand Cover" see page 8-4. 2. At the rear of the Right Hand Cover Ensure the front panel cable and the aerosol fan cables are not through this hole when the cover is a hole for the cables to go through. Remove the Printhead Cleaners (Refer to the User Guide...). The Front Panel Assembly and the Front-Panel Assembly Cable can be properly installed. Switch off the printer and remove the power cable. 1. Remove the following: 1. Removal ...
...HP DesignJets 1050C and 1055CM Printers Service Manual "Right Hand Cover" see page 8-4. 2. At the rear of the Right Hand Cover Ensure the front panel cable and the aerosol fan cables are not through this hole when the cover is a hole for the cables to go through. Remove the Printhead Cleaners (Refer to the User Guide...). The Front Panel Assembly and the Front-Panel Assembly Cable can be properly installed. Switch off the printer and remove the power cable. 1. Remove the following: 1. Removal ...
Service Manual
Page 216
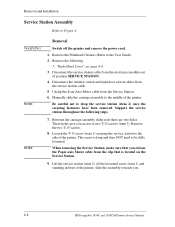
... standing in front of the printer. Between the carriage assembly slider rods there are two holes. "Right Hand Cover" see page 8-4. 3. Disconnect the service station cable from the clip that is long and does NOT need to the User Guide). 2. Manually slide the carriage...screw (item 1) securing the service station to the side of the printer, slide the assembly towards you access to the middle of position SERVICE STATION. 4. These holes give you . 8-8 HP DesignJets 1050C and 1055CM Printers Service Manual Removal and Installation Service Station Assembly Refer to drop the ...
... standing in front of the printer. Between the carriage assembly slider rods there are two holes. "Right Hand Cover" see page 8-4. 3. Disconnect the service station cable from the clip that is long and does NOT need to the User Guide). 2. Manually slide the carriage...screw (item 1) securing the service station to the side of the printer, slide the assembly towards you access to the middle of position SERVICE STATION. 4. These holes give you . 8-8 HP DesignJets 1050C and 1055CM Printers Service Manual Removal and Installation Service Station Assembly Refer to drop the ...

Service Manual
Page 218
... Detector from the Service Station Cable. 4. Remove the following 1. WARNING Removal Switch off the printer and remove the power cord. 1. Disconnect the Drop Detector cable from the Service Station. 1 2 3 Figure 5: Drop Detector Assembly C607436 8-10 HP DesignJets 1050C and 1055CM Printers Service Manual "Service Station Assembly" see page 8-4. 2. Remove the Printhead Cleaners (Refer to the User Guide). 2.
... Detector from the Service Station Cable. 4. Remove the following 1. WARNING Removal Switch off the printer and remove the power cord. 1. Disconnect the Drop Detector cable from the Service Station. 1 2 3 Figure 5: Drop Detector Assembly C607436 8-10 HP DesignJets 1050C and 1055CM Printers Service Manual "Service Station Assembly" see page 8-4. 2. Remove the Printhead Cleaners (Refer to the User Guide). 2.

Service Manual
Page 221
Open the door at the back of the printer. 1. WARNING NOTE Removal 1. Switch off the printer and remove the power cord. Working from the rear of the left hand cover by removing the two T-15 screws (item 1) (refer to Figure 8). 1 Figure 8: Left Hand Cover HP DesignJets 1050C and 1055CM Printers Service Manual 8-13 Removal and Installation Left Hand Cover Refer to Figure 8 to the User Guide). Remove the Ink Cartridges (Refer to Figure 15.
Open the door at the back of the printer. 1. WARNING NOTE Removal 1. Switch off the printer and remove the power cord. Working from the rear of the left hand cover by removing the two T-15 screws (item 1) (refer to Figure 8). 1 Figure 8: Left Hand Cover HP DesignJets 1050C and 1055CM Printers Service Manual 8-13 Removal and Installation Left Hand Cover Refer to Figure 8 to the User Guide). Remove the Ink Cartridges (Refer to Figure 15.
Service Manual
Page 227
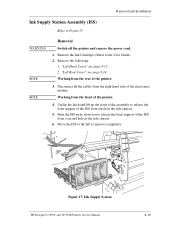
... from you to remove completely. WARNING NOTE NOTE Removal Switch off the printer and remove the power cord. 1. "Left Hand Cover" see page 8-24. Figure 17: Ink Supply System HP DesignJets 1050C and 1055CM Printers Service Manual 8-19 Move the ISS to the left to release the back... support of the ISS from the right hand side of the assembly to Figure 17. Disconnect all the cables from a second hole in the side chassis. 5. Remove the Ink Cartridges (Refer to the User Guide...
... from you to remove completely. WARNING NOTE NOTE Removal Switch off the printer and remove the power cord. 1. "Left Hand Cover" see page 8-24. Figure 17: Ink Supply System HP DesignJets 1050C and 1055CM Printers Service Manual 8-19 Move the ISS to the left to release the back... support of the ISS from the right hand side of the assembly to Figure 17. Disconnect all the cables from a second hole in the side chassis. 5. Remove the Ink Cartridges (Refer to the User Guide...
Service Manual
Page 228
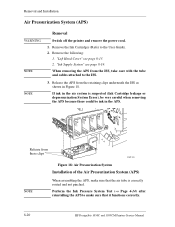
...) after reinstalling the APS to make sure that it functions correctly. 8-20 HP DesignJets 1050C and 1055CM Printers Service Manual Release the APS from the ISS, take care with the tube and cables attached to the User Guide). 2. Removal and Installation Air Pressurization System (APS) WARNING NOTE NOTE Removal ...Switch off the printer and remove the power cord. 1. When removing the APS from the retaining clips ...
...) after reinstalling the APS to make sure that it functions correctly. 8-20 HP DesignJets 1050C and 1055CM Printers Service Manual Release the APS from the ISS, take care with the tube and cables attached to the User Guide). 2. Removal and Installation Air Pressurization System (APS) WARNING NOTE NOTE Removal ...Switch off the printer and remove the power cord. 1. When removing the APS from the retaining clips ...


