HP 1050c Support Question
HP 1050c Support Question
Find answers below for this question about HP 1050c - DesignJet Plus Color Inkjet Printer.Need a HP 1050c manual? We have 8 online manuals for this item!
Question posted by bokkiMill on October 13th, 2013
How To Change The Carriage Belt On A Designjet 1050c Plus Plotter Step By Step
The person who posted this question about this HP product did not include a detailed explanation. Please use the "Request More Information" button to the right if more details would help you to answer this question.
Current Answers
Related HP 1050c Manual Pages
Service Manual - Page 10

... Holder Strip 8-69 Drive Roller 8-70 Center Guide 8-71 Pinch-Wheel Assembly and Cam 8-73
Preventive Maintenance 9-1
Moisture on the Printer 9-2 Noisy Carriage Bushing 9-2 Belt Swelling 9-2 Cleaning the Printer 9-2 General Cleaning 9-2 Cleaning the Overdrive 9-3 Scheduled Maintenance 9-3 Level of Printer Usage 9-3 Scan-axis Maintenance 9-4
8
HP DesignJets 1050C and 1055CM Printers Service Manual
Service Manual - Page 19
...To clear this, you will require different steps to Page 1-10, Printhead Crashes/Smears on...carriage to the correct height ⇒ Page 5-24 and try to Page 1-9, Problems with the Vacuum Fan. n If the client has had media jams, it is still stuck there.
2 Is the customer using HP Coated Media when problem occurred, please also refer to resolve the
HP DesignJets 1050C and 1055CM Printers...
Service Manual - Page 62
...System has to use the printer. When to change the HP No.80 ...carriage during the priming process, they will show the "Wrong Model" message. The printer will also display the ink level and will automatically perform the priming process. The customer must not remove the setup printheads from the front panel.
If the Printing Printheads are used .
3-6
HP DesignJets 1050C and 1055CM Printers...
Service Manual - Page 70

... the Carriage Assembly is possible that media could be started. If you say NO, the printer will be wasted. If you select YES the print job will be replaced. However, this problem may be corrected before the printer will display:
Warning!
If all 4 Printheads have the Status "Failed", it is faulty.
3-14
HP DesignJets 1050C...
Service Manual - Page 73
... the correct orientation, with the
color coded label at the top.
HP DesignJets 1050C and 1055CM Printers Service Manual
3-17 Problems reseating the printhead
If you have removed the protective tape from the printhead.
n Insert the printhead into the printhead carriage assembly and the printer does not "BEEP" try the following steps. You Cannot Insert the Printhead...
Service Manual - Page 93

... following: 1 Clean the Slider Rods and Apply Oil along the complete axis of the Slider Rods. HP DesignJets 1050C and 1055CM Printers Service Manual
4-19 If necessary, clean Encoder Strip using a damp cloth. 3 Check that the Carriage Belt and pulleys are installed correctly. 5 Replace the Scan-Axis Motor ⇒ Page 8-33. Service Tests and Utilities...
Service Manual - Page 141

... Cable Connector from the back of the printer for correct calibration. HP DesignJets 1050C and 1055CM Printers Service Manual
5-25
Correct: move using the belt. NOTE
Service Calibrations
During the Carriage Height Calibration procedure the Carriage Assembly has to be moved along the length of the printer. Make sure that the Carriage Assembly is only ever moved by pulling...
Service Manual - Page 144

... the Carriage Assembly. Service Calibrations
NOTE
6 Loosen the two T10 screws at the back of the printer, you are listening for a scraping sound: if you hear a sound already you may proceed directly with step 9, if not you must lower the Carriage Assembly (step 8), and try again until a scraping sound is heard.
5-28
HP DesignJets 1050C and 1055CM Printers...
Service Manual - Page 145

...
anti-clockwise and then check for a scraping sound again as shown previously in step 7.
9 On moving the Carriage Assembly along the length of the printer you should
now hear a scraping sound: this sound indicates that you need to raise the Carriage Assembly (if there is no sound repeat step 8). HP DesignJets 1050C and 1055CM Printers Service Manual
5-29
Service Manual - Page 147

HP DesignJets 1050C and 1055CM Printers Service Manual
5-31 Service Calibrations 12 When the scraping has been eliminated it is important to leave the Carriage
Assembly as close as possible to the Center Platen: move the Carriage Assembly back and forth across the area where the scraping sound was, gently lowering and raising the Carriage Assembly until...
Service Manual - Page 161
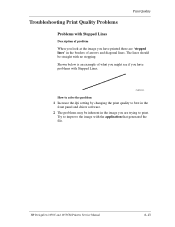
... and diagonal lines. C6074283
How to solve the problem
1 Increase the dpi setting by changing the print quality to best in the borders of what you might see if you have problems with Stepped Lines.
HP DesignJets 1050C and 1055CM Printers Service Manual
6-13
Try to print. The lines should be inherent in the image...
Service Manual - Page 209
... Cutter Assembly 8-42 Carriage Assembly and Belt 8-44 Tubes System Assembly 8-53 Ink Leak Detector Assembly 8-60 Front Platen Assembly 8-62 Platen Assembly 8-63 Paper Entry Assembly 8-64 Roller Guide 8-66 Media Holder Strip 8-69 Drive Roller 8-70 Center Guide 8-71 Pinch-Wheel Assembly and Cam 8-73
HP DesignJets 1050C and 1055CM Printers Service Manual
8-1
Service Manual - Page 210

.... Immediately after the table of removal.
Serious shock hazard leading to in the module.
8-2
HP DesignJets 1050C and 1055CM Printers Service Manual Switch the plotter off the steps as they are performed. If the test passes you service the printer.
WARNING
Safety Precautions
(Safety symbols - Follow these warnings and cautions for your protection and to tick...
Service Manual - Page 212

... Carriage is attached to drop the cover (item 3) once the securing fasteners have been removed. "Electronics Module Left Rear Cover" see page 8-24. Support the cover throughout the next step....
NOTE
Switch off the printer and remove the power cable.
1.
Remove two T-15 screws (item 1) from the service station cable.
8-4
HP DesignJets 1050C and 1055CM Printers Service Manual
Be careful...
Service Manual - Page 216
... to the side of the printer. Between the carriage assembly slider rods there are two holes.
Remove the following steps.
7. Support the service station throughout the ...electronics module out
of the printer. "Right Hand Cover" see page 8-4. 3. Disconnect the service station cable from the clip that you .
8-8
HP DesignJets 1050C and 1055CM Printers Service Manual When removing the...
Service Manual - Page 253

... tube connector
a. NOTE
Removal and Installation
For steps 3 and 4, refer to a safe position.
HP DesignJets 1050C and 1055CM Printers Service Manual
8-45 Push in here b. Loosen the retaining screw T-9 at the back of the printhead tube
connector. 4. View from the rear
c. Pull here
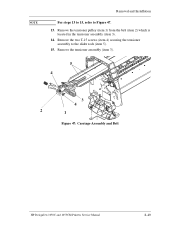
Figure 42: Carriage Assembly and Belt 5. Loosen this screw
a. Move the Printhead tube...
Service Manual - Page 254
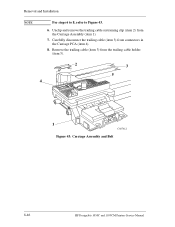
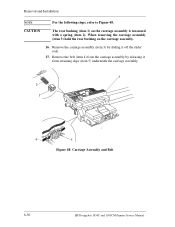
... cable holder (item 5).
2 4
3 5
1
C607412
Figure 43: Carriage Assembly and Belt
8-46
HP DesignJets 1050C and 1055CM Printers Service Manual Remove the trailing cable (item 3) from the Carriage Assembly (item 1).
7. Carefully disconnect the trailing cable (item 3) from connectors in the Carriage PCA (item 4).
8. Removal and Installation
NOTE
For steps 6 to 8, refer to Figure 43.
6.
Service Manual - Page 257
Remove the tensioner assembly (item 3).
5
4
3 4
2
1
Figure 47: Carriage Assembly and Belt
HP DesignJets 1050C and 1055CM Printers Service Manual
8-49 NOTE
Removal and Installation
For steps 13 to 15, refer to the slider rods (item 5). 15. Remove the tensioner pulley (item 1) from the belt (item 2) which is
located in the tensioner assembly (item 3). 14. Remove the two T-15...
Service Manual - Page 258
... and Installation
NOTE
For the following steps, refer to Figure 48.
Remove the belt (item 4) from retaining clips (item 5) underneath the carriage assembly.
3 2
1
4
5
Figure 48: Carriage Assembly and Belt
8-50
HP DesignJets 1050C and 1055CM Printers Service Manual When removing the carriage assembly (item 3) hold the rear bushing on the carriage assembly is tensioned with a spring...
Service Manual - Page 315
... 4-42 Belt 8-44 Belt Swelling 9-2
C
Calibrations Backup 5-19 Cam 8-73 Cap 10-10 Carriage Assembly 7-18, 8-44 Carriage Height Calibration 5-24 Carriage Interconnect Wiper 3-18 Center Guide 7-30, 8-71 Cleaning
General 9-2 Overdrive 9-3 Printer 9-2 Clutch Assembly 7-16, 8-21 Color Accuracy Configuration 6-23 Color changes when stacking 1-10
Color differences 1-11 Color to Color calibration 5-16...
Similar Questions

How To Change Carriage Belt In T610.
(Posted by lcdahi 9 years ago)

Hp Designjet T610 How To Change The Belt
(Posted by awrosey 9 years ago)

How Change Date In Hp 1050c Plotter
(Posted by gmgorcharl 10 years ago)

How To Change A Carriage Belt Designjet T610
(Posted by Homergorg 10 years ago)
I Have Hp Designjet 1050c Plus, Receiving File But Not Printing
when i sen the file to print it shows the printer is receiving but afta few seconds it shows there i...
when i sen the file to print it shows the printer is receiving but afta few seconds it shows there i...
(Posted by mbewaephraim 11 years ago)