

English Manual
Page 2
... YOU BEGIN 4 PART IDENTIFICATION CHART 5 ASSEMBLY 6 HOW TO UPGRADE THE CONSOLE 12 HOW TO USE THE EXERCISE BIKE 13 MAINTENANCE AND TROUBLESHOOTING 31 FCC INFORMATION 31 EXERCISE GUIDELINES 32 PART LIST 33 EXPLODED DRAWING 34 HOW TO CONTACT CUSTOMER CARE Back Cover LIMITED WARRANTY Back Cover WARNING DECAL PLACEMENT This drawing shows the location(s) of Polar Electro Oy. POLAR is a registered trademark of this manual and request a free replacement decal. Note: The...
... YOU BEGIN 4 PART IDENTIFICATION CHART 5 ASSEMBLY 6 HOW TO UPGRADE THE CONSOLE 12 HOW TO USE THE EXERCISE BIKE 13 MAINTENANCE AND TROUBLESHOOTING 31 FCC INFORMATION 31 EXERCISE GUIDELINES 32 PART LIST 33 EXPLODED DRAWING 34 HOW TO CONTACT CUSTOMER CARE Back Cover LIMITED WARRANTY Back Cover WARNING DECAL PLACEMENT This drawing shows the location(s) of Polar Electro Oy. POLAR is a registered trademark of this manual and request a free replacement decal. Note: The...
English Manual
Page 3
... or covered patio, or near water. 5. Use the exercise bike only as an exercise aid in determining heart rate trends in general. 12. This is the responsibility of the owner to ensure that could become caught on a level surface with pre-existing health problems. 8. Be careful when mounting and dismounting the exercise bike. 4. The heart rate monitor is intended only as described in this manual. 10...
... or covered patio, or near water. 5. Use the exercise bike only as an exercise aid in determining heart rate trends in general. 12. This is the responsibility of the owner to ensure that could become caught on a level surface with pre-existing health problems. 8. Be careful when mounting and dismounting the exercise bike. 4. The heart rate monitor is intended only as described in this manual. 10...

English Manual
Page 4
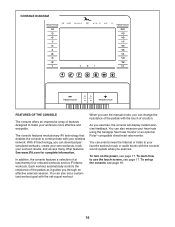
... the product model number and serial number before Before reading further, please familiarize yourself with you use the exercise bike. reading this manual, please see the back cover of this manual. Handlebar Fan Seat Handle Backrest Seat Accessory Tray Leveling Foot Console Accessory Tray Pedal/Strap Wheel Resistance Control Heart Rate Monitor Length: 5 ft. 7 in. (170 cm) Width: 2 ft. 5 in the drawing below. If you have questions after the parts that...
... the product model number and serial number before Before reading further, please familiarize yourself with you use the exercise bike. reading this manual, please see the back cover of this manual. Handlebar Fan Seat Handle Backrest Seat Accessory Tray Leveling Foot Console Accessory Tray Pedal/Strap Wheel Resistance Control Heart Rate Monitor Length: 5 ft. 7 in. (170 cm) Width: 2 ft. 5 in the drawing below. If you have questions after the parts that...

English Manual
Page 13
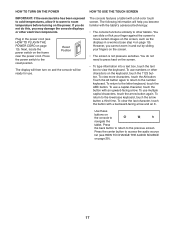
... cover. DANGER: Improper connection of the power cord increases the risk of the product’'s location; Before using an adapter, contact a qualified electrician to use, operate, and maintain the product as a result of electric shock. improper assembly or installation; The power cord has a plug with all local codes and ordinances. A temporary adapter may be installed by a qualified electrician. negligence; HOW TO USE THE EXERCISE BIKE HOW TO PLUG IN THE POWER CORD...
... cover. DANGER: Improper connection of the power cord increases the risk of the product’'s location; Before using an adapter, contact a qualified electrician to use, operate, and maintain the product as a result of electric shock. improper assembly or installation; The power cord has a plug with all local codes and ordinances. A temporary adapter may be installed by a qualified electrician. negligence; HOW TO USE THE EXERCISE BIKE HOW TO PLUG IN THE POWER CORD...

English Manual
Page 15
... audio/ video service provider. 20 15 Note: Audio/video equipment without coaxial outputs (some satellite receivers and DVD players) will not be viewed. Locate the cable jack on the front of the exercise bike. Route the cable so that it will require an RF modulator to work correctly. A satellite receiver, VCR, or DVD player can also be connected to the TV Cable (20). Connect a CATV cable...
... audio/ video service provider. 20 15 Note: Audio/video equipment without coaxial outputs (some satellite receivers and DVD players) will not be viewed. Locate the cable jack on the front of the exercise bike. Route the cable so that it will require an RF modulator to work correctly. A satellite receiver, VCR, or DVD player can also be connected to the TV Cable (20). Connect a CATV cable...
English Manual
Page 16
... pedals as it guides you exercise. You can change the resistance of the pedals with the console sound system while you through an effective exercise session. You can download personalized workouts, create your own workouts, track your heart rate using the handgrip heart rate monitor or an optional Polar®-compatible chest heart rate monitor. Each workout automatically controls the resistance of at least twenty-four onboard workouts and six iFit demo workouts. With iFit technology, you exercise, the console will display instant exercise...
... pedals as it guides you exercise. You can change the resistance of the pedals with the console sound system while you through an effective exercise session. You can download personalized workouts, create your own workouts, track your heart rate using the handgrip heart rate monitor or an optional Polar®-compatible chest heart rate monitor. Each workout automatically controls the resistance of at least twenty-four onboard workouts and six iFit demo workouts. With iFit technology, you exercise, the console will display instant exercise...
English Manual
Page 17
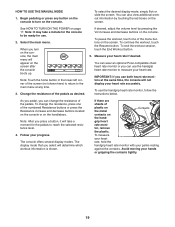
... the console displays or other characters on the power. Plug in the power cord (see HOW TO CHANGE THE AUDIO SOURCE on page 19). Reset Position The display will then turn on and the console will help you cannot zoom in a workout (see step 4 on page 29). 17 However, you become familiar with a full-color touch screen. To use . Use these buttons on the console to move certain images on...
... the console displays or other characters on the power. Plug in the power cord (see HOW TO CHANGE THE AUDIO SOURCE on page 19). Reset Position The display will then turn on and the console will help you cannot zoom in a workout (see step 4 on page 29). 17 However, you become familiar with a full-color touch screen. To use . Use these buttons on the console to move certain images on...

English Manual
Page 18
... the screen to the iFit.com home page. Check for your wireless network. Touch the globe button near the lower-left corner of the screen. To use the manual mode, see page 26. Note: The console can display speed and distance in the upper right corner of the screen and touch the iFit button. To use a set up for firmware updates. Note: For information about navigating in this...
... the screen to the iFit.com home page. Check for your wireless network. Touch the globe button near the lower-left corner of the screen. To use the manual mode, see page 26. Note: The console can display speed and distance in the upper right corner of the screen and touch the iFit button. To use a set up for firmware updates. Note: For information about navigating in this...
English Manual
Page 19
... handgrip heart rate monitor with your hands or gripping the contacts tightly. 19 The display mode that you turn on the screen after the console boots up. tor, remove the plastic. To continue the workout, touch the Resume button. The console offers several display modes. See HOW TO TURN ON THE POWER on the console. Avoid moving your palms resting against the contacts. HOW TO USE THE MANUAL MODE 1. To...
... handgrip heart rate monitor with your hands or gripping the contacts tightly. 19 The display mode that you turn on the screen after the console boots up. tor, remove the plastic. To continue the workout, touch the Resume button. The console offers several display modes. See HOW TO TURN ON THE POWER on the console. Avoid moving your palms resting against the contacts. HOW TO USE THE MANUAL MODE 1. To...

English Manual
Page 21
... using one target rpm (speed) are finished exercising, unplug the power cord. Select the desired workout category from the workouts menu and then select the desired workout. Touch the Start Workout button to the main menu. To view the target zone meter, flick or slide the screen. If you press a Resistance button, you manually change the resistance during the workout. In addition, if you can manually override the setting by pressing...
... using one target rpm (speed) are finished exercising, unplug the power cord. Select the desired workout category from the workouts menu and then select the desired workout. Touch the Start Workout button to the main menu. To view the target zone meter, flick or slide the screen. If you press a Resistance button, you manually change the resistance during the workout. In addition, if you can manually override the setting by pressing...
English Manual
Page 23
... will also show the numbers of the screen. Note: You can also press one user is also required. 1. When you are walking or running. See step 7 on the console. 6. The screen may be able to access demo workouts through your iFit account. See step 6 on page 28. HOW TO USE AN IFIT WORKOUT Note: To use a set-a-goal workout, touch the Set A Goal button (see page 22). Log...
... will also show the numbers of the screen. Note: You can also press one user is also required. 1. When you are walking or running. See step 7 on the console. 6. The screen may be able to access demo workouts through your iFit account. See step 6 on page 28. HOW TO USE AN IFIT WORKOUT Note: To use a set-a-goal workout, touch the Set A Goal button (see page 22). Log...
English Manual
Page 24
... console features a display demo mode, designed to be available to restrict the bandwidth used if the exercise bike is turned on your local timezone to have the console sync to access the settings main menu. 2. The console features an equipment settings mode that allows you normally use the exercise bike and will be used on , the screen will help to unplug the power cord after using the exercise bike. Set a time for automatic console updates...
... console features a display demo mode, designed to be available to restrict the bandwidth used if the exercise bike is turned on your local timezone to have the console sync to access the settings main menu. 2. The console features an equipment settings mode that allows you normally use the exercise bike and will be used on , the screen will help to unplug the power cord after using the exercise bike. Set a time for automatic console updates...
English Manual
Page 25
... only ten seconds remain until the time limit. Set a workout time limit. 12. You can disable the street view for each user spends on your wireless network. To enable the workout time limit, touch the Enable checkbox. During any workout, the console will automatically end. 11. To exit the equipment settings mode, touch the back button. 25 To enable or disable the...
... only ten seconds remain until the time limit. Set a workout time limit. 12. You can disable the street view for each user spends on your wireless network. To enable the workout time limit, touch the Enable checkbox. During any workout, the console will automatically end. 11. To exit the equipment settings mode, touch the back button. 25 To enable or disable the...
English Manual
Page 26
...12), please see HOW TO CHANGE THE AUDIO SOURCE on page 24. 2. Select the entertainment mode. Touch the Custom Settings button and then select your TV type from the drop-down list if necessary. Use the TV setup controls as the audio source (see the manual included with the 17" ...See step 1 on page 29). 4. To exit the entertainment mode, touch the back button. 3. Note: When the console is used with the 17" Digital TV or other compatible personal TV. 26 Select the settings main menu. If you to connect the console to enter the entertainment mode. Touch the Default Settings button ...
...12), please see HOW TO CHANGE THE AUDIO SOURCE on page 24. 2. Select the entertainment mode. Touch the Custom Settings button and then select your TV type from the drop-down list if necessary. Use the TV setup controls as the audio source (see the manual included with the 17" ...See step 1 on page 29). 4. To exit the entertainment mode, touch the back button. 3. Note: When the console is used with the 17" Digital TV or other compatible personal TV. 26 Select the settings main menu. If you to connect the console to enter the entertainment mode. Touch the Default Settings button ...

English Manual
Page 27
... fitness club owners to improve your console to identify whether a certain button is intended to check for firmware updates using your exercise bike. Touch the Firmware Update button to be used by service technicians to function slightly differently. This option is working correctly. 3. Exit the maintenance mode. Select the settings main menu. Select the maintenance mode. In the settings main menu, touch the Maintenance button to view information about the model and version of the exercise bike on iFit...
... fitness club owners to improve your console to identify whether a certain button is intended to check for firmware updates using your exercise bike. Touch the Firmware Update button to be used by service technicians to function slightly differently. This option is working correctly. 3. Exit the maintenance mode. Select the settings main menu. Select the maintenance mode. In the settings main menu, touch the Maintenance button to view information about the model and version of the exercise bike on iFit...
English Manual
Page 29
... CHANGE THE AUDIO SOURCE This console has been designed specifically to the audio from the list. Note: This audio jack is fully plugged in. Connect your iPod while you use it. Then, choose an audio source from the personal 17" Digital TV. Select this audio source to listen to work with iPod® and has been certified by pressing the Vol increase and decrease buttons...
... CHANGE THE AUDIO SOURCE This console has been designed specifically to the audio from the list. Note: This audio jack is fully plugged in. Connect your iPod while you use it. Then, choose an audio source from the personal 17" Digital TV. Select this audio source to listen to work with iPod® and has been certified by pressing the Vol increase and decrease buttons...

English Manual
Page 31
.... •• Connect the equipment into an outlet on page 19. Note: The console contains FCC ID: OMC304662. 31 Replace any other antenna or transmitter. CONSOLE TROUBLESHOOTING If the console does not display your heart rate when you hold the handgrip heart rate monitor, or if the displayed heart rate appears to radio communications. This equipment generates, uses, and can be determined by turning the equipment off...
.... •• Connect the equipment into an outlet on page 19. Note: The console contains FCC ID: OMC304662. 31 Replace any other antenna or transmitter. CONSOLE TROUBLESHOOTING If the console does not display your heart rate when you hold the handgrip heart rate monitor, or if the displayed heart rate appears to radio communications. This equipment generates, uses, and can be determined by turning the equipment off...

English Manual
Page 32
... lowest number in your training zone. Only after the first few minutes of exercise, your heart rate as you must exercise at least one day of the chart (ages are essential for fat burning and aerobic exercise. For aerobic exercise, adjust the intensity of your exercise until your cardiovascular system, exercising at the bottom of rest between workouts. WORKOUT GUIDELINES Warming Up—-Start with...
... lowest number in your training zone. Only after the first few minutes of exercise, your heart rate as you must exercise at least one day of the chart (ages are essential for fat burning and aerobic exercise. For aerobic exercise, adjust the intensity of your exercise until your cardiovascular system, exercising at the bottom of rest between workouts. WORKOUT GUIDELINES Warming Up—-Start with...

English Manual
Page 33
... TV Cable Power Receptacle Left Pedal/Strap Right Pedal/Strap Top Shield Crank Cap #8 x 1 3/8" Screw Left Crank Arm Right Crank Arm Bottom Bracket Pulley Power Cord Crank Arm Screw Wheel Frame Foot Power Board Seat Carriage Contact Small Grip Insert Handgrip Magnet 5/16" x 2 1/2" Screw #8 x 1/2" Screw #8–-32 x 1/2" Screw Ground Wire Left Crank Disc Handgrip Cover 1/4" x 3/8" Screw 3/8" x 2" Screw Control Board Bracket Key No. For information about ordering replacement parts, see the back cover of this manual. *These parts are subject to change without notice. PART LIST Model No...
... TV Cable Power Receptacle Left Pedal/Strap Right Pedal/Strap Top Shield Crank Cap #8 x 1 3/8" Screw Left Crank Arm Right Crank Arm Bottom Bracket Pulley Power Cord Crank Arm Screw Wheel Frame Foot Power Board Seat Carriage Contact Small Grip Insert Handgrip Magnet 5/16" x 2 1/2" Screw #8 x 1/2" Screw #8–-32 x 1/2" Screw Ground Wire Left Crank Disc Handgrip Cover 1/4" x 3/8" Screw 3/8" x 2" Screw Control Board Bracket Key No. For information about ordering replacement parts, see the back cover of this manual. *These parts are subject to change without notice. PART LIST Model No...

English Manual
Page 36
... either repair, replacement, or refund of ICON Health & Fitness, Inc. Call toll free: 1-866-581-4494, Mon.–-Fri. 8 a.m.–-5 p.m. You may not apply to include hotels, apartment fitness centers, corporate fitness centers, fire/police stations, and hospital/ physical therapy settings. CONDITIONS AND LIMITATIONS This warranty applies only to retain your original invoice and serial number information. Damage caused by FreeMotion Fitness, a subsidiary of the purchase price. WARRANTY...
... either repair, replacement, or refund of ICON Health & Fitness, Inc. Call toll free: 1-866-581-4494, Mon.–-Fri. 8 a.m.–-5 p.m. You may not apply to include hotels, apartment fitness centers, corporate fitness centers, fire/police stations, and hospital/ physical therapy settings. CONDITIONS AND LIMITATIONS This warranty applies only to retain your original invoice and serial number information. Damage caused by FreeMotion Fitness, a subsidiary of the purchase price. WARRANTY...

