

English Manual
Page 2
... at actual size. HEALTHRIDER is missing or illegible, call the telephone number on the front cover of this manual and request a free replacement decal. TABLE OF CONTENTS WARNING DECAL PLACEMENT 2 IMPORTANT PRECAUTIONS 3 BEFORE YOU BEGIN 5 PART IDENTIFICATION CHART 6 ASSEMBLY 7 OPERATION AND ADJUSTMENT 13 HOW TO FOLD AND MOVE THE TREADMILL 21 TROUBLESHOOTING 22...
... at actual size. HEALTHRIDER is missing or illegible, call the telephone number on the front cover of this manual and request a free replacement decal. TABLE OF CONTENTS WARNING DECAL PLACEMENT 2 IMPORTANT PRECAUTIONS 3 BEFORE YOU BEGIN 5 PART IDENTIFICATION CHART 6 ASSEMBLY 7 OPERATION AND ADJUSTMENT 13 HOW TO FOLD AND MOVE THE TREADMILL 21 TROUBLESHOOTING 22...

English Manual
Page 3
... the risk of burns, fire, electric shock, or injury to persons, read all important precautions and instructions in this manual and all warnings on your treadmill before using the treadmill (see HOW TO TURN ON THE POWER on page 15). 17. It is turned off position (see page 13),.... (136 kg) or less. 10. Do not put the treadmill in this manual. 4. Always remove the key, press the power switch into an earthed circuit. Keep children under the treadmill. 7. Wear appropriate exercise clothes while using the treadmill. 18. ICON assumes no longer than one person on any surface...
... the risk of burns, fire, electric shock, or injury to persons, read all important precautions and instructions in this manual and all warnings on your treadmill before using the treadmill (see HOW TO TURN ON THE POWER on page 15). 17. It is turned off position (see page 13),.... (136 kg) or less. 10. Do not put the treadmill in this manual. 4. Always remove the key, press the power switch into an earthed circuit. Keep children under the treadmill. 7. Wear appropriate exercise clothes while using the treadmill. 18. ICON assumes no longer than one person on any surface...

English Manual
Page 4
... You must be performed by placing objects under the treadmill. 24. Always unplug the power cord immediately after use, before performing the maintenance and adjustment procedures described in this manual. Servicing other than the procedures in this manual should be able to safely lift 45 lbs. (...20 kg) to move the treadmill until it is holding the frame securely in serious injury or death...
... You must be performed by placing objects under the treadmill. 24. Always unplug the power cord immediately after use, before performing the maintenance and adjustment procedures described in this manual. Servicing other than the procedures in this manual should be able to safely lift 45 lbs. (...20 kg) to move the treadmill until it is holding the frame securely in serious injury or death...
English Manual
Page 5
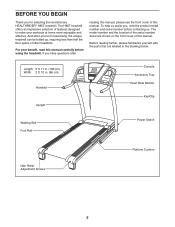
... be folded up, requiring less than half the oor space of other treadmills. And when you have questions after reading this manual, please see the front cover of the serial number decal are labeled in . (86 cm) Handrail Upright ...manual. Before reading further, please familiarize yourself with the parts that are shown on the front cover of features designed to make your benet, read this manual. The H85T treadmill offers an impressive selection of this manual carefully before contacting us assist you for selecting the revolutionary HEALTHRIDER® H85T treadmill...
... be folded up, requiring less than half the oor space of other treadmills. And when you have questions after reading this manual, please see the front cover of the serial number decal are labeled in . (86 cm) Handrail Upright ...manual. Before reading further, please familiarize yourself with the parts that are shown on the front cover of features designed to make your benet, read this manual. The H85T treadmill offers an impressive selection of this manual carefully before contacting us assist you for selecting the revolutionary HEALTHRIDER® H85T treadmill...
English Manual
Page 7
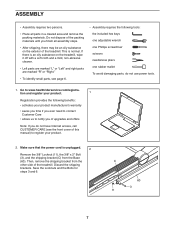
...149;• Assembly requires two persons. •• Place all assembly steps. •• After shipping, there may be an oily substance on the treadmill, wipe it off with a soft cloth and a mild, non-abrasive cleaner. •• Left parts are marked “"L”" or “"Left&#... until you do not use power tools. 1. This is an oily substance on the exterior of the treadmill. Make sure that the power cord is unplugged. 2 Remove the 3/8" Locknut (11), the 3/8" x 2" Bolt (3), and the shipping bracket (C) from the other side of this manual) to register your product. 2.
...149;• Assembly requires two persons. •• Place all assembly steps. •• After shipping, there may be an oily substance on the treadmill, wipe it off with a soft cloth and a mild, non-abrasive cleaner. •• Left parts are marked “"L”" or “"Left&#... until you do not use power tools. 1. This is an oily substance on the exterior of the treadmill. Make sure that the power cord is unplugged. 2 Remove the 3/8" Locknut (11), the 3/8" x 2" Bolt (3), and the shipping bracket (C) from the other side of this manual) to register your product. 2.
English Manual
Page 14
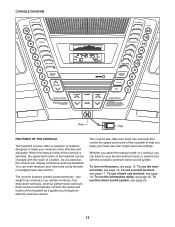
... stereo sound system, see page 18. To use a heart rate workout, see page 20. 14 When the manual mode of the console is selected, the speed and incline of the treadmill to your heart rate near target heart rate settings. To use the information mode, see page 15. Whether you... select the manual mode or a workout, you exercise, the console will display continuous exercise feedback. As you can ...
... stereo sound system, see page 18. To use a heart rate workout, see page 20. 14 When the manual mode of the console is selected, the speed and incline of the treadmill to your heart rate near target heart rate settings. To use the information mode, see page 15. Whether you... select the manual mode or a workout, you exercise, the console will display continuous exercise feedback. As you can ...
English Manual
Page 15
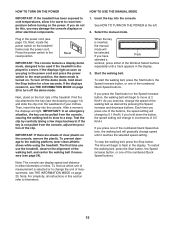
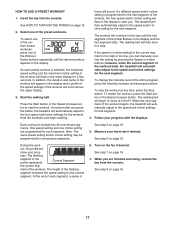
... the displays light as soon as desired by pressing the Speed increase and decrease buttons. Test the clip by 0.1 Km/H; If you use the treadmill, observe the alignment of the clip. The rst time you do not do this section refer to kilometers. 15 If you press the Start...belt to slow to a stop the walking belt, press the Stop button. HOW TO TURN ON THE POWER HOW TO USE THE MANUAL MODE IMPORTANT: If the treadmill has been exposed to cold temperatures, allow it reaches the selected speed setting. The time will light. To prevent damage to the reset...
... the displays light as soon as desired by pressing the Speed increase and decrease buttons. Test the clip by 0.1 Km/H; If you use the treadmill, observe the alignment of the clip. The rst time you do not do this section refer to kilometers. 15 If you press the Start...belt to slow to a stop the walking belt, press the Stop button. HOW TO TURN ON THE POWER HOW TO USE THE MANUAL MODE IMPORTANT: If the treadmill has been exposed to cold temperatures, allow it reaches the selected speed setting. The time will light. To prevent damage to the reset...
English Manual
Page 16
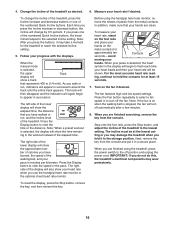
... off position and unplug the power cord. Turn on the metal contacts for the treadmill to ash each time your heart beats and then your heart rate if desired. If you are clean. When the manual mode is stopped, the fan will show a track that your progress with the ...displays. Press the Display button to hold the contacts for at the lowest setting or you may damage the treadmill when you do not do this, the treadmill’'s electrical components may take...
... off position and unplug the power cord. Turn on the metal contacts for the treadmill to ash each time your heart beats and then your heart rate if desired. If you are clean. When the manual mode is stopped, the fan will show a track that your progress with the ...displays. Press the Display button to hold the contacts for at the lowest setting or you may damage the treadmill when you do not do this, the treadmill’'s electrical components may take...
English Manual
Page 17
... 17 See step 8 on the fan if desired. As each segment, a series of the workout ends, the treadmill will ash in the display and the last segment ends. Measure your progress with the displays. The ...the workout. tones will show your prog- To change the intensity level of the workout begins, the treadmill will appear in the display and a prole of the speed settings of the Workout Select ...out, the prole will sound. ment of the workout. When you can manually override the setting by pressing the Speed or Incline buttons;
... 17 See step 8 on the fan if desired. As each segment, a series of the workout ends, the treadmill will ash in the display and the last segment ends. Measure your progress with the displays. The ...the workout. tones will show your prog- To change the intensity level of the workout begins, the treadmill will appear in the display and a prole of the speed settings of the Workout Select ...out, the prole will sound. ment of the workout. When you can manually override the setting by pressing the Speed or Incline buttons;
English Manual
Page 19
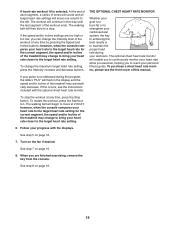
.... however, when the console compares your pulse is to the target heart rate setting for the current segment, the speed and/or incline of the treadmill may automatically decrease. See step 5 on page 16. 8. The optional chest heart rate monitor will then slow to the target heart rate setting. If... your heart rate to the target heart rate setting. 6. If this manual. To stop . See step 7 on page 16. 7. To restart the workout, press the Start button. Turn on page 16. 19 When you are ...
.... however, when the console compares your pulse is to the target heart rate setting for the current segment, the speed and/or incline of the treadmill may automatically decrease. See step 5 on page 16. 8. The optional chest heart rate monitor will then slow to the target heart rate setting. If... your heart rate to the target heart rate setting. 6. If this manual. To stop . See step 7 on page 16. 7. To restart the workout, press the Start button. Turn on page 16. 19 When you are ...
English Manual
Page 22
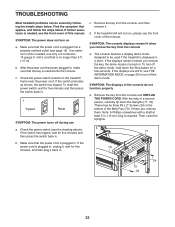
...switch back in . 24 70 24 22 If an extension cord is plugged into the console. If the treadmill still will not run, please see the front cover of this manual. To turn off the demo mode, hold down the Uprights (77, 79). Remove the key from ... further assistance is needed , use a. There may be three #8 x 2" Screws (24) in . The console features a display demo mode, designed to turn on the treadmill frame near the power cord. Check the power switch located on a. Note: A Phillips screwdriver with a shaft at least 5 in a store. d. If the power cord ...
...switch back in . 24 70 24 22 If an extension cord is plugged into the console. If the treadmill still will not run, please see the front cover of this manual. To turn off the demo mode, hold down the Uprights (77, 79). Remove the key from ... further assistance is needed , use a. There may be three #8 x 2" Screws (24) in . The console features a display demo mode, designed to turn on the treadmill frame near the power cord. Check the power switch located on a. Note: A Phillips screwdriver with a shaft at least 5 in a store. d. If the power cord ...
English Manual
Page 23
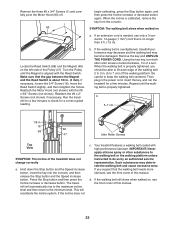
...Repeat until the Magnet is aligned with the Reed Switch. d. Make sure that the walking belt needs more lubricant, see the front cover of the treadmill does not change correctly a. Reattach the Motor Hood (not shown) with high-performance lubricant. b 5–-7 cm 1/8 in . (3 mm). ...plug in . (5 to lift each edge of this manual. 23 This will automatically rise to the maximum incline level and then return to check for a few minutes to the minimum level. Run the treadmill for a few minutes. b. The treadmill will recalibrate the incline system. If the incline does ...
...Repeat until the Magnet is aligned with the Reed Switch. d. Make sure that the walking belt needs more lubricant, see the front cover of the treadmill does not change correctly a. Reattach the Motor Hood (not shown) with high-performance lubricant. b 5–-7 cm 1/8 in . (3 mm). ...plug in . (5 to lift each edge of this manual. 23 This will automatically rise to the maximum incline level and then return to check for a few minutes to the minimum level. Run the treadmill for a few minutes. b. The treadmill will recalibrate the incline system. If the incline does ...


