
English Manual
Page 1
... Serial No. As a manufacturer, we are missing parts, we will provide immediate assistance, free of charge to providing complete customer satisfaction. The trained technicians on our customer hot line will guarantee complete satisfaction through direct assistance from our factory. MST CAUTION Read all precautions and instructions in this manual before using this manual for future reference. ¨ USERÕS MANUAL Patent...
... Serial No. As a manufacturer, we are missing parts, we will provide immediate assistance, free of charge to providing complete customer satisfaction. The trained technicians on our customer hot line will guarantee complete satisfaction through direct assistance from our factory. MST CAUTION Read all precautions and instructions in this manual before using this manual for future reference. ¨ USERÕS MANUAL Patent...
English Manual
Page 2
... be used by or through the use of all instructions before using the exercise cycle. The pulse sensor is not a medical device. Do not use only. lems. Read all precautions. 7. TABLE OF CONTENTS IMPORTANT PRECAUTIONS 2 BEFORE YOU BEGIN 3 ASSEMBLY 4 HOW TO OPERATE THE RECUMBENT CYCLE 8 MAINTENANCE AND TROUBLE-SHOOTING 12 EXERCISE GUIDELINES 13 PART LIST 14 EXPLODED DRAWING 15 HOW TO ORDER REPLACEMENT PARTS Back Cover LIMITED WARRANTY Back Cover IMPORTANT...
... be used by or through the use of all instructions before using the exercise cycle. The pulse sensor is not a medical device. Do not use only. lems. Read all precautions. 7. TABLE OF CONTENTS IMPORTANT PRECAUTIONS 2 BEFORE YOU BEGIN 3 ASSEMBLY 4 HOW TO OPERATE THE RECUMBENT CYCLE 8 MAINTENANCE AND TROUBLE-SHOOTING 12 EXERCISE GUIDELINES 13 PART LIST 14 EXPLODED DRAWING 15 HOW TO ORDER REPLACEMENT PARTS Back Cover LIMITED WARRANTY Back Cover IMPORTANT...
English Manual
Page 3
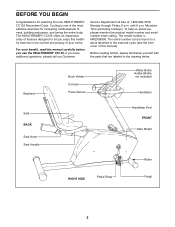
...; CC125 Recumbent Cycle. The model number is one of your benefit, read this healthful exercise in the drawing below. Mountain Time (excluding holidays). Cycling is HREX36500. For your home. The serial number can be found on a decal attached to let you enjoy this manual carefully before you use the HEALTHRIDER¨ CC125. until 6 p.m. Backrest Book Holder Console Pulse Sensor Water Bottle Holder (Bottle not included) Handlebar Seat BACK Seat Knob Seat...
...; CC125 Recumbent Cycle. The model number is one of your benefit, read this healthful exercise in the drawing below. Mountain Time (excluding holidays). Cycling is HREX36500. For your home. The serial number can be found on a decal attached to let you enjoy this manual carefully before you use the HEALTHRIDER¨ CC125. until 6 p.m. Backrest Book Holder Console Pulse Sensor Water Bottle Holder (Bottle not included) Handlebar Seat BACK Seat Knob Seat...
English Manual
Page 4
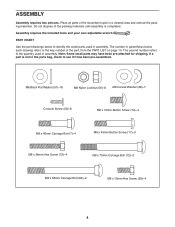
...;7 Console Screw (20)Ð8 M8 x 15mm Button Screw (74)Ð4 M8 x 40mm Carriage Bolt (7)Ð4 M8 x 45mm Button Screw (17)Ð3 M6 x 38mm Hex Screw (73)Ð4 M8 x 70mm Carriage Bolt (72)Ð2 M8 x 85mm Carriage Bolt (63)Ð2 M6 x 15mm Hex Screw (29)Ð4 4 Note: Some small parts may have been pre-attached for shipping. ASSEMBLY Assembly requires two persons. The number in assembly. If a part is...
...;7 Console Screw (20)Ð8 M8 x 15mm Button Screw (74)Ð4 M8 x 40mm Carriage Bolt (7)Ð4 M8 x 45mm Button Screw (17)Ð3 M6 x 38mm Hex Screw (73)Ð4 M8 x 70mm Carriage Bolt (72)Ð2 M8 x 85mm Carriage Bolt (63)Ð2 M6 x 15mm Hex Screw (29)Ð4 4 Note: Some small parts may have been pre-attached for shipping. ASSEMBLY Assembly requires two persons. The number in assembly. If a part is...
English Manual
Page 5
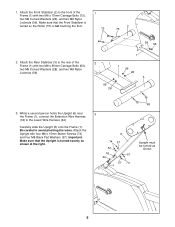
... the Frame (1) with four M8 x 15mm Button Screws (74) and four M8 Black Flat Washers (57). While a second person holds the Upright (6) near the Frame (1), connect the Extension Wire Harness (18) to avoid pinching the wires. Attach the Rear Stabilizer (3) to the front of the Frame (1) with two M8 x 85mm Carriage Bolts (63), two M8 Curved Washers (28), and...
... the Frame (1) with four M8 x 15mm Button Screws (74) and four M8 Black Flat Washers (57). While a second person holds the Upright (6) near the Frame (1), connect the Extension Wire Harness (18) to avoid pinching the wires. Attach the Rear Stabilizer (3) to the front of the Frame (1) with two M8 x 85mm Carriage Bolts (63), two M8 Curved Washers (28), and...
English Manual
Page 6
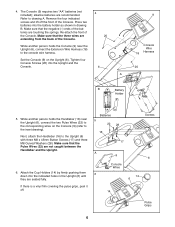
... Console. Set the Console (9) on the Console (9) (refer to the inset drawing). Re-attach the front of the Console. Tighten four Console Screws (20) into the battery holder as shown in the Upright (6) until they are extending from the back of the Console. Next, attach the Handlebar (16) to drawing A. While another person holds the Console (9) near the Upright (6), connect the two Pulse Wires (22) to the console wire harness. Attach...
... Console. Set the Console (9) on the Console (9) (refer to the inset drawing). Re-attach the front of the Console. Tighten four Console Screws (20) into the battery holder as shown in the Upright (6) until they are extending from the back of the Console. Next, attach the Handlebar (16) to drawing A. While another person holds the Console (9) near the Upright (6), connect the two Pulse Wires (22) to the console wire harness. Attach...
English Manual
Page 7
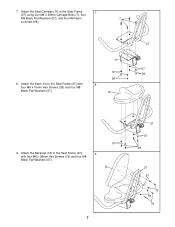
7. Attach the Seat Carriage (11) to the Seat Frame (27) with four M6 x 38mm Hex Screws (73) and four M8 Black Flat Washers (57). 57 9 13 7 27 57 29 27 57 73 57 73 Attach the Backrest (13) to the Seat Frame (27) with four M6 x 15mm Hex Screws (29) and four M8 Black Flat Washers (57). 11 57 56 8 12 27 57 56 9. Attach the Seat (12) to the Seat Frame 7 (27) using four M8 x 40mm Carriage Bolts (7), four M8 Black Flat Washers (57), and four M8 Nylon 7 Locknuts (56). 8.
7. Attach the Seat Carriage (11) to the Seat Frame (27) with four M6 x 38mm Hex Screws (73) and four M8 Black Flat Washers (57). 57 9 13 7 27 57 29 27 57 73 57 73 Attach the Backrest (13) to the Seat Frame (27) with four M6 x 15mm Hex Screws (29) and four M8 Black Flat Washers (57). 11 57 56 8 12 27 57 56 9. Attach the Seat (12) to the Seat Frame 7 (27) using four M8 x 40mm Carriage Bolts (7), four M8 Black Flat Washers (57), and four M8 Nylon 7 Locknuts (56). 8.
English Manual
Page 8
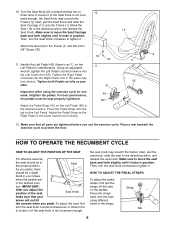
... release the Seat Knob. Tighten the Right Pedal clockwise into the Left Crank Arm (55). Place a mat beneath the exercise cycle to the Frame (1) with the #10 x 5/8Ó Screw (30). 11. IMPORTANT: After you adjust the position of the seat, Seat Knob make sure that all parts are in the same manner (not shown). 12. Press the straps back onto the tabs using the exercise cycle for...
... release the Seat Knob. Tighten the Right Pedal clockwise into the Left Crank Arm (55). Place a mat beneath the exercise cycle to the Frame (1) with the #10 x 5/8Ó Screw (30). 11. IMPORTANT: After you adjust the position of the seat, Seat Knob make sure that all parts are in the same manner (not shown). 12. Press the straps back onto the tabs using the exercise cycle for...
English Manual
Page 9
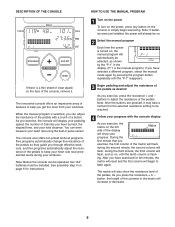
... time, and your pedaling speed, the number of Calories you exercise, the console will increase or decrease. 9 The matrix will show the resistance level of the pedals as desired As you get the most from your heart rate using the built-in the matrix will display your total distance. As you have selected a different program, select the manual mode again by pressing the program button repeatedly until the...
... time, and your pedaling speed, the number of Calories you exercise, the console will increase or decrease. 9 The matrix will show the resistance level of the pedals as desired As you get the most from your heart rate using the built-in the matrix will display your total distance. As you have selected a different program, select the manual mode again by pressing the program button repeatedly until the...
English Manual
Page 10
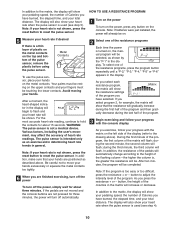
... will show that your total distance. WARNING: The pulse sensor is turned on, the manual program will be . During the first minute of the program, the first column of the program. during the last half of the program. 3 Begin exercising and follow your progress with the console display As you exercise, follow your heart rate if desired If there is used (see step 5). Note: If your hands...
... will show that your total distance. WARNING: The pulse sensor is turned on, the manual program will be . During the first minute of the program, the first column of the program. during the last half of the program. 3 Begin exercising and follow your progress with the console display As you exercise, follow your heart rate if desired If there is used (see step 5). Note: If your hands...
English Manual
Page 11
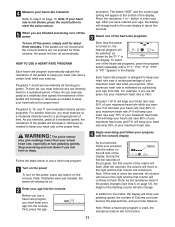
... used, the resistance buttons will turn off the power, simply wait for three minutes, the power will not function. 11 Note: As the resistance level of the pedals changes (see step 5 on page 12), the height of the display. 4 Measure your heart rate if desired Refer to reset the pulse sensor. 5 When you are finished exercising, turn off the power To turn off automatically. Note: If your heart rate is turned on the console...
... used, the resistance buttons will turn off the power, simply wait for three minutes, the power will not function. 11 Note: As the resistance level of the pedals changes (see step 5 on page 12), the height of the display. 4 Measure your heart rate if desired Refer to reset the pulse sensor. 5 When you are finished exercising, turn off the power To turn off automatically. Note: If your heart rate is turned on the console...
English Manual
Page 12
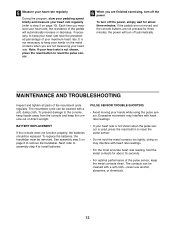
... the pedals are not moved and the console buttons are not measuring your heart rate. PULSE SENSOR TROUBLE-SHOOTING ¥ Avoid moving your heart rate is not shown when the pulse sensor is used, press the reset button to step 5 on page 10). doing so may interfere with a soft, damp cloth. MAINTENANCE AND TROUBLESHOOTING Inspect and tighten all parts of your hands on page 6 to install batteries. Note: If your heart rate is not necessary to reset the pulse sensor...
... the pedals are not moved and the console buttons are not measuring your heart rate. PULSE SENSOR TROUBLE-SHOOTING ¥ Avoid moving your heart rate is not shown when the pulse sensor is used, press the reset button to step 5 on page 10). doing so may interfere with a soft, damp cloth. MAINTENANCE AND TROUBLESHOOTING Inspect and tighten all parts of your hands on page 6 to install batteries. Note: If your heart rate is not necessary to reset the pulse sensor...
English Manual
Page 13
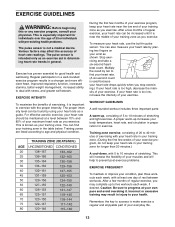
... measure your heart rate should be found by ten to prevent post-exercise problems. EXERCISE FREQUENCY To maintain or improve your heart rate as you may affect the accuracy of your training zone as a guide. For effective aerobic exercise, your heart rate, use the built-in the table below. WORKOUT GUIDELINES A well-rounded workout includes three important parts: A warm-up increases your health. Remember, the key to 10...
... measure your heart rate should be found by ten to prevent post-exercise problems. EXERCISE FREQUENCY To maintain or improve your heart rate as you may affect the accuracy of your training zone as a guide. For effective aerobic exercise, your heart rate, use the built-in the table below. WORKOUT GUIDELINES A well-rounded workout includes three important parts: A warm-up increases your health. Remember, the key to 10...
English Manual
Page 14
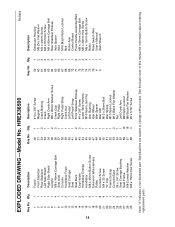
... Housing M8 Zinc Flat Washer M4 x 44mm Screw M4 x 63.5mm Screw M8 x 85mm Carriage Bolt Rear Stabilizer Endcap Axle Spacer Axle M10 Black Nylon Locknut Belt Roller Axle Control Board Pulse Handle Assembly/Wire M8 x 70mm Carriage Bolt M6 x 38mm Hex Screw M8 x 15mm Button Screw Roller Reed Switch Wire UserÕs Manual Allen Wrench 14 Note: Ò#Ó indicates a non-illustrated part. EXPLODED DRAWINGÑModel No. HREX36500 R1000A Key No.
... Housing M8 Zinc Flat Washer M4 x 44mm Screw M4 x 63.5mm Screw M8 x 85mm Carriage Bolt Rear Stabilizer Endcap Axle Spacer Axle M10 Black Nylon Locknut Belt Roller Axle Control Board Pulse Handle Assembly/Wire M8 x 70mm Carriage Bolt M6 x 38mm Hex Screw M8 x 15mm Button Screw Roller Reed Switch Wire UserÕs Manual Allen Wrench 14 Note: Ò#Ó indicates a non-illustrated part. EXPLODED DRAWINGÑModel No. HREX36500 R1000A Key No.
English Manual
Page 16
... by an ICON authorized service center, products used as store display models. LIMITED WARRANTY ICON Health & Fitness, Inc. (ICON), warrants this warranty is limited to replacing or repairing, at 1-800-999-3756, Monday through one of merchantability or fitness for a particular purpose is in workmanship and material, under normal use , costs of removal, installation or other warranty beyond that specifically set forth above limitation may also have other warranties and any implied warranties of its...
... by an ICON authorized service center, products used as store display models. LIMITED WARRANTY ICON Health & Fitness, Inc. (ICON), warrants this warranty is limited to replacing or repairing, at 1-800-999-3756, Monday through one of merchantability or fitness for a particular purpose is in workmanship and material, under normal use , costs of removal, installation or other warranty beyond that specifically set forth above limitation may also have other warranties and any implied warranties of its...


