
User Manual
Page 1
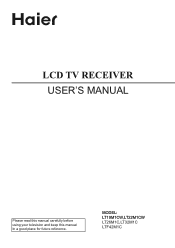
LCD TV RECEIVER USER'S MANUAL Please read this manual carefully before using your television and keep this manual In a good place for future reference. MODEL: LT19M1CW,LT22M1CW LT26M1C,LT32M1C LTF42M1C
LCD TV RECEIVER USER'S MANUAL Please read this manual carefully before using your television and keep this manual In a good place for future reference. MODEL: LT19M1CW,LT22M1CW LT26M1C,LT32M1C LTF42M1C

User Manual
Page 3
... CONTROL 9 TO USE THE REMOTE CONTROL 10 VIEWING MODE ILLUSTRATIONS 12 CONNECTING EQUIPMENT 13 TO USE THE MENUS ...19 PICTURE MENU...19 SOUND MENU...20 TV MENU ...20 FEATURES MENU ...21 PARENTAL MENU ...22 COMMON INTERFACE MODULE 23 OAD OPERATION ...24 TIPS ...25 PICTURE VIEWING & MUSIC 26 PRODUCT SPECIFICATION 27 BEFORE...
... CONTROL 9 TO USE THE REMOTE CONTROL 10 VIEWING MODE ILLUSTRATIONS 12 CONNECTING EQUIPMENT 13 TO USE THE MENUS ...19 PICTURE MENU...19 SOUND MENU...20 TV MENU ...20 FEATURES MENU ...21 PARENTAL MENU ...22 COMMON INTERFACE MODULE 23 OAD OPERATION ...24 TIPS ...25 PICTURE VIEWING & MUSIC 26 PRODUCT SPECIFICATION 27 BEFORE...

User Manual
Page 4
... caused by the party responsible for future reference. WARNING: To prevent fire or shock hazard, do not expose the TV to qualified personnel only. Do not open the cabinet. SYMBOL SYMBOL DEFINITION DANGEROUS VOLTAGE: The lightning flash with arrowhead symbol, within an equilateral triangle, is ... THE ELECTRONIC INDUSTRIES ALLIANCE AT WWW.EIAE.ORG. 2 Danger of the user to persons. NOTICE 1. Batteries installed warning Caution - INSTRUCTIONS: The exclamation mark inside the TV. Refer servicing to rain or moisture. FOR YOUR SAFETY Before operating the...
... caused by the party responsible for future reference. WARNING: To prevent fire or shock hazard, do not expose the TV to qualified personnel only. Do not open the cabinet. SYMBOL SYMBOL DEFINITION DANGEROUS VOLTAGE: The lightning flash with arrowhead symbol, within an equilateral triangle, is ... THE ELECTRONIC INDUSTRIES ALLIANCE AT WWW.EIAE.ORG. 2 Danger of the user to persons. NOTICE 1. Batteries installed warning Caution - INSTRUCTIONS: The exclamation mark inside the TV. Refer servicing to rain or moisture. FOR YOUR SAFETY Before operating the...

User Manual
Page 5
... laundry tub, swimming pool or in a box when using it. Unplug immediately if is malfunction like metals or other foreign materials are put inside the TV box like no picture, no video/audio, smoke and bad odor from the AC outlet before cleaning. PRECAUTIONS AND REMINDERS Place unit on even surfaces.... Notice for a long period of the display unit and cause overheating. Do not cover or block any object inside TV box or if the TV fell down. Call service personnel to unplug the unit when not in use liquid cleaners or aerosol cleaners to unplug the AC cord...
... laundry tub, swimming pool or in a box when using it. Unplug immediately if is malfunction like metals or other foreign materials are put inside the TV box like no picture, no video/audio, smoke and bad odor from the AC outlet before cleaning. PRECAUTIONS AND REMINDERS Place unit on even surfaces.... Notice for a long period of the display unit and cause overheating. Do not cover or block any object inside TV box or if the TV fell down. Call service personnel to unplug the unit when not in use liquid cleaners or aerosol cleaners to unplug the AC cord...

User Manual
Page 6
... at plugs, convenience receptacles, and the point where they exit from the type of the set and cause product damage and/or personal injury. 4 The TV should be connected to rain or moisture, does not operate normally, or has been dropped. 16. Unplug this apparatus near any heat sources such as...
... at plugs, convenience receptacles, and the point where they exit from the type of the set and cause product damage and/or personal injury. 4 The TV should be connected to rain or moisture, does not operate normally, or has been dropped. 16. Unplug this apparatus near any heat sources such as...
User Manual
Page 7
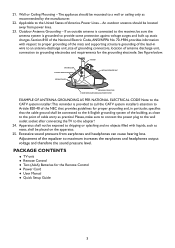
... protection against voltage surges and built up static charges. Please, make sure to connect the power plug to the wall outlet socket after connecting the TV to maximum increases the earphones and headphones output voltage and therefore the sound pressure level. Apparatus shall not be located away from earphones and headphones... building, as practical. Excessive sound pressure from power lines. 23. Applicable to the United States of the equalizer to the adapter! 24. PACKAGE CONTENTS Ɣ TV unit Ɣ Remote Control Ɣ Two (AAA) Batteries for the grounding electrode.
... protection against voltage surges and built up static charges. Please, make sure to connect the power plug to the wall outlet socket after connecting the TV to maximum increases the earphones and headphones output voltage and therefore the sound pressure level. Apparatus shall not be located away from earphones and headphones... building, as practical. Excessive sound pressure from power lines. 23. Applicable to the United States of the equalizer to the adapter! 24. PACKAGE CONTENTS Ɣ TV unit Ɣ Remote Control Ɣ Two (AAA) Batteries for the grounding electrode.

User Manual
Page 8
... & screws are not included. Install the base stand; To prevent any unsafe situations, no naked 6 Before mounting your TV on the wall, you keep your TV at least 2.36 inches (60 mm) from the TV. 2 Secure the wall mount bracket to the screen display area which may compromise the integrity of the display.... Please make sure to connect the power plug to the wall outlet socket after connecting the TV to allow free flow of air. Do not cover the ventilation openings on a solid surface. M4 screws For 26" model 200 mm M4 screws 100...
... & screws are not included. Install the base stand; To prevent any unsafe situations, no naked 6 Before mounting your TV on the wall, you keep your TV at least 2.36 inches (60 mm) from the TV. 2 Secure the wall mount bracket to the screen display area which may compromise the integrity of the display.... Please make sure to connect the power plug to the wall outlet socket after connecting the TV to allow free flow of air. Do not cover the ventilation openings on a solid surface. M4 screws For 26" model 200 mm M4 screws 100...

User Manual
Page 9
.... 5. If the LED colour is power on or in the wall socket with display on the Remote control or the side panel control knobs. 7 The TV will be turned on in a minute with AC power supply.You can see LED states at the back of the battery compartment. If the LED... colour is Blue, means the TV set is Red, which means this TV set . Power: Insert the power cord in the vicinity. flame sources, such as lighted candles, should be placed on .
.... 5. If the LED colour is power on or in the wall socket with display on the Remote control or the side panel control knobs. 7 The TV will be turned on in a minute with AC power supply.You can see LED states at the back of the battery compartment. If the LED... colour is Blue, means the TV set is Red, which means this TV set . Power: Insert the power cord in the vicinity. flame sources, such as lighted candles, should be placed on .

User Manual
Page 10
...video devices such as a DVD Player or set top box through this SPDIF connection to Component socket.) 8 Connect the primary source for analogue or Digital TV. ཷᇬོᇫSCART - Once your home theatre system. HALF SCART transmits CVBS video in/ out, and audio in / out; When ... Module (CAM) use the following procedure to view the input signal: Press the SOURCE button on this all the speakers will be muted. ྲྀ TV ANTENNA - PERIPHERAL CONNECTION GUIDE ླྀ 19/22 ྲྀ 26/32 AC POWER 42 USB USB 19/22/26 32 COMMON INTERFACE 42 ...
...video devices such as a DVD Player or set top box through this SPDIF connection to Component socket.) 8 Connect the primary source for analogue or Digital TV. ཷᇬོᇫSCART - Once your home theatre system. HALF SCART transmits CVBS video in/ out, and audio in / out; When ... Module (CAM) use the following procedure to view the input signal: Press the SOURCE button on this all the speakers will be muted. ྲྀ TV ANTENNA - PERIPHERAL CONNECTION GUIDE ླྀ 19/22 ྲྀ 26/32 AC POWER 42 USB USB 19/22/26 32 COMMON INTERFACE 42 ...
User Manual
Page 11
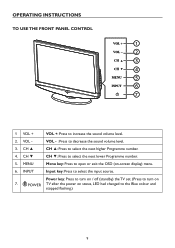
Power key: Press to turn on / off (standby) the TV set. (Press to select the next higher Programme number. 4. CH Ÿ CH Ÿ: Press to turn on 7. OPERATING INSTRUCTIONS TO USE THE FRONT PANEL CONTROL 1 2 3 4 5 6 7 1 ...VOL + VOL +: Press to open or exit the OSD (on-screen display) menu. 6. MENU Menu key: Press to increase the sound volume level. 2. i POWER TV after the power on status, LED had changed to select the next lower Programme number. 5. VOL - CH ź CH ź: Press to the Blue colour...
Power key: Press to turn on / off (standby) the TV set. (Press to select the next higher Programme number. 4. CH Ÿ CH Ÿ: Press to turn on 7. OPERATING INSTRUCTIONS TO USE THE FRONT PANEL CONTROL 1 2 3 4 5 6 7 1 ...VOL + VOL +: Press to open or exit the OSD (on-screen display) menu. 6. MENU Menu key: Press to increase the sound volume level. 2. i POWER TV after the power on status, LED had changed to select the next lower Programme number. 5. VOL - CH ź CH ź: Press to the Blue colour...

User Manual
Page 12
... Dual I, or Dual II. AUDIO ADJ Press to select from Personal, Speech, Music. VIDEO ADJ Press to select channel. OK Press to browse through the TV channels. INFO Press to choose AV source mode. v In Text mode:Text control buttons. VIDEO Press to display or close menu. SLEEP Press to set.... PC Press to choose YPbPr source mode. YPbPr Press to choose PC source mode. MUTE Switch the sound ON/OFF. Number buttons Press to enter TV channel number to choose the Smart Picture mode from Auto, Normal (4:3),Wide (16:9), subtitle, full screen, or 14:9 mode. Vol USB 10 ZOOM Select ...
... Dual I, or Dual II. AUDIO ADJ Press to select from Personal, Speech, Music. VIDEO ADJ Press to select channel. OK Press to browse through the TV channels. INFO Press to choose AV source mode. v In Text mode:Text control buttons. VIDEO Press to display or close menu. SLEEP Press to set.... PC Press to choose YPbPr source mode. YPbPr Press to choose PC source mode. MUTE Switch the sound ON/OFF. Number buttons Press to enter TV channel number to choose the Smart Picture mode from Auto, Normal (4:3),Wide (16:9), subtitle, full screen, or 14:9 mode. Vol USB 10 ZOOM Select ...

User Manual
Page 13
...USB to display the multimedia selection screen. (Detail USB multimedia function please refer to page 100 or the index page. MIX Display the Teletext with TV. v In Text mode: Select the next page marked as a subtitle page and request it as subtitle. FAV Display the Favourite Channel List.... Top half and Bottom half. INDEX Press to return to P26). FREEZE Press to display or close the Teletext. TELETEXT Press to freeze the TV picture. 11 CH-LIST Display the Channel List. HOLD Press to a quiz. SUBPAGE Display the sub page (when available). REVEAL Reveal hidden ...
...USB to display the multimedia selection screen. (Detail USB multimedia function please refer to page 100 or the index page. MIX Display the Teletext with TV. v In Text mode: Select the next page marked as a subtitle page and request it as subtitle. FAV Display the Favourite Channel List.... Top half and Bottom half. INDEX Press to return to P26). FREEZE Press to display or close the Teletext. TELETEXT Press to freeze the TV picture. 11 CH-LIST Display the Channel List. HOLD Press to a quiz. SUBPAGE Display the sub page (when available). REVEAL Reveal hidden ...
User Manual
Page 15
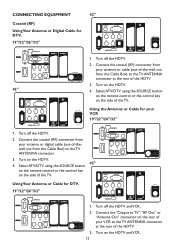
Connect the coaxial (RF) connector from your antenna or digital cable (out-of-thewall, not from the Cable Box) to the TV ANTENNA connector at the rear of the HDTV. 3. Select ATV/DTV using the SOURCE button on the remote control or the control key on the ...HDTV. 42" 4. Turn on the side of the TV. Using the Antenna or Cable for DTV. 19"/22"/26"/32" 1. Connect the "Output to the TV ANTENNA connector. 3. Select ATV/DTV using the SOURCE button on the remote control or the control key...
Connect the coaxial (RF) connector from your antenna or digital cable (out-of-thewall, not from the Cable Box) to the TV ANTENNA connector at the rear of the HDTV. 3. Select ATV/DTV using the SOURCE button on the remote control or the control key on the ...HDTV. 42" 4. Turn on the side of the TV. Using the Antenna or Cable for DTV. 19"/22"/26"/32" 1. Connect the "Output to the TV ANTENNA connector. 3. Select ATV/DTV using the SOURCE button on the remote control or the control key...

User Manual
Page 16
... about the video output requirements of the product or consult your HDTV Set-Top Box and the other end to the HDMI input of the TV. Select ATV/DTV using the SOURCE button on the remote control or the control key on the Remote Control. 1. Select HDMI using the SOURCE button... Your HDTV Set-Top Box Using HDMI (19"/22" only have one HDMI) HDTV Set-Top Boxes that have an off-air antenna or cable TV, connect it to the "Antenna In" connector on the HDTV supports High-bandwidth Digital Content Protection (HDCP). Connect a HDMI cable to HDMI connection provides video...
... about the video output requirements of the product or consult your HDTV Set-Top Box and the other end to the HDMI input of the TV. Select ATV/DTV using the SOURCE button on the remote control or the control key on the Remote Control. 1. Select HDMI using the SOURCE button... Your HDTV Set-Top Box Using HDMI (19"/22" only have one HDMI) HDTV Set-Top Boxes that have an off-air antenna or cable TV, connect it to the "Antenna In" connector on the HDTV supports High-bandwidth Digital Content Protection (HDCP). Connect a HDMI cable to HDMI connection provides video...

User Manual
Page 18
...rear of the HDTV or directly by pressing the HDMI button on the Remote Control. NOTE f Refer to the TV OUT (RF) on the HDTV and DVD player. 3. Select ATV/DTV using the SOURCE button on the ...of the HDTV, or directly by pressing the HDMI button on the Remote Control. NOTE f Refer to the TV input at the rear of the HDTV. 3. Turn on your DVD player and the other end to your... DVD player user manual for more information about selecting the video or RF output of the TV. Connect a HDMI cable to the HDMI output of your Set Top Box and the other end to HDMI...
...rear of the HDTV or directly by pressing the HDMI button on the Remote Control. NOTE f Refer to the TV OUT (RF) on the HDTV and DVD player. 3. Select ATV/DTV using the SOURCE button on the ...of the HDTV, or directly by pressing the HDMI button on the Remote Control. NOTE f Refer to the TV input at the rear of the HDTV. 3. Turn on your DVD player and the other end to your... DVD player user manual for more information about selecting the video or RF output of the TV. Connect a HDMI cable to the HDMI output of your Set Top Box and the other end to HDMI...

User Manual
Page 21
... menus may only be more depths in the particular source modes. To make the background colour brighter or darker. [DCR] - Picture Sound TV Features Parental OK Enter Smart Picture Brightness Contrast Colour Tint Sharpness Colour Temperature Advanced Control Standard 45 50 60 0 5 Cool Select EXIT Exit ... to show more natural. Smart Picture: To set your computer timing mode to enter the main OSD.Adjust the items including Picture, Sound,TV, Features, and Parental. v Video: Force graphic timing shows as graphic timing, for example: 720p shows 1280x720@60Hz; 1080i shows 1920x1080@...
... menus may only be more depths in the particular source modes. To make the background colour brighter or darker. [DCR] - Picture Sound TV Features Parental OK Enter Smart Picture Brightness Contrast Colour Tint Sharpness Colour Temperature Advanced Control Standard 45 50 60 0 5 Cool Select EXIT Exit ... to show more natural. Smart Picture: To set your computer timing mode to enter the main OSD.Adjust the items including Picture, Sound,TV, Features, and Parental. v Video: Force graphic timing shows as graphic timing, for example: 720p shows 1280x720@60Hz; 1080i shows 1920x1080@...

User Manual
Page 22
... a/v delays; Audio Carrier (ATV only): Select Stereo, Dual 1, Dual 2, or Mono for digital channels with audio signals. 7. Picture Sound TV Features Parental OK Enter Sound Mode Equalizer 120Hz Equalizer 500Hz Equalizer 1.5KHz Equalizer 5KHz Equalizer 10KHz Balance Virtual Surround Digital Audio Out Personal 0 0 ...0 0 0 0 On PCM Select EXIT Exit Picture Sound TV Features Parental SPDIF Delay AVL Type Audio Description 0 Off Normal 6. Digital Audio Out: To select the Digital Audio Out from Normal,...
... a/v delays; Audio Carrier (ATV only): Select Stereo, Dual 1, Dual 2, or Mono for digital channels with audio signals. 7. Picture Sound TV Features Parental OK Enter Sound Mode Equalizer 120Hz Equalizer 500Hz Equalizer 1.5KHz Equalizer 5KHz Equalizer 10KHz Balance Virtual Surround Digital Audio Out Personal 0 0 ...0 0 0 0 On PCM Select EXIT Exit Picture Sound TV Features Parental SPDIF Delay AVL Type Audio Description 0 Off Normal 6. Digital Audio Out: To select the Digital Audio Out from Normal,...

User Manual
Page 23
...: Use this function when two or more audio languages are broadcast.This is the language to be used for analog channels. Picture Sound TV Features Parental OK Scan Scan single RF channel.(Digital Only) 0% RF Channel Signal Strength Signal Quality EXIT Back 7 60 Good [Analog Manual...This menu gives users the most flexibilities to the various requirements in different source modes, certain features should be hidden (disable) on the TV screen. Channel Decode support the Canal+ (paid television channel); Search the new channels automatically that all new services are not in the channel...
...: Use this function when two or more audio languages are broadcast.This is the language to be used for analog channels. Picture Sound TV Features Parental OK Scan Scan single RF channel.(Digital Only) 0% RF Channel Signal Strength Signal Quality EXIT Back 7 60 Good [Analog Manual...This menu gives users the most flexibilities to the various requirements in different source modes, certain features should be hidden (disable) on the TV screen. Channel Decode support the Canal+ (paid television channel); Search the new channels automatically that all new services are not in the channel...
User Manual
Page 24
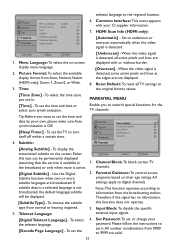
...pixels and lines at the edges are displayed with your password. All settings apply to information from 0000 to control special functions for the TV channels. Input Block: To disable the specific external input signals. [Digital Teletext Language] - channels. [Digital Subtitle] - Note:This ...Decode Page Language] - Picture Format: To select the available display format from normal or hearing impaired. 5. To set the 4. To set the TV to the original factory values. [Time Zone] - HDMI Scan Info (HDMI only): [Automatic] - When the video signal is active. To display...
...pixels and lines at the edges are displayed with your password. All settings apply to information from 0000 to control special functions for the TV channels. Input Block: To disable the specific external input signals. [Digital Teletext Language] - channels. [Digital Subtitle] - Note:This ...Decode Page Language] - Picture Format: To select the available display format from normal or hearing impaired. 5. To set the 4. To set the TV to the original factory values. [Time Zone] - HDMI Scan Info (HDMI only): [Automatic] - When the video signal is active. To display...

User Manual
Page 25
... off your access code has been changed or you have forgotten the code, you can always get in by us. Picture Sound TV Features Parental Menu Language Picture Format Time Subtitle Teletext Language Common Interface Reset Default English Wide COMMON INTERFACE MODULE OK Enter Select EXIT ... Parental Teletext Language Common Interface Reset Default Smart Card CA Module OK Enter Select EXIT Exit 4. Tip: Remember that CA Picture Sound TV Menu Language Picture Format Time Subtitle English Wide modules and smart cards are not included, or supplied as optional extras by inputting the...
... off your access code has been changed or you have forgotten the code, you can always get in by us. Picture Sound TV Features Parental Menu Language Picture Format Time Subtitle Teletext Language Common Interface Reset Default English Wide COMMON INTERFACE MODULE OK Enter Select EXIT ... Parental Teletext Language Common Interface Reset Default Smart Card CA Module OK Enter Select EXIT Exit 4. Tip: Remember that CA Picture Sound TV Menu Language Picture Format Time Subtitle English Wide modules and smart cards are not included, or supplied as optional extras by inputting the...


