User Manual
Page 2
... Page 26 Playable Discs 28 Disc Protection and DVD Characteristics 29 Troubleshooting Guide 30 Specifications 31 To users: Thank you for restoring the function. Please keep this book carefully. CONTENT Safety Notice Items 1 Front Panel Controls 2 Connection Options 3 Remote Control Key Functions 4 Remote Control 5 Installing Batteries 5 Connection Instructions 6 Grounding 6 External equipment Connections 6 Antenna Connection 6 PC Setup 7 VCR Setup 8 Cable TV Setup 9 External AV Source Setup 9 Basic Operating Instructions 10 Turn on , please read this book for later...
... Page 26 Playable Discs 28 Disc Protection and DVD Characteristics 29 Troubleshooting Guide 30 Specifications 31 To users: Thank you for restoring the function. Please keep this book carefully. CONTENT Safety Notice Items 1 Front Panel Controls 2 Connection Options 3 Remote Control Key Functions 4 Remote Control 5 Installing Batteries 5 Connection Instructions 6 Grounding 6 External equipment Connections 6 Antenna Connection 6 PC Setup 7 VCR Setup 8 Cable TV Setup 9 External AV Source Setup 9 Basic Operating Instructions 10 Turn on , please read this book for later...
User Manual
Page 4
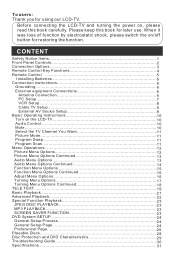
... enter 5. Front Panel Controls L1509A-A, L1709A-A, L1910A-A, L2009A-A 2 3 4 5 1 TV/AV MENU VOL- CH+ POWER L1911W-A 6 7 6 7 Control Panel Function 1. MENU Press to select the item in standby mode, illuminates green when the display is turned on 7.Remote Sensor Receiving remote control sends the infrared remote signal. CH- VOL- TV channel down / Left orientation to adjust the item in the OSD VOL+ Volume up / to select the main menu 4. Power supply switch 2.TV/AV Select the input signals: COMPONENT/PC/AV...
... enter 5. Front Panel Controls L1509A-A, L1709A-A, L1910A-A, L2009A-A 2 3 4 5 1 TV/AV MENU VOL- CH+ POWER L1911W-A 6 7 6 7 Control Panel Function 1. MENU Press to select the item in standby mode, illuminates green when the display is turned on 7.Remote Sensor Receiving remote control sends the infrared remote signal. CH- VOL- TV channel down / Left orientation to adjust the item in the OSD VOL+ Volume up / to select the main menu 4. Power supply switch 2.TV/AV Select the input signals: COMPONENT/PC/AV...
User Manual
Page 5
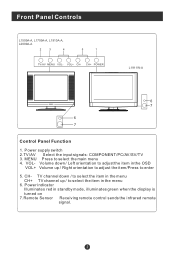
... analog output output from an S-Video device the audio input port to this jack display card for reference, please see the real. And the AC power supply switch is just for PC display purpose cable box. VIDEO IN AUDIO PC AUDIO IN ANT IN L R Connection Options DVD STOP PLAY/PAUSE OPEN/CLOSE PREW NEXT S-VIDEO SCART VGA IN DVD insert The figure is on the back of the set) AV /S-VIDEO/COMPONENT Audio Input Connect audio output from an external device to this jack Earphone port DVD...
... analog output output from an S-Video device the audio input port to this jack display card for reference, please see the real. And the AC power supply switch is just for PC display purpose cable box. VIDEO IN AUDIO PC AUDIO IN ANT IN L R Connection Options DVD STOP PLAY/PAUSE OPEN/CLOSE PREW NEXT S-VIDEO SCART VGA IN DVD insert The figure is on the back of the set) AV /S-VIDEO/COMPONENT Audio Input Connect audio output from an external device to this jack Earphone port DVD...
User Manual
Page 6
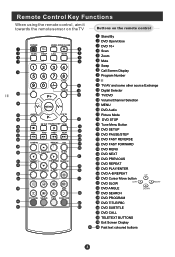
... EXIT PICTURE SOUND TIME FUNCTION Stand By DVD Open/close DVD 10+ Scan Zoom Mute Swap Call Screen Display Program Number / TV/AV and some other source Exchange Digital Selector TV/DVD Volume/Channel Selection MENU DVD Audio Picture Mode DVD STOP Tune Menu Button DVD SETUP DVD PAUSE/STEP DVD FAST REVERSE DVD FAST FORWARD DVD MENU DVD NEXT DVD PREVIOUS DVD REPEAT DVD PLAY/ENTER DVD A-B REPEAT UP DVD Cursor Move button LEFT DVD SLOW RIGHT DVD ANGLE DOWN DVD SEARCH DVD PROGRAM DVD TITLE/PBC DVD SUBTITLE DVD CALL TELETEXT BUTTONS Exit Screen Display Fast...
... EXIT PICTURE SOUND TIME FUNCTION Stand By DVD Open/close DVD 10+ Scan Zoom Mute Swap Call Screen Display Program Number / TV/AV and some other source Exchange Digital Selector TV/DVD Volume/Channel Selection MENU DVD Audio Picture Mode DVD STOP Tune Menu Button DVD SETUP DVD PAUSE/STEP DVD FAST REVERSE DVD FAST FORWARD DVD MENU DVD NEXT DVD PREVIOUS DVD REPEAT DVD PLAY/ENTER DVD A-B REPEAT UP DVD Cursor Move button LEFT DVD SLOW RIGHT DVD ANGLE DOWN DVD SEARCH DVD PROGRAM DVD TITLE/PBC DVD SUBTITLE DVD CALL TELETEXT BUTTONS Exit Screen Display Fast...
User Manual
Page 8
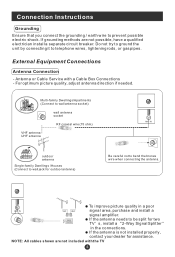
... bronze wire when connecting the antenna. NOTE: All cables shown are not possible, have a qualified electrician install a separate circuit breaker. Do not try to ground the unit by connecting it to prevent possible electric shock. External Equipment Connections Antenna Connection - To improve picture quality in the connections. If grounding methods are not included with a Cable Box Connections - For optimum picture quality, adjust antenna direction if needed. Connection Instructions Grounding Ensure that...
... bronze wire when connecting the antenna. NOTE: All cables shown are not possible, have a qualified electrician install a separate circuit breaker. Do not try to ground the unit by connecting it to prevent possible electric shock. External Equipment Connections Antenna Connection - To improve picture quality in the connections. If grounding methods are not included with a Cable Box Connections - For optimum picture quality, adjust antenna direction if needed. Connection Instructions Grounding Ensure that...
User Manual
Page 9
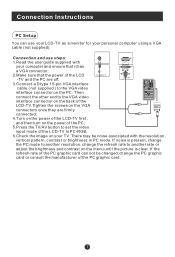
... ensure that it has a VGA connector; 2.Make sure that the power of the LCD VGA IN -TV and the PC are firmly connected; 4.Turn on the power of the LCD-TV first , and then turn on the power of the PC; 5.Press the TV/AV button to set the video input mode of the LCD-TV to PC-RGB; 6.Check the image on your personal computer using a VGA cable (not supplied).
... ensure that it has a VGA connector; 2.Make sure that the power of the LCD VGA IN -TV and the PC are firmly connected; 4.Turn on the power of the LCD-TV first , and then turn on the power of the PC; 5.Press the TV/AV button to set the video input mode of the LCD-TV to PC-RGB; 6.Check the image on your personal computer using a VGA cable (not supplied).

User Manual
Page 10
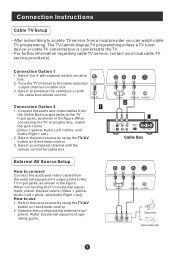
.... Connect the audio and video cables from VCR to the VCR owner s manual.) 3.Turn on the power of the AV device; 4.Press the TV/AV button to set the video input mode of the LCD-TV and the AV device are off; When connecting the TV to the same channel number. Connection Option 1 Set VCR output switch to 3 or 4 and then tune TV to VCR, match the jack colors (Video = yellow, Audio Left = white,and Audio Right = red). and then turn on...
.... Connect the audio and video cables from VCR to the VCR owner s manual.) 3.Turn on the power of the AV device; 4.Press the TV/AV button to set the video input mode of the LCD-TV and the AV device are off; When connecting the TV to the same channel number. Connection Option 1 Set VCR output switch to 3 or 4 and then tune TV to VCR, match the jack colors (Video = yellow, Audio Left = white,and Audio Right = red). and then turn on...
User Manual
Page 11
... cannot display TV programming unless a TV tuner device or cable TV converter box is connected to external equipment, match the jack colors (Video = yellow, Audio Left = white, and Audio Right = red). External AV Source Setup How to the same selected output channel on cable box. 2. Operate the corresponding external equi- pment. For further information regarding cable TV service, contact your desired channel with the cable box remote control. Select channels at the cable box or with the remote control for cable box. Select your local cable TV service provider(s). Select 3 or...
... cannot display TV programming unless a TV tuner device or cable TV converter box is connected to external equipment, match the jack colors (Video = yellow, Audio Left = white, and Audio Right = red). External AV Source Setup How to the same selected output channel on cable box. 2. Operate the corresponding external equi- pment. For further information regarding cable TV service, contact your desired channel with the cable box remote control. Select channels at the cable box or with the remote control for cable box. Select your local cable TV service provider(s). Select 3 or...
User Manual
Page 12
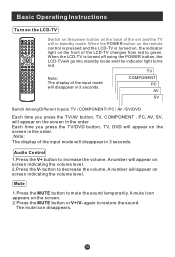
... the input mode will in standby mode. PREV NEXT D.MENU REPEAT A-B PLAY/ENTER SLOW ANGLE TITLE/PBC SEARCH PROGRAM SUBTITLE D.CALL EXIT PICTURE SOUND TIME FUNCTION Switch on the power button on screen indicating the volume level. 2.Press the V- again to decrease the volume. MENU V+ AUDIO P- When the POWER button on the remote control is pressed and the LCD-TV is turned off using the POWER button, the LCD-TVwill go into standby mode and the indicator light turns red. Each time you...
... the input mode will in standby mode. PREV NEXT D.MENU REPEAT A-B PLAY/ENTER SLOW ANGLE TITLE/PBC SEARCH PROGRAM SUBTITLE D.CALL EXIT PICTURE SOUND TIME FUNCTION Switch on the power button on screen indicating the volume level. 2.Press the V- again to decrease the volume. MENU V+ AUDIO P- When the POWER button on the remote control is pressed and the LCD-TV is turned off using the POWER button, the LCD-TVwill go into standby mode and the indicator light turns red. Each time you...
User Manual
Page 13
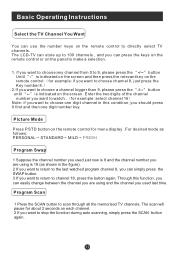
... MILD FRESH Program Swap 1 Suppose the channel number you used last time. The scan will pause for menu display . button until -- button Until - is 18 (as shown in this function, you can simply press the SWAP button. 3 If you want to return to stop the function during auto scanning, simply press the SCAN button again. Picture Mode Press P.STD button on the screen. Program Scan 1 Press the SCAN button to choose one digit number key.
... MILD FRESH Program Swap 1 Suppose the channel number you used last time. The scan will pause for menu display . button until -- button Until - is 18 (as shown in this function, you can simply press the SWAP button. 3 If you want to return to stop the function during auto scanning, simply press the SCAN button again. Picture Mode Press P.STD button on the screen. Program Scan 1 Press the SCAN button to choose one digit number key.
User Manual
Page 14
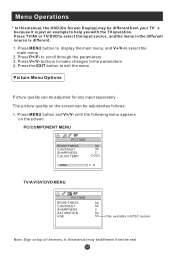
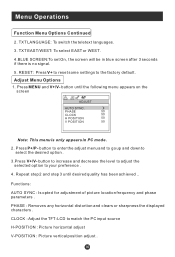
... the real Menu Operations * In this manual may be different from your TV s because it is different . 1. to select the main menu . 2. Press TV/AV or TV/DVD to help you with the TV operation. until the following menu appears on the screen can be adjusted as follows: 1. Press V+/V- buttons to make changes to exit the menu Picture Menu Options Picture quality can be adjusted for any input separately...
... the real Menu Operations * In this manual may be different from your TV s because it is different . 1. to select the main menu . 2. Press TV/AV or TV/DVD to help you with the TV operation. until the following menu appears on the screen can be adjusted as follows: 1. Press V+/V- buttons to make changes to exit the menu Picture Menu Options Picture quality can be adjusted for any input separately...
User Manual
Page 15
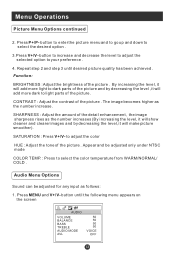
... the picture . to adjust the color HUE : Adjust the tone of the detail enhancement , the image sharpness rises as the number increase. button until desired picture quality has been achieved . Audio Menu Options Sound can be adjusted only under NTSC mode COLOR TEMP. : Press to light parts of the picture and by decreasing the level, it will make picture smoother). SHARPNESS : Adjust the amount of the picture . Press MENU and V+/V- Menu Operations Picture Menu Options...
... the picture . to adjust the color HUE : Adjust the tone of the detail enhancement , the image sharpness rises as the number increase. button until desired picture quality has been achieved . Audio Menu Options Sound can be adjusted only under NTSC mode COLOR TEMP. : Press to light parts of the picture and by decreasing the level, it will make picture smoother). SHARPNESS : Adjust the amount of the picture . Press MENU and V+/V- Menu Operations Picture Menu Options...
User Manual
Page 18
... screen ADJUST AUTO SYNC. RESET : Press V+ to reset some settings to select the desired option . 3.Press V+/V- button to enter the adjust menu and to go up and down to the factory default . button until desired quality has been achieved .. button to increase and decrease the level to adjust the selected option to match the PC input source H-POSITION : Picture horizontal adjust V-POSITION : Picture vertical position adjust . Press P+/P- Adjust Menu Options 1. CLOCK : Adjust the TFT-LCD...
... screen ADJUST AUTO SYNC. RESET : Press V+ to reset some settings to select the desired option . 3.Press V+/V- button to enter the adjust menu and to go up and down to the factory default . button until desired quality has been achieved .. button to increase and decrease the level to adjust the selected option to match the PC input source H-POSITION : Picture horizontal adjust V-POSITION : Picture vertical position adjust . Press P+/P- Adjust Menu Options 1. CLOCK : Adjust the TFT-LCD...
User Manual
Page 22
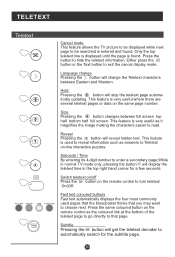
... for the subtitle page. Subcode / Time By entering its 4-digit number to hide the teletext information. Switch teletext on/off Press the button on -line interactive puzzles. PICTURE SOUND TIME FUNCTION Fast text coloured buttons Fast text automatically displays the four most commonly used to reveal information such as it magnifies the image making the characters easier to Teletext on the remote control to choose...
... for the subtitle page. Subcode / Time By entering its 4-digit number to hide the teletext information. Switch teletext on/off Press the button on -line interactive puzzles. PICTURE SOUND TIME FUNCTION Fast text coloured buttons Fast text automatically displays the four most commonly used to reveal information such as it magnifies the image making the characters easier to Teletext on the remote control to choose...

User Manual
Page 24
... enter program mode. The selected section A-B will display "SUBTITLE 01/XX XXXXX", "01" indicates the ordinal number of language; Each time the SLOW button is invalid for discs possessing this function. You can select up to select the item you can change the audio mode. Each displays the appropriate time information. SBUTITLE PROGRAM Press " SUBTILTLE ", the screen will be displayed on disc). When playing discs, press "PROGRAM" to select "START" . Press PLAY...
... enter program mode. The selected section A-B will display "SUBTITLE 01/XX XXXXX", "01" indicates the ordinal number of language; Each time the SLOW button is invalid for discs possessing this function. You can select up to select the item you can change the audio mode. Each displays the appropriate time information. SBUTITLE PROGRAM Press " SUBTILTLE ", the screen will be displayed on disc). When playing discs, press "PROGRAM" to select "START" . Press PLAY...

User Manual
Page 25
... you to the previous screen/menu. Use the UP and DOWN cursor buttons to move between pictures. Press PREVIOUS or NEXT to select the file and press PLAY/ENTER. Such function can be turned off on the GENERAL SETUP PAGE That reduces teachers' repetition work and good for reservation (information in disc can record pictures which formed by digital camera or scanner, which...
... you to the previous screen/menu. Use the UP and DOWN cursor buttons to move between pictures. Press PREVIOUS or NEXT to select the file and press PLAY/ENTER. Such function can be turned off on the GENERAL SETUP PAGE That reduces teachers' repetition work and good for reservation (information in disc can record pictures which formed by digital camera or scanner, which...
User Manual
Page 26
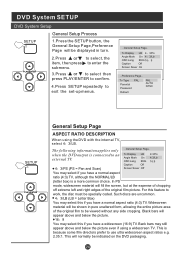
... uncommon. 4 3/LB (LB = Letter Box) You may still appear above and below the picture even if using the DVD with the internal TV, select 4 3/LB. ..General Setup Page.. bu to select then press PLAY/ENTER to confirm. 4.Press SETUP repeatedly to enter the submenu. 3.Press CH+o/r- Tv Type PAL Parental Password Default PAL AUTO NTSC SETUP PLAY/ENTER General Setup Page ASPECT RATIO DESCRIPTION When using a widescreen TV. Widescreen material...
... uncommon. 4 3/LB (LB = Letter Box) You may still appear above and below the picture even if using the DVD with the internal TV, select 4 3/LB. ..General Setup Page.. bu to select then press PLAY/ENTER to confirm. 4.Press SETUP repeatedly to enter the submenu. 3.Press CH+o/r- Tv Type PAL Parental Password Default PAL AUTO NTSC SETUP PLAY/ENTER General Setup Page ASPECT RATIO DESCRIPTION When using a widescreen TV. Widescreen material...
User Manual
Page 28
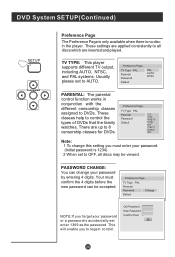
... accidentally set to control the types of DVDs that the family watches, There are inserted and played. TV Type PAL Parental Password Default Change NOTE:If you must confirm the 4 digits before the new password can change this setting you forget your password by entering 4 digits. TV Type PAL Parental Password Default PAL AUTO NTSC PARENTAL: The parental control function works in the player. Old Password New Password Confirm Pwd PASSWORD CHANGE: You can be viewed. TV TYPE: This player supports different TV output, including AUTO...
... accidentally set to control the types of DVDs that the family watches, There are inserted and played. TV Type PAL Parental Password Default Change NOTE:If you must confirm the 4 digits before the new password can change this setting you forget your password by entering 4 digits. TV Type PAL Parental Password Default PAL AUTO NTSC PARENTAL: The parental control function works in the player. Old Password New Password Confirm Pwd PASSWORD CHANGE: You can be viewed. TV TYPE: This player supports different TV output, including AUTO...
User Manual
Page 32
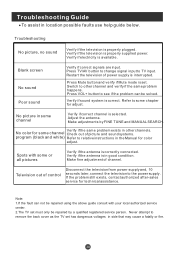
... the fault can be repaired by FINE TUNE and MANUAL SEARCH. Troubleshooting Guide To assist in good condition. Troubleshooting No picture, no sound Verify if the television is properly supplied power. Restart the television of channel. Press VOL+ button to the power supply. No color for color adjust. Switch to some or all pictures Verify if the antenna is correctly connected. Adjust the antenna. Verify if the antenna is selected. Make fine adjustment of power supply is available. Verify...
... the fault can be repaired by FINE TUNE and MANUAL SEARCH. Troubleshooting Guide To assist in good condition. Troubleshooting No picture, no sound Verify if the television is properly supplied power. Restart the television of channel. Press VOL+ button to the power supply. No color for color adjust. Switch to some or all pictures Verify if the antenna is correctly connected. Adjust the antenna. Verify if the antenna is selected. Make fine adjustment of power supply is available. Verify...
User Manual
Page 33
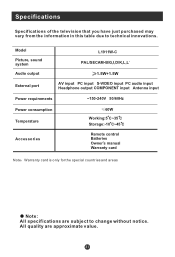
Model Picture, sound system Audio output L1911W-C PAL/SECAM-B/G,I,D/K,L,L 1.5W+1.5W External port AV input PC input S-VIDEO input PC audio input Headphone output COMPONENT input Antenna input Power requirements ~150-240V 50/60Hz Power consumption Temperature 60W Working:5 C~35 C Storage:-10 C~45 C Accessories Remote control Batteries Owner's manual Warranty card Note Warranty card is only for the special countries and areas Note: All specifications are approximate value. All quality are subject to technical innovations. Specifications Specifications of the television that you ...
Model Picture, sound system Audio output L1911W-C PAL/SECAM-B/G,I,D/K,L,L 1.5W+1.5W External port AV input PC input S-VIDEO input PC audio input Headphone output COMPONENT input Antenna input Power requirements ~150-240V 50/60Hz Power consumption Temperature 60W Working:5 C~35 C Storage:-10 C~45 C Accessories Remote control Batteries Owner's manual Warranty card Note Warranty card is only for the special countries and areas Note: All specifications are approximate value. All quality are subject to technical innovations. Specifications Specifications of the television that you ...


