Manual
Page 2
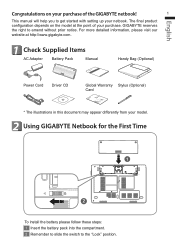
... the model at http://www.gigabyte.com. 1 Check Supplied Items AC Adapter Battery Pack Manual Handy Bag (Optional) Power Cord Driver CD Global Warranty Stylus (Optional) Card * The illustrations in this document may appear differently from your netbook. For more detailed information, ...please visit our website at the point of the GIGABYTE netbook! 1 This manual will help you to get started with setting up your model. 2 Using GIGABYTE Netbook for the First Time 1 2 To install ...
... the model at http://www.gigabyte.com. 1 Check Supplied Items AC Adapter Battery Pack Manual Handy Bag (Optional) Power Cord Driver CD Global Warranty Stylus (Optional) Card * The illustrations in this document may appear differently from your netbook. For more detailed information, ...please visit our website at the point of the GIGABYTE netbook! 1 This manual will help you to get started with setting up your model. 2 Using GIGABYTE Netbook for the First Time 1 2 To install ...
Manual
Page 3
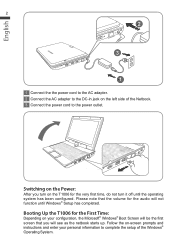
... configuration, the Microsoft® Windows® Boot Screen will be the first screen that the volume for the audio will see as the netbook starts up. Please note that you turn on the T1006 for the First Time: Depending on the left side of the Windows® Operating System. Booting Up the... T1006 for the very first time, do not turn it off until Windows® Setup has completed. English 2 2 3 1 1 Connect the the power cord to the AC ...
... configuration, the Microsoft® Windows® Boot Screen will be the first screen that the volume for the audio will see as the netbook starts up. Please note that you turn on the T1006 for the First Time: Depending on the left side of the Windows® Operating System. Booting Up the... T1006 for the very first time, do not turn it off until Windows® Setup has completed. English 2 2 3 1 1 Connect the the power cord to the AC ...
Manual
Page 4
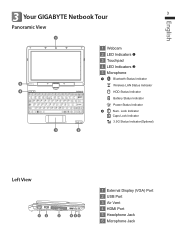
English 3 Your GIGABYTE Netbook Tour 3 Panoramic View 1 1 Webcam 2 LED Indicators 3 Touchpad 4 LED Indicators 5 Microphone Bluetooth Status Indicator 5 Wireless LAN Status Indicator 4 HDD Status Indicator Battery Status Indicator Power Status Indicator Num. Lock Indicator Caps Lock Indicator 3.5G Status Indicator(Optional) 3 2 Left View 12 3 4 56 1 External Display (VGA) Port 2 USB Port 3 Air Vent 4 HDMI Port 5 Headphone Jack 6 Microphone Jack
English 3 Your GIGABYTE Netbook Tour 3 Panoramic View 1 1 Webcam 2 LED Indicators 3 Touchpad 4 LED Indicators 5 Microphone Bluetooth Status Indicator 5 Wireless LAN Status Indicator 4 HDD Status Indicator Battery Status Indicator Power Status Indicator Num. Lock Indicator Caps Lock Indicator 3.5G Status Indicator(Optional) 3 2 Left View 12 3 4 56 1 External Display (VGA) Port 2 USB Port 3 Air Vent 4 HDMI Port 5 Headphone Jack 6 Microphone Jack
Manual
Page 8
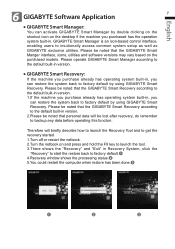
...Please be noted that the GIGABYTE Smart Recovery according to the default built-in version. 2.Please be noted that personal data will briefly describe how to launch the Recovery Tool and to get the recovery started. 1.Turn off or restart the netbook. 2.Turn the netbook on and press and ...default built-in version. 1.If the machine you purchase already has operating system built-in . Please operate GIGABYTE Smart Manager according to the default built-in version. ● GIGABYTE Smart Recovery: If the machine you purchase already has operating system built-in, you purchased has the operation...
...Please be noted that the GIGABYTE Smart Recovery according to the default built-in version. 2.Please be noted that personal data will briefly describe how to launch the Recovery Tool and to get the recovery started. 1.Turn off or restart the netbook. 2.Turn the netbook on and press and ...default built-in version. 1.If the machine you purchase already has operating system built-in . Please operate GIGABYTE Smart Manager according to the default built-in version. ● GIGABYTE Smart Recovery: If the machine you purchase already has operating system built-in, you purchased has the operation...


