Manual
Page 11
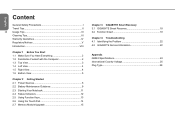
... Maintenance Guidance 9 2.3 Starting Your Notebook 11 2.4 Status Indicators 12 2.5 Using Function Keys 13 2.6 Using the Touch Pad 14 2.7 Memory Module Upgrade 15 Chapter 3 GIGABYTE Smart Recovery 3.1 GIGABYTE Smart Recovery 18 3.2 Function Smart 19 Chapter 4 Troubleshooting 4.1 Identifying the Problem 22 4.2 GIGABYTE Service Information 22 Appendix Q2542 Specifications 24 International Country Voltage 25 Plug Type 29
... Maintenance Guidance 9 2.3 Starting Your Notebook 11 2.4 Status Indicators 12 2.5 Using Function Keys 13 2.6 Using the Touch Pad 14 2.7 Memory Module Upgrade 15 Chapter 3 GIGABYTE Smart Recovery 3.1 GIGABYTE Smart Recovery 18 3.2 Function Smart 19 Chapter 4 Troubleshooting 4.1 Identifying the Problem 22 4.2 GIGABYTE Service Information 22 Appendix Q2542 Specifications 24 International Country Voltage 25 Plug Type 29
Manual
Page 22
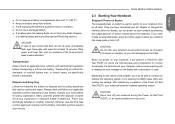
... sleep mode or turn off your notebook, it will perform a Power On Self Test (POST) to check the internal parts and confguration for at least 15 minutes, lifting upper and lower lids, until no evidence of eye contact with the power on or subject it off state. CAUTION Never turn it...
... sleep mode or turn off your notebook, it will perform a Power On Self Test (POST) to check the internal parts and confguration for at least 15 minutes, lifting upper and lower lids, until no evidence of eye contact with the power on or subject it off state. CAUTION Never turn it...

Manual
Page 26
... your notebook's memory capacity (up , with the connector slot in the compartment. Installing a Memory Module: The following steps describe how to increase system memory capacity. 15 You will hear a click when it is installed, you should leave it locks into the retaining clips on a clean work surface. (3) Loosen the five screws...
... your notebook's memory capacity (up , with the connector slot in the compartment. Installing a Memory Module: The following steps describe how to increase system memory capacity. 15 You will hear a click when it is installed, you should leave it locks into the retaining clips on a clean work surface. (3) Loosen the five screws...
Manual
Page 35
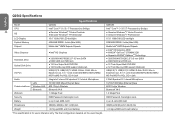
...'bought. Q2542 Specifications English Model CPU 24 OS LCD Display Specifications Q2542C Intel® Core™ i3 / i5 / i7 Processor(Ivy Bridge) ● Genuine Windows® 7 Home Premium ● Genuine Windows® 7 Professional 15.6" 1366x768 LED backlight Q2542N Intel ® Core™ i3 /... i5 / i7 Processor(Ivy Bridge) ● Genuine Windows® 7 Home Premium ● Genuine Windows® 7 Professional 15.6" 1366x768 LED backlight System Memory Chipset Video Graphics Hard Disk Drive Optical Disk Drive I/O Port 2GB/4GB DDRIII, 2 slots (Max 8GB) Mobile Intel...
...'bought. Q2542 Specifications English Model CPU 24 OS LCD Display Specifications Q2542C Intel® Core™ i3 / i5 / i7 Processor(Ivy Bridge) ● Genuine Windows® 7 Home Premium ● Genuine Windows® 7 Professional 15.6" 1366x768 LED backlight Q2542N Intel ® Core™ i3 /... i5 / i7 Processor(Ivy Bridge) ● Genuine Windows® 7 Home Premium ● Genuine Windows® 7 Professional 15.6" 1366x768 LED backlight System Memory Chipset Video Graphics Hard Disk Drive Optical Disk Drive I/O Port 2GB/4GB DDRIII, 2 slots (Max 8GB) Mobile Intel...
