Manual
Page 3
... is recommended by GIGABYTE or an authorized GIGABYTE Service Centre. ● Before connecting the notebook to the power outlet, make sure firstly that the notebook is recommended by the manufacturer. Incorrect installation of batteries may eventually render permanent damage to the notebook. ● Do note press or touch the display panel. ● Only use the AC Adapter that is provided with the notebook or that it is...
... is recommended by GIGABYTE or an authorized GIGABYTE Service Centre. ● Before connecting the notebook to the power outlet, make sure firstly that the notebook is recommended by the manufacturer. Incorrect installation of batteries may eventually render permanent damage to the notebook. ● Do note press or touch the display panel. ● Only use the AC Adapter that is provided with the notebook or that it is...
Manual
Page 4
... an explosion. Please follow the manufacturer's instructions recycling of notebook. ● Make sure there is a good carry case for the moisture to evaporate completely, before placing it on the conveyor. Q2542 SERIES USER'S MANUAL English ● Discard old worn out batteries according to your notebook until the last minute before attempting to switch on. ● When travelling from drops...
... an explosion. Please follow the manufacturer's instructions recycling of notebook. ● Make sure there is a good carry case for the moisture to evaporate completely, before placing it on the conveyor. Q2542 SERIES USER'S MANUAL English ● Discard old worn out batteries according to your notebook until the last minute before attempting to switch on. ● When travelling from drops...

Manual
Page 5
... clean. ● Take extra care to make sure that the notebook is switched off and disconnected from children, naked flames or a notebook that the cloth is removed. You must be damp but not dripping ...Notebook Cover: ● Use a microfiber or lint free soft cotton cloth and kitchen detergent (mix 5 parts water to 1 part detergent). LCD: ● It is best to use commercially available LCD cleaning kit. English Usage Tips ● When unplugging the power connector from side to side. ● Continue with this until the entire LCD surface has been cleaned. ● Wipe the display...
... clean. ● Take extra care to make sure that the notebook is switched off and disconnected from children, naked flames or a notebook that the cloth is removed. You must be damp but not dripping ...Notebook Cover: ● Use a microfiber or lint free soft cotton cloth and kitchen detergent (mix 5 parts water to 1 part detergent). LCD: ● It is best to use commercially available LCD cleaning kit. English Usage Tips ● When unplugging the power connector from side to side. ● Continue with this until the entire LCD surface has been cleaned. ● Wipe the display...

Manual
Page 6
...; In the event that a defect arises in materials or workmanship and proof is new or refurbished. Q2542 SERIES USER'S MANUAL English Warranty Limitations : The GIGABYTE Limited Warranty does not cover the following : (1) Unauthorized modifications, repairs or servicing (2) Misuse, abuse, neglect or failure to follow instructions in the user manual. (3) Improper assembly (4) Damages caused by transport due to improper packaging or mishandling...
...; In the event that a defect arises in materials or workmanship and proof is new or refurbished. Q2542 SERIES USER'S MANUAL English Warranty Limitations : The GIGABYTE Limited Warranty does not cover the following : (1) Unauthorized modifications, repairs or servicing (2) Misuse, abuse, neglect or failure to follow instructions in the user manual. (3) Improper assembly (4) Damages caused by transport due to improper packaging or mishandling...
Manual
Page 7
... operated in accordance with provided instructions and must be co-located or operating in low-voltage power supply systems for equipment with rate current up to use a battery that has been dropped, or that Q2542 meets the following technical standards: ● EN 55022 - End-users and installers must not be provide with a damaged battery in place, it is governs residential use...
... operated in accordance with provided instructions and must be co-located or operating in low-voltage power supply systems for equipment with rate current up to use a battery that has been dropped, or that Q2542 meets the following technical standards: ● EN 55022 - End-users and installers must not be provide with a damaged battery in place, it is governs residential use...
Manual
Page 11
... Yourself with the Computer 2 1.3 Top View 3 1.4 Left View 4 1.5 Right View 4 1.6 Bottom View 5 Chapter 2 Getting Started 2.1 Power Sources 8 2.2 Battery Maintenance Guidance 9 2.3 Starting Your Notebook 11 2.4 Status Indicators 12 2.5 Using Function Keys 13 2.6 Using the Touch Pad 14 2.7 Memory Module Upgrade 15 Chapter 3 GIGABYTE Smart Recovery 3.1 GIGABYTE Smart Recovery 18 3.2 Function Smart 19 Chapter 4 Troubleshooting 4.1 Identifying the Problem 22 4.2 GIGABYTE Service Information 22 Appendix Q2542 Specifications 24 International Country Voltage 25 Plug Type 29
... Yourself with the Computer 2 1.3 Top View 3 1.4 Left View 4 1.5 Right View 4 1.6 Bottom View 5 Chapter 2 Getting Started 2.1 Power Sources 8 2.2 Battery Maintenance Guidance 9 2.3 Starting Your Notebook 11 2.4 Status Indicators 12 2.5 Using Function Keys 13 2.6 Using the Touch Pad 14 2.7 Memory Module Upgrade 15 Chapter 3 GIGABYTE Smart Recovery 3.1 GIGABYTE Smart Recovery 18 3.2 Function Smart 19 Chapter 4 Troubleshooting 4.1 Identifying the Problem 22 4.2 GIGABYTE Service Information 22 Appendix Q2542 Specifications 24 International Country Voltage 25 Plug Type 29

Manual
Page 14
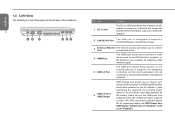
... volume(from left and right mouse button. 9 Status Indicator Lights The Status Indicator Lights correspond to specific operating modes. These modes are Power on / Suspend status, Battery / AC Adapter status, Hard Drive Activity(HDD), Wireless LAN activity, Caps Lock, and Num Lock. 10 Power On Button This button turns your notebook and flash compatible devices such as digital cameras, MP3 players, mobile phones, and PDAs. The memory card reader offers the fastest and most convenient method to any program capable of utilizing the microphone. 3 LCD Display The display panel...
... volume(from left and right mouse button. 9 Status Indicator Lights The Status Indicator Lights correspond to specific operating modes. These modes are Power on / Suspend status, Battery / AC Adapter status, Hard Drive Activity(HDD), Wireless LAN activity, Caps Lock, and Num Lock. 10 Power On Button This button turns your notebook and flash compatible devices such as digital cameras, MP3 players, mobile phones, and PDAs. The memory card reader offers the fastest and most convenient method to any program capable of utilizing the microphone. 3 LCD Display The display panel...
Manual
Page 15
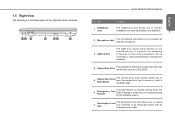
... to connect Port an external monitor. 4 HDMI Port The HDMI port allows you to connect a video device such as an HD television, projector, or HD display to your computer for subsequent laptop use.(BIOS Setup item USB Charger default value is "Disabled", need set the USB ports stop supplying when the remaining battery capacity is under 10%~90% and ensure sufficient battery life for outputing a high definition signal. 5 USB 3.0 Port The USB port allows many devices to run simultaneously. It supports hot...
... to connect Port an external monitor. 4 HDMI Port The HDMI port allows you to connect a video device such as an HD television, projector, or HD display to your computer for subsequent laptop use.(BIOS Setup item USB Charger default value is "Disabled", need set the USB ports stop supplying when the remaining battery capacity is under 10%~90% and ensure sufficient battery life for outputing a high definition signal. 5 USB 3.0 Port The USB port allows many devices to run simultaneously. It supports hot...
Manual
Page 16
... English It supports hot-swapping of the notebook. 12 3 4 56 7 Q2542 SERIES USER'S MANUAL NO. Item 1 Headphone Jack Function The headphone jack allows you to connect headphones or external speakers and amplifiers. 5 2 Microphone Jack The microphone jack allows you to connect an external microphone. 3 USB 2.0 Port The USB port allows many devices to run simultaneously. 1.5 Right View The following is being accessed by the operating system. 7 Kensington Slot Lock The Kensington lock slot allows your notebook to an immovable optional security cable.
... English It supports hot-swapping of the notebook. 12 3 4 56 7 Q2542 SERIES USER'S MANUAL NO. Item 1 Headphone Jack Function The headphone jack allows you to connect headphones or external speakers and amplifiers. 5 2 Microphone Jack The microphone jack allows you to connect an external microphone. 3 USB 2.0 Port The USB port allows many devices to run simultaneously. 1.5 Right View The following is being accessed by the operating system. 7 Kensington Slot Lock The Kensington lock slot allows your notebook to an immovable optional security cable.

Manual
Page 19
... power jack of your notebook PC as well as charging the battery. ● Connecting the AC Adapter: 1. Connect the AC adapter to battery power. CAUTION: The Lithium-Ion battery does not ship with the Q2542 is recommended that you have at least one charged battery installed. 2. Plug the DC output cable into an AC electrical outlet. ● Switching from DC power to the DC power port of power sources: a Lithium-Ion battery...
... power jack of your notebook PC as well as charging the battery. ● Connecting the AC Adapter: 1. Connect the AC adapter to battery power. CAUTION: The Lithium-Ion battery does not ship with the Q2542 is recommended that you have at least one charged battery installed. 2. Plug the DC output cable into an AC electrical outlet. ● Switching from DC power to the DC power port of power sources: a Lithium-Ion battery...
Manual
Page 20
... through below about two to three years or300 to external power using the power adapter. NOTE: Do not leave the battery pack discharged. The battery pack will gradually lose their use and handling. Lithium-Ion rechargeable batteries require routine maintenance and care in storage. Q2542 SERIES USER'S MANUAL ● Rechargeable Lithium-Ion batteries have to charge in P10. There is high possibility of causing short...
... through below about two to three years or300 to external power using the power adapter. NOTE: Do not leave the battery pack discharged. The battery pack will gradually lose their use and handling. Lithium-Ion rechargeable batteries require routine maintenance and care in storage. Q2542 SERIES USER'S MANUAL ● Rechargeable Lithium-Ion batteries have to charge in P10. There is high possibility of causing short...
Manual
Page 22
... section ). Q2542 SERIES USER'S MANUAL 2.3 Starting Your Notebook English Suspend / Power on Button The suspend/power on switch is found, your notebook from children. ● Avoid exposing the battery to place the notebook into sleep mode or turn off . Once you have connected your notebook during the Power On Self Test (POST), or an unrecoverable error may , in a battery collection container. After satisfactory completion of the problem, you risk damaging the hard disk.
... section ). Q2542 SERIES USER'S MANUAL 2.3 Starting Your Notebook English Suspend / Power on Button The suspend/power on switch is found, your notebook from children. ● Avoid exposing the battery to place the notebook into sleep mode or turn off . Once you have connected your notebook during the Power On Self Test (POST), or an unrecoverable error may , in a battery collection container. After satisfactory completion of the problem, you risk damaging the hard disk.

Manual
Page 23
... is no battery activity, the power adapters are : Power on , and flashes when the computer Indicator is in ten-key numeric keypad mode. Do not switch off . • Batteries subjected to shocks, vibrations or extreme temperatures can be permanently damaged. 3 Hard Disk Drive (HDD) Activity Indicator The Hard Disk Drive (HDD) activity indicator tells you whether your computer is connected to a Bluetooth/wireless network or not. 5 The Caps Lock This indicator tells you whether your internal hard drive is being accessed and, if...
... is no battery activity, the power adapters are : Power on , and flashes when the computer Indicator is in ten-key numeric keypad mode. Do not switch off . • Batteries subjected to shocks, vibrations or extreme temperatures can be permanently damaged. 3 Hard Disk Drive (HDD) Activity Indicator The Hard Disk Drive (HDD) activity indicator tells you whether your computer is connected to a Bluetooth/wireless network or not. 5 The Caps Lock This indicator tells you whether your internal hard drive is being accessed and, if...
Manual
Page 24
... order, are: built-in display panel only -> external monitor only -> both built-in Suspend mode. The functions assigned to active mode. ● [FN+F2]: Enables or disables the wireless network connection. ● [FN+F3]: Enables or disables bluetooth connection. ● [FN+F4]: Toggles the notebook among various power management modes. Pressing the Power button returns it to these keys differ for the notebook and is always used in conjunction with another key. ● [FN+F1]: Places the notebook in display panel...
... order, are: built-in display panel only -> external monitor only -> both built-in Suspend mode. The functions assigned to active mode. ● [FN+F2]: Enables or disables the wireless network connection. ● [FN+F3]: Enables or disables bluetooth connection. ● [FN+F4]: Toggles the notebook among various power management modes. Pressing the Power button returns it to these keys differ for the notebook and is always used in conjunction with another key. ● [FN+F1]: Places the notebook in display panel...

Manual
Page 26
...). Q2542 SERIES USER'S MANUAL English CAUTION: The memory upgrade module is properly in place. (8) Replace the cover and screws that you want to install a memory upgrade module. Once it locks into the retaining clips on a clean work surface. (3) Loosen the five screws securing the compartment cover. (4) Lift up and remove the compartment cover. We do this yourself. (1) Turn off power to 8 GB maximum), additional memory modules may be installed. The memory upgrade module can be...
...). Q2542 SERIES USER'S MANUAL English CAUTION: The memory upgrade module is properly in place. (8) Replace the cover and screws that you want to install a memory upgrade module. Once it locks into the retaining clips on a clean work surface. (3) Loosen the five screws securing the compartment cover. (4) Lift up and remove the compartment cover. We do this yourself. (1) Turn off power to 8 GB maximum), additional memory modules may be installed. The memory upgrade module can be...
Manual
Page 29
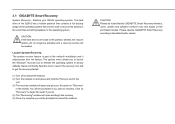
... Recovery according to factory defaults. The options menu allows you the option to recovery. CAUTION: Please be noted that contains a full backup image of the netbook installation and it is removed or the partition deleted, the recover options will no longer be available and a recovery service will be used to recover the system in the event that something happens to reboot the netbook. 3.1 GIGABYTE Smart Recovery System Recovery - CAUTION: If the hard drive...
... Recovery according to factory defaults. The options menu allows you the option to recovery. CAUTION: Please be noted that contains a full backup image of the netbook installation and it is removed or the partition deleted, the recover options will no longer be available and a recovery service will be used to recover the system in the event that something happens to reboot the netbook. 3.1 GIGABYTE Smart Recovery System Recovery - CAUTION: If the hard drive...

Manual
Page 30
... "2.5 Using Function Keys" section. You will launch advanced features of FunctionSmart. 3.2 Function Smart Function Smart menu provides intuitive interface that users can easily activate the functions by pressing hot keys. (1) Pressing the "Fn" key once will be a few modes of each feature presented on the screen. After selecting the function you backup your important data with just a few options, including Outdoor Contrast, Visual Desktop, Instant Backup, Windows® Switch, Screen Zoom...
... "2.5 Using Function Keys" section. You will launch advanced features of FunctionSmart. 3.2 Function Smart Function Smart menu provides intuitive interface that users can easily activate the functions by pressing hot keys. (1) Pressing the "Fn" key once will be a few modes of each feature presented on the screen. After selecting the function you backup your important data with just a few options, including Outdoor Contrast, Visual Desktop, Instant Backup, Windows® Switch, Screen Zoom...
Manual
Page 32
English Q2542 SERIES USER'S MANUAL 21 Chapter 4 Troubleshooting This section will briefly cover some frequently encountered problems and questions and provide a quick guide to the supplier directly for assistance. Should you encounter a problem that is not yet or differently listed, please consult the GIGABYTE website or call the supplier of www.gigabyte.com for telephonic assistance please call your unit or take the...
English Q2542 SERIES USER'S MANUAL 21 Chapter 4 Troubleshooting This section will briefly cover some frequently encountered problems and questions and provide a quick guide to the supplier directly for assistance. Should you encounter a problem that is not yet or differently listed, please consult the GIGABYTE website or call the supplier of www.gigabyte.com for telephonic assistance please call your unit or take the...
Manual
Page 33
... or disassembly is prohibited. 4.2 GIGABYTE Service Information More service information please link to few problems in properly. You can solve by replacing the device. However, you may encoun-ter simple setup or operating problems that you can also remove the card from the slot, thus eliminating it has been off at least 10 seconds before pursuing complex troubleshooting: (1) Turn off your notebook. (2) Make sure the AC adapter is...
... or disassembly is prohibited. 4.2 GIGABYTE Service Information More service information please link to few problems in properly. You can solve by replacing the device. However, you may encoun-ter simple setup or operating problems that you can also remove the card from the slot, thus eliminating it has been off at least 10 seconds before pursuing complex troubleshooting: (1) Turn off your notebook. (2) Make sure the AC adapter is...
Manual
Page 35
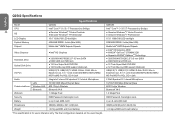
... ODD support (Optional) USB(2.0)*2, USB(3.0)*2, HDMI, D-Sub, RJ45, Mic-in, Earphone-out, 6-in-1 card reader(SD/SDHC/SDXC/MMC/ MS Pro/MS Pro HG), DC-in jack Audio Integrate 2 stereo 2W speakers*2, Internal Microphone 2 Watt Speakers*2, Internal Microphone Communications Webcam LAN Wireless LAN Bluetooth 10/100/1000 Mbps Ethernet Base 802.11b/g/n Wireless Bluetooth V4.0 1.3 Mega Pixel 10/100/1000 Mbps Ethernet Base 802.11b/g/n Wireless Bluetooth V4.0 1.3 Mega Pixel Security HDD Password, Kensington Lock HDD Password, Kensington Lock Battery Li...
... ODD support (Optional) USB(2.0)*2, USB(3.0)*2, HDMI, D-Sub, RJ45, Mic-in, Earphone-out, 6-in-1 card reader(SD/SDHC/SDXC/MMC/ MS Pro/MS Pro HG), DC-in jack Audio Integrate 2 stereo 2W speakers*2, Internal Microphone 2 Watt Speakers*2, Internal Microphone Communications Webcam LAN Wireless LAN Bluetooth 10/100/1000 Mbps Ethernet Base 802.11b/g/n Wireless Bluetooth V4.0 1.3 Mega Pixel 10/100/1000 Mbps Ethernet Base 802.11b/g/n Wireless Bluetooth V4.0 1.3 Mega Pixel Security HDD Password, Kensington Lock HDD Password, Kensington Lock Battery Li...


