
Manual
Page 1
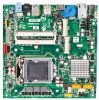
MSH61PI LGA1155 socket motherboard for Intel® Core™ i3 / Core™ i5 Core™ i7 processors/ Intel® Pentium® series processors User's Manual Rev. 1001
MSH61PI LGA1155 socket motherboard for Intel® Core™ i3 / Core™ i5 Core™ i7 processors/ Intel® Pentium® series processors User's Manual Rev. 1001
Manual
Page 2
...: For quick set-up of this manual are legally registered to the specifications and features in this manual may be reproduced, copied, translated, transmitted, or published in this manual is the property of this manual may be made by copyright laws and is protected by GIGABYTE without GIGABYTE's prior written permission. All rights reserved. The...
...: For quick set-up of this manual are legally registered to the specifications and features in this manual may be reproduced, copied, translated, transmitted, or published in this manual is the property of this manual may be made by copyright laws and is protected by GIGABYTE without GIGABYTE's prior written permission. All rights reserved. The...

Manual
Page 7
MSH61PI LGA1155 socket motherboard for Intel® Core™ i3 / Core™ i5 Core™ i7 processors/ Intel® Pentium® series processors User's Manual Rev. 1001
MSH61PI LGA1155 socket motherboard for Intel® Core™ i3 / Core™ i5 Core™ i7 processors/ Intel® Pentium® series processors User's Manual Rev. 1001

Manual
Page 8
...Disclaimer Information in any form or by copyright laws and is the property of this manual may be reproduced, copied, translated, transmitted, or published in this product, GIGABYTE provides the following types of documentations: For quick set-up of the ... product information, carefully read the User's Manual. For product-related information, check on our website at: http://www.gigabyte.com Documentation Classifications In order to the specifications and features in this manual may be made by GIGABYTE without GIGABYTE's prior written permission. Copyright © ...
...Disclaimer Information in any form or by copyright laws and is the property of this manual may be reproduced, copied, translated, transmitted, or published in this product, GIGABYTE provides the following types of documentations: For quick set-up of the ... product information, carefully read the User's Manual. For product-related information, check on our website at: http://www.gigabyte.com Documentation Classifications In order to the specifications and features in this manual may be made by GIGABYTE without GIGABYTE's prior written permission. Copyright © ...
Manual
Page 13
Prior to installation, carefully read the user's manual and follow these procedures: • Prior to installation, do not remove or break motherboard S/N (Serial Number) sticker or warranty sticker provided by unplugging the power ...
Prior to installation, carefully read the user's manual and follow these procedures: • Prior to installation, do not remove or break motherboard S/N (Serial Number) sticker or warranty sticker provided by unplugging the power ...

Manual
Page 17
... the CPU fan header (CPU_FAN) on installing the cooler.) Step 5: After the installation, check the back of the CPU cooler to your CPU cooler installation manual for removing the cooler, and the opposite direction is complete. Push down each push pin. Step 6: Finally, attach the power connector of the motherboard. Step...
... the CPU fan header (CPU_FAN) on installing the cooler.) Step 5: After the installation, check the back of the CPU cooler to your CPU cooler installation manual for removing the cooler, and the opposite direction is complete. Push down each push pin. Step 6: Finally, attach the power connector of the motherboard. Step...
Manual
Page 30
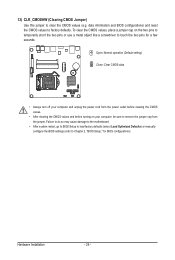
... do so may cause damage to the motherboard. • After system restart, go to BIOS Setup to load factory defaults (select Load Optimized Defaults) or manually configure the BIOS settings (refer to clear the CMOS values (e.g. date information and BIOS configurations) and reset the CMOS values to remove the jumper cap...
... do so may cause damage to the motherboard. • After system restart, go to BIOS Setup to load factory defaults (select Load Optimized Defaults) or manually configure the BIOS settings (refer to clear the CMOS values (e.g. date information and BIOS configurations) and reset the CMOS values to remove the jumper cap...
Manual
Page 47
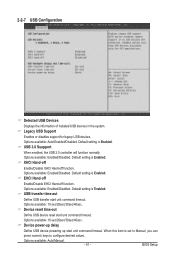
.... Default setting is Enabled. Legacy USB Support Enables or disables support for legacy USB devices. Options available: Auto/Manual. - 41 - Options available: Enabled/Disabled. When this item is Enabled. Default setting is set to Manual, you can press numeric keys to configure desired values. 2-2-7 USB Configuration Detected USB Devices Displays the information...
.... Default setting is Enabled. Legacy USB Support Enables or disables support for legacy USB devices. Options available: Auto/Manual. - 41 - Options available: Enabled/Disabled. When this item is Enabled. Default setting is set to Manual, you can press numeric keys to configure desired values. 2-2-7 USB Configuration Detected USB Devices Displays the information...


