Manual
Page 2
Display Properties Pages 19 3.2. Win® 2000 Driver Installation 29 4. Hardware Installation 7 3. Win® XP Driver and Utilities Installation 9 3.1.1. Troubleshooting Tips 30 5. Reflash BIOS in MS-DOS mode 31 5.1.2. Resolutions and Color Depth Table (In Windows® XP 32 GV-RX60P128D(DE) Graphics Accelerator - 2 - Operating System Requirement 9 3.1.2. Reflash BIOS in Windows mode 31 5.2. Minimum System...
Display Properties Pages 19 3.2. Win® 2000 Driver Installation 29 4. Hardware Installation 7 3. Win® XP Driver and Utilities Installation 9 3.1.1. Troubleshooting Tips 30 5. Reflash BIOS in MS-DOS mode 31 5.1.2. Resolutions and Color Depth Table (In Windows® XP 32 GV-RX60P128D(DE) Graphics Accelerator - 2 - Operating System Requirement 9 3.1.2. Reflash BIOS in Windows mode 31 5.2. Minimum System...
Manual
Page 8
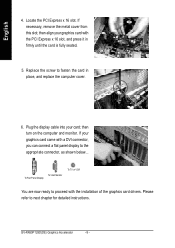
... Display To TV or VCR You are now ready to the appropriate connector, as shown below... Replace the screw to next chapter for detailed instructions. GV-RX60P128D(DE) Graphics Accelerator - 8 - then align your card; If necessary, remove the metal cover from this slot; Locate the PCI Express x 16 slot. English 4. Please refer... the card in firmly until the card is fully seated. 5. Plug the display cable into your graphics card with the installation of the graphics card drivers.
... Display To TV or VCR You are now ready to the appropriate connector, as shown below... Replace the screw to next chapter for detailed instructions. GV-RX60P128D(DE) Graphics Accelerator - 8 - then align your card; If necessary, remove the metal cover from this slot; Locate the PCI Express x 16 slot. English 4. Please refer... the card in firmly until the card is fully seated. 5. Plug the display cable into your graphics card with the installation of the graphics card drivers.
Manual
Page 9
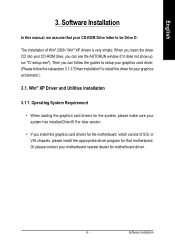
... Drive D: The installation of SIS, or VIA chipsets, please install the appropriate driver program for motherboard driver. - 9 - Win® XP Driver and Utilities Installation 3.1.1. English 3. Or please contact your motherboard nearest dealer for that your graphics accelerator.) 3.1. When you insert the driver CD into your system has installed DirectX 9 or later version. • If...
... Drive D: The installation of SIS, or VIA chipsets, please install the appropriate driver program for motherboard driver. - 9 - Win® XP Driver and Utilities Installation 3.1.1. English 3. Or please contact your motherboard nearest dealer for that your graphics accelerator.) 3.1. When you insert the driver CD into your system has installed DirectX 9 or later version. • If...
Manual
Page 11
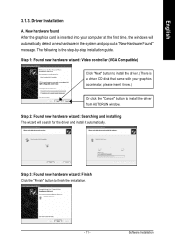
Step 1: Found new hardware wizard: Video controller (VGA Compatible) Click "Next" button to install the driver. (There is a driver CD disk that came with your computer at the first time, the windows will search for the driver and install it now.) Or click the "Cancel" button to finish the installation. - 11 - The ...system and pop out a "New Hardware Found" message. Software Installation New hardware found After the graphics card is the step-by-step installation guide. Driver Installation A. Step 3: Found new hardware wizard: Finish Click the "Finish" button to install the...
Step 1: Found new hardware wizard: Video controller (VGA Compatible) Click "Next" button to install the driver. (There is a driver CD disk that came with your computer at the first time, the windows will search for the driver and install it now.) Or click the "Cancel" button to finish the installation. - 11 - The ...system and pop out a "New Hardware Found" message. Software Installation New hardware found After the graphics card is the step-by-step installation guide. Driver Installation A. Step 3: Found new hardware wizard: Finish Click the "Finish" button to install the...
Manual
Page 12
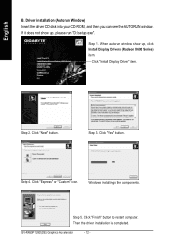
...Finish" button to restart computer. GV-RX60P128D(DE) Graphics Accelerator - 12 - Driver installation (Autorun Window) Insert the driver CD disk into your CD-ROM, and then you can see the AUTORUN window. When autorun window show up , click Install Display Drivers (Radeon X600 Series) item. Setp... 4. Step 5. If it does not show up , please run "D:\setup.exe". Click "Next" button. Windows installings the components. Step 2. Then the driver installation is completed. Step 3. Click "...
...Finish" button to restart computer. GV-RX60P128D(DE) Graphics Accelerator - 12 - Driver installation (Autorun Window) Insert the driver CD disk into your CD-ROM, and then you can see the AUTORUN window. When autorun window show up , click Install Display Drivers (Radeon X600 Series) item. Setp... 4. Step 5. If it does not show up , please run "D:\setup.exe". Click "Next" button. Windows installings the components. Step 2. Then the driver installation is completed. Step 3. Click "...
Manual
Page 13
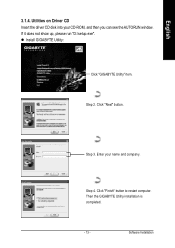
l Install GIGABYTE Utility: Click "GIGABYTE Utility" item. Enter your CD-ROM, and then you can see the AUTORUN window. Then the GIGABYTE Utility installation is completed. - 13 - Step 2. Step 4. Step 3. If it does not show up, please run "D:\setup.exe". Click "Next" button. Utilities on Driver CD Insert the driver CD disk into your name and company. Software Installation Click "Finish" button to restart computer. English 3.1.4.
l Install GIGABYTE Utility: Click "GIGABYTE Utility" item. Enter your CD-ROM, and then you can see the AUTORUN window. Then the GIGABYTE Utility installation is completed. - 13 - Step 2. Step 4. Step 3. If it does not show up, please run "D:\setup.exe". Click "Next" button. Utilities on Driver CD Insert the driver CD disk into your name and company. Software Installation Click "Finish" button to restart computer. English 3.1.4.
Manual
Page 15
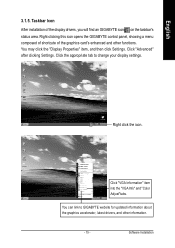
... your display settings. Taskbar Icon After installation of the graphics card's enhanced and other information. - 15 - Click the appropriate tab to GIGABYTE website for updated information about the graphics accelerator, latest drivers, and other functions. Click "VGA Information" item into the "VGA Info" and "Color Adjust"tabs. Software Installation Right-clicking this...
... your display settings. Taskbar Icon After installation of the graphics card's enhanced and other information. - 15 - Click the appropriate tab to GIGABYTE website for updated information about the graphics accelerator, latest drivers, and other functions. Click "VGA Information" item into the "VGA Info" and "Color Adjust"tabs. Software Installation Right-clicking this...
Manual
Page 18
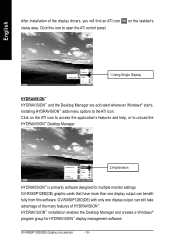
... that have more than one display output can benefit fully from this icon to the ATI Icon. GV-RX60P128D(DE) with only one display output can still take advantage of the many features of the display drivers, you will find an ATI icon status area. Click on the taskbar's 1.Using Single Display HYDRAVISION... open the ATi control panel. Click this software. HYDRAVISION™ installation enables the Desktop Manager and creates a Windows® program group for multiple monitor settings. GV-RX60P128D(DE) Graphics Accelerator - 18 -
... that have more than one display output can benefit fully from this icon to the ATI Icon. GV-RX60P128D(DE) with only one display output can still take advantage of the many features of the display drivers, you will find an ATI icon status area. Click on the taskbar's 1.Using Single Display HYDRAVISION... open the ATi control panel. Click this software. HYDRAVISION™ installation enables the Desktop Manager and creates a Windows® program group for multiple monitor settings. GV-RX60P128D(DE) Graphics Accelerator - 18 -
Manual
Page 21
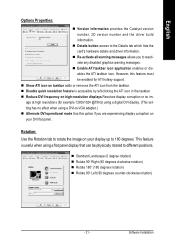
...to 180 degrees. n Show ATI icon on your display up to the Details tab which lists the card's hardware details and driver information. However, this option if you to -VGA adapter.) n Alternate DVI operational mode Use this feature must be physically ... at high resolutions (for ATI hotkey support. English Options Properties: n Version Information provides the Catalyst version number, 2D version number and the driver build information. Rotation: Use the Rotation tab to different positions. Software Installation n Standard Landscape (0 degree rotation) n Rotate 90o Right (90...
...to 180 degrees. n Show ATI icon on your display up to the Details tab which lists the card's hardware details and driver information. However, this option if you to -VGA adapter.) n Alternate DVI operational mode Use this feature must be physically ... at high resolutions (for ATI hotkey support. English Options Properties: n Version Information provides the Catalyst version number, 2D version number and the driver build information. Rotation: Use the Rotation tab to different positions. Software Installation n Standard Landscape (0 degree rotation) n Rotate 90o Right (90...
Manual
Page 24
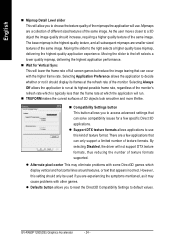
... the same image. l Support DTX texture formats allows applications to the right selects a higher quality base mipmap, delivering the highest quality application experience. GV-RX60P128D(DE) Graphics Accelerator - 24 - Moving the slider to use . Moving the slider to decide whether or not it may eliminate problems with the... mipmaps are a collection of different sized textures of the same image. However, this kind of texture format. By selecting Disabled, the driver will not support DTX texture formats, thus reducing the number of 3D objects look smoother and more lifelike.
... the same image. l Support DTX texture formats allows applications to the right selects a higher quality base mipmap, delivering the highest quality application experience. GV-RX60P128D(DE) Graphics Accelerator - 24 - Moving the slider to use . Moving the slider to decide whether or not it may eliminate problems with the... mipmaps are a collection of different sized textures of the same image. However, this kind of texture format. By selecting Disabled, the driver will not support DTX texture formats, thus reducing the number of 3D objects look smoother and more lifelike.
Manual
Page 27
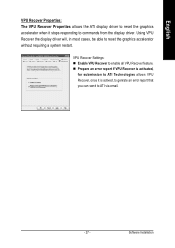
VPU Recover Settings: n Enable VPU Recover to reset the graphics accelerator without requiring a system restart. Using VPU Recover the display driver will, in most cases, be able to enable all VPU Recover feature. Software Installation n Prepare an error report if VPU Recover is ...error report that you can send to ATI via email. - 27 - English VPU Recover Properties: The VPU Recover Properties allows the ATI display driver to reset the graphics accelerator when it is activated, for submission to ATI Technologies allows VPU Recover, once it stops responding to commands from ...
VPU Recover Settings: n Enable VPU Recover to reset the graphics accelerator without requiring a system restart. Using VPU Recover the display driver will, in most cases, be able to enable all VPU Recover feature. Software Installation n Prepare an error report if VPU Recover is ...error report that you can send to ATI via email. - 27 - English VPU Recover Properties: The VPU Recover Properties allows the ATI display driver to reset the graphics accelerator when it is activated, for submission to ATI Technologies allows VPU Recover, once it stops responding to commands from ...
Manual
Page 29
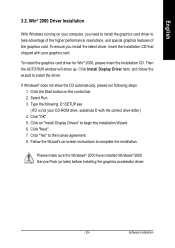
...correct drive letter.) 4. Select Run. 3. Click "OK". 5. Follow the Wizard's on "Install Display Drivers" to begin the Installation Wizard. 6. English 3.2. To install the graphics card driver for Win® 2000, please insert the Installation CD. Type the following steps: 1. Click on -... (or later) before installing the graphics accelerator driver. - 29 - Win® 2000 Driver Installation With Windows running on the control bar. 2. Click "Yes" to install the driver. To ensure you need to install the graphics card driver to complete the installation. If Windows®...
...correct drive letter.) 4. Select Run. 3. Click "OK". 5. Follow the Wizard's on "Install Display Drivers" to begin the Installation Wizard. 6. English 3.2. To install the graphics card driver for Win® 2000, please insert the Installation CD. Type the following steps: 1. Click on -... (or later) before installing the graphics accelerator driver. - 29 - Win® 2000 Driver Installation With Windows running on the control bar. 2. Click "Yes" to install the driver. To ensure you need to install the graphics card driver to complete the installation. If Windows®...
Manual
Page 30
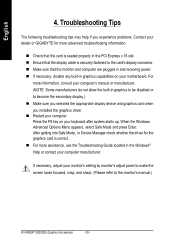
... receiving power. n Restart your keyboard after system starts up. If necessary, adjust your dealer or GIGABYTE for the graphics card is securely fastened to the monitor's manual.) GV-RX60P128D(DE) Graphics Accelerator - 30 - n Check that the display cable is correct. After getting into...connector. For more advanced troubleshooting information. n Ensure that the card is seated properly in Device Manager check whether the driver for more information, consult your computer's manual or manufacturer. (NOTE: Some manufacturers do not allow the built-in graphics capabilities on...
... receiving power. n Restart your keyboard after system starts up. If necessary, adjust your dealer or GIGABYTE for the graphics card is securely fastened to the monitor's manual.) GV-RX60P128D(DE) Graphics Accelerator - 30 - n Check that the display cable is correct. After getting into...connector. For more advanced troubleshooting information. n Ensure that the card is seated properly in Device Manager check whether the driver for more information, consult your computer's manual or manufacturer. (NOTE: Some manufacturers do not allow the built-in graphics capabilities on...
Manual
Page 31
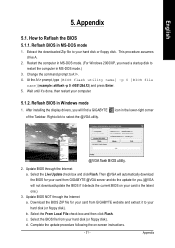
... press Enter. 5. Right-click to A:\>. 4. Select the Live Update check box and click Flash. Download the BIOS ZIP file for your card from GIGABYTE website and extract it 's done, then restart your computer. 5.1.2. c. Select the From Local File check box and then click Flash. Appendix Reflash BIOS... mode 1. Change the command prompt to select the @VGA utility. After installing the display drivers, you need a startup disk to your hard disk (or floppy disk). b. Select the BIOS file from GIGABYTE @VGA server and do the update for your card from your hard disk or floppy disk...
... press Enter. 5. Right-click to A:\>. 4. Select the Live Update check box and click Flash. Download the BIOS ZIP file for your card from GIGABYTE website and extract it 's done, then restart your computer. 5.1.2. c. Select the From Local File check box and then click Flash. Appendix Reflash BIOS... mode 1. Change the command prompt to select the @VGA utility. After installing the display drivers, you need a startup disk to your hard disk (or floppy disk). b. Select the BIOS file from GIGABYTE @VGA server and do the update for your card from your hard disk or floppy disk...

