Manual
Page 1
GV-RX60P128D(DE) Radeon X600 Pro Graphics Accelerator User's Manual Rev. 103 12MD-RX60P128D-103 Copyright © 2004 GIGABYTE TECHNOLOGY CO., LTD Copyright by GIGA-BYTE TECHNOLOGY CO., LTD. ("GBT"). The author assumes no responsibility for any errors or omissions that may be out of date before publication of their respective owners. Trademarks Third-party brands and names are the property of this document nor does the author make a commitment...
GV-RX60P128D(DE) Radeon X600 Pro Graphics Accelerator User's Manual Rev. 103 12MD-RX60P128D-103 Copyright © 2004 GIGABYTE TECHNOLOGY CO., LTD Copyright by GIGA-BYTE TECHNOLOGY CO., LTD. ("GBT"). The author assumes no responsibility for any errors or omissions that may be out of date before publication of their respective owners. Trademarks Third-party brands and names are the property of this document nor does the author make a commitment...
Manual
Page 2
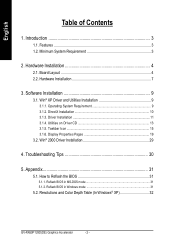
... 3.1.6. Win® 2000 Driver Installation 29 4. Reflash BIOS in MS-DOS mode 31 5.1.2. Hardware Installation 7 3. Resolutions and Color Depth Table (In Windows® XP 32 GV-RX60P128D(DE) Graphics Accelerator - 2 - Software Installation 9 3.1. DirectX Installation 10 3.1.3. Display Properties Pages 19 3.2. Appendix 31 5.1. Reflash BIOS in Windows mode 31 5.2. Features 3 1.2. Hardware Installation 4 2.1. Troubleshooting Tips 30 5. English Table of Contents 1. Board Layout 4 2.2. Win® XP Driver and Utilities Installation 9 3.1.1. Operating...
... 3.1.6. Win® 2000 Driver Installation 29 4. Reflash BIOS in MS-DOS mode 31 5.1.2. Hardware Installation 7 3. Resolutions and Color Depth Table (In Windows® XP 32 GV-RX60P128D(DE) Graphics Accelerator - 2 - Software Installation 9 3.1. DirectX Installation 10 3.1.3. Display Properties Pages 19 3.2. Appendix 31 5.1. Reflash BIOS in Windows mode 31 5.2. Features 3 1.2. Hardware Installation 4 2.1. Troubleshooting Tips 30 5. English Table of Contents 1. Board Layout 4 2.2. Win® XP Driver and Utilities Installation 9 3.1.1. Operating...
Manual
Page 4
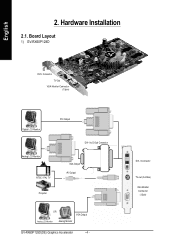
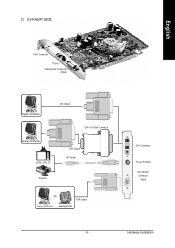
Hardware Installation 2.1. DVI-I to D-Sub Connector Analog LCD Monitor NTSC / PAL TV VGA Output AV Output Projector OR VGA Output Analog LCD Monitor Analog Monitor GV-RX60P128D(DE) Graphics Accelerator - 4 - English 2. Board Layout 1) GV-RX60P128D DVI-I Connector TV-Out VGA Monitor Connector (15pin) Digital LCD Monitor DVI Output DVI-I Connector TV-out (S-Video) VGA Monitor Connector (15pin)
Hardware Installation 2.1. DVI-I to D-Sub Connector Analog LCD Monitor NTSC / PAL TV VGA Output AV Output Projector OR VGA Output Analog LCD Monitor Analog Monitor GV-RX60P128D(DE) Graphics Accelerator - 4 - English 2. Board Layout 1) GV-RX60P128D DVI-I Connector TV-Out VGA Monitor Connector (15pin) Digital LCD Monitor DVI Output DVI-I Connector TV-out (S-Video) VGA Monitor Connector (15pin)
Manual
Page 5
Hardware Installation 2) GV-RX60P128DE English DVI-I Connector TV-Out VGA Monitor Connector (15pin) Digital LCD Monitor DVI Output DVI-I to D-Sub Connector Analog LCD Monitor NTSC / PAL TV VGA Output AV Output Projector OR VGA Output Analog LCD Monitor Analog Monitor DVI-I Connector TV-out (S-Video) VGA Monitor Connector (15pin) - 5 -
Hardware Installation 2) GV-RX60P128DE English DVI-I Connector TV-Out VGA Monitor Connector (15pin) Digital LCD Monitor DVI Output DVI-I to D-Sub Connector Analog LCD Monitor NTSC / PAL TV VGA Output AV Output Projector OR VGA Output Analog LCD Monitor Analog Monitor DVI-I Connector TV-out (S-Video) VGA Monitor Connector (15pin) - 5 -
Manual
Page 7
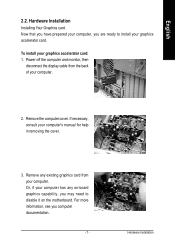
... your computer. Power off the computer and monitor, then disconnect the display cable from your computer, you may need to disable it on -board graphics capability, you are ready to install your computer. 2. If necessary, consult your graphics accelerator card: 1. Or, if your computer has any existing graphics card from the back of your graphics accelerator card. Hardware Installation Installing Your Graphics card. Remove any on the motherboard. English 2.2. To install your computer's manual for help...
... your computer. Power off the computer and monitor, then disconnect the display cable from your computer, you may need to disable it on -board graphics capability, you are ready to install your computer. 2. If necessary, consult your graphics accelerator card: 1. Or, if your computer has any existing graphics card from the back of your graphics accelerator card. Hardware Installation Installing Your Graphics card. Remove any on the motherboard. English 2.2. To install your computer's manual for help...
Manual
Page 8
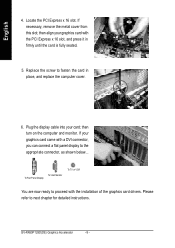
... now ready to proceed with a DVI connector, you can connect a flat panel display to the appropriate connector, as shown below... GV-RX60P128D(DE) Graphics Accelerator - 8 - If necessary, remove the metal cover from this slot; Please refer to fasten the card in firmly until the card is fully seated. 5. Locate the PCI Express x 16 slot. Replace the screw to next chapter for detailed instructions. Plug the display cable into your graphics card...
... now ready to proceed with a DVI connector, you can connect a flat panel display to the appropriate connector, as shown below... GV-RX60P128D(DE) Graphics Accelerator - 8 - If necessary, remove the metal cover from this slot; Please refer to fasten the card in firmly until the card is fully seated. 5. Locate the PCI Express x 16 slot. Replace the screw to next chapter for detailed instructions. Plug the display cable into your graphics card...
Manual
Page 9
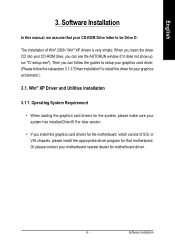
... see the AUTORUN window (if it does not show up, run "D:\setup.exe"). Win® XP Driver and Utilities Installation 3.1.1. Software Installation Software Installation In this manual, we assume that motherboard. Or please contact your system has installed DirectX 9 or later version. • If you can follow the guides to setup your graphics card driver. (Please follow the subsection 3.1.3 "Driver installation" to install the driver for your CD-ROM Drive letter to be Drive D: The installation of SIS...
... see the AUTORUN window (if it does not show up, run "D:\setup.exe"). Win® XP Driver and Utilities Installation 3.1.1. Software Installation Software Installation In this manual, we assume that motherboard. Or please contact your system has installed DirectX 9 or later version. • If you can follow the guides to setup your graphics card driver. (Please follow the subsection 3.1.3 "Driver installation" to install the driver for your CD-ROM Drive letter to be Drive D: The installation of SIS...
Manual
Page 11
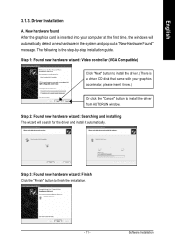
... and pop out a "New Hardware Found" message. English 3.1.3. The following is a driver CD disk that came with your computer at the first time, the windows will search for the driver and install it now.) Or click the "Cancel" button to finish the installation. - 11 - Step 1: Found new hardware wizard: Video controller (VGA Compatible) Click "Next" button to install the driver. (There is the step-by-step installation guide. Driver Installation A.
... and pop out a "New Hardware Found" message. English 3.1.3. The following is a driver CD disk that came with your computer at the first time, the windows will search for the driver and install it now.) Or click the "Cancel" button to finish the installation. - 11 - Step 1: Found new hardware wizard: Video controller (VGA Compatible) Click "Next" button to install the driver. (There is the step-by-step installation guide. Driver Installation A.
Manual
Page 12
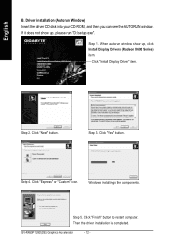
Step 3. Driver installation (Autorun Window) Insert the driver CD disk into your CD-ROM, and then you can see the AUTORUN window. Click "Next" button. Click "Finish" button to restart computer. When autorun window show up , click Install Display Drivers (Radeon X600 Series) item. Click "Express" or "Custom" icon. Then the driver installation is completed. Click "Install Display Driver" item. Windows installings the components. Step 1. GV-RX60P128D(DE) Graphics Accelerator - 12 - Setp 4. Step 2. If it...
Step 3. Driver installation (Autorun Window) Insert the driver CD disk into your CD-ROM, and then you can see the AUTORUN window. Click "Next" button. Click "Finish" button to restart computer. When autorun window show up , click Install Display Drivers (Radeon X600 Series) item. Click "Express" or "Custom" icon. Then the driver installation is completed. Click "Install Display Driver" item. Windows installings the components. Step 1. GV-RX60P128D(DE) Graphics Accelerator - 12 - Setp 4. Step 2. If it...
Manual
Page 15
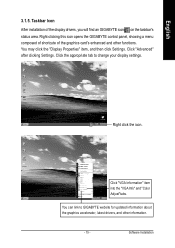
..." after clicking Settings. Software Installation Right click the icon. Click "VGA Information" item into the "VGA Info" and "Color Adjust"tabs. You can link to change your display settings. Right-clicking this icon opens the GIGABYTE control panel, showing a menu composed of shortcute of the display drivers, you will find an GIGABYTE icon on the taskbar's status area. Taskbar Icon After installation of the graphics card's enhanced and other...
..." after clicking Settings. Software Installation Right click the icon. Click "VGA Information" item into the "VGA Info" and "Color Adjust"tabs. You can link to change your display settings. Right-clicking this icon opens the GIGABYTE control panel, showing a menu composed of shortcute of the display drivers, you will find an GIGABYTE icon on the taskbar's status area. Taskbar Icon After installation of the graphics card's enhanced and other...
Manual
Page 18
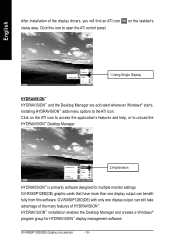
...™ display management software. Installing HYDRAVISION™ adds menu options to open the ATi control panel. GV-RX60P128D(DE) with only one display output can still take advantage of the many features of the display drivers, you will find an ATI icon status area. HYDRAVISION™ installation enables the Desktop Manager and creates a Windows® program group for multiple monitor settings. GV-RX60P128D(DE) graphic cards that have more than one display output can...
...™ display management software. Installing HYDRAVISION™ adds menu options to open the ATi control panel. GV-RX60P128D(DE) with only one display output can still take advantage of the many features of the display drivers, you will find an ATI icon status area. HYDRAVISION™ installation enables the Desktop Manager and creates a Windows® program group for multiple monitor settings. GV-RX60P128D(DE) graphic cards that have more than one display output can...
Manual
Page 19
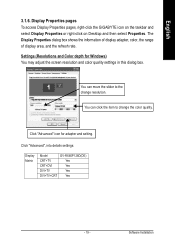
... select Display Properties or right-click on Desktop and then select Properties. The Display Properties dialog box shows the information of display adapter, color, the range of display area, and the refresh rate. English 3.1.6. Settings (Resolutions and Color depth for adapter and setting. Click "Advanced", into details settings: Display Matrix Model CRT+TV CRT+DVI DVI+TV DVI+TV+CRT GV-RX60P128D(DE) Yes Yes Yes Yes - 19 - Click "Advanced" icon for Windows) You may adjust the screen resolution and color quality settings in...
... select Display Properties or right-click on Desktop and then select Properties. The Display Properties dialog box shows the information of display adapter, color, the range of display area, and the refresh rate. English 3.1.6. Settings (Resolutions and Color depth for adapter and setting. Click "Advanced", into details settings: Display Matrix Model CRT+TV CRT+DVI DVI+TV DVI+TV+CRT GV-RX60P128D(DE) Yes Yes Yes Yes - 19 - Click "Advanced" icon for Windows) You may adjust the screen resolution and color quality settings in...
Manual
Page 20
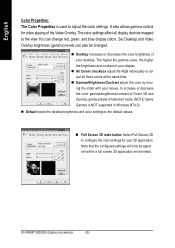
English Color Properties: The Color Properties is NOT supported in fullscreen mode. (NOTE: Game Gamma is used to configure the color settings for video playing of Direct 3D and OpenGL games played in Windows NT4.0) n Default resets the desktop brightness and color settings to the view.You can also be appar ent within a full screen 3D application environment. n Full Screen 3D radio button Select Full Screen 3D to adjust the color settings. n Desktop increases or...
English Color Properties: The Color Properties is NOT supported in fullscreen mode. (NOTE: Game Gamma is used to configure the color settings for video playing of Direct 3D and OpenGL games played in Windows NT4.0) n Default resets the desktop brightness and color settings to the view.You can also be appar ent within a full screen 3D application environment. n Full Screen 3D radio button Select Full Screen 3D to adjust the color settings. n Desktop increases or...
Manual
Page 21
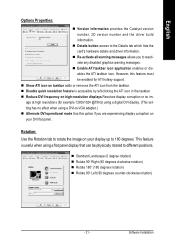
... Properties: n Version Information provides the Catalyst version number, 2D version number and the driver build information. However, this option if you to different positions. n Disable quick resolution feature is useful when using a digital DVI display. (This setting has no im- n Re-activate all warning messages allows you are experiencing display corruption on your DVI flat panel. n Reduce DVI frequency on taskbar adds or removes the ATI icon from the taskbar. n Enable...
... Properties: n Version Information provides the Catalyst version number, 2D version number and the driver build information. However, this option if you to different positions. n Disable quick resolution feature is useful when using a digital DVI display. (This setting has no im- n Re-activate all warning messages allows you are experiencing display corruption on your DVI flat panel. n Reduce DVI frequency on taskbar adds or removes the ATI icon from the taskbar. n Enable...
Manual
Page 24
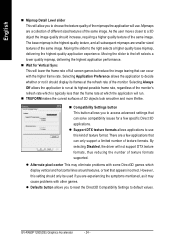
... refresh rate of the monitor's refresh rate which is the highest quality texture, and all subsequent mipmaps are a few specific Direct 3D applications. n Compatibility Settings button This button allows you to default values. However, this kind of the mipmaps the application will use this setting should display its highest possible frame rate, regardless of the monitor. n Wait for a few applications that can only support a limited number...
... refresh rate of the monitor's refresh rate which is the highest quality texture, and all subsequent mipmaps are a few specific Direct 3D applications. n Compatibility Settings button This button allows you to default values. However, this kind of the mipmaps the application will use this setting should display its highest possible frame rate, regardless of the monitor. n Wait for a few applications that can only support a limited number...

Manual
Page 26
... advanced settings that can solve compatibility issues for Vertical Sync This will lower the frame rate of full screen games but reduce the image tearing that can occur with the higher frame rate. As the user moves closer to a 3D object the image quality should display its frames at the refresh rate of the monitor's refresh rate which the application will run. l Triple Buffering Enabling...
... advanced settings that can solve compatibility issues for Vertical Sync This will lower the frame rate of full screen games but reduce the image tearing that can occur with the higher frame rate. As the user moves closer to a 3D object the image quality should display its frames at the refresh rate of the monitor's refresh rate which the application will run. l Triple Buffering Enabling...
Manual
Page 28
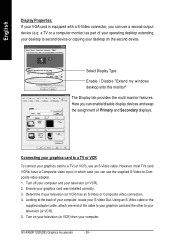
...) have a Composite video input, in which case you can use an S-Video cable. Turn off your computer and your television (or VCR) has an S-Video or Composite video connection. 4. Determine if your television (or VCR). 2. Select Display Type Enable / Disable "Extend my windows desktop onto this monitor" The Display tab provides the multi monitor features. English Display Properties: If your graphics card was installed correctly. 3. Ensure your VGA card is equipped with a S-Video connector, you can enable/disable display devices...
...) have a Composite video input, in which case you can use an S-Video cable. Turn off your computer and your television (or VCR) has an S-Video or Composite video connection. 4. Determine if your television (or VCR). 2. Select Display Type Enable / Disable "Extend my windows desktop onto this monitor" The Display tab provides the multi monitor features. English Display Properties: If your graphics card was installed correctly. 3. Ensure your VGA card is equipped with a S-Video connector, you can enable/disable display devices...
Manual
Page 29
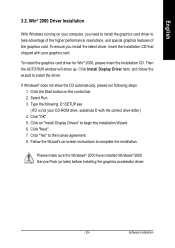
... the CD automatically, please run following : D:\SETUP.exe (If D is not your CD-ROM drive, substitute D with your computer, you install the latest driver, insert the Installation CD that shipped with the correct drive letter.) 4. Click "Next". 7. Software Installation Click "OK". 5. To install the graphics card driver for Win® 2000, please insert the Installation CD. Win® 2000 Driver Installation With Windows running on the control bar. 2. Type the following...
... the CD automatically, please run following : D:\SETUP.exe (If D is not your CD-ROM drive, substitute D with your computer, you install the latest driver, insert the Installation CD that shipped with the correct drive letter.) 4. Click "Next". 7. Software Installation Click "OK". 5. To install the graphics card driver for Win® 2000, please insert the Installation CD. Win® 2000 Driver Installation With Windows running on the control bar. 2. Type the following...
Manual
Page 30
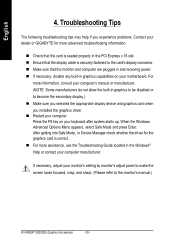
... the built-in the Windows® Help or contact your computer. n For more assistance, use the Troubleshooting Guide located in graphics to be disabled or to become the secondary display.) n Make sure you selected the appropriate display device and graphics card when you experience problems. Contact your dealer or GIGABYTE for the graphics card is securely fastened to the monitor's manual.) GV-RX60P128D(DE) Graphics Accelerator - 30 - For more advanced...
... the built-in the Windows® Help or contact your computer. n For more assistance, use the Troubleshooting Guide located in graphics to be disabled or to become the secondary display.) n Make sure you selected the appropriate display device and graphics card when you experience problems. Contact your dealer or GIGABYTE for the graphics card is securely fastened to the monitor's manual.) GV-RX60P128D(DE) Graphics Accelerator - 30 - For more advanced...
Manual
Page 31
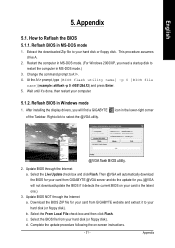
... [BIOS flash utility name] -p 0 [BIOS file name](example: atiflash -p 0 r955128d.f2) and press Enter. 5. After installing the display drivers, you .(@VGA will find a GIGABYTE of the Taskbar. Update BIOS through the Internet a. Reflash BIOS in MS-DOS mode.) 3. Appendix How to your card is the latest one.) 3. This procedure assumes drive A. 2. Download the BIOS ZIP file for you will not download/update the BIOS if it detects the current BIOS on -screen instructions...
... [BIOS flash utility name] -p 0 [BIOS file name](example: atiflash -p 0 r955128d.f2) and press Enter. 5. After installing the display drivers, you .(@VGA will find a GIGABYTE of the Taskbar. Update BIOS through the Internet a. Reflash BIOS in MS-DOS mode.) 3. Appendix How to your card is the latest one.) 3. This procedure assumes drive A. 2. Download the BIOS ZIP file for you will not download/update the BIOS if it detects the current BIOS on -screen instructions...


