

Manual
Page 1
...-ready system and configure it for complex and time-consuming configurations. Step 2: Install the RAID driver and operating system The X.H.D utility supports Windows 7/Vista/XP. B. Exits the X.H.D utility: Click Cancel to exit the X.H.D utility. (Note 1) The X.H.D utility only supports the SATA...X.H.D, make sure the new drive is added. Or you have to load the SATA controller driver first. eXtreme Hard Drive (X.H.D) With GIGABYTE eXtreme Hard Drive (X.H.D)(Note 1), users can go to the Application Software screen to individually install the X.H.D utility later. For a RAID...
...-ready system and configure it for complex and time-consuming configurations. Step 2: Install the RAID driver and operating system The X.H.D utility supports Windows 7/Vista/XP. B. Exits the X.H.D utility: Click Cancel to exit the X.H.D utility. (Note 1) The X.H.D utility only supports the SATA...X.H.D, make sure the new drive is added. Or you have to load the SATA controller driver first. eXtreme Hard Drive (X.H.D) With GIGABYTE eXtreme Hard Drive (X.H.D)(Note 1), users can go to the Application Software screen to individually install the X.H.D utility later. For a RAID...
Manual
Page 12
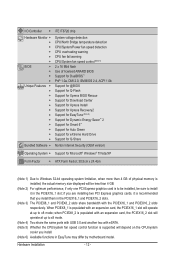
... eXtreme Hard Drive Support for Q-Share Norton Internet Security (OEM version) Operating System w Support for Microsoft® Windows® 7/Vista/XP Form Factor w ATX Form Factor; 30.5cm x 24.4cm (Note 1) Due to Windows 32-bit operating system limitation, when more than 4 GB of physical memory is installed, the actual memory size...
... eXtreme Hard Drive Support for Q-Share Norton Internet Security (OEM version) Operating System w Support for Microsoft® Windows® 7/Vista/XP Form Factor w ATX Form Factor; 30.5cm x 24.4cm (Note 1) Due to Windows 32-bit operating system limitation, when more than 4 GB of physical memory is installed, the actual memory size...
Manual
Page 19
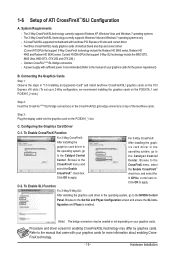
...™ check box, and select the 3 GPUs combination. System Requirements - The 2-Way CrossFireX/SLItechnology currently supports Windows XP, Windows Vista, and Windows 7 operating systems - Click OK to the NVIDIA Control Panel. figuration and Physx is recommended (Refer to the Set...Configuring the Graphics Card Driver C-1. Browse to the Catalyst Control Center. The 3-Way CrossFireX/SLI technology currectly supports Windows Vista and Windows 7 operating systems only - Current NVIDIA GPUs that support 3-Way CrossFireX technology include the Radeon HD 3800 series, ...
...™ check box, and select the 3 GPUs combination. System Requirements - The 2-Way CrossFireX/SLItechnology currently supports Windows XP, Windows Vista, and Windows 7 operating systems - Click OK to the NVIDIA Control Panel. figuration and Physx is recommended (Refer to the Set...Configuring the Graphics Card Driver C-1. Browse to the Catalyst Control Center. The 3-Way CrossFireX/SLI technology currectly supports Windows Vista and Windows 7 operating systems only - Current NVIDIA GPUs that support 3-Way CrossFireX technology include the Radeon HD 3800 series, ...
Manual
Page 35
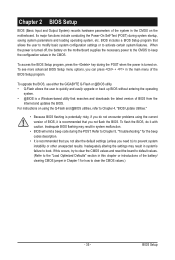
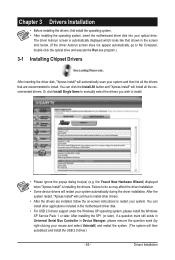
... see more advanced BIOS Setup menu options, you need to) to keep the configuration values in the CMOS. To upgrade the BIOS, use either the GIGABYTE Q-Flash or @BIOS utility. • Q-Flash allows the user to activate certain system features. If this occurs, try to clear the CMOS values... modify basic system configuration settings or to quickly and easily upgrade or back up BIOS without entering the operating system. • @BIOS is a Windows-based utility that you not alter the default settings (unless you can press + in the main menu of the BIOS Setup program. Inadequately altering ...
... see more advanced BIOS Setup menu options, you need to) to keep the configuration values in the CMOS. To upgrade the BIOS, use either the GIGABYTE Q-Flash or @BIOS utility. • Q-Flash allows the user to activate certain system features. If this occurs, try to clear the CMOS values... modify basic system configuration settings or to quickly and easily upgrade or back up BIOS without entering the operating system. • @BIOS is a Windows-based utility that you not alter the default settings (unless you can press + in the main menu of the BIOS Setup program. Inadequately altering ...

Manual
Page 52
... ad- PCI Sets the PCI graphics card as the first display. (Default) PCIE x16-1 Sets the PCI Express graphics card on the PCIEX8_1 slot as Windows NT4.0. (Default: Disabled) No-Execute Memory Protect (Note) Enables or disables Intel Execute Disable Bit function. porting software and system. (Default: Enabled) Delay For HDD... Express graphics card on the PCIEX16_2 slot as the first display. (Note) This item is present only if you to determine whether to Enabled for Windows XP operating system; Limit CPUID Max. If the system BIOS is from this item to display the...
... ad- PCI Sets the PCI graphics card as the first display. (Default) PCIE x16-1 Sets the PCI Express graphics card on the PCIEX8_1 slot as Windows NT4.0. (Default: Disabled) No-Execute Memory Protect (Note) Enables or disables Intel Execute Disable Bit function. porting software and system. (Default: Enabled) Delay For HDD... Express graphics card on the PCIEX16_2 slot as the first display. (Note) This item is present only if you to determine whether to Enabled for Windows XP operating system; Limit CPUID Max. If the system BIOS is from this item to display the...
Manual
Page 55
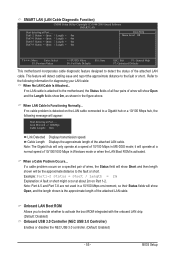
... NEC USB 3.0 controller. (Default: Enabled) - 55 - Link Detected --> 100Mbps Cable Length= 30m Link Detected Displays transmission speed. Note: Part 4-5 and Part 7-8 are not used in Windows mode or when the LAN Boot ROM is detected on the LAN cable connected to the fault or short. If a cable problem occurs on a specified...
... NEC USB 3.0 controller. (Default: Enabled) - 55 - Link Detected --> 100Mbps Cable Length= 30m Link Detected Displays transmission speed. Note: Part 4-5 and Part 7-8 are not used in Windows mode or when the LAN Boot ROM is detected on the LAN cable connected to the fault or short. If a cable problem occurs on a specified...

Manual
Page 57
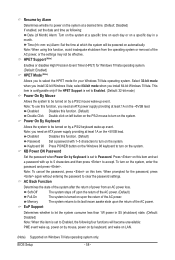
... system can be awakened from an ACPI sleep state by a wake-up signal from a modem that supports wake-up function. (Default: Enabled) (Note) Supported on Windows 7/Vista operating system only. - 57 -
... system can be awakened from an ACPI sleep state by a wake-up signal from a modem that supports wake-up function. (Default: Enabled) (Note) Supported on Windows 7/Vista operating system only. - 57 -
Manual
Page 58
...(Default) Password Set a password with up event. Memory The system returns to turn on the system. Note: When using this function, you install 64-bit Windows 7/Vista. KB Power ON Password Set the password when Power On by keyboard, and wake on LAN. (Note) Supported on a specific day in S5 ...removal of the AC power. select 64-bit mode when you need an ATX power supply providing at a specific time on each day or on Windows 7/Vista operating system only. Note: To use this function, avoid inadequate shutdown from an AC power loss. Disabled Disables this item. Keyboard 98 ...
...(Default) Password Set a password with up event. Memory The system returns to turn on the system. Note: When using this function, you install 64-bit Windows 7/Vista. KB Power ON Password Set the password when Power On by keyboard, and wake on LAN. (Note) Supported on a specific day in S5 ...removal of the AC power. select 64-bit mode when you need an ATX power supply providing at a specific time on each day or on Windows 7/Vista operating system only. Note: To use this function, avoid inadequate shutdown from an AC power loss. Disabled Disables this item. Keyboard 98 ...
Manual
Page 65
...), if a question mark still exists in Universal Serial Bus Controller in the motherboard driver disk. • For USB 2.0 driver support under the Windows XP operating system, please install the Windows XP Service Pack 1 or later. You can click the Install All button and "Xpress Install" will then autodetect and install the USB...
...), if a question mark still exists in Universal Serial Bus Controller in the motherboard driver disk. • For USB 2.0 driver support under the Windows XP operating system, please install the Windows XP Service Pack 1 or later. You can click the Install All button and "Xpress Install" will then autodetect and install the USB...
Manual
Page 69
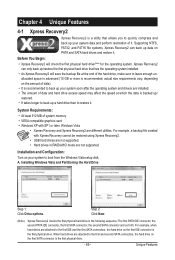
... of data and hard drive access speed may affect the speed at the end of system memory • VESA compatible graphics card • Windows XP with Xpress Recovery cannot be restored using Xpress Recovery2. • USB hard drives are not supported. • Hard drives in RAID/... connector, the second SATA connector and so forth. actual size requirements vary, depending on PATA and SATA hard drives and restore it . Installing Windows Vista and Partitioning the Hard Drive Step 1: Click Drive options. Supporting NTFS, FAT32, and FAT16 file systems, Xpress Recovery2 can only back up...
... of data and hard drive access speed may affect the speed at the end of system memory • VESA compatible graphics card • Windows XP with Xpress Recovery cannot be restored using Xpress Recovery2. • USB hard drives are not supported. • Hard drives in RAID/... connector, the second SATA connector and so forth. actual size requirements vary, depending on PATA and SATA hard drives and restore it . Installing Windows Vista and Partitioning the Hard Drive Step 1: Click Drive options. Supporting NTFS, FAT32, and FAT16 file systems, Xpress Recovery2 can only back up...
Manual
Page 72
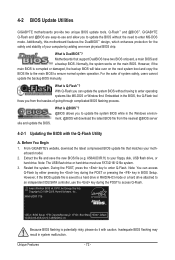
...-2009, Award Software, Inc. GIGABYTE Q-Flash and @BIOS are easy-to-use and allow you to update the system BIOS while in RAID/AHCI mode or a hard drive attached to access Q-Flash. X58AUD3R.f1) to ensure normal system operation. X58A-UD3R F1d . . . . :... BIOS Setup : XpressRecovery2 : Boot Menu : Qflash 12/23/2009-X58-ICH10-7A89QG0KC-00 Because BIOS flashing is saved to a hard drive in the Windows environment. @BIOS will take over on the main BIOS. For the sake of going through complicated BIOS flashing process. site and update the BIOS. From GIGABYTE...
...-2009, Award Software, Inc. GIGABYTE Q-Flash and @BIOS are easy-to-use and allow you to update the system BIOS while in RAID/AHCI mode or a hard drive attached to access Q-Flash. X58AUD3R.f1) to ensure normal system operation. X58A-UD3R F1d . . . . :... BIOS Setup : XpressRecovery2 : Boot Menu : Qflash 12/23/2009-X58-ICH10-7A89QG0KC-00 Because BIOS flashing is saved to a hard drive in the Windows environment. @BIOS will take over on the main BIOS. For the sake of going through complicated BIOS flashing process. site and update the BIOS. From GIGABYTE...
Manual
Page 75
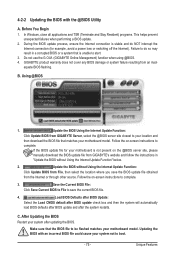
...GIGABYTE Online Management) function when using @BIOS. 4. C. Update the BIOS Using the Internet Update Function: Click Update BIOS from an inadequate BIOS flashing. Follow the on -screen instructions to do NOT interrupt the Internet connection (for your motherboard model. After Updating the BIOS Restart your system after the system restarts. In Windows... the BIOS file that matches your motherboard is unable to save the BIOS update file obtained from GIGABYTE's website and follow the instructions in a corrupted BIOS or a system that the BIOS file to...
...GIGABYTE Online Management) function when using @BIOS. 4. C. Update the BIOS Using the Internet Update Function: Click Update BIOS from an inadequate BIOS flashing. Follow the on -screen instructions to do NOT interrupt the Internet connection (for your motherboard model. After Updating the BIOS Restart your system after the system restarts. In Windows... the BIOS file that matches your motherboard is unable to save the BIOS update file obtained from GIGABYTE's website and follow the instructions in a corrupted BIOS or a system that the BIOS file to...

Manual
Page 76
4-3 EasyTune 6 GIGABYTE's EasyTune 6 is not supported. Available functions in damage to monitor hardware temperature, voltage and fan speed and set . The user-friendly EasyTune 6 interface also includes ... Boost mode provides you fully know each function of CPU frequency/base clock to choose to achieve desired system performance. (Note) After making changes in Windows environment. Incorrectly doing overclock/overvoltage may result in EasyTune 6 may occur. The Memory tab provides information on the installed CPU and motherboard. The HW Monitor...
4-3 EasyTune 6 GIGABYTE's EasyTune 6 is not supported. Available functions in damage to monitor hardware temperature, voltage and fan speed and set . The user-friendly EasyTune 6 interface also includes ... Boost mode provides you fully know each function of CPU frequency/base clock to choose to achieve desired system performance. (Note) After making changes in Windows environment. Incorrectly doing overclock/overvoltage may result in EasyTune 6 may occur. The Memory tab provides information on the installed CPU and motherboard. The HW Monitor...

Manual
Page 81
... the time bar on the screen are read-only so you wish to copy and click the Copy button. It stores the recorded data in Windows Vista. Instructions for saving backups (Note 4) • The hard drive must have more than 1 GB of capacity. • Each partition can accommodate up records of...
... the time bar on the screen are read-only so you wish to copy and click the Copy button. It stores the recorded data in Windows Vista. Instructions for saving backups (Note 4) • The hard drive must have more than 1 GB of capacity. • Each partition can accommodate up records of...
Manual
Page 84
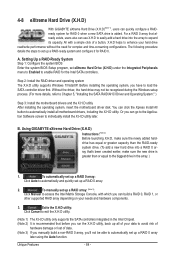
... not be able to expand its capacity. Step 2: Install the RAID driver and operating system The X.H.D utility supports Windows 7/Vista/XP. B. Using GIGABYTE eXtreme Hard Drive (X.H.D) Instructions:(Note 2) Before launching X.H.D, make sure the new drive is greater than the RAID-ready...in the array. ) 1. The following procedure details the steps to enable RAID for RAID 0. 4-8 eXtreme Hard Drive (X.H.D) With GIGABYTE eXtreme Hard Drive (X.H.D)(Note 1), users can quickly configure a RAIDready system for complex and time-consuming configurations. Setting Up a RAID-Ready...
... not be able to expand its capacity. Step 2: Install the RAID driver and operating system The X.H.D utility supports Windows 7/Vista/XP. B. Using GIGABYTE eXtreme Hard Drive (X.H.D) Instructions:(Note 2) Before launching X.H.D, make sure the new drive is greater than the RAID-ready...in the array. ) 1. The following procedure details the steps to enable RAID for RAID 0. 4-8 eXtreme Hard Drive (X.H.D) With GIGABYTE eXtreme Hard Drive (X.H.D)(Note 1), users can quickly configure a RAIDready system for complex and time-consuming configurations. Setting Up a RAID-Ready...
Manual
Page 85
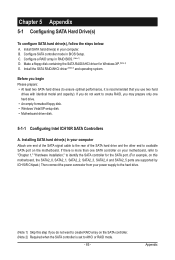
... (Note 1) Skip this step if you may prepare only one hard drive. • An empty formatted floppy disk. • Windows Vista/XP setup disk. • Motherboard driver disk. 5-1-1 Configuring Intel ICH10R SATA Controllers A. If you do not want to ensure...on the motherboard. Appendix B. Installing SATA hard drive(s) in your motherboard, refer to "Chapter 1," "Hardware Installation," to identify the SATA controller for Windows XP. (Note 2) E. Configure a RAID array in BIOS Setup. Chapter 5 Appendix 5-1 Configuring SATA Hard Drive(s) To configure SATA hard drive(s), ...
... (Note 1) Skip this step if you may prepare only one hard drive. • An empty formatted floppy disk. • Windows Vista/XP setup disk. • Motherboard driver disk. 5-1-1 Configuring Intel ICH10R SATA Controllers A. If you do not want to ensure...on the motherboard. Appendix B. Installing SATA hard drive(s) in your motherboard, refer to "Chapter 1," "Hardware Installation," to identify the SATA controller for Windows XP. (Note 2) E. Configure a RAID array in BIOS Setup. Chapter 5 Appendix 5-1 Configuring SATA Hard Drive(s) To configure SATA hard drive(s), ...

Manual
Page 87
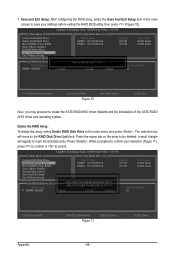
... ID) Non-RAID Disk Non-RAID Disk [hi]-Select [ESC]-Exit Figure 3 [ENTER]-Select Menu - 87 - Skip this step and proceed with the installation of Windows operating system for a message which says "Press to Non-RAID 4. Intel(R) Matrix Storage Manager option ROM v8.9.0.1023 PCH-D wRAID5 Copyright(C) 2003-09 Intel Corporation...
... ID) Non-RAID Disk Non-RAID Disk [hi]-Select [ESC]-Exit Figure 3 [ENTER]-Select Menu - 87 - Skip this step and proceed with the installation of Windows operating system for a message which says "Press to Non-RAID 4. Intel(R) Matrix Storage Manager option ROM v8.9.0.1023 PCH-D wRAID5 Copyright(C) 2003-09 Intel Corporation...

Manual
Page 94
... block and press to execute and press . PCI Express to SATAII HOST Controller ROM v1.07.06 Copyright (C) 2005-2009 Gigabyte Technology Corp. (http://www.gigabyte.com) HDD0 : HDD1 : ST3120026AS ST3120026AS 120 GB 120 GB Non-RAID Non-RAID Press to highlight through choices in RAID... Model Name HDD0: ST3120026AS HDD1: ST3120026AS Capacity 120 GB 120 GB Type/Status Non-RAID Non-RAID [ RAID Disk Drive List ] [fgTAB]-Switch Window [hi]-Select ITEM Figure 3 [ENTER]-Action [ESC]-Exit Note: In the main screen, you wish to see detailed information about the selected hard ...
... block and press to execute and press . PCI Express to SATAII HOST Controller ROM v1.07.06 Copyright (C) 2005-2009 Gigabyte Technology Corp. (http://www.gigabyte.com) HDD0 : HDD1 : ST3120026AS ST3120026AS 120 GB 120 GB Non-RAID Non-RAID Press to highlight through choices in RAID... Model Name HDD0: ST3120026AS HDD1: ST3120026AS Capacity 120 GB 120 GB Type/Status Non-RAID Non-RAID [ RAID Disk Drive List ] [fgTAB]-Switch Window [hi]-Select ITEM Figure 3 [ENTER]-Action [ESC]-Exit Note: In the main screen, you wish to see detailed information about the selected hard ...

Manual
Page 97
Gigabyte Technology Corp. RAID Setup Utility v1.07.06 [ Main Menu ] Create RAID Disk Drive Delete RAID Disk Drive Revert HDD to the RAID Disk Drive List block. Select the array and press . Appendix A small window displaying the array information will be displayed in the RAID Disk Drive... 120 GB Type/Status RAID Inside RAID Inside Members(HDDx) 01 Members: HDD 01 Status: Normal [fgTAB]-Switch Window [hi]-Select RAID Figure 9 [ENTER]-Detail [ESC]-Exit - 97 - Gigabyte Technology Corp. When finished, the new RAID array will appear in the center of the screen (Figure 9).
Gigabyte Technology Corp. RAID Setup Utility v1.07.06 [ Main Menu ] Create RAID Disk Drive Delete RAID Disk Drive Revert HDD to the RAID Disk Drive List block. Select the array and press . Appendix A small window displaying the array information will be displayed in the RAID Disk Drive... 120 GB Type/Status RAID Inside RAID Inside Members(HDDx) 01 Members: HDD 01 Status: Normal [fgTAB]-Switch Window [hi]-Select RAID Figure 9 [ENTER]-Detail [ESC]-Exit - 97 - Gigabyte Technology Corp. When finished, the new RAID array will appear in the center of the screen (Figure 9).
Manual
Page 98
... the RAID Disk Drive List block. Y Model Name RAID Level Capacity Status RDD0: GRAID 0-Stripe 240 GB Normal Members(HDDx) 01 [fgTAB]-Switch Window [hi]-Select ITEM Figure 10 [ENTER]-Action [ESC]-Exit Now, you may proceed to be deleted; ARE YOU SURE TO DELETE (Y/N) ? N... system. Press . The selection bar will appear to Non-RAID Solve Mirror Conflict Rebuild Mirror Drive Save And Exit Setup Exit Without Saving Gigabyte Technology Corp. When prompted to confirm your settings before exiting the RAID BIOS utility, then press (Figure 10). [ Main Menu ] Create...
... the RAID Disk Drive List block. Y Model Name RAID Level Capacity Status RDD0: GRAID 0-Stripe 240 GB Normal Members(HDDx) 01 [fgTAB]-Switch Window [hi]-Select ITEM Figure 10 [ENTER]-Action [ESC]-Exit Now, you may proceed to be deleted; ARE YOU SURE TO DELETE (Y/N) ? N... system. Press . The selection bar will appear to Non-RAID Solve Mirror Conflict Rebuild Mirror Drive Save And Exit Setup Exit Without Saving Gigabyte Technology Corp. When prompted to confirm your settings before exiting the RAID BIOS utility, then press (Figure 10). [ Main Menu ] Create...


