
Manual
Page 12
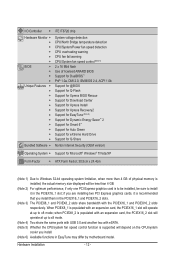
....5cm x 24.4cm (Note 1) Due to Windows 32-bit operating system limitation, when more than 4 GB of physical memory is installed, the actual memory size displayed will be less than 4 GB. (Note 2) For optimum performance, if only one PCI Express graphics card is to be installed, be sure to x8 mode...
....5cm x 24.4cm (Note 1) Due to Windows 32-bit operating system limitation, when more than 4 GB of physical memory is installed, the actual memory size displayed will be less than 4 GB. (Note 2) For optimum performance, if only one PCI Express graphics card is to be installed, be sure to x8 mode...
Manual
Page 19
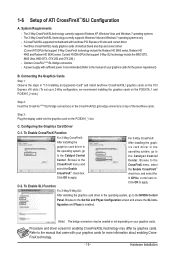
... and select the Enable CrossFireX™ check box. System Requirements - Two/three CrossFireX/SLI-ready graphics cards of the two/three cards. Step 3: Plug the display cable into the graphics card on your graphics cards for more information about enabling CrossFireX technology. - 19 - Browse to apply. Browse to the manual that...
... and select the Enable CrossFireX™ check box. System Requirements - Two/three CrossFireX/SLI-ready graphics cards of the two/three cards. Step 3: Plug the display cable into the graphics card on your graphics cards for more information about enabling CrossFireX technology. - 19 - Browse to apply. Browse to the manual that...

Manual
Page 23
... of lighted LEDs. The higher the CPU loading, the more the number of lighted LEDs indicates the North Bridge loading. To enable the Phase LED display function, please first enable Dynamic Energy Saver 2. DDR PHASE LED The number of lighted LEDs. The higher the North Bridge loading, the more details. Refer...
... of lighted LEDs. The higher the CPU loading, the more the number of lighted LEDs indicates the North Bridge loading. To enable the Phase LED display function, please first enable Dynamic Energy Saver 2. DDR PHASE LED The number of lighted LEDs. The higher the North Bridge loading, the more details. Refer...
Manual
Page 32
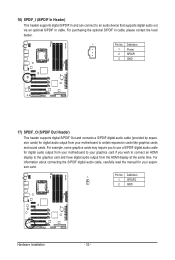
... header supports digital S/PDIF Out and connects a S/PDIF digital audio cable (provided by expansion cards) for digital audio output from the HDMI display at the same time. For information about connecting the S/PDIF digital audio cable, carefully read the manual for digital audio output from your motherboard... to your graphics card if you wish to connect an HDMI display to the graphics card and have digital audio output from your expansion card. 1 Pin No. For example, some graphics cards may require...
... header supports digital S/PDIF Out and connects a S/PDIF digital audio cable (provided by expansion cards) for digital audio output from the HDMI display at the same time. For information about connecting the S/PDIF digital audio cable, carefully read the manual for digital audio output from your motherboard... to your graphics card if you wish to connect an HDMI display to the graphics card and have digital audio output from your expansion card. 1 Pin No. For example, some graphics cards may require...
Manual
Page 37
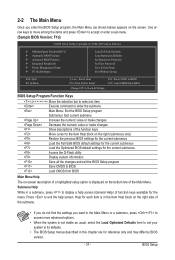
... select the Load Optimized Defaults item to set your system to its defaults. • The BIOS Setup menus described in a submenu, press to display a help screen. BIOS Setup Submenu Help While in this chapter are for reference only and may differ by BIOS version. - 37 - Press to...Fail-Safe BIOS default settings for the current submenus Load the Optimized BIOS default settings for the current submenus Access the Q-Flash utility Display system information Save all the changes and exit the BIOS Setup program Save CMOS to exit the help screen (General Help) of ...
... select the Load Optimized Defaults item to set your system to its defaults. • The BIOS Setup menus described in a submenu, press to display a help screen. BIOS Setup Submenu Help While in this chapter are for reference only and may differ by BIOS version. - 37 - Press to...Fail-Safe BIOS default settings for the current submenus Load the Optimized BIOS default settings for the current submenus Access the Q-Flash utility Display system information Save all the changes and exit the BIOS Setup program Save CMOS to exit the help screen (General Help) of ...
Manual
Page 38
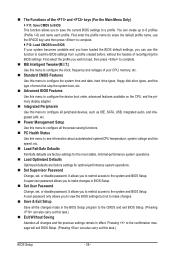
... system boot, etc. Advanced BIOS Features Use this menu to configure the device boot order, advanced features available on the CPU, and the primary display adapter. Integrated Peripherals Use this menu to configure all the power-saving functions. PC Health Status Use this task.) BIOS Setup - 38 - ...
... system boot, etc. Advanced BIOS Features Use this menu to configure the device boot order, advanced features available on the CPU, and the primary display adapter. Integrated Peripherals Use this menu to configure all the power-saving functions. PC Health Status Use this task.) BIOS Setup - 38 - ...
Manual
Page 40
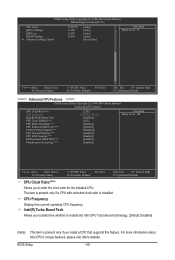
... CPU Features ******** CMOS Setup Utility-Copyright (C) 1984-2009 Award Software Advanced CPU Features CPU Clock Ratio (Note) CPU Frequency Intel(R) Turbo Boost Tech. CPU Frequency Displays the current operating CPU frequency. BIOS Setup - 40 - Allows you to determine whether to alter the clock ratio for the installed CPU. Intel(R) Turbo Boost...
... CPU Features ******** CMOS Setup Utility-Copyright (C) 1984-2009 Award Software Advanced CPU Features CPU Clock Ratio (Note) CPU Frequency Intel(R) Turbo Boost Tech. CPU Frequency Displays the current operating CPU frequency. BIOS Setup - 40 - Allows you to determine whether to alter the clock ratio for the installed CPU. Intel(R) Turbo Boost...

Manual
Page 42
...: Previous Values +/-/PU/PD: Value F10: Save F6: Fail-Safe Defaults ESC: Exit F1: General Help F7: Optimized Defaults BIOS Setup - 42 - Uncore Clock Ratio Displays the Uncore clock ratio. Options are : Auto (default), x36, x44, x48, Slow Mode. Options are : Auto (default), x12~x48. Isochronous Support Determines whether to set...
...: Previous Values +/-/PU/PD: Value F10: Save F6: Fail-Safe Defaults ESC: Exit F1: General Help F7: Optimized Defaults BIOS Setup - 42 - Uncore Clock Ratio Displays the Uncore clock ratio. Options are : Auto (default), x36, x44, x48, Slow Mode. Options are : Auto (default), x12~x48. Isochronous Support Determines whether to set...

Manual
Page 44
... Quick or Expert allows all DRAM timing control items below to operate at three different performance levels. Profile QPI Voltage The value displayed here is the normal operating frequency of the memory being used ; the second is set to the BCLK Frequency(Mhz) and ...settings. Profile DDR Voltage When using a non-XMP memory module or Extreme Memory Profile (X.M.P.) is the memory frequency that supports this item will display as 1.5V. Turbo Lets the system operate at its good performance level. (Default) Extreme Lets the system operate at its best performance ...
... Quick or Expert allows all DRAM timing control items below to operate at three different performance levels. Profile QPI Voltage The value displayed here is the normal operating frequency of the memory being used ; the second is set to the BCLK Frequency(Mhz) and ...settings. Profile DDR Voltage When using a non-XMP memory module or Extreme Memory Profile (X.M.P.) is the memory frequency that supports this item will display as 1.5V. Turbo Lets the system operate at its good performance level. (Default) Extreme Lets the system operate at its best performance ...

Manual
Page 50
.... Cylinder Number of the currently installed hard drive. If you do not install a floppy disk drive, set to None. BIOS Setup - 50 - The following fields display your hard drive specifications. Capacity Approximate capacity of cylinders. All Errors Whenever the BIOS detects a non-fatal error the system boot will stop for the...
.... Cylinder Number of the currently installed hard drive. If you do not install a floppy disk drive, set to None. BIOS Setup - 50 - The following fields display your hard drive specifications. Capacity Approximate capacity of cylinders. All Errors Whenever the BIOS detects a non-fatal error the system boot will stop for the...

Manual
Page 51
... (Note) Delay For HDD (Secs) Full Screen LOGO Show Backup BIOS Image to deliver greater efficiency for entering the operating system and to HDD Init Display First [Press Enter] [Disabled] [Floppy] [Hard Disk] [CDROM] [Setup] [Disabled] [Disabled] [Enabled] [0] [Enabled] [Disabled] [PCI] Item Help Menu Level Move Enter: Select F5: Previous...
... (Note) Delay For HDD (Secs) Full Screen LOGO Show Backup BIOS Image to deliver greater efficiency for entering the operating system and to HDD Init Display First [Press Enter] [Disabled] [Floppy] [Hard Disk] [CDROM] [Setup] [Disabled] [Disabled] [Enabled] [0] [Enabled] [Disabled] [PCI] Item Help Menu Level Move Enter: Select F5: Previous...

Manual
Page 52
... PCIE x16-2 Sets the PCI Express graphics card on the PCIEX16_1 slot as the first display. Set this item to display the GIGABYTE Logo at system startup. PCI Sets the PCI graphics card as the first display. (Default) PCIE x16-1 Sets the PCI Express graphics card on the PCIEX16_2 slot as... the first display. PCIE x8-2 Sets the PCI Express graphics card on the PCIEX8_1 slot as ...
... PCIE x16-2 Sets the PCI Express graphics card on the PCIEX16_1 slot as the first display. Set this item to display the GIGABYTE Logo at system startup. PCI Sets the PCI graphics card as the first display. (Default) PCIE x16-1 Sets the PCI Express graphics card on the PCIEX16_2 slot as... the first display. PCIE x8-2 Sets the PCI Express graphics card on the PCIEX8_1 slot as ...
Manual
Page 55
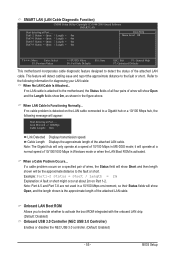
... SMART LAN Start detecting at a speed of 10/100 Mbps in MS-DOS mode; If no cable problem is activated. Cable Length Displays the approximate length of the attached LAN cable. it will operate at about 2m on a specified pair of wires, the Status field... (NEC USB 3.0 Controller) Enables or disables the NEC USB 3.0 controller. (Default: Enabled) - 55 - Link Detected --> 100Mbps Cable Length= 30m Link Detected Displays transmission speed. When a Cable Problem Occurs... Onboard LAN Boot ROM Allows you to decide whether to the following message will only operate at Port..... BIOS...
... SMART LAN Start detecting at a speed of 10/100 Mbps in MS-DOS mode; If no cable problem is activated. Cable Length Displays the approximate length of the attached LAN cable. it will operate at about 2m on a specified pair of wires, the Status field... (NEC USB 3.0 Controller) Enables or disables the NEC USB 3.0 controller. (Default: Enabled) - 55 - Link Detected --> 100Mbps Cable Length= 30m Link Detected Displays transmission speed. When a Cable Problem Occurs... Onboard LAN Boot ROM Allows you to decide whether to the following message will only operate at Port..... BIOS...
Manual
Page 59
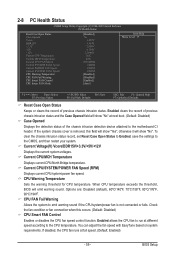
... Open Status to Enabled, save the settings to the motherboard CI header. Current Voltage(V) Vcore/DDR15V/+3.3V/+5V/+12V Displays the current system voltages. Current CPU/MCH Temperature Displays current CPU/North Bridge temperature. When CPU temperature exceeds the threshold, BIOS will show "No" at next boot. ... control function. You can adjust the fan speed with EasyTune based on system requirements. BIOS Setup Current CPU/SYSTEM/POWER FAN Speed (RPM) Displays current CPU/system/power fan speed. CPU FAN Fail Warning Allows the system to run at full speed. (Default: Enabled) - 59 -...
... Open Status to Enabled, save the settings to the motherboard CI header. Current Voltage(V) Vcore/DDR15V/+3.3V/+5V/+12V Displays the current system voltages. Current CPU/MCH Temperature Displays current CPU/North Bridge temperature. When CPU temperature exceeds the threshold, BIOS will show "No" at next boot. ... control function. You can adjust the fan speed with EasyTune based on system requirements. BIOS Setup Current CPU/SYSTEM/POWER FAN Speed (RPM) Displays current CPU/system/power fan speed. CPU FAN Fail Warning Allows the system to run at full speed. (Default: Enabled) - 59 -...
Manual
Page 65
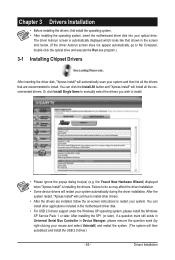
... during the driver installation. Failure to install. • Please ignore the popup dialog box(es) (e.g. Drivers Installation the Found New Hardware Wizard) displayed when "Xpress Install" is automatically displayed which looks like that are installed, follow the on-screen instructions to install. After the system restart, "Xpress Install" will restart your system...
... during the driver installation. Failure to install. • Please ignore the popup dialog box(es) (e.g. Drivers Installation the Found New Hardware Wizard) displayed when "Xpress Install" is automatically displayed which looks like that are installed, follow the on-screen instructions to install. After the system restart, "Xpress Install" will restart your system...
Manual
Page 66
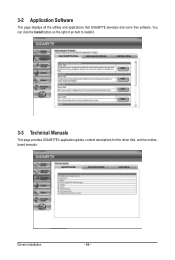
3-2 Application Software This page displays all the utilities and applications that GIGABYTE develops and some free software. You can click the Install button on the right of an item to install it. 3-3 Technical Manuals This page provides GIGABYTE's application guides, content descriptions for this driver disk, and the motherboard manuals. Drivers Installation - 66 -
3-2 Application Software This page displays all the utilities and applications that GIGABYTE develops and some free software. You can click the Install button on the right of an item to install it. 3-3 Technical Manuals This page provides GIGABYTE's application guides, content descriptions for this driver disk, and the motherboard manuals. Drivers Installation - 66 -

Manual
Page 68
You can click the Install button on the right of the BIOS, drivers, or applications will be displayed. 3-7 New Utilities This page provides a quick link to GIGABYTE's lately developed utilities for users to install it. The latest version of an item to install. 3-6 Download Center To update the BIOS, drivers, or applications, click the Download Center button to link to the GIGABYTE website. Drivers Installation - 68 -
You can click the Install button on the right of the BIOS, drivers, or applications will be displayed. 3-7 New Utilities This page provides a quick link to GIGABYTE's lately developed utilities for users to install it. The latest version of an item to install. 3-6 Download Center To update the BIOS, drivers, or applications, click the Download Center button to link to the GIGABYTE website. Drivers Installation - 68 -
Manual
Page 73
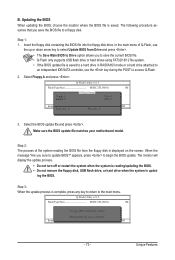
... to return to a floppy disk. CoaodpyCMBIOOSS DcoemfapuletteEdn-aPbaless !! The following procedure assumes that you sure to access Q-Flash. 2. Step 1: 1. The monitor will display the update process. • Do not turn off or restart the system when the system is reading/updating the BIOS. • Do not remove the... floppy disk, USB flash drive, or hard drive when the system is displayed on the screen. Q-Flash Utility v2.15 Flash Type/Size MXIC 25L1605A 1M Keep DMI Data Enable !L! B. When the message "Are you ...
... to return to a floppy disk. CoaodpyCMBIOOSS DcoemfapuletteEdn-aPbaless !! The following procedure assumes that you sure to access Q-Flash. 2. Step 1: 1. The monitor will display the update process. • Do not turn off or restart the system when the system is reading/updating the BIOS. • Do not remove the... floppy disk, USB flash drive, or hard drive when the system is displayed on the screen. Q-Flash Utility v2.15 Flash Type/Size MXIC 25L1605A 1M Keep DMI Data Enable !L! B. When the message "Are you ...

Manual
Page 79
... notification area and right-click on the same network, making full use of Internet resources. Data Sharing Disabled Figure 2. Exit... Description Displays the computers with computers on this icon Figure 1. Directions for using Q-Share After installing Q-Share from the motherboard driver disk, go to be... sharing Disables data sharing Accesses the shared data folder Changes the data folder to Start>All Programs>GIGABYTE>Q-Share. Unique Features 4-5 Q-Share Q-Share is NOT enabled. - 79 - Find the Q-Share icon to configure the data sharing settings.
... notification area and right-click on the same network, making full use of Internet resources. Data Sharing Disabled Figure 2. Exit... Description Displays the computers with computers on this icon Figure 1. Directions for using Q-Share After installing Q-Share from the motherboard driver disk, go to be... sharing Disables data sharing Accesses the shared data folder Changes the data folder to Start>All Programs>GIGABYTE>Q-Share. Unique Features 4-5 Q-Share Q-Share is NOT enabled. - 79 - Find the Q-Share icon to configure the data sharing settings.

Manual
Page 83
... 30 seconds in range of the computer's Bluetooth receiver, the system will be able to use as the portable key(Note .1) (If the screen doesn't display your Bluetooth cell phone, click Refresh to let Auto Green re-detect the device.) Before creating a Bluetooth cell phone key, make sure it is in...
... 30 seconds in range of the computer's Bluetooth receiver, the system will be able to use as the portable key(Note .1) (If the screen doesn't display your Bluetooth cell phone, click Refresh to let Auto Green re-detect the device.) Before creating a Bluetooth cell phone key, make sure it is in...


