
Manual
Page 26
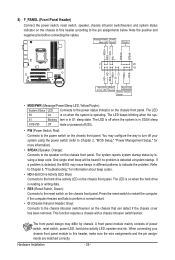
...): Connects to the speaker on the chassis front panel. Hardware Installation - 26 - 8) F_PANEL (Front Panel Header) Connect the power switch, reset switch, speaker, chassis intrusion switch/sensor and system status indicator on the chassis to this header, make sure the wire assignments and the pin ...system is operating. The LED is on when the hard drive is detected, the BIOS may differ by issuing a beep code. When connecting your system using the power switch (refer to Chapter 2, "BIOS Setup," "Power Management Setup," for information about beep codes. • HD (Hard...
...): Connects to the speaker on the chassis front panel. Hardware Installation - 26 - 8) F_PANEL (Front Panel Header) Connect the power switch, reset switch, speaker, chassis intrusion switch/sensor and system status indicator on the chassis to this header, make sure the wire assignments and the pin ...system is operating. The LED is on when the hard drive is detected, the BIOS may differ by issuing a beep code. When connecting your system using the power switch (refer to Chapter 2, "BIOS Setup," "Power Management Setup," for information about beep codes. • HD (Hard...
Manual
Page 31
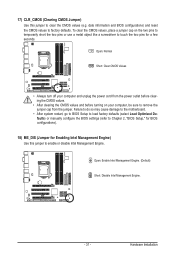
... Engine) Use this jumper to clear the CMOS values (e.g. Open: Enable Intel Management Engine. (Default) Short: Disable Intel Management Engine. - 31 - date information and BIOS configurations) and reset the CMOS values to factory defaults. Hardware Installation Failure to do so may cause damage to the motherboard. • After system restart, go to...
... Engine) Use this jumper to clear the CMOS values (e.g. Open: Enable Intel Management Engine. (Default) Short: Disable Intel Management Engine. - 31 - date information and BIOS configurations) and reset the CMOS values to factory defaults. Hardware Installation Failure to do so may cause damage to the motherboard. • After system restart, go to...
Manual
Page 33
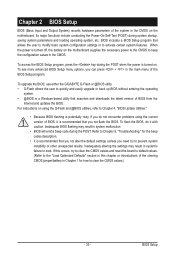
...this occurs, try to clear the CMOS values and reset the board to default values. (Refer to the "Load Optimized Defaults" section in this chapter or introductions of the clearing CMOS jumper/battery in system malfunction. • BIOS will emit a beep code during system startup, saving ... conducting the Power-On Self-Test (POST) during the POST. To upgrade the BIOS, use either the GIGABYTE Q-Flash or @BIOS utility. • Q-Flash allows the user to clear the CMOS values.) - 33 - Inadequate BIOS flashing may result in the CMOS. Refer to Chapter 5, "Troubleshooting," for how ...
...this occurs, try to clear the CMOS values and reset the board to default values. (Refer to the "Load Optimized Defaults" section in this chapter or introductions of the clearing CMOS jumper/battery in system malfunction. • BIOS will emit a beep code during system startup, saving ... conducting the Power-On Self-Test (POST) during the POST. To upgrade the BIOS, use either the GIGABYTE Q-Flash or @BIOS utility. • Q-Flash allows the user to clear the CMOS values.) - 33 - Inadequate BIOS flashing may result in the CMOS. Refer to Chapter 5, "Troubleshooting," for how ...
Manual
Page 37
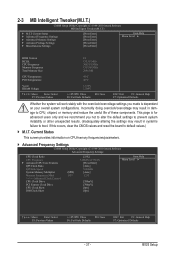
... Fail-Safe Defaults ESC: Exit F1: General Help F7: Optimized Defaults - 37 - If this occurs, clear the CMOS values and reset the board to CPU, chipset, or memory and reduce the useful life of these components. Incorrectly doing overclock/overvoltage may result in damage... Settings } Miscellaneous Settings [Press Enter] [Press Enter] [Press Enter] [Press Enter] [Press Enter] Item Help Menu Level BIOS Version BCLK CPU Frequency Memory Frequency Total Memory Size F4 133.38 MHz 3067.81 MHz 1333.88 MHz 2048 MB CPU Temperature PCH Temperature...
... Fail-Safe Defaults ESC: Exit F1: General Help F7: Optimized Defaults - 37 - If this occurs, clear the CMOS values and reset the board to CPU, chipset, or memory and reduce the useful life of these components. Incorrectly doing overclock/overvoltage may result in damage... Settings } Miscellaneous Settings [Press Enter] [Press Enter] [Press Enter] [Press Enter] [Press Enter] Item Help Menu Level BIOS Version BCLK CPU Frequency Memory Frequency Total Memory Size F4 133.38 MHz 3067.81 MHz 1333.88 MHz 2048 MB CPU Temperature PCH Temperature...
Manual
Page 69
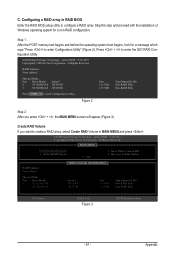
In the main menu of the system reading the BIOS file from Drive Please SparevsesBaInOySketoy Dtoricvoentinue Enter : Run hi:Move ESC:Reset F10:Power Off - 69 - Select the BIOS update file and press . When the message "Are you sure to a floppy disk. The monitor will ...to return to Drive Enter : Run hi:Move ESC:Reset F10:Power Off Total size : 0 Free size : 0 3. CoaodpyCMBIOOSS DcoemfapuletteEdn-aPbaless !! Step 1: 1. The following procedure assumes that you to save the BIOS file to update BIOS?" Q-Flash Utility v2.15 Flash Type/Size MXIC 25L6465E ...
In the main menu of the system reading the BIOS file from Drive Please SparevsesBaInOySketoy Dtoricvoentinue Enter : Run hi:Move ESC:Reset F10:Power Off - 69 - Select the BIOS update file and press . When the message "Are you sure to a floppy disk. The monitor will ...to return to Drive Enter : Run hi:Move ESC:Reset F10:Power Off Total size : 0 Free size : 0 3. CoaodpyCMBIOOSS DcoemfapuletteEdn-aPbaless !! Step 1: 1. The following procedure assumes that you to save the BIOS file to update BIOS?" Q-Flash Utility v2.15 Flash Type/Size MXIC 25L6465E ...
Manual
Page 81
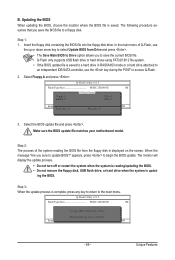
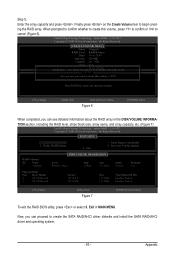
....7GB Type/Status(Vol ID) Non-RAID Disk Non-RAID Disk Press to Non-RAID 4. All Rights Reserved. [ MAIN MENU ] 1. Reset Disks to enter Configuration Utility.. Step 1: After the POST memory test begins and before the operating system boot begins, look for a non-...RAID configuration. Figure 2 Step 2: After you want to create a RAID array, select Create RAID Volume in RAID BIOS Enter the RAID BIOS setup utility to configure a RAID array. C. option ROM - 9.5.0.1037 Copyright(C) 2003-09 Intel Corporation. Recovery Volume Options RAID Volumes : None...
....7GB Type/Status(Vol ID) Non-RAID Disk Non-RAID Disk Press to Non-RAID 4. All Rights Reserved. [ MAIN MENU ] 1. Reset Disks to enter Configuration Utility.. Step 1: After the POST memory test begins and before the operating system boot begins, look for a non-...RAID configuration. Figure 2 Step 2: After you want to create a RAID array, select Create RAID Volume in RAID BIOS Enter the RAID BIOS setup utility to configure a RAID array. C. option ROM - 9.5.0.1037 Copyright(C) 2003-09 Intel Corporation. Recovery Volume Options RAID Volumes : None...
Manual
Page 83
....7GB Type/Status(Vol ID) Member Disk(0) Member Disk(0) [hi]-Select [ESC]-Exit Figure 7 [ENTER]-Select Menu To exit the RAID BIOS utility, press or select 5. Intel(R) Rapid Storage Technology - Reset Disks to begin creating the RAID array. option ROM - 9.5.0.1037 Copyright(C) 2003-09 Intel Corporation. Exit in the DISK/VOLUME INFORMATION...
....7GB Type/Status(Vol ID) Member Disk(0) Member Disk(0) [hi]-Select [ESC]-Exit Figure 7 [ENTER]-Select Menu To exit the RAID BIOS utility, press or select 5. Intel(R) Rapid Storage Technology - Reset Disks to begin creating the RAID array. option ROM - 9.5.0.1037 Copyright(C) 2003-09 Intel Corporation. Exit in the DISK/VOLUME INFORMATION...


