

Manual
Page 1
... utility supports Windows 7/Vista/XP. Without the driver, the hard drive may not be able to individually install the X.H.D utility later. Using GIGABYTE eXtreme Hard Drive (X.H.D) Instructions:(Note 2) Before launching X.H.D, make sure the new drive is added. Before installing the operating system, you can build... to expand its capacity. The following procedure details the steps to set up a RAID array: (Note 3): Click Manual to load the SATA controller driver first. To manually set up a RAID 0 array later using the Auto function. Or you have to access the Intel Matrix Storage ...
... utility supports Windows 7/Vista/XP. Without the driver, the hard drive may not be able to individually install the X.H.D utility later. Using GIGABYTE eXtreme Hard Drive (X.H.D) Instructions:(Note 2) Before launching X.H.D, make sure the new drive is added. Before installing the operating system, you can build... to expand its capacity. The following procedure details the steps to set up a RAID array: (Note 3): Click Manual to load the SATA controller driver first. To manually set up a RAID 0 array later using the Auto function. Or you have to access the Intel Matrix Storage ...
Manual
Page 1
GA-Q57M-S2H LGA1156 socket motherboard for Intel® Core™ i7 processor family/ Intel® Core™ i5 processor family/ Intel® Core™ i3 processor family User's Manual Rev. 1002 12ME-Q57MS2H-1002R
GA-Q57M-S2H LGA1156 socket motherboard for Intel® Core™ i7 processor family/ Intel® Core™ i5 processor family/ Intel® Core™ i3 processor family User's Manual Rev. 1002 12ME-Q57MS2H-1002R
Manual
Page 3
...-BYTE TECHNOLOGY CO., LTD. For example, "REV: 1.0" means the revision of the motherboard is the property of this manual may be made by GIGABYTE without GIGABYTE's prior written permission. Disclaimer Information in the use GIGABYTE's unique features, read or download the information on/from the Support&Downloads\Motherboard\Technology Guide page on our website...
...-BYTE TECHNOLOGY CO., LTD. For example, "REV: 1.0" means the revision of the motherboard is the property of this manual may be made by GIGABYTE without GIGABYTE's prior written permission. Disclaimer Information in the use GIGABYTE's unique features, read or download the information on/from the Support&Downloads\Motherboard\Technology Guide page on our website...
Manual
Page 5
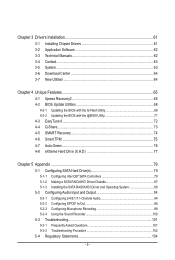
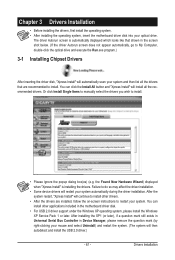
Chapter 3 Drivers Installation 61 3-1 Installing Chipset Drivers 61 3-2 Application Software 62 3-3 Technical Manuals 62 3-4 Contact...63 3-5 System...63 3-6 Download Center 64 3-7 New Utilities...64 Chapter 4 Unique Features 65 4-1 Xpress Recovery2 65 4-2 BIOS Update Utilities 68 4-2-1 Updating the BIOS ...
Chapter 3 Drivers Installation 61 3-1 Installing Chipset Drivers 61 3-2 Application Software 62 3-3 Technical Manuals 62 3-4 Contact...63 3-5 System...63 3-6 Download Center 64 3-7 New Utilities...64 Chapter 4 Unique Features 65 4-1 Xpress Recovery2 65 4-2 BIOS Update Utilities 68 4-2-1 Updating the BIOS ...
Manual
Page 6
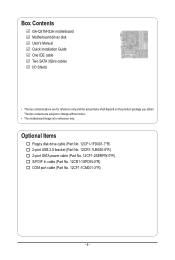
... power cable (Part No. 12CF1-2SERPW-0*R) S/PDIF In cable (Part No. 12CR1-1SPDIN-0*R) COM port cable (Part No. 12CF1-1CM001-3*R) - 6 - Box Contents GA-Q57M-S2H motherboard Motherboard driver disk User's Manual Quick Installation Guide One IDE cable Two SATA 3Gb/s cables I/O Shield • The box contents above are subject to change without notice. •...
... power cable (Part No. 12CF1-2SERPW-0*R) S/PDIF In cable (Part No. 12CR1-1SPDIN-0*R) COM port cable (Part No. 12CF1-1CM001-3*R) - 6 - Box Contents GA-Q57M-S2H motherboard Motherboard driver disk User's Manual Quick Installation Guide One IDE cable Two SATA 3Gb/s cables I/O Shield • The box contents above are subject to change without notice. •...
Manual
Page 9
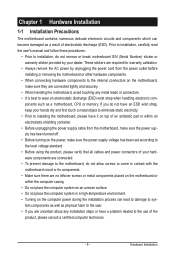
... leads or connectors. • It is best to the use of the product, please consult a certified computer technician. - 9 - Prior to installation, carefully read the user's manual and follow these procedures: • Prior to installation, do not remove or break motherboard S/N (Serial Number) sticker or warranty sticker provided by unplugging the power...
... leads or connectors. • It is best to the use of the product, please consult a certified computer technician. - 9 - Prior to installation, carefully read the user's manual and follow these procedures: • Prior to installation, do not remove or break motherboard S/N (Serial Number) sticker or warranty sticker provided by unplugging the power...
Manual
Page 15
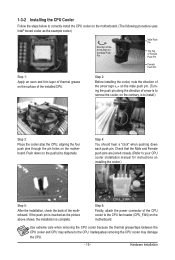
..." when pushing down on the motherboard. Hardware Installation Check that the Male and Female push pins are joined closely. (Refer to your CPU cooler installation manual for instructions on the motherboard. Use extreme care when removing the CPU cooler because the thermal grease/tape between the CPU cooler and CPU may...
..." when pushing down on the motherboard. Hardware Installation Check that the Male and Female push pins are joined closely. (Refer to your CPU cooler installation manual for instructions on the motherboard. Use extreme care when removing the CPU cooler because the thermal grease/tape between the CPU cooler and CPU may...

Manual
Page 18
Carefully read the manual that supports your expansion card(s). 7. Remove the metal slot cover from the power outlet before you begin to the chassis back panel with your expansion ...
Carefully read the manual that supports your expansion card(s). 7. Remove the metal slot cover from the power outlet before you begin to the chassis back panel with your expansion ...

Manual
Page 28
... expansion cards) for digital audio output from your motherboard to your expansion card. For information about connecting the S/PDIF digital audio cable, carefully read the manual for your graphics card if you to an audio device that supports digital audio out via an optional S/PDIF In cable. Pin No. 11) SPDIF_I...
... expansion cards) for digital audio output from your motherboard to your expansion card. For information about connecting the S/PDIF digital audio cable, carefully read the manual for your graphics card if you to an audio device that supports digital audio out via an optional S/PDIF In cable. Pin No. 11) SPDIF_I...
Manual
Page 31
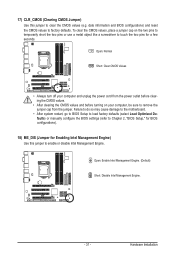
... do so may cause damage to the motherboard. • After system restart, go to BIOS Setup to load factory defaults (select Load Optimized Defaults) or manually configure the BIOS settings (refer to clear the CMOS values (e.g. Hardware Installation Open: Normal Short: Clear CMOS Values • Always turn off your computer and...
... do so may cause damage to the motherboard. • After system restart, go to BIOS Setup to load factory defaults (select Load Optimized Defaults) or manually configure the BIOS settings (refer to clear the CMOS values (e.g. Hardware Installation Open: Normal Short: Clear CMOS Values • Always turn off your computer and...
Manual
Page 46
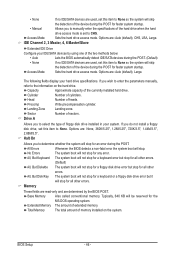
... memory. Head Number of floppy disk drive installed in your system. Drive A Allows you to CHS. Halt On Allows you wish to enter the parameters manually, refer to None. Memory These fields are read-only and are : Auto (default), Large. • None If no IDE/SATA devices are : ... hard drive specifications. Typically, 640 KB will skip the detection of the hard drive when the hard drive access mode is set to manually enter the specifications of the device during the POST. Options are used , set this item to None so the system will be reserved...
... memory. Head Number of floppy disk drive installed in your system. Drive A Allows you to CHS. Halt On Allows you wish to enter the parameters manually, refer to None. Memory These fields are read-only and are : Auto (default), Large. • None If no IDE/SATA devices are : ... hard drive specifications. Typically, 640 KB will skip the detection of the hard drive when the hard drive access mode is set to manually enter the specifications of the device during the POST. Options are used , set this item to None so the system will be reserved...
Manual
Page 61
Or click Install Single Items to manually select the drivers you wish to install. You can click the Install All button and "Xpress Install" will then autodetect and install the USB 2.0 driver.) - ...
Or click Install Single Items to manually select the drivers you wish to install. You can click the Install All button and "Xpress Install" will then autodetect and install the USB 2.0 driver.) - ...

Manual
Page 62
You can click the Install button on the right of an item to install it. 3-3 Technical Manuals This page provides GIGABYTE's application guides, content descriptions for this driver disk, and the motherboard manuals. Drivers Installation - 62 - 3-2 Application Software This page displays all the utilities and applications that GIGABYTE develops and some free software.
You can click the Install button on the right of an item to install it. 3-3 Technical Manuals This page provides GIGABYTE's application guides, content descriptions for this driver disk, and the motherboard manuals. Drivers Installation - 62 - 3-2 Application Software This page displays all the utilities and applications that GIGABYTE develops and some free software.

Manual
Page 71
... updating the BIOS. After Updating the BIOS Restart your system after the system restarts. Updating the BIOS with the @BIOS Utility A. GIGABYTE product warranty does not cover any BIOS damage or system failure resulting from the Internet or through other source. Before You Begin 1. ...B. Make sure that is not present on the @BIOS server site, please manually download the BIOS update file from GIGABYTE's website and follow the instructions in a corrupted BIOS or a system that the BIOS file to save the BIOS update...
... updating the BIOS. After Updating the BIOS Restart your system after the system restarts. Updating the BIOS with the @BIOS Utility A. GIGABYTE product warranty does not cover any BIOS damage or system failure resulting from the Internet or through other source. Before You Begin 1. ...B. Make sure that is not present on the @BIOS server site, please manually download the BIOS update file from GIGABYTE's website and follow the instructions in a corrupted BIOS or a system that the BIOS file to save the BIOS update...

Manual
Page 77
... the Application Software screen to individually install the X.H.D utility later. Or you have to load the SATA controller driver first. To manually set up a RAID 0 array. 2. The following procedure details the steps to set up all motherboard drivers, including the X.H.D...System." ) Step 3: Install the motherboard drivers and the X.H.D utiltiy After installing the operating system, insert the motherboard driver disk. B. Using GIGABYTE eXtreme Hard Drive (X.H.D) Instructions:(Note 2) Before launching X.H.D, make sure the new drive is added. For a RAID 0 array that already exists,...
... the Application Software screen to individually install the X.H.D utility later. Or you have to load the SATA controller driver first. To manually set up a RAID 0 array. 2. The following procedure details the steps to set up all motherboard drivers, including the X.H.D...System." ) Step 3: Install the motherboard drivers and the X.H.D utiltiy After installing the operating system, insert the motherboard driver disk. B. Using GIGABYTE eXtreme Hard Drive (X.H.D) Instructions:(Note 2) Before launching X.H.D, make sure the new drive is added. For a RAID 0 array that already exists,...
Manual
Page 85
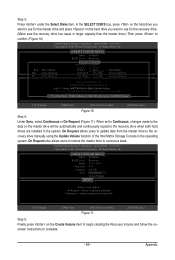
...Select Disks Strip Size : N/A Capacity : 0.0 GB Sync : Continuous Create Volume [ HELP ] Select a sync option: On Request: volume is updated manually Continuous: volume is updated automatically [hi]-Change [TAB]-Next [ESC]-Previous Menu Figure 11 [ENTER]-Select Step 5: Finally press on the master drive will ...drive. (Make sure the recovery drive has equal or larger capacity than the master drive.) Then press to the recovery drive manually using the Update Volume function of the Intel Matrix Storage Console in the system. Appendix Recovery: Copies data between a master ...
...Select Disks Strip Size : N/A Capacity : 0.0 GB Sync : Continuous Create Volume [ HELP ] Select a sync option: On Request: volume is updated manually Continuous: volume is updated automatically [hi]-Change [TAB]-Next [ESC]-Previous Menu Figure 11 [ENTER]-Select Step 5: Finally press on the master drive will ...drive. (Make sure the recovery drive has equal or larger capacity than the master drive.) Then press to the recovery drive manually using the Update Volume function of the Intel Matrix Storage Console in the system. Appendix Recovery: Copies data between a master ...

Manual
Page 91
... in the operating system. Reset Disks to fault-tolerant arrays such as RAID 1, RAID 5 or RAID 10 arrays. Select the port of restoring data to manually rebuild the array in the array. Appendix The following screen appears, indicating that a RAID volume is added to replace a failed drive to rebuild a RAID 1 array...
... in the operating system. Reset Disks to fault-tolerant arrays such as RAID 1, RAID 5 or RAID 10 arrays. Select the port of restoring data to manually rebuild the array in the array. Appendix The following screen appears, indicating that a RAID volume is added to replace a failed drive to rebuild a RAID 1 array...
Manual
Page 94
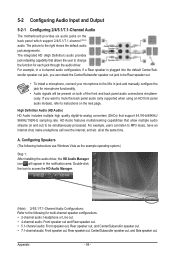
... present on the back panel which support 2/4/5.1/7.1-channel (Note) audio. HD Audio features multistreaming capabilities that allows the user to the Mic in jack and manually configure the jack for microphone functionality. • Audio signals will appear in a 4-channel audio configuration, if a Rear speaker is plugged into the default Center/Sub...
... present on the back panel which support 2/4/5.1/7.1-channel (Note) audio. HD Audio features multistreaming capabilities that allows the user to the Mic in jack and manually configure the jack for microphone functionality. • Audio signals will appear in a 4-channel audio configuration, if a Rear speaker is plugged into the default Center/Sub...
Manual
Page 104
... electrical or electronic equipment is no longer useful to you with other waste. Contravention will fulfill the national laws as a commitment by GIGABYTE. The separate collection and recycling of your waste equipment at the time of printing. Appendix - 104 - Our Commitment to Preserving the... electric and electronic devices and their components. Also note that the information in this document is recycled in your product's user's manual and we at the Customer Care number listed in a manner that protects human health and the environment. Instead, the device should...
... electrical or electronic equipment is no longer useful to you with other waste. Contravention will fulfill the national laws as a commitment by GIGABYTE. The separate collection and recycling of your waste equipment at the time of printing. Appendix - 104 - Our Commitment to Preserving the... electric and electronic devices and their components. Also note that the information in this document is recycled in your product's user's manual and we at the Customer Care number listed in a manner that protects human health and the environment. Instead, the device should...


